manuals.online logo
Brands
  1. Home
  2. •
  3. Brands
  4. •
  5. BVF
  6. •
  7. Thermostat
  8. •
  9. BVF 23-FA User manual

BVF 23-FA User manual

User manual
www.bvfheating.com
BVF 23-FA
RF Thermostat with plug receiver
TECHNICAL DATA
Thermostat Operating Voltage: 2 x AAA 1.5V, alkaline batteries
Receiver Current Load: 230V, 50/60Hz
Backup Storage: EEPROM
Capacity: 3600W / 16A
Frequency: 868MHz / 433MHz
Switching options: 5+1+1 day, 4 periods each day
Temperature settings: 5°C ~ 30°C, 0.5°C increments
Accuracy: +/- 0.5°C
Thermostat dimensions: 135mm x 88mm x 22mm
Receiver dimensions: 114mm x 86mm x 30mm
Color: White
IP protection rating: 20
Certication: CE
PRODUCT FEATURES
• Large display can be clearly read with the background
lighting
• Easytotwithoutinstallationworks
• Six buttons make it easy to use
• 4 periods of each day programmable (5+1+1)
• The display shows the set and the measured temperature
• Thethermostatissuppliedwithawall-xingframand
desktop stand
1 + button Increase temperature (change value at settings)
2 – button Decrease temperature (change value at settings)
3 Back Back to main page
4 Menu Set time / Select Mode
5 PRG Programming
6On/O TurnunitOn/O
7 Actual mode Displays actual mode
8 Temperature Displays actual temperature
9 Clock Displays actual time
10 Weekday Displays actual weekday
11 Cycle time Displays actual cycle time
12 Power on LED indicator
13 Heating on LED indicator
14 Setup in progress LED indicator
15 Pairing device button
The unit consists of two parts: 23-F controller and 23-A receiver. The controller has been developed to operate electric heating panels or conven-
tional electric heating units. Receiver part is designed for standard electric outlet. The controller can be accommodated anywhere in the room.
1. DISPLAY AND BUTTONS
1
11
10
2
9
47 56
3
8
12
14
13
15
User manual
www.bvfheating.com
2. TEMPERATURE CALIBRATION
Youmightneedtocalibratethetemperaturesensorfortherstuse.Turnothecontroller,pressandholdthe button for 3 seconds. Use
the and buttons to set the temperature value. This value can be adjusted within -8 to +8°C in 0,5°C increments.
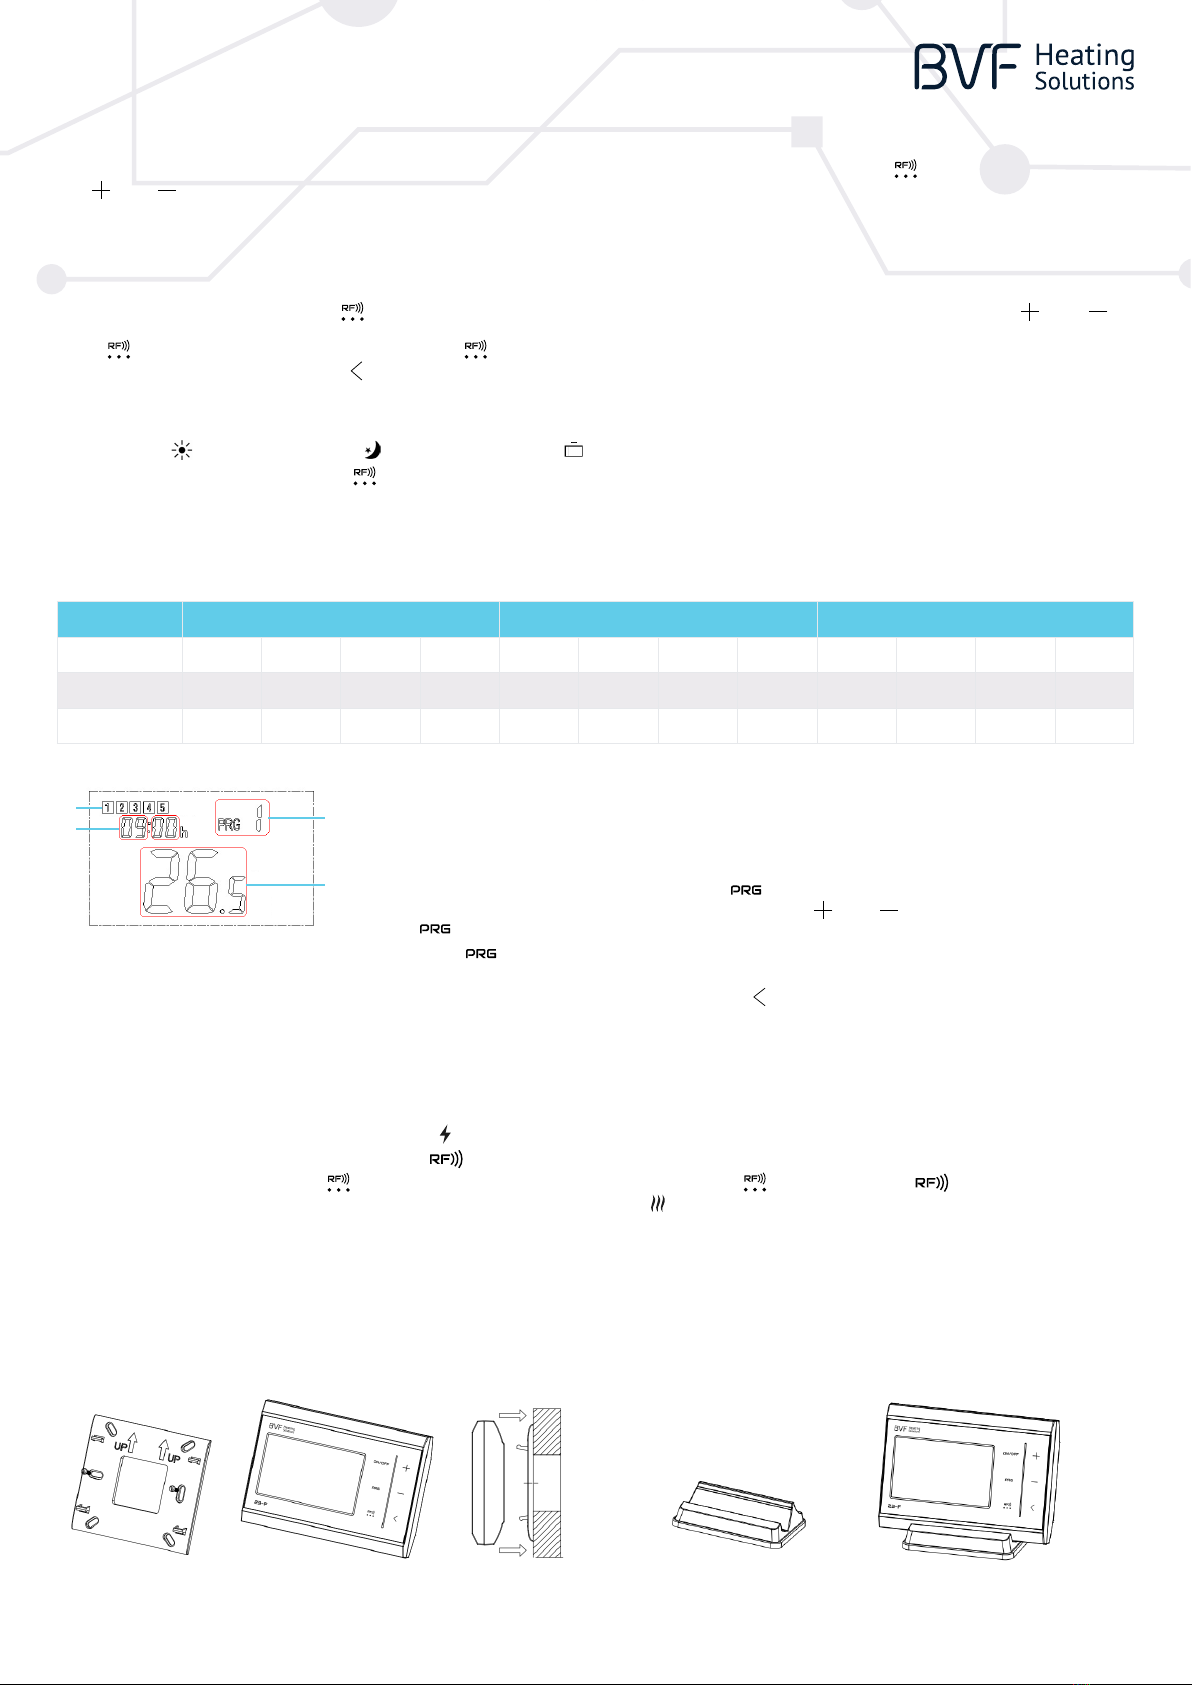
4. SETUP PROGRAM MODE
Pre-setfactoryvaluesoftheprogrammodemightbemodiedeasyasfollows:
5. PAIRING WITH THE RECEIVER
The receiver is usually paired with the receiver; still in some cases you might need to repeat pairing, which is fast and easy:
1. Connect the receiver to the power outlet. The LED light turns on.
2. Pushthepairingbuttononthereceiver.TheLEDlightstartsashing.
3. Turnthermostatoandpressfor3sec.IftheRFcodeshowsonthescreenpressbuttonagain.TheLEDturnso,pairingis
ready. When you set the temperature higher than room temperature, the LED will light.
Weekdays are displayed on the top left area of the screen (B) from Monday to Sunday (1-7). You can
adjust cycle times (D) and temperatures (C) for each period: one for the working days (1-5), one for
Saturday (6) and one for Sunday (7). All three periods have a daily routine of four cycles with its own
starting time and temperature value.
1. Tomodifyvaluesinprogrammodepressbuttonfor3seconds.Timestartsashing(A) Set
the starting time of the cycle within the period using and buttons, and after pushing
button again, set the desired temperature value of the cycle.
2. Press button and display will jump to the next cycle. Program all values of the working
days, then Saturday and Sunday.
3. You may save changes and return using the button.
6. MOUNTING
Mounting on wall: Desktop:
Monday to Friday Saturday Sunday
Cycle 1 2 3 4 1 2 3 4 1 2 3 4
Time 6:30 8:00 18:00 22:30 8:00 10:00 18:00 23:00 9:00 12:00 19:00 0:00
Temperature 21°C 18°C 21°C 16°C 21°C 21°C 21°C 16°C 23°C 21°C 16°C 21°C
B
AD
C
v1.2 EN (2019.02.07.)
3. SETUP TIME AND SELECT MODE
Set up actual time and weekday
After turning the controller on, press buttonandhold3seconds,thetimedisplaywillstartashing.Changetheminutesby and
button.
Press button again, and change the hours. Press button again and set the day of the week: 1-Monday; 2-Tuesday etc.
After setting up time and day push the button to save changes.
Select mode
Thecontrolleroersfourdierentpre-setmodes.ThePRGmodesetsuptemperatureusing4dierentprogrammedcycletimesaday.The
Comfort mode , Energy saving mode and the holiday mode keeps the assigned temperature all around the week.
You may switch between modes using button.

Other BVF Thermostat manuals

BVF Heato9 User manual

BVF

BVF Heato9 User manual

BVF 23-FA User manual

BVF

BVF 23-FA User manual

BVF L-1 User manual

BVF

BVF L-1 User manual

BVF Heato8 User manual

BVF

BVF Heato8 User manual

BVF 24-F User manual

BVF

BVF 24-F User manual

BVF 23-FA User manual

BVF

BVF 23-FA User manual

BVF SYME model-E User manual

BVF

BVF SYME model-E User manual

BVF 24-F User manual

BVF

BVF 24-F User manual

BVF 601 User manual

BVF

BVF 601 User manual

Popular Thermostat manuals by other brands

EWC Controls EWT-725 installation manual

EWC Controls

EWC Controls EWT-725 installation manual

Blaufoss Smartbox SOFTLINE installation guide

Blaufoss

Blaufoss Smartbox SOFTLINE installation guide

Honeywell RTH2510 Series operating manual

Honeywell

Honeywell RTH2510 Series operating manual

Honeywell RTH2310 Quick installation guide

Honeywell

Honeywell RTH2310 Quick installation guide

Honeywell FocusPRO TH6110D installation guide

Honeywell

Honeywell FocusPRO TH6110D installation guide

CIAT CS2B installation manual

CIAT

CIAT CS2B installation manual

POLA HP43 Handbook

POLA

POLA HP43 Handbook

Eco ET1 instruction manual

Eco

Eco ET1 instruction manual

Braeburn Premier 5100 owner's manual

Braeburn

Braeburn Premier 5100 owner's manual

Danfoss RET 230LS installation instructions

Danfoss

Danfoss RET 230LS installation instructions

Siemens DIGIFLOOR 2NC9 840 user manual

Siemens

Siemens DIGIFLOOR 2NC9 840 user manual

Carrier A94134 Installation, start-up, and operating instructions

Carrier

Carrier A94134 Installation, start-up, and operating instructions

Midea KJR-25B owner's manual

Midea

Midea KJR-25B owner's manual

TPS PTR5100-5500W instructions

TPS

TPS PTR5100-5500W instructions

AKO 226.0120 Series Mounting and Servicing Instructions

AKO

AKO 226.0120 Series Mounting and Servicing Instructions

Everwell LP260 installation instructions

Everwell

Everwell LP260 installation instructions

Duke Energy H?M Energy Manager Homeowner's manual

Duke Energy

Duke Energy H?M Energy Manager Homeowner's manual

Lauda ECO GOLD Operation manual

Lauda

Lauda ECO GOLD Operation manual

manuals.online logo
manuals.online logoBrands
  • About & Mission
  • Contact us
  • Privacy Policy
  • Terms and Conditions

Copyright 2025 Manuals.Online. All Rights Reserved.