Byte Delight DivMMC EnJOY! PRO ONE User manual

The
DivMMC EnJOY!
PRO ONE
with
0.8.7
SD card interface for the
Sinclair ZX Spectrum
Dual configurable
joystick ports
Auto detection
of ZX Spectrum
model
Throughput
edge connector
Dual SD card
sockets
Power off your ZX Spectrum before connecting this interface
No need to read the rest of this manual before using
the DivMMC EnJOY! PRO ONE, just plug and play!
Manufactured by Ben Versteeg

2
Overview
With the DivMMC EnJOY! PRO ONE you can load software from SD card to your ZX Spectrum easily!
The DivMMC EnJOY! PRO ONE has two configurable joystick ports, two full size SD card slots, a
throughput edge connector and advanced auto detection features to make it plug-and-play.
There is an NMI button for an easy NMI Browser menu with lots of functions, and there is a reset
button.
The DivMMC EnJOY! PRO ONE comes with ESXDOS, which is FAT and FAT32 compatible, hence no
additional pc software is needed.
The most used file type on ESXDOS is .TAP, which can contain a complete ZX Spectrum game in one
file. Other supported formats are .SNA and .Z80 snapshot files and .TRD files.
Check out www.worldofspectrum.org for many ZX Spectrum titles.
You can also load and save separate files directly from and to the SD card!
In the box
Your DivMMC EnJOY! PRO ONE interface is delivered with an SD card and this manual.
The card is formatted and contains some ZX Spectrum games and demos for you to try instantly when
you install your DivMMC EnJOY! PRO ONE for the first time, without having to download software
first.
Compatibility
The DivMMC EnJOY! PRO ONE has been successfully tested with:
▪ZX Spectrum 16K board issues 1 and 2
▪ZX Spectrum 48K all board issues
▪ZX Spectrum 48K Plus all board issues
▪ZX Spectrum 128K all board issues
▪ZX Spectrum +2
▪ZX Spectrum +2A
▪ZX Spectrum +2B
▪ZX Spectrum +3
▪ZX Spectrum +3 with +3e ROMs
▪Investronica ZX Spectrum 48K Plus*
▪Investronica ZX Spectrum 128K
▪Harlequin 48K rev.G
▪Harlequin 48K rev.H
▪Sparrow Lite rev.3 with Nebula
▪ZX-HD HDMI interface
▪ZX-AY external stereo sound interface
▪Kempston Mouse Turbo 2017 interface
*The Investronica ZX Spectrum 48K Plus has an integrated joystick interface that conflicts with the
Kempston mode on the PRO ONE. When using this ZX Spectrum model, select another joystick
interface on the PRO ONE. Find out more in the Joystick interface paragraph.
Compatible joysticks
You can use any 9-pin Atari compatible joystick or gamepads, with these exceptions:
-Sinclair SJS1 or SJS2 joysticks, which are not Atari-pinout compatible and can cause faults
-Wireless joysticks, since many seem to overload the joystick signals causing faults
Please know that for the Sinclair Joystick configuration, you still need an Atari-compatible joystick,
not a Sinclair SJS1 or SJS2 joystick!
Make sure the ZX Spectrum’s edge connector is clean
It’s important that your ZX Spectrum has a clean edge connector before connecting any interface.
Advised is to use cotton swabs with >95% pure (e.g. isopropol) alcohol.

3
Notification Leds
The DivMMC EnJOY! PRO ONE has two notification leds.
The ‘POWER’ led indicates the ZX Spectrum with DivMMC EnJOY! PRO ONE is powered on.
And the ‘CARD’ led shows the SD card activity (blue for card1, red for card2).
Throughput edge connector
The DivMMC EnJOY! PRO ONE has a throughput edge connector for any device, such as the ZX-HD
HDMI interface or ZX-AY external stereo audio interface (check out ZXSpectrum.shop for those).
Joystick interface configuration
The DivMMC EnJOY! PRO ONE has two configurable joystick ports numbered ‘1’ and ‘2’.
The default configuration is Kempston joystick for port 1, and Cursor joystick for port 2.
DIP switch
2
3
PORT1
PORT2
ON
ON
KEMPSTON JOYSTICK
CURSOR JOYSTICK
ON
OFF
SINCLAIR1 JOYSTICK
SINCLAIR2 JOYSTICK
OFF
ON
KEMPSTON JOYSTICK
FULLER JOYSTICK
OFF
OFF
JOYSTICK INTERFACE DISABLED
The ZX Spectrum +2, +2A, +2B or +3 have Sinclair1 and Sinclair2 ports already integrated, so for those
you could select Kempston and Fuller joystick on the DivMMC EnJOY! PRO ONE (Cursor joystick will
conflict with Sinclair1 or Sinclair 2 joystick as well).
When the DivMMC EnJOY! PRO ONE joystick ports are configured to Sinclair 1 and Sinclair 2 joystick,
and the PRO ONE is connected to a ZX Spectrum +2A, +2B or +3, the joystick ports of the PRO ONE
are automatically disabled to avoid conflicts.
Unfortunately there are 2 types of Fuller joystick standards. The DivMMC EnJOY! PRO ONE supports
the older standards which most games that have Fuller support will work with.
Enabling or disabling ESXDOS
By default ESXDOS is enabled, making it possible to access the FAT or FAT32 formatted SD card with
BASIC commands, and using the NMI Browser by pressing the NMI button.
However there are some situations you might need to disable ESXDOS, for example if you want to use
the +3e ROMS which allow direct SD card access from +3 BASIC on a ZX Spectrum +3.
Another situation for which you need to disable ESXDOS is when you want to upgrade the ESXDOS
firmware.
Detailed instructions for this are found on this website: http://www.bytedelight.com/?p=140
DIP SWITCH
1
ON
OFF
ESXDOS ENABLED (default)
ESXDOS DISABLED / firmware upgrade mode
A DIP switch is
in the ’ON’
position when
pushed down
like this:

4
Connecting the DivMMC EnJOY! PRO ONE
Always disconnect the power from your ZX Spectrum
before connecting any interface!
When powered off, connect the DivMMC EnJOY! PRO ONE to your ZX Spectrum carefully and insert
the SD card.
Now you can power up your ZX Spectrum.
Powering up with the DivMMC EnJOY! PRO ONE connected
This DivMMC EnJOY! PRO ONE interface comes with ESXDOS.
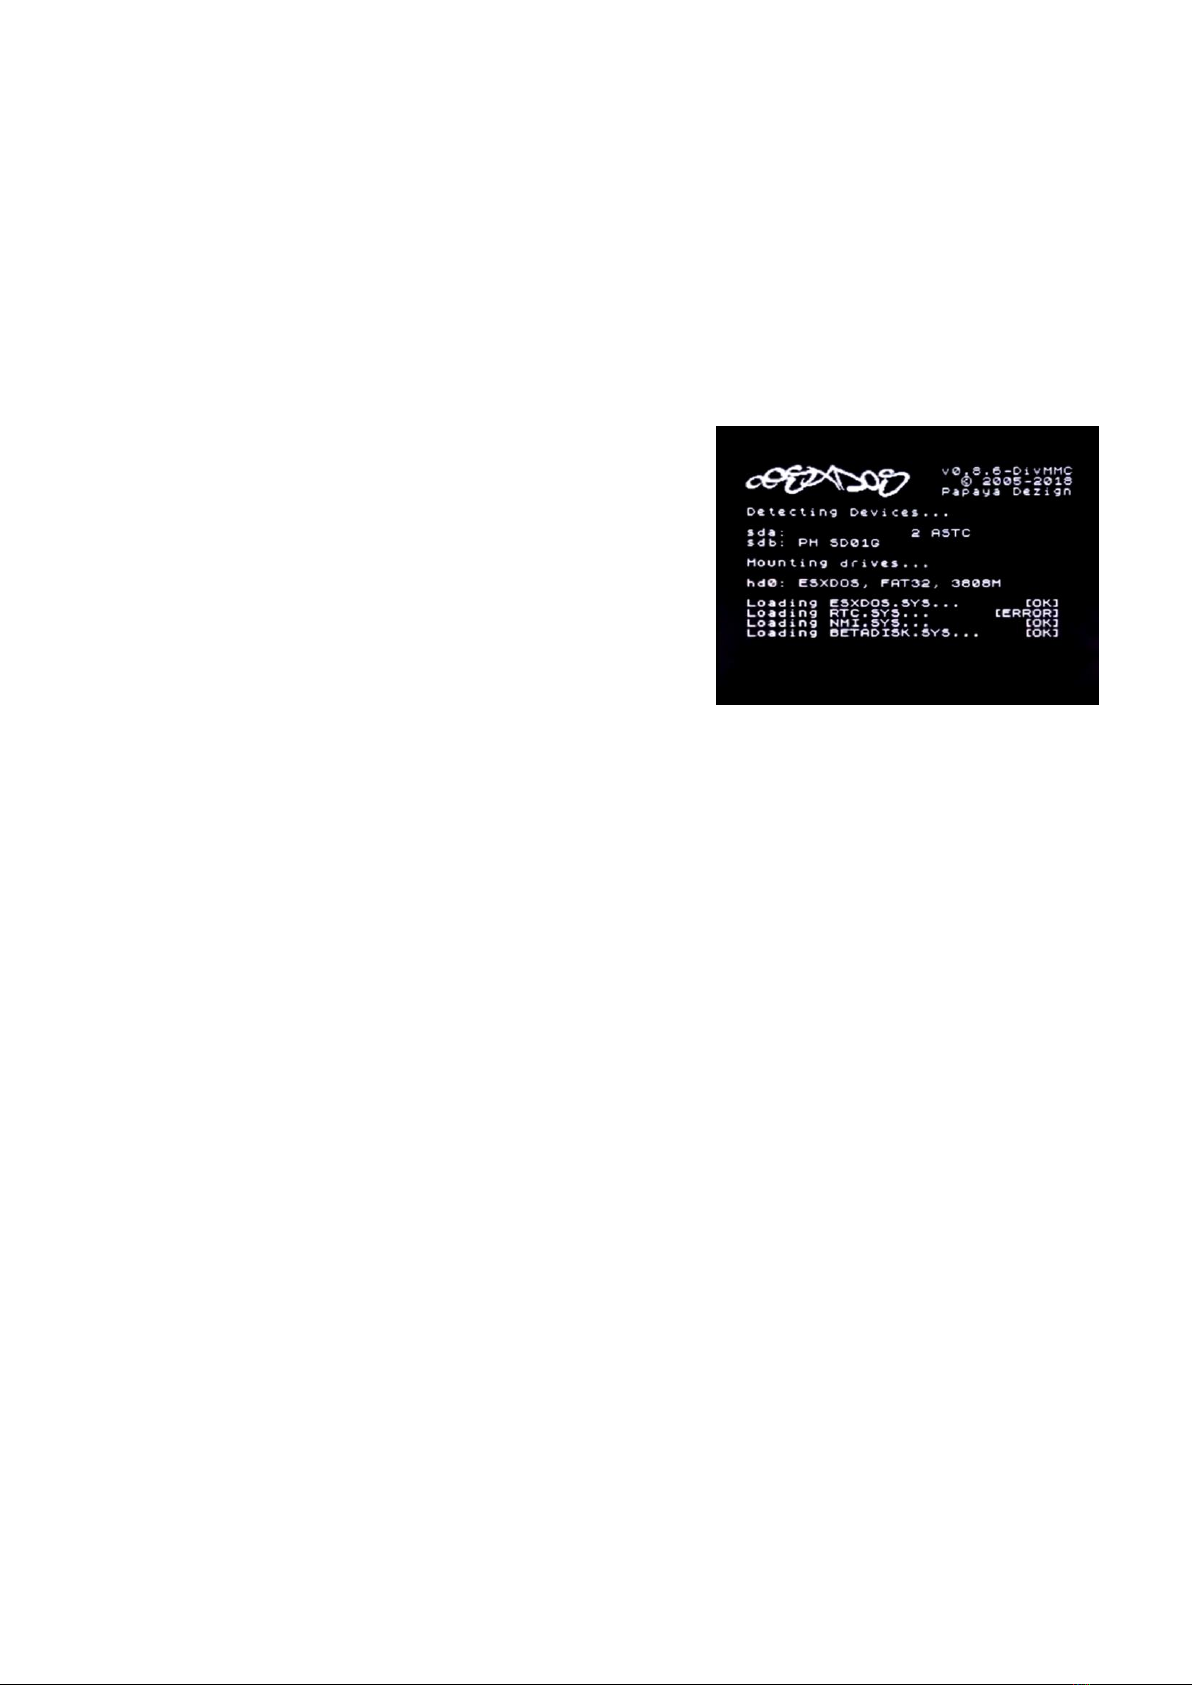
Once you power on your DivMMC EnJOY! PRO ONE, you
should briefly see a black screen shown here at the right,
with the ESXDOS logo and information about the card
detected, and system files that are being loaded.
If you do not see this black boot-screen, or the system files
are not being loaded properly, please check this website:
troubleshoot.bytedelight.com.
Introduction
After the ZX Spectrum with DivMMC EnJOY! PRO ONE had finished the boot sequence, the
introduction application will load automatically.
You may end this pressing S, or pressing D to disable it with the next boot.
USR 0 Mode
After the ZX Spectrum with DivMMC EnJOY! PRO ONE had finished the boot sequence, you will enter
48K BASIC in USR 0 mode.
For ZX Spectrum 128K / +2 / +2A / +2B or +3 users: the DivMMC EnJOY! PRO ONE starts the ZX
Spectrum in USR 0 mode. This mode supports 128K software and using the 3-channel audio chip in
128K models.
128K programs will however run fine.
Playing Ultimate games on ZX Spectrum 128K models
This is not specifically DivMMC EnJOY! related, but lots of people have been asking for it.
When loading Ultimate titles (and some other games, such as ‘Sly Spy: Secret Agent’) on any ZX
Spectrum 128K model with DivMMC EnJOY! or DivIDE, the 128K paging system needs to be ‘locked’.
To achieve this, perform:
OUT 32765,48
Then load the game by either NMI menu or by .TAPELOAD.
You only have to enter the OUT command once, as it disables 128 memory paging completely until the next
power off.
When you want to play 128 games after entering that OUT command, you do need to power off the ZX
Spectrum first.

5
Using the DivMMC EnJOY! PRO ONE
Loading a game with the NMI Browser
This is the simplest way of loading a game or program.
Press the NMI button at any time and the NMI Browser will appear. Press H for a help screen.
Use the cursor keys or keys 6 or 7 to select a file. Press ENTER to load and run it.
More info about the NMI Browser is found in the separate ‘NMI Browser’ paragraph.
Getting software on the memory card
Disconnect power from your ZX Spectrum and pull the SD card from the DivMMC EnJOY! PRO ONE.
Put the SD card into a card reader on your PC or laptop and you are able to copy files to the SD card.
Visit www.worldofspectrum.org to download lots of games and other software!
Please note that a maximum of 704 files per folder is supported.
When having more files than that, split the file-set in subfolders.
Supported emulator file formats
The DivMMC EnJOY! PRO ONE with ESXDOS supports .TAP, .SNA, .Z80 and .SCR files, and there is
limited support for .TRD files.
The .TZX file format is not supported; this file format contains exotic loading systems (speed loaders,
loaders with copy protections, etc.) which need a lot of CPU power to decode.
There is a limitation in snapshot files (.Z80 and .SNA): 128K snapshot files will often only work on the
ZX Spectrum 128K (‘toast rack’) but not on the ZX Spectrum +2A, +2B and +3 because of ROM
incompatibility.
ESXDOS 0.8.7
Welcome to ESXDOS, the most advanced firmware for mass storage interfaces for the ZX Spectrum!
ESXDOS is still continuously in development, thus being a future-safe choice for your ZX Spectrum interface.
New ESXDOS 0.8.7 features
▪Bugfixes
▪New/Updated Commands: .dfwload, .more, .dumpmem and .sercp
New ESXDOS 0.8.6 features
▪New BASIC and many new "DOT" commands
▪Autoboot-support
Currently unsupported features / known bugs
▪No long file names
▪No wildcards in BASIC commands

6
Cold start
To perform a cold start without powering off your ZX Spectrum, press the reset-button and hold the SPACE key
while resetting.
This will reinitialize ESXDOS.
Using drive names
Drives are named according to their type and partition number: sd0 for the first SD card.
Using ‘*’ in commands will point to the SD card currently in use.
You can see a list of drive names when ESXDOS runs its initial BIOS drive detection (on a cold start).
Using directory names
You can use the name of directories in all commands, and use ‘/’ at the start of the directory to point to the
root of the SD card.
For example:
LOAD *”/sys/AUTOBOOT.BAS” –this loads AUTOBOOT.BAS from whatever directory you are currently in.
.cd /sys/config –this will set the current directory tot /SYS/CONFIG
New BASIC commands
On all BASIC commands that use a drive parameter, you can use * for the current drive.
[…] means it’s an optional parameters.
GOTO [drive] ["path"]
Example:
GOTO hd0"demos"
This will change the current drive and directory to hd0:/demos.
You can use it to change the current drive, dir, or both.
CAT [drive]
Example:
CAT, CAT *, CAT hd1
Without specifying a drive a fast CAT is done (no speccy header info is displayed).
LOAD drive "path/filename" [CODE]|[SCREEN$]
Example:
LOAD *"/test/blabla", etc
SAVE drive "path/filename" [LINE]|[CODE]|[SCREEN$]
Example:
SAVE *"filename" SCREEN$, etc
ERASE [drive] "path/filename"
Example:
ERASE *"filename", etc

7
DOT commands
Files located in the /BIN directory are so-called DOT commands.
These system commands can be executed from BASIC by typing: ".[command] <args>".
DOT commands are self-explanatory: enter the command without arguments to get more information.
An example, entering:
.tapeout
Will show:
tapeOUT v0.1 (c) phoenix
Usage: tapeout [args] [tapfile]
-c: Close file
-o: Overwrite file
For developers: each DOT command has 7.5K of RAM available and may call any ESXDOS syscall.
Commands can also exit to BASIC with a custom error message.
.ls
Show directory listing
.cd somedir
Change directory
.tapein somefile.tap
Attach .tap file for reading
.tapeout somefile.tap
Attach .tap file for writing
.chmod +h somefile.sys
Set/unset attributes on file/dir
.mkdir newdir
Create a new directory
.mv oldname newname
Rename/move file/dir
.cp source target
Copy file
.more textfile
Display the contents of a textfile
New commands in ESXDOS 0.8.5:
New commands in ESXDOS 0.8.6:
New commands in ESXDOS 0.8.7:
.vdisk
.playwav
.dskprobe
.snapload
.gramon
.speakcz
.playtfm
.playpt3
.ls
.tapein
.tapeout
.partinfo
.launcher
.rm
.hexview
.drives
.mktrd
.128
.dfwload
.more
.dumpmem
.sercp
TR-DOS emulator
Either use the NMI browser to attach/auto-LOAD .TRDs, or use the .vdisk command:
.vdisk unit <filename>
Unit 0 = Drive A, Unit 1 = Drive B, etc.
If you specify just the unit, it will eject the virtual drive.
You can use .dskprobe to check the contents of the vdisk.

8
NMI Browser
Pressing the NMI button will bring up the NMI Browser.
From that menu the following keyboard shortcuts can be used.
Up, Down
Move cursor on page
Left, Right
Change page
Enter
RUN selected file (if supported)
r
Reset(Warm)
s
Create snapshot (auto incrementing name starting with snap0000.sna on initialisation of ESXDOS).
If you get ERROR 18 it’s because file already exists, try again.
1
Go to parent directory (chdir to ‘..’)
v
Show screen from .scr and .sna files (or files with ZX header of type ‘CODE’)
i
Attach tape file to input slot
Space
Exit from NMI mode
H
Onscreen help
ESXDOS (c) 2005-2019 by Papaya Dezign - www.esxdos.org
Document revision: June 2020
Manufactured by Ben Versteeg
Website:
ByteDelight.com
Shop:
ZXSpectrum.shop
Other Byte Delight Recording Equipment manuals
Popular Recording Equipment manuals by other brands

Alcatel
Alcatel MTC-20172 Reference manual

Cisco
Cisco Flex 7500 Series installation guide

Electro-Voice
Electro-Voice Digital Sound System Processor Dx34 owner's manual

Walrus Audio
Walrus Audio FATHOM instruction manual

Sound Devices
Sound Devices 788T User guide and technical information

EMS
EMS EC-63-0001 installation guide