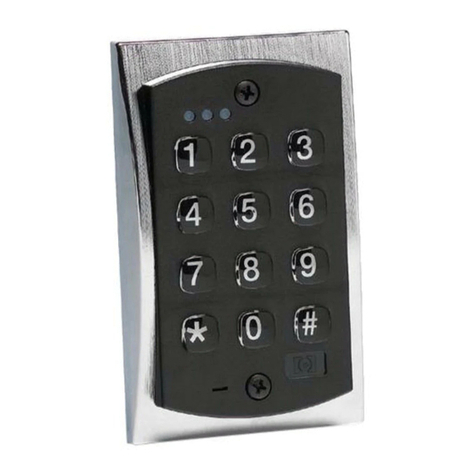
C & K Systems Alpha Plus User manual

Using your
Alpha Plus keypad
With your
Part Number 5-051-373-00 Rev C
System 236
System 238
System 2316
❑
❑
❑
❑
❑
❑
System 236i
System 238i
System 2316i

22
22
2
Thank you for purchasing this C K alarm system. Your system is one of the most powerful
and advanced alarm systems on the market today designed to provide you with years of
reliable operation.
This manual explains how to operate your alarm system. Basic operating instructions are also
printed on the small label attached to the inside of your keypad(s) door.
If you have questions or need help with your
alarm system, call:
______________________________________
______________________________________
(Alarm Company Name)
If you have monitoring questions or in cases
of accidental alarms, call:
______________________________________
______________________________________
(Monitoring Station Name)
When calling the monitoring company, know the following:
My Account Number is: _______________________ My Password is:_____________________

33
33
3
Table of contents
Getting acquainted ..............................................4-5
What the lights mean ...........................................6
What the sounds mean ....................................... 7
Arming the system ...............................................8-17
Arming options ....................................................18-19
Disarming the system ..........................................20
After an alarm ...................................................... 21
Options ................................................................22-34
Duress (Systems 238, 238i, 2316, 2316i ,236i only) ...... 23-24
Guest combination (Systems 238, 2316 only) .......... 25
Changing a User PIN - System 238......................... 26-27
Deleting a User PIN - System 238 ............................ 28
Changing a User PIN - System 236, 2316 ............... 29-30
Deleting a User PIN - System 236, 2316 .................. 31-32
Resetting smoke detectors............................. 33
Testing your system ............................................ 35-37
Local System Test .......................................... 35
Standby Battery Test ......................................36
Bell/Siren Test .................................................36
Central Station Test ........................................ 37
Telephone trouble ...............................................38
Customizing your keypads ..................................39
Language versions .............................................. 40
Smoke detector placement .................................41
Emergency evacuation ........................................ 42
Definitions ............................................................43
Limitations of your alarm system .........................44
Test procedures index ......................................... 45
Zone description list ............................................46-48
FCC Notice / Industry Canada ............................ 50-51

44
44
4
What your alarm system is...
Your alarm system is made up of a control panel and several detection devices like motion sensors,
magnetic contacts, and so on. Specific areas of detection are called zones. Zones can be programmed to
have different characteristics. Some zones may be 24-hour zones, that is, they remain armed even when
the alarm system is off. Zones used for fire detection, for example, are always 24-hour zones. In addition,
some zones can be programmed to allow bypassing. When you bypass a zone, you temporarily remove
it from the alarm system. Always remember, however, that bypassed zones are not protected.
How your alarm system wor s...
When a detection device is triggered, the status of its zone goes from normal to FAULTED. If armed,
the control panel responds by reporting an alarm condition on site sounding bells, message on keypad
display and if programmed, by transmitting an alarm signal over the telephone wires to a
central monitoring station. The monitoring station then dispatches the appropriate authorities.
Some of your system's operations require you to enter your personal identification number (PIN) on
the keypad. These include ARMING and DISARMING.
Along with its many other features, your system can be programmed to ARM INSTANTLY or to ARM
WITH TIME DELAY (i.e., after giving you time to leave the premises).

55
55
5
Each alarm system in the 2300 family is designed to meet the specific needs of a variety of applications. System 236
is specifically designed for smaller, six zone applications.
Systems 238 and 2316 are designed for applications requiring protection of eight and sixteen zones, respectively.
Although these systems do not offer all the same options, your alarm professional has installed the system best suited
for your application. Refer to the headings at the top of each page to determine if an option is available on your system.
(If no systems are listed in the page heading, the option is available on all systems.)
Some of the available features of your alarm system are also optional, and will only be installed if appropriate for
your installation. In addition, some system features will require you to enter your personal identification number
(PIN).
As you read through this manual, watch for boxes like these:
If an optional feature has been installed in your system, its
OPTION INSTALLED box will be checked.
.
.If a feature of your system requires you to enter your personal
identification number, its PIN REQUIRED box will be checked.
OPTION
INSTALLED
PIN
REQUIRED

6
ARMED
LIGHT
POWER
LIGHT REMARKS
AC POWER FAILURE
LOW BATTERY
SYSTEM ARMED
SYSTEM DISARMED
SYSTEM IS ARMED
WITH DELAY ZONES
CONVERTED TO INSTANT
Slow Flash
On
Off
Power Failure. System is operating on battery.
Battery is low; Call your service department. LCD
display will show system trouble.
Protection is on.
Protection is off.
LCD DISPLAY
Off
Slow Flash System armed using * 7 #.
SYSTEM TROUBLE MESSAGES
AC Fail Low Battery
Connection Fail Bell Fuse Fail
NORMAL MESSAGES
Ready to ARM Faulted Zone
Invalid PIN Entry-Disarm Now
Trouble Zone

7
*Not available on System 236/236i
SOUND MEANING
2 beeps system armed or disarmed
.
successful central station test or battery test
.
5 beeps
unauthorized command attempted
error changing PIN number
wrong PIN number entered
.
.
.
.
.
continuous tone, beeping fast for last ten seconds entry delay time
continuous beeping, speeding up for last ten seconds exit delay time
2 second beep door chime
ring back after closing report*
.
.
.
zone faulted during walk-test
.
chirping (1 second on, 4 seconds off) chirp alert warning: system is armed, but a delay zone is faulted; you
must disarm the system before entry delay expires or alarm will occur*
.
alarm signal for zone programmed for chirping bell or siren
.
continuous tone alarm signal for zone programmed for steady bell or siren
circuit malfunction (trouble on supervised loops only)
.
.
pulsed tone (2 seconds on, 2 seconds off) alarm signal for zone programmed for pulsed bell or siren
.
invalid function

8
Ma e sure the display reads READY TO ARM.
Faulted zones must be cleared or bypassed before the system can be armed. If the
display reads NOT READY TO ARM, followed by FAULTED ZONE, push the # key. The
display will then indicate which zone(s) are faulted. For more information, refer to the
sections Bypassing Zones and After An Alarm Occurs.
TO ARM THE SYSTEM:
.
Enter your PIN and push the
# ey.
PIN
REQUIRED #
Don't pause for more than 5 seconds while entering the digits or the control panel will
reject your PIN number.
.
.
PIN = 4 digits long
236/236i
If you make a mistake while entering your PIN number, the keypad will beep five times.
After the fifth beep, enter your PIN number again.
PIN = 2 - 5 digits long
PIN = 2 - 5 digits long
2316/2316i
238/238i

9
Ma e sure the red ARM light comes on.
The keypad will beep twice to confirm that the system is armed.
.
The display will read EXIT NOW.
.
Exit through any TIME DELAY DOOR within seconds.
The exit delay time can be programmed from 10 seconds to 150 seconds.
.
If the EXIT PRE-ALARM option is installed, the keypad will beep slowly until 10 seconds
before the delay time expires, then rapidly for the last 10 seconds.
.
OPTION
INSTALLED
.A bar graph will appear on the display, showing how much exit time remains.
Once the exit time has expired, the keypad will beep twice to confirm that the system is
armed, and the display will read ARMED.
The rest of the Arming The System section describes other arming options, and explains how
to bypass zones before arming the system. No matter how your system is programmed, you
will always disarm it in the same way: enter your PIN, then push the # ey.
.

10
AUTO HOME ARMING
Ma e sure the display reads READY TO ARM.
Enter your PIN and push the
# ey.
PIN
REQUIRED
.If you do not exit before the exit delay time expires, the system will automatically arm
perimeter zones and bypass interior zones.
.If you exit through an exit delay door during the Exit Delay Time, the system will auto-
matically arm interior and perimeter zones.
This option enables the system to automatically bypass interior zones if
you arm the system but do not leave the premises. The perimeter zones
will be armed, and the entry delay will remain intact.
#
System: 236/236i ONLY
OPTION
INSTALLED

11
The keypad will beep twice to confirm that the system is armed,
and the display will read ARMED - INSTANT.
INSTANT ARMING
Instant Arming converts all time delayed zones to INSTANT zones.
Ma e sure that the display reads READY TO ARM.
Enter your PIN (if required),
push the ey, enter the digit "7",
then push the # ey.
PIN
REQUIRED
.
The red ARM light will flash while the system is Instant Armed.
.
CAUTION: When the system is Instant Armed, you will not be able to enter through any
perimeter door or walk through any protected area without setting off an alarm.
Bypassing interior zones will allow you to move about freely inside the premises while
the system is armed. Refer to BYPASSING ZONES (pages 14 - 17).
.
7#
*
*
.Exit Delay Disable (see page 19).
OPTION
INSTALLED

12
HOME ARMING
Home Arming arms perimeter zones, while bypassing interior zones.
Ma e sure that the display reads READY TO ARM.
Enter your PIN (if required),
push the ey, enter the digit "4",
then push the # ey.
PIN
REQUIRED
.The keypad will beep twice to confirm that the system is armed,
and the display will read ARMED.
The red ARM light will flash while the system is armed.
.
Exit Delay Disable (see page 19).
.
Home Arming allows you to move about freely inside the premises while the system is
armed.
.
When the system is Home Armed, you can enter the premises without setting off an
alarm through a delayed entry zone. (Don't forget to disarm the system after entry!)
.
OPTION
INSTALLED
4#
*
*

13
INSTANT HOME ARMING
Enter your PIN (if required),
push the ey, enter the digit "7",
the digit "4", then push the # ey.
PIN
REQUIRED
.The keypad will beep twice to confirm that the system
is armed, and the display will read ARMED - INSTANT.
Instant Home Arming arms perimeter zones, and bypasses interior zones.
Entry time delays are converted to INSTANT.
Ma e sure that the display reads READY TO ARM.
.The red ARM light will flash while the perimeter zones
are instant armed.
47
.
OPTION
INSTALLED Exit Delay Disable (see page 19).
OR
CAUTION: When the system is Instant Home Armed, you will not be able to enter
through any perimeter door without setting off an alarm.
#
*
74 #
*
*

14
Push the ey, enter the zone to be
bypassed, then push the # ey.
BYPASSING ZONES
This procedure allows you to bypass one or more zones while your system is
DISARMED.
NOTE: System programming determines which PINs can bypass zones, also which
zones can be bypassed. To learn if a zone can be bypassed, see the Zone
description list on pages 46-48.
PIN
REQUIRED
ZONE #
#
NOTE: Zones can also be bypassed by remote programming. The system can either
be armed or disarmed for remote programming.
If required, enter your PIN.
System: 238, 238i, 2316, 2316i ONLY

15
ZONE #
ZONE #
.To bypass more than one zone: enter your
PIN (if required), push the key, enter the
first zone to be bypassed, push the
key again, enter the next zone to be bypassed,
and so on. When the last zone to be bypassed
has been entered, push the # key.
.To indicate that zones are bypassed, the display will read BYPASSED ZONE. To see
which zones are bypassed, push the # key (once for each bypassed zone).
.The procedures for adding a bypass and removing a bypass are identical. To
remove a bypass: enter your PIN, push the key, enter the zone from which the
bypass is to be removed, then push the # key.
When you have finished bypassing zones, arm the system by entering your PIN and
pushing the # key.
.
NOTE: Disarming your alarm system REMOVES all bypasses.
PIN
REQUIRED
#
System: 238, 238i, 2316, 2316i ONLY

16
This procedure allows you to bypass one or more zones while your system is
DISARMED
BYPASSING ZONES
NOTE: System programming determines which PINs can bypass zones, also which
zones can be bypassed. To learn if a zone can be bypassed, see the Zone
description list on page 46.
Enter your PIN (EBHAGKEHA@).
PIN
REQUIRED
Push the ey, enter the digit "2", enter
the zone to be bypassed, then push the
# ey.
2
ZONE #
*#
*
OPTION
INSTALLED
OR
System: 236 and 236i ONLY
1(See NOTE page 17 ).
Push the ey, enter the zone to
be bypassed, then push the
# ey. #
ZONE #
OPTION
INSTALLED

17
.To indicate that zones are bypassed, the display will read BYPASSED ZONE. To see
which zones are bypassed, push the # key.
The procedures for adding a bypass and removing a bypass are identical.
To remove a bypass:
.
.
NOTE: Zones can also be bypassed by remote programming. The system can either be
armed or disarmed for remote programming.
1
Enter your PIN, push the ey, enter the digit "2", enter the zone
from which the bypass is to be removed, then push the # ey.
OR
NOTE: Disarming your alarm system REMOVES all bypasses.
Enter your PIN, push the ey, enter the zone from which the
bypass is to be removed then press the # ey.
*
System: 236 and 236i ONLY

18
Your alarm system has been programmed for one of the following arming types:
FORCE ARMING
Any zone (except for 24-hour zones) that is violated during the EXIT DELAY
time has expired will be automatically bypassed until the system is disarmed.
Warning: bypassed zones are not protected.
OPTION
INSTALLED
GOOF-PROOF ARMING
If any zone other than a 24-hour zone is faulted (open window, malfunctioning
sensor, etc.), your system will not arm. You will not be able to arm the system
until the faulted zone is cleared or manually bypassed.
OPTION
INSTALLED

19
CHIRP ALERT (Available on Systems 238, 238i, 2316 and 2316i ONLY)
The system will arm even if delayed or interior zones are faulted at the time of
arming. If an EXIT DELAY zone is still faulted when the EXIT DELAY time expires,
the bell/siren will begin to chirp. The chirping will continue for the duration of the
ENTRY DELAY time. You must re-enter the premises and disarm the system
before the ENTRY DELAY time expires or an alarm will occur.
OPTION
INSTALLED
EXIT DELAY DISABLE (Available on System 236 and 236i ONLY)
OPTION
INSTALLED If this option is installed, the exit delay will be eliminated when arming your system
using Instant Arming (page 11), Home Arming (page 12), or Instant Home Arming
(page 13).

20
TO DISARM THE SYSTEM:
Enter only through a TIME DELAY door.
.
OPTION
INSTALLED
The display will read ENTRY - DISARM NOW. A bar graph will appear on the display,
showing how much entry time remains.
Enter your PIN within
seconds and push the # ey.
PIN
REQUIRED
Ma e sure the red ARM light on the eypad goes off.
If the ARM light does not go off, wait for the keypad to beep five times, then enter your
PIN again.
.
The display will read READY TO ARM or NOT READY TO ARM (if a zone is faulted).
.
If the ENTRY PRE-ALARM option is installed, the keypad will sound constantly until 10
seconds before the delay time expires (or the panel is disarmed), then beep rapidly for
the last 10 seconds.
.
#
Table of contents
Other C & K Systems Keypad manuals
