C.P. Electronics WD976 User manual

EBD-ENCIP1
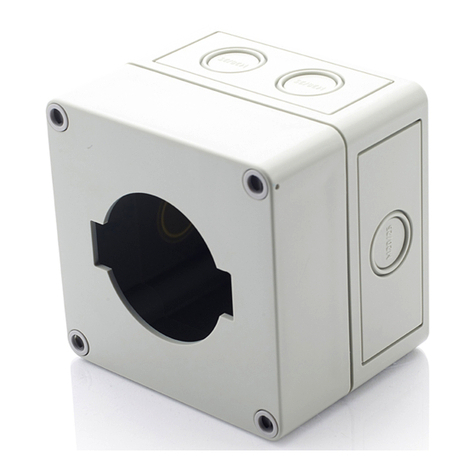
Pre-drilled 64mm hole detector adapter enclosure
Vorgebohrtes Detektorgehäuse mit 64-mm-Bohrung
Carcasa de detector con oricio de 64 mm
pre-taladrado
Orifício de 64 mm pré-brocado do invólucro do
detetor
Trou de 64 mm prépercé, enceinte de détecteur
Alloggiamento per il rilevatore con foro da 64 mm
Detectorbehuizing met voorgeboord gat van 64 mm
Предварительно просверленный корпус
переходника детектора отверстия 64 мм
Warning | Warnung | Advertencia |
Aviso | Attention | Attenzione |
Waarschuwing | Внимание
EN This device should be
installed by a qualied electrician in
accordance with the latest edition
of the IEE wiring regulations.
DE Dieses Gerät ist
ausschließlich von qualizierten
Elektrofachkräen zu installieren.
ES Sólo un electricista
cualicado debe instalar este
dispositivo.
PT Somente um eletricista
qualicado deve instalar este
dispositivo.
FR Seul un électricien qualié
peut installer ce dispositif.
IT Il dispositivo deve essere
installato da un elettricista
qualicato.
NL Dit apparaat moet
worden geïnstalleerd door een
gekwaliceerde elektricien.
RU Это устройство
должно быть установлено
квалифицированным
электриком.
WD976 Issue 5 Installation Guide
EBD-ENCIP1
Downloads and Videos | Downloads und Videos | Descargas y Videos | Descargas e Videos |
Téléchargements & Vidéos | Downloads e Video | Downloads en Video’s | Загрузки и Видео
cpelectronics.co.uk/cp/976
Dimensions (mm) | Abmessungen (mm) | Dimensiones (mm) | Dimensões (mm) | Dimensioni (mm) |
Dimensies (mm) | Размеры (мм)
95
76
76
95
110
66
78
54
Ø14 Ø5.5
90
59.5
69.5
19.5
Knockout
65
28
28
65
Ø3.4
8.5
6.5
(8x)
3
51
80.8

2
1
Secure to wall or ceiling | Befestigung an der Decke | Fijar al techo | Fixar à teto | Le xer au plafond |
Fissare alla sotto | Bevestig aan het plafond | Закрепить на стене или потолке
EN Surface mounting, using the optional
surface mounted enclosure EBD-ENCIP1.
If you are using the product in a low
temperature environment a
Breather Plug & Cable gland MUST be
installed, to prevent condensation
build up & to maintain IP integrity.
DE Oberächenmontage mit dem
optionalen Aufputzgehäuse EBD-ENCIP1.
Wenn Sie das Produkt in einer
Umgebung mit niedriger
Temperatur verwenden, MUSS eine
Entlüungsstopfen- und
Kabelverschraubung installiert
werden, um die Bildung von
Kondenswasser zu verhindern und
die IP-Integrität
aufrechtzuerhalten.
ES Montaje en supercie, usando la carcasa
opcional montada en supercie EBD-ENCIP1.
Si está utilizando el producto en un
entorno de baja temperatura, DEBE
instalarse un tapón de ventilación
y un prensaestopas para evitar la
acumulación de condensación y
mantener la integridad de la IP.
PT Montagem na superfície utilizando o
invólucro montado na superície opcional do
EBD-ENCIP1.
Se você estiver usando o produto em
um ambiente de baixa temperatura,
um plugue de respiro e prensa-cabo
DEVEM ser instalados para evitar o
acúmulo de condensação e manter a
integridade do IP.
FR Fixation en applique en utilisant l’enceinte
optionnelle en applique EBD-ENCIP1.
Si vous utilisez le produit dans un
environnement à basse
température, une prise de reniard
et un presse-étoupe DOIVENT être
installés pour éviter l'accumulation
de condensation et pour maintenir
l'intégrité IP.
IT Installazione superciale utilizzando
l’alloggiamento con installazione superciale
opzionale EBD-ENCIP1.
Se si utilizza il prodotto in un
ambiente a bassa temperatura, è
NECESSARIO installare un tappo di
sato e un pressacavo per evitare la
formazione di condensa e per
mantenere l'integrità IP.
NL Opbouw met behulp van de optionele
opbouwdoos EBD-ENCIP1.
Als u het product in een omgeving
met lage temperaturen gebruikt,
MOET een ontluchtingsplug en
kabelwartel worden geïnstalleerd
om condensatie te voorkomen en
de IP-integriteit te behouden.
RU Поверхностный монтаж с
использованием дополнительного элемента
для поверхностного монтажа EBD-ENCIP1.
Если вы используете продукт в
условиях низких температур,
НЕОБХОДИМО установить сапун и
кабельный ввод, чтобы
предотвратить образование
конденсата и сохранить
целостность IP.
Installation | Instalación | instalação | Installazione | Installatie | Установка
EN Apply xing screws to the 4 corner holes
and preserve the seals of the internal area of the
enclosure. Use screw xing type suitable to the
mounting surface structure. Do not over tighten to
prevent damage to the enclosure.
Fixing Screws x 4 (max 4.5 mm diameter sha, 8mm
diameter head)
DE Befestigen Sie die 4 Ecklöcher mit
Befestigungsschrauben, und bewahren Sie die
Dichtungen im Innenbereich des Gehäuses auf.
Verwenden Sie eine für die Struktur der Montageäche
geeignete Schraubbefestigung. Nicht zu fest anziehen,
um das Gehäuse nicht zu beschädigen.
Befestigungsschrauben x 4 (Schadurchmesser max.
4,5 mm, Kopfdurchmesser 8 mm).
ES Aplique tornillos de jación a los 4 agujeros
de las esquinas y conserve los sellos del área interna
del gabinete. Utilice un tipo de jación por tornillo
adecuado para la estructura de la supercie de
montaje. No apriete demasiado para evitar daños a
la carcasa.
Tornillos de jación x 4 (eje máximo de 4,5 mm de
diámetro, cabeza de 8 mm de diámetro).
PT Aplique parafusos de xação nos 4 orifícios
de canto e preserve as vedações da área interna
do gabinete. Use o tipo de xação por parafuso
adequado à estrutura da superfície de montagem.
Não aperte demais para evitar danos ao gabinete.
Parafusos de xação x 4 (eixo máximo de 4,5 mm de
diâmetro, cabeça de 8mm de diâmetro).
FR Appliquer des vis de xation sur les 4 trous
d’angle et préserver les joints de la zone interne du
boîtier. Utilisez un type de xation à vis adapté à la
structure de la surface de montage. Ne serrez pas
trop pour éviter d’endommager le boîtier.
Vis de xation x 4 (tige de 4,5 mm de diamètre
maximum, tête de 8 mm de diamètre)
IT Applicare le viti di ssaggio ai 4 fori angolari
e conservare le guarnizioni dell’area interna della
custodia. Utilizzare un tipo di ssaggio a vite adatto alla
struttura della supercie di montaggio. Non stringere
eccessivamente per evitare danni alla custodia.
Viti di ssaggio x 4 (albero diametro max 4,5 mm, testa
diametro 8 mm).
NL Breng bevestigingsschroeven aan op de
4 hoekgaten en bewaar de afdichtingen van het
interne gedeelte van de behuizing. Gebruik een
schroeevestiging die geschikt is voor de structuur
van het montageoppervlak. Draai niet te vast aan om
schade aan de behuizing te voorkomen.
Bevestigingsschroeven x 4 (max. As van 4,5 mm
diameter, kop van 8 mm diameter).
RU Прикрутите крепежные винты к 4
угловым отверстиям и сохраните уплотнения
внутренней области корпуса. Используйте
винтовое крепление, подходящее для структуры
монтажной поверхности. Не перетягивайте,
чтобы не повредить корпус.
Крепежные винты х 4 (диаметр вала не более 4,5
мм, головка диаметром 8 мм)

3
2
Install detector | Melder installieren | Instalación del detector | Instalaçao do detector | Installer le détecteur |
Installazione del sensore | Installeer detector | Установить детектор
EN Pull out spring tab, rotate spring arm as shown
insert into aperture and rotate for location.
DE Ziehen Sie die Federzunge heraus, drehen Sie
den Federarm wie abgebildet, führen Sie ihn in die
Önung ein und drehen Sie ihn in Position.
ES Extraiga la pestaña del muelle, gire el brazo
del muelle como se muestra, inserte en la abertura y
gire para ubicarlo.
PT Puxar a lingueta de mola para fora, rodar
o braço de mola conforme ilustrado, inserir na
abertura e rodar para encaixar.
FR Extraire la languette à ressort, faire pivoter
le bras du ressort comme illustré, l’insérer dans
l’ouverture et le faire pivoter pour le mettre en place.
IT Estrarre la linguetta a molla, ruotare il braccio
a molla come mostrato, inserirlo nell’apertura e poi
ruotarlo nché non entra in posizione.
NL Trek de veer uit, draai de veerarm zoals is
weergegeven, plaats in de opening en draai om te
bevestigen.
RU Вытащите язычок пружины, поверните
рычаг пружины, как показано, вставьте в
отверстие и поверните, чтобы найти место.
3
EN Advise to use cable gland to the side
knockouts to preserve the IP integrity of the unit.
For example use Wiska ESKV-L-20 cable gland.
DE Es wird empfohlen, eine
Kabelverschraubung an den seitlichen
Aussparungen zu verwenden, um die
IP-Integrität des Geräts zu gewährleisten.
Verwenden Sie beispielsweise die
Kabelverschraubung Wiska ESKV-L-20.
ES Aconseje utilizar prensaestopas para
los agujeros ciegos laterales para preservar la
integridad de la IP de la unidad. Por ejemplo,
utilice prensaestopas Wiska ESKV-L-20.
PT Aconselhe a usar prensa-cabo
nas aberturas laterais para preservar a
integridade IP da unidade. Por exemplo, use
prensa-cabo Wiska ESKV-L-20.
FR Conseillez d'utiliser un presse-étoupe
sur les débouchures latérales pour préserver
l'intégrité IP de l'unité. Par exemple, utilisez le
presse-étoupe Wiska ESKV-L-20.
IT Consigliare di utilizzare pressacavi
per i fori laterali per preservare l'integrità IP
dell'unità. Ad esempio, utilizzare il pressacavo
Wiska ESKV-L-20.
NL Adviseer om kabelwartels te gebruiken
voor de uitbreekpoorten aan de zijkant om
de IP-integriteit van de unit te behouden.
Gebruik bijvoorbeeld de Wiska ESKV-L-20
kabelwartel.
RU Советуем использовать кабельный
ввод на боковых заглушках, чтобы
сохранить IP целостность блока.
Например, используйте кабельный ввод
Wiska ESKV-L-20.
Use of side knockouts | Verwendung von Seitenausschlägen | Uso de nocauts laterales | Uso de nocautes laterais |
Utilisation de knockouts latéraux | Uso di knockout laterali | Gebruik van uitsparingen aan de zijkant |
Использование боковых нокаутов
EN Advise to use vent plugs to the side
knock-out facility so as to reduce condensation
that may occur. For example use Wiska
EVPS-L-20 vent plug and EMUG-20 locknut.
DE Es wird empfohlen,
Entlüungsstopfen an der seitlichen
Ausbrechanlage zu verwenden, um die
möglicherweise auretende Kondensation
zu verringern. Verwenden Sie beispielsweise
den Entlüungsstopfen Wiska EVPS-L-20 und
die Kontermutter EMUG-20.
ES Aconseje utilizar tapones de
ventilación en la instalación de eliminación
lateral para reducir la condensación que
pueda ocurrir. Por ejemplo, use el tapón de
ventilación Wiska EVPS-L-20 y la contratuerca
EMUG-20.
PT Aconselhar a usar tampões de
ventilação na instalação de extração lateral
para reduzir a condensação que pode ocorrer.
Por exemplo, use o plugue de ventilação Wiska
EVPS-L-20 e a contraporca EMUG-20.
FR Il est conseillé d'utiliser des bouchons
d'aération sur l'installation d'éjection latérale
an de réduire la condensation qui peut se
produire. Par exemple, utilisez le bouchon
d'évent Wiska EVPS-L-20 et le contre-écrou
EMUG-20.
IT Consigliare di utilizzare tappi di
sato per l'impianto di espulsione laterale in
modo da ridurre la condensa che potrebbe
vericarsi. Ad esempio, utilizzare il tappo
di sato Wiska EVPS-L-20 e il controdado
EMUG-20.
NL Adviseer om ontluchtingspluggen te
gebruiken voor de uitbreekvoorziening aan
de zijkant om condensatie te verminderen.
Gebruik bijvoorbeeld Wiska EVPS-L-20
ontluchtingsplug en EMUG-20 borgmoer.
RU Рекомендуется использовать
вентиляционные заглушки для бокового
выбивания, чтобы уменьшить возможное
образование конденсата. Например,
используйте вентиляционную пробку
Wiska EVPS-L-20 и контргайку EMUG-20.
4

4
Matériau (boîtier)
Plage de température de travail
Code de la pièce
FR Données Techniques
Materiale (rivestimento)
Intervallo di temperatura di lavoro
Codice parte
IT Speciche Tecnichev
Materiaal (behuizing)
Werktemperatuurbereik
Onderdeelcode
NL Technische data
Material (casing)
Working temperature range
Part code
Материал (корпус)
Диапазон рабочих температур
Наименование изделия
EN Technical Data
RU Технические характеристики
Material (Gehäuse)
Arbeitstemperaturbereich
Artikelcode
DE Technische Daten
Material (carcasa)
Rango de temperatura de trabajo
Código de pieza
ES Datos Técnicos
Material (caixa)
Faixa de temperatura de trabalho
Código da peça
PT Dados Técnicos
Cover, base –
Polystyrene Screw –
Polymide 6
-30 to 50ºC
EBD-ENCIP1
Крышка, база -
полистирол, винт
- полимид 6
От -30 до 50ºC
EBD-ENCIP1
Cubierta, base - Tornillo
de poliestireno -
Polimida 6
-30 a 50ºC
EBD-ENCIP1
Couvercle, base
- Vis en polystyrène -
Polymide 6
-30 à 50ºC
EBD-ENCIP1
Deksel, voet -
Polystyreenschroef
- Polymide 6
-30 tot 50ºC
EBD-ENCIP1
Abdeckung, Sockel
- Styroporschraube -
Polymid 6
-30 bis 50ºC
EBD-ENCIP1
Cobertura, base -
Poliestireno Parafuso
- Polymide 6
-30 a 50ºC
EBD-ENCIP1
Copertura, base
- Vite in polistirolo -
Polimide 6
-30 al 50ºC
EBD-ENCIP1
WD976 Issue 5 Installation Guide, EBD-ENCIP1
CP Electronics
Brent Crescent, London NW10 7XR
t. +44 (0)333 900 0671
enquir[email protected]
www.cpelectronics.co.uk connect with us
Due to our policy of continual product improvement CP Electronics reserves the right to alter the specication of this product without prior notice.
This manual suits for next models
1
Other C.P. Electronics Enclosure manuals
