C RELIEF CR-1360 User manual
THE ELITE SET
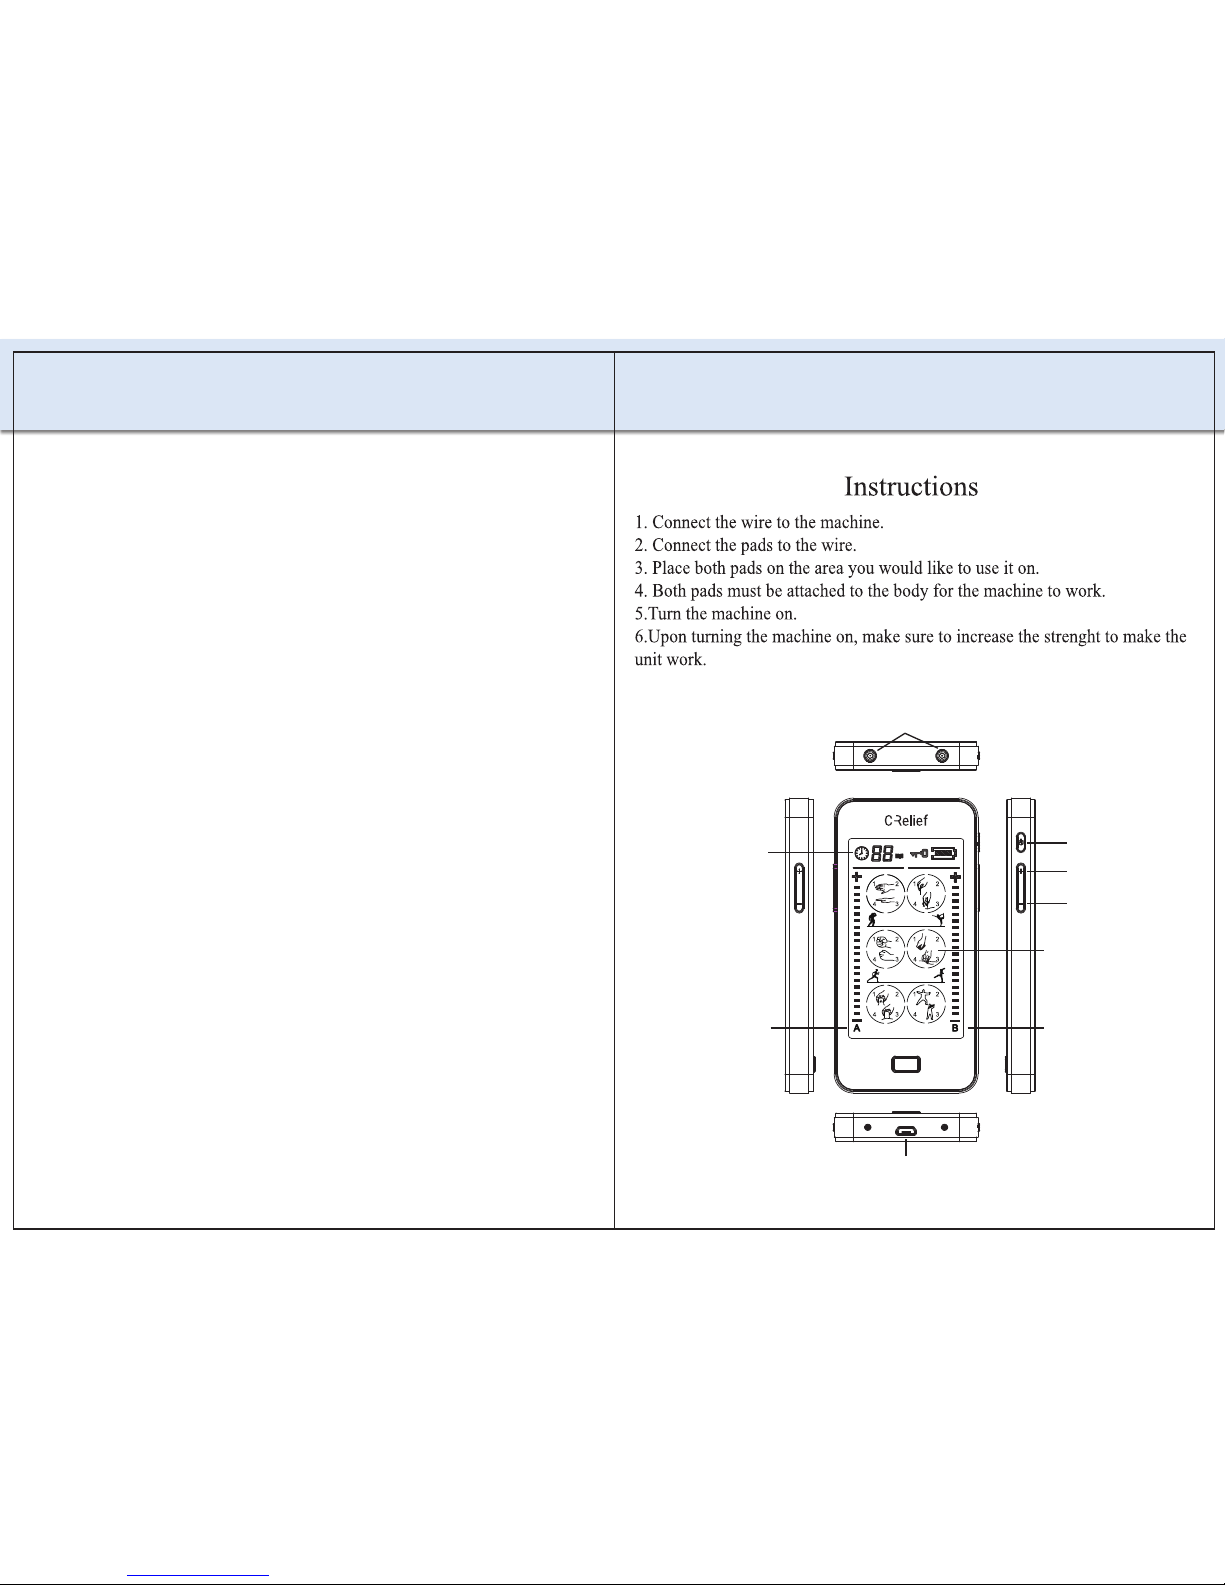
Output
Switch
Timing
Intensity +
Intensity -
Intensity BIntensity A
Modeselection
USB port

1. Introduction
Thank you for purchasing TENS (Transcutaneous Electrical Nerve
Stimulation) Massager . To enable you properly operate this product,
please thoroughly read this product introduction first and keep the
manual well after reading for future reference.
1.1General information
TENS(Tanscuataneous Electrical Nerve Stimulation) Massager is a
new health-oriented product to benefit the tired body. Due to its
portable appearance, the use ofthe device will be no longer bound by
time or space. It is really a good partner for health care in daily life.
1.2 Warnings and Precautions
1.DO NOT use this device if you have any of the following medical
conditions:
(1) An implanted cardiac pacemaker, defibrillator or other implanted
metallic or electronic device
(2) Undiagnosed pain syndromes
(3) Have been diagnosed with cancer
(4) Are pregnant
(5) Have suffered acute trauma or surgical procedure in the past six
months
(6) Have cardiac problems or cardiac disease
(7) Have epilepsy
(8) Have painful and/or atrophied muscles
(9) Have abdominal or inguinal hernia
(10) Have limited range of motion in skeletal joints
(11) Have blood circulatory problems
2. This unit is only intended for adult use only on healthy muscles.
DO NOT use on muscles that are:Atrophied, painful, suffer spasms,
on a limb with painful or otherwise afflicted joints.
3. This device is not intended for the application of any medical
condition or disease nor intended for physiotherapy or muscle
rehabilitation. It is contraindicated for use on any muscle that is
injured or diseased.
4. DO NOT use for:
(1) Muscle reeducation
(2) To prevent muscle atrophy or spasms
(3) Improving range of motion
(4) Blood flow deficiencies / venous thrombosis
Warnings:
1. Stimulation should not be applied over the carotid sinus nerves,
particularly in patients with known sensitivity to the carotid sinus
reflex.
2. Stimulation should not be applied transthoracicallyin that the
introduction of electrical current into the heart may cause cardiac
arrhythmias.
3. Stimulation should not be applied transcerebrally.
4. Apply electrodes only to normal, intact, clean skin. Do not apply
electrodes over open wounds or over swollen, infected, or inflamed
areas or skin eruptions, e.g., phlebitis, thrombophlebitis, varicose
veins.
5. DO NOT apply stimulation:
(1) Over frontal area of the neck (near site of carotid sinus nerves).
(2) Over the neck or mouth.
(3) Across the chest.

(4) Over or in proximity to cancerous lesion.
(5) If you are epileptic.
(6) After experiencing acute trauma or fracture.
(7) Following recent surgery.
(8) If you have a hernia.
6. Never use the device while driving, operating machinery or during
activities in which involuntary muscle contractions may endanger the
users or others.
7. Do not use the device in the bath or shower.
8. Do not use the device while sleeping.
C Relief Pads
C Relief Massager is intended to be used for temporary relief of
pain associated with sore and aching muscles in the
shoulder,waist,back,neck,upper extremities(arm),and lower
extremities(leg) due to strain from exercise or normal household
work activities.
C Relief Belt
C Relief Massager is intended to be used for temporary relief of
pain associated with sore and aching muscles in the
shoulder,waist,back,neck,upper extremities(arm),and lower
extremities(leg) due to strain from exercise or normal household
work activities.It is intended to be used to stimulate healthy
muscles in order to improve and facilitate muscle performance.
2 .Product Description
2.1Features
Large touch screen
The large touched, clear LCD indicator makes it easier for visually
impaired to set and operate, This LCD will be utilized to display
stimulating mode/intensity level and timer.
A&B independent outputs Two output to do the massage on more
treatment points at the same time.24 modes with 20 respective
intensity levels Offering versatile choice for long time users
Automatic Timer
Automatically switches the unit off after the set time when
activated (20 minutes)
C Relief Shoes
Treat yourself with a foot massage with the C Relief massage
shoes. C Relief shoes is intended to be used for temporary relief
of pain associated with sore and aching muscles due to strain
from exercise or normal household work activities.It is intended
to be used to stimulate healthy muscles in order to improve and
facilitate muscle performance.

Output
Switch
Timing
Intensity +
Intensity -
Intensity BIntensity A
Modeselection
USB port
2.2 Function
1. Relaxing body.
2. Stimulate inhibiting sympathetic, enlarge blood vessels, and
improve blood circulation.
3. Pain relief, including:backing pain,Sciatica Sports strains and
sprains.
4. Dredge the channels and collaterals.
3. Instructions for use
1. Clip the output cord onto the massage pads.
2. Plug the output cord into the output jack of the controller.
3. Use a damp towel to wipe the skin where you put the pads, so as
to remove any body oil, cosmetic or dirt (Should the pads be soiled,
both their adhesivenessand the use time will be reduced).
4. Peel off the protective film on the pads.
Warning: Do not put two pads together in the process of using, to
avoid short cut.
5. Apply the pads to the areas of the body you want to massage. The
unit cannot operate unless both pads are applied.
Warning: Do not move pads or touch them with hands in the process
of using, it may cause strong stimulation.
6. Press button, the screen starts to display. The small flashing
hands on the LCD screen will automatically points at mode 1. The
“T” will automatically choose the state of 20minutes.
7. Touch mode area to select different modes (24 modes).
Mode 1 contains tapping, scrapping, body building, knocking
waveforms;
Mode 2 contains acupuncture, foot therapy, trigger point Lomi lomi
waveforms;
Mode 3 contains strike,reflexology,Tha chi,nuge massage waveforms;
Mode 4 contains kneading,butterfly,shiatsu-deep streching waveforms;
Mode 5 contains cupping, sports, Swedish thai waveforms;
Mode 6 contains rubbing, assorted,stepping,auto waveforms Please
increase the intensity when change to new mode because it will
return to be lowest automatically.
8. Press “+” button or click“+” on the screen to strengthen the
output power. Press “—” button or click“-” on the screen to reduce
the output power. One press to increase or reduce one grade, totally
20 grades. The chosen power output depends on the feeling comfort.
At the precondition of acceptance, the power should be chosen as
high as possible for the best effect.
9. Click timer figure to adjust time. The auto time set is 20 minutes.
One click to increase 10 minutes. The instrument sets time to auto
turn-off, and it should be restarted if treatment is needed to be
continued.
Note: The standard time is 20 minutes (time on the screen can be
adjusted). The devicecan be used 1 or 2 times (the maximum use
time) for the same area per day. There may be some people who feel
fatigue, in this case, lower the speed and strength, shorten the time
(for example stop the machine when the time shows 5 minutes), and
limit the use time to once a day.
10. Press bottom button to lock the LCD screen.When there is a key
showed on the top of the screen, it will be no uses no matter where
you touch on the screen, but the intensity level can be adjusted by
pressing side button. Press bottom button to unlock.
11. If you need to turn off the device during massaging, long press
“OFF” button.
12. Take off the physiotherapy film, cover the protectionfilm, and put
away the massager.
Note:
1.Never connect this product with common headphone.
2. Do not touch USB port in the process of using. The USB port is
only for charging- do not connect to any other device.
3. The charger supplied by the manufacturer must be in compliance
with IEC/EN 60601-1, the use of unauthorized charger can degrade
minimum safety.
4. Maintenance and Storage
1. Unplug the output cord from the output jack of the controller after
using.
2. Cover both pads with the protective film before storage.
3. Never fold the massage pads.
4. To keep the controller clean, use a soft and dry cloth for dust or a
soft damp cloth for any dirt and smudges. Do not use any cleaning
solutions to clean the controller and its pads.
5. Never apply the pads on any surface other than your skin. If the
pads become soiled or dirty, the adhesive power may decrease. In
this case, moisten the surface of the pads with water and wipe away
the dirty portion. This will allow a temporary restoration of the
adhesive power. However, too much water will result in loss of the
adhesive power.
6. Do not use or store the devices where there are magnetic fields or
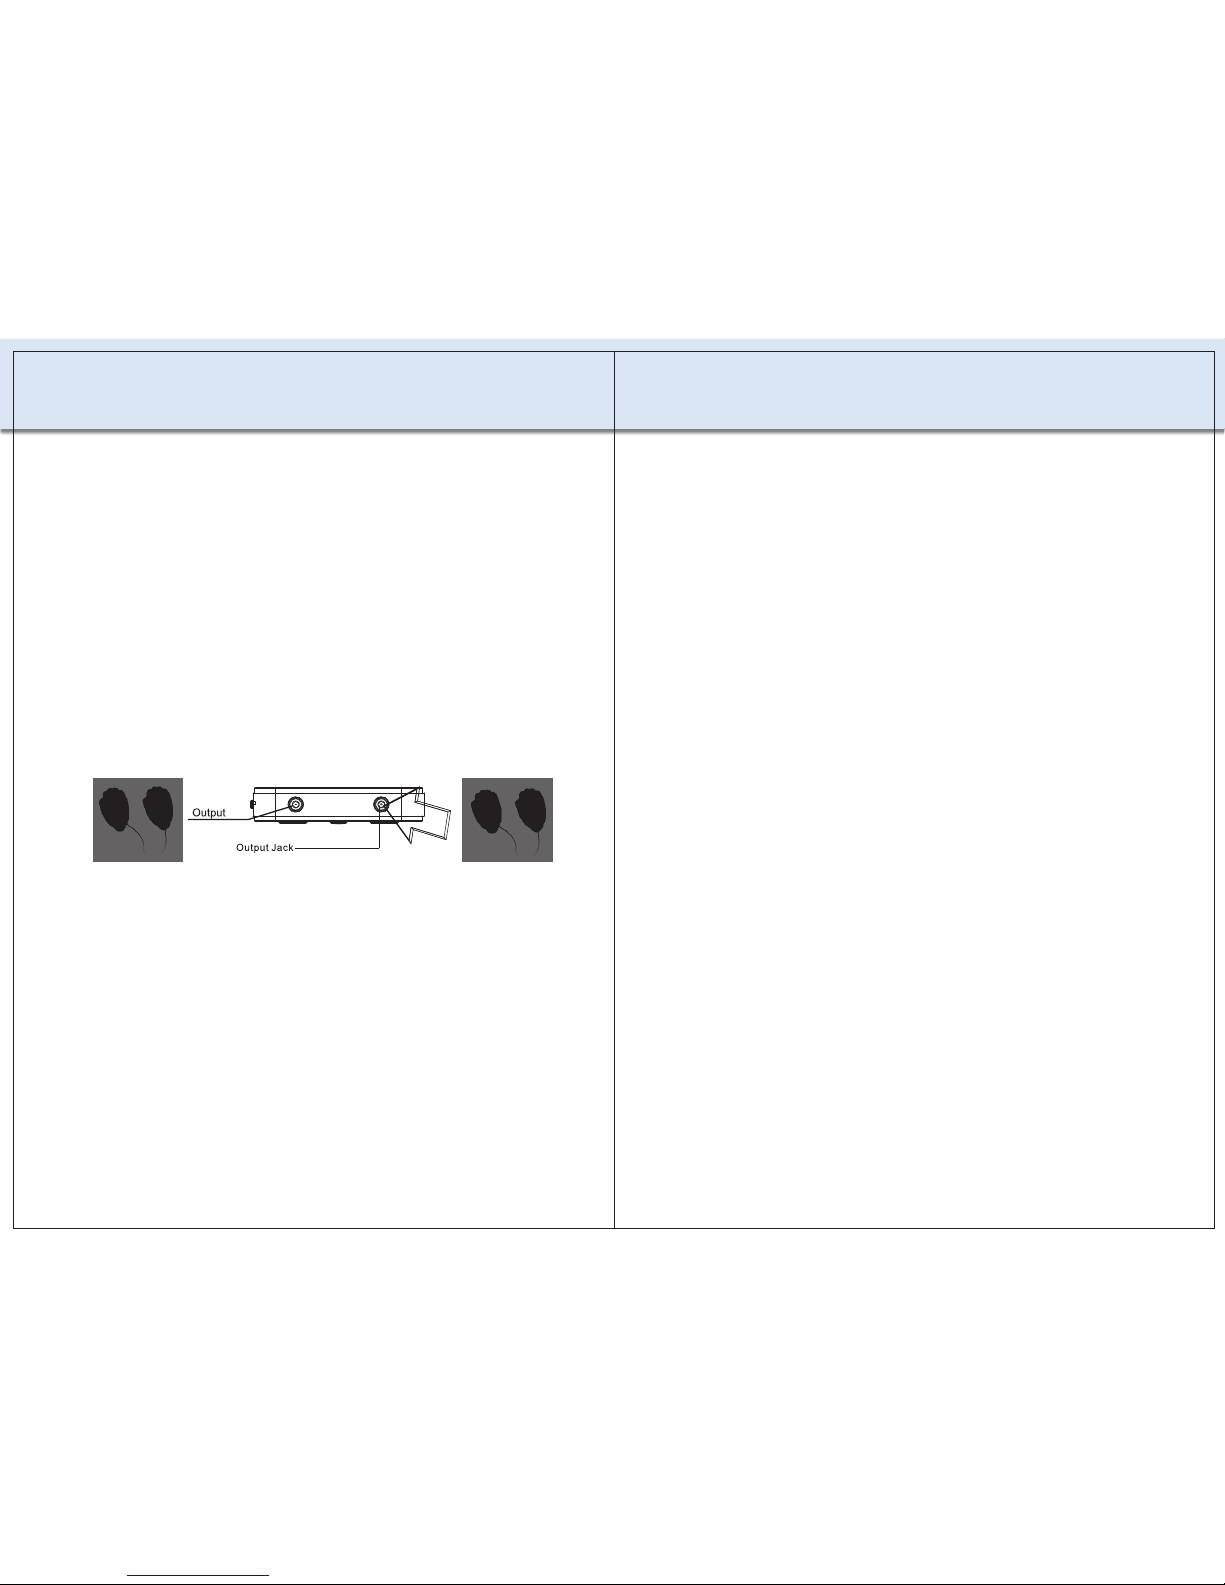
MASSAGE PADS OPERATING INSTRUCTION
1.Connect the pads to the wire by snapping them in place( picture 1)
2.Plug the connection wires into the output jack at the bottom of the
controller (picture 2).
3.Clean the skin prior to application of the pads; this will remove
any body oil, cosmetic or dirt.
4.Peel off the protective film from pads (keep the protective film to
reuse).
5.Apply the pads on your body you want to massage. The unit
cannot operate unless both pads are applied.
6.Use controller as previous instructed.
ABDOMINAL & LOWER BACK BELT
With recommended use of 30 minutes per day.
Features
1.Combining designing of soft and hard materials make the
abdominal & lower back belt, comfortable, flexible, breathable and
durable.
2.Large contacting surface makes the belt easily to use.
Functions
1.Eliminating fatigue of arms, waist abdomen and legs.
2.Is specifically designed to give optimum relief for the lower back.
Safety Precautions
1.Do not use the belt if you have heart disease.
2.Do not apply the belt over the neck or mouth, as severe muscle
spasms of the laryngeal and pharyngeal portion muscle s may occur.
3.Do not use the belt over head or chest.
4.Do not apply the belt over infected or irritated skin areas.
5.Do not use the belt during pregnancy.
6.A 30-minutes daily routine is recommended.
7.Keep the belt out of reach of children
Cautions
The belt should be cleaned regularly with warm water. Discoloration of the
conductive
area is, however, normal. Do not wash the belt in the
washing machine nor use fabric conditioner to wash.
Check the belt before every use.
( picture 1) ( picture 2)
ABDOMINAL & LOWER BACK BELT OPERATING
INSTRUCTIONS
1.Connect the belt and place the belt where needed.
2.Press the two snap connectors at the end of the auxiliary wire
respectively on either button found beneath the cloth in which the
C Relief
logo is printed.
3.Insert the other end of the auxiliary wire into the output jack found
at the bottom
of controller.
4.Turn on controller.
MASSAGE SHOES
C Relief
Massage Shoes are high-Tech product. Regular and
lasting use can relieve fatigue and enhance circulation.
Features
1.Combination of soft and hard material makes the massage
shoes flexible,
comfortable and durable.
Functions
1.Patients with heart disease, hypertension, calf pain and
women who are
pregnant are prohibited from using the massage
shoes, People with unexplained
joint and muscle inflammation
within 72 hours of using massage shoes should
consult a doctor.
2. Not allowed for children usage
3. Do not operate this product in wet places such as
bathing/showering.
4. Do not attempt to disassemble or repair.
Cautions
When massaging, please keep the points and the massage shoes
clean.For most
users the output strength of this machine is high
enough, if the maximum strength
level of this device does meet your
requirements, you may moisten the massage
points with a little clean
water to enhance the effect.
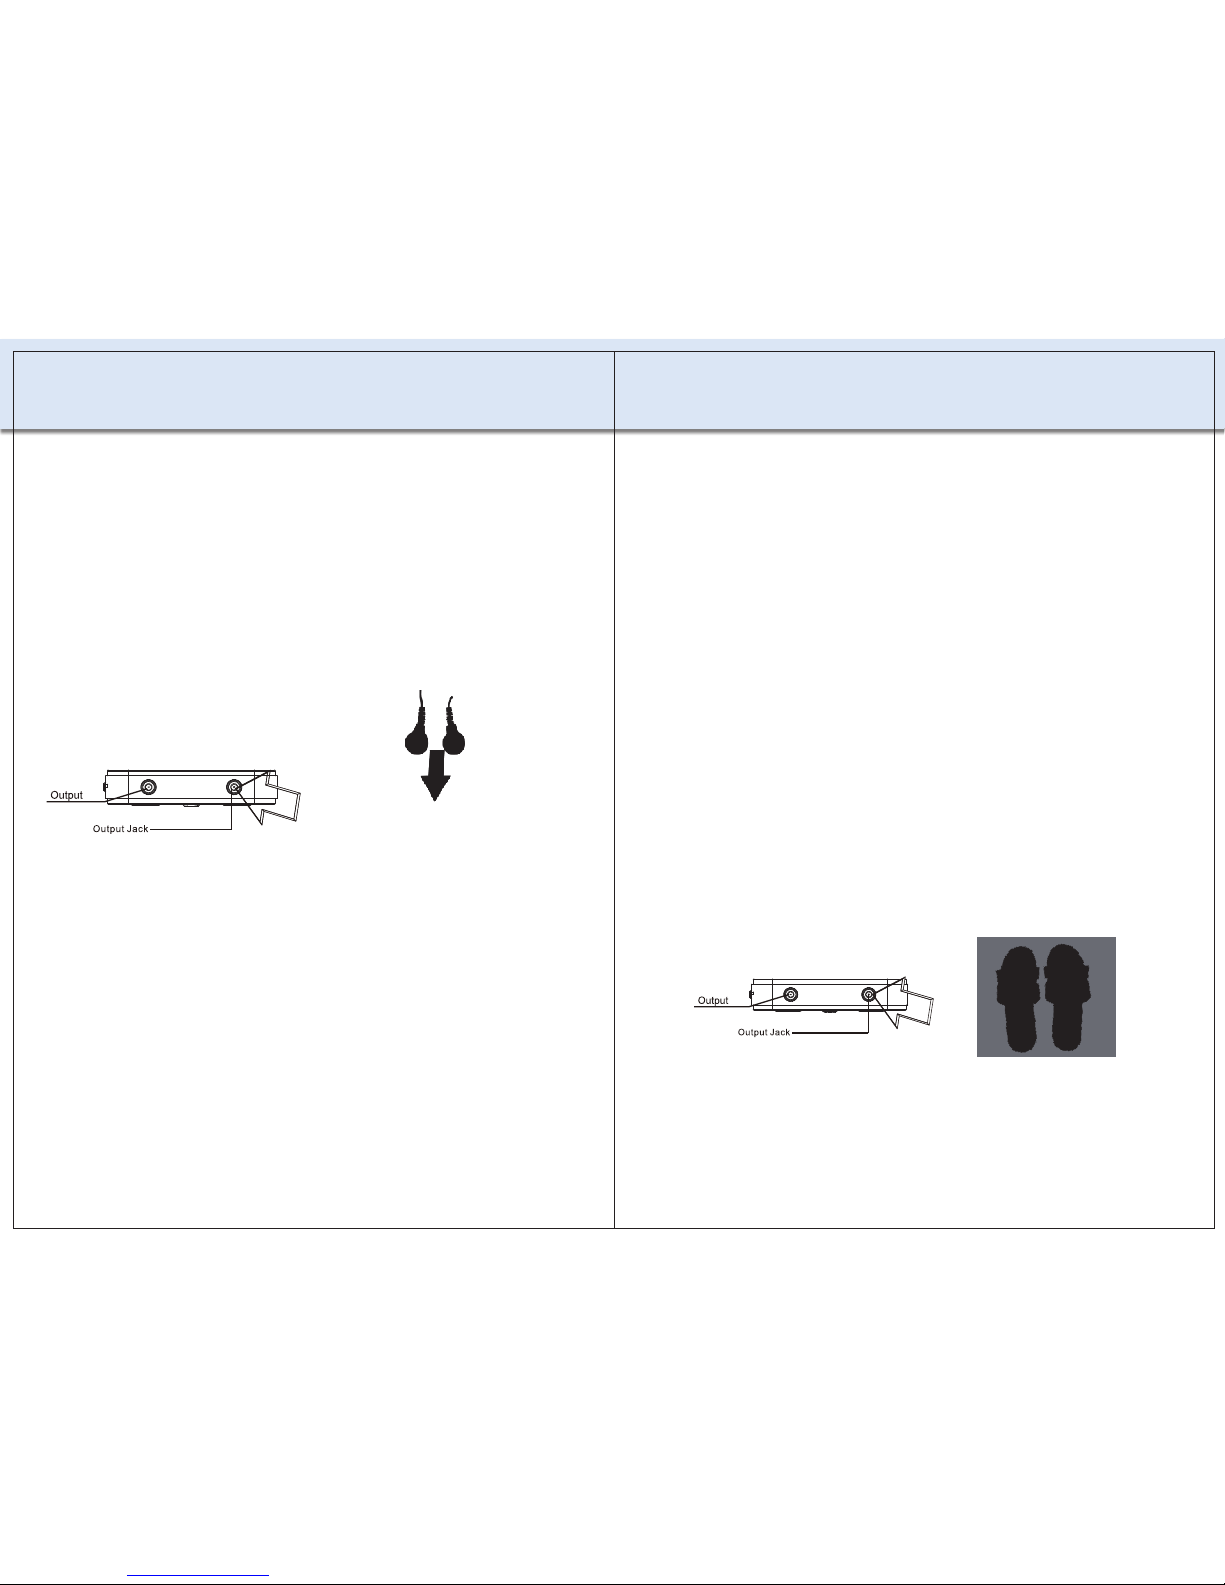
MASSAGE SHOES INSTRUCTIONS
Snap on the wire to the shoes and the other end of the auxiliary wire
to bottom of the controller.
Place bare feet into the massager shoes.
Operate the controller to massage your feet(please refer to the
Operating Instructions of the controller)
9 10
electric wave (near TV set or speakers).
7. Do not place the devices in areas of high temperature,
highhumidity, or under direct sunlight.
8. Keep the device out of reach of children.
9. All worn accessories should be dealt according to the regulations.
MASSAGE PADS OPERATING INSTRUCTION
1.Connect the pads to the wire by snapping them in place( picture 1)
2.Plug the connection wires into the output jack at the bottom of the
controller (picture 2).
3.Clean the skin prior to application of the pads; this will remove
any body oil, cosmetic or dirt.
4.Peel off the protective film from pads (keep the protective film to
reuse).
5.Apply the pads on your body you want to massage. The unit
cannot operate unless both pads are applied.
6.Use controller as previous instructed.
ABDOMINAL & LOWER BACK BELT
With recommended use of 30 minutes per day.
Features
1.Combining designing of soft and hard materials make the
abdominal & lower back belt, comfortable, flexible, breathable and
durable.
2.Large contacting surface makes the belt easily to use.
Functions
1.Eliminating fatigue of arms, waist abdomen and legs.
2.Is specifically designed to give optimum relief for the lower back.
Safety Precautions
1.Do not use the belt if you have heart disease.
2.Do not apply the belt over the neck or mouth, as severe muscle
spasms of the laryngeal and pharyngeal portion muscle s may occur.
3.Do not use the belt over head or chest.
4.Do not apply the belt over infected or irritated skin areas.
5.Do not use the belt during pregnancy.
6.A 30-minutes daily routine is recommended.
7.Keep the belt out of reach of children
Cautions
The belt should be cleaned regularly with warm water. Discoloration of the
conductive
area is, however, normal. Do not wash the belt in the
washing machine nor use fabric conditioner to wash.
Check the belt before every use.
ABDOMINAL & LOWER BACK BELT OPERATING
INSTRUCTIONS
1.Connect the belt and place the belt where needed.
2.Press the two snap connectors at the end of the auxiliary wire
respectively on either button found beneath the cloth in which the
C Relief
logo is printed.
3.Insert the other end of the auxiliary wire into the output jack found
at the bottom
of controller.
4.Turn on controller.
MASSAGE SHOES
C Relief
Massage Shoes are high-Tech product. Regular and
lasting use can relieve fatigue and enhance circulation.
Features
1.Combination of soft and hard material makes the massage
shoes flexible,
comfortable and durable.
Functions
1.Patients with heart disease, hypertension, calf pain and
women who are
pregnant are prohibited from using the massage
shoes, People with unexplained
joint and muscle inflammation
within 72 hours of using massage shoes should
consult a doctor.
2. Not allowed for children usage
3. Do not operate this product in wet places such as
bathing/showering.
4. Do not attempt to disassemble or repair.
Cautions
When massaging, please keep the points and the massage shoes
clean.For most
users the output strength of this machine is high
enough, if the maximum strength
level of this device does meet your
requirements, you may moisten the massage
points with a little clean
water to enhance the effect.
MASSAGE SHOES INSTRUCTIONS
Snap on the wire to the shoes and the other end of the auxiliary wire
to bottom of the controller.
Place bare feet into the massager shoes.
Operate the controller to massage your feet(please refer to the
Operating Instructions of the controller)
11

6. Package
Controller
Small oval shape pads 1 pair
Palm-shape pads 1 pair
Charger (USB port, 100-240V
50/60Hz automatically adjusted)
Output cord 2 pcs
USB extension cord 1 pc
Meridians figure 1 pc
User’s manual 1 pc
1 unit
1 unit
Name of product THE ELITE SET
Model No. CR-1360
Power/voltage 3.7V
Output current 84MA
Strength level
adjustment
20 sections
Mode 24 modes
Frequency 1-110HZ
5. Specifications

Table of contents
Other C RELIEF Massager manuals


