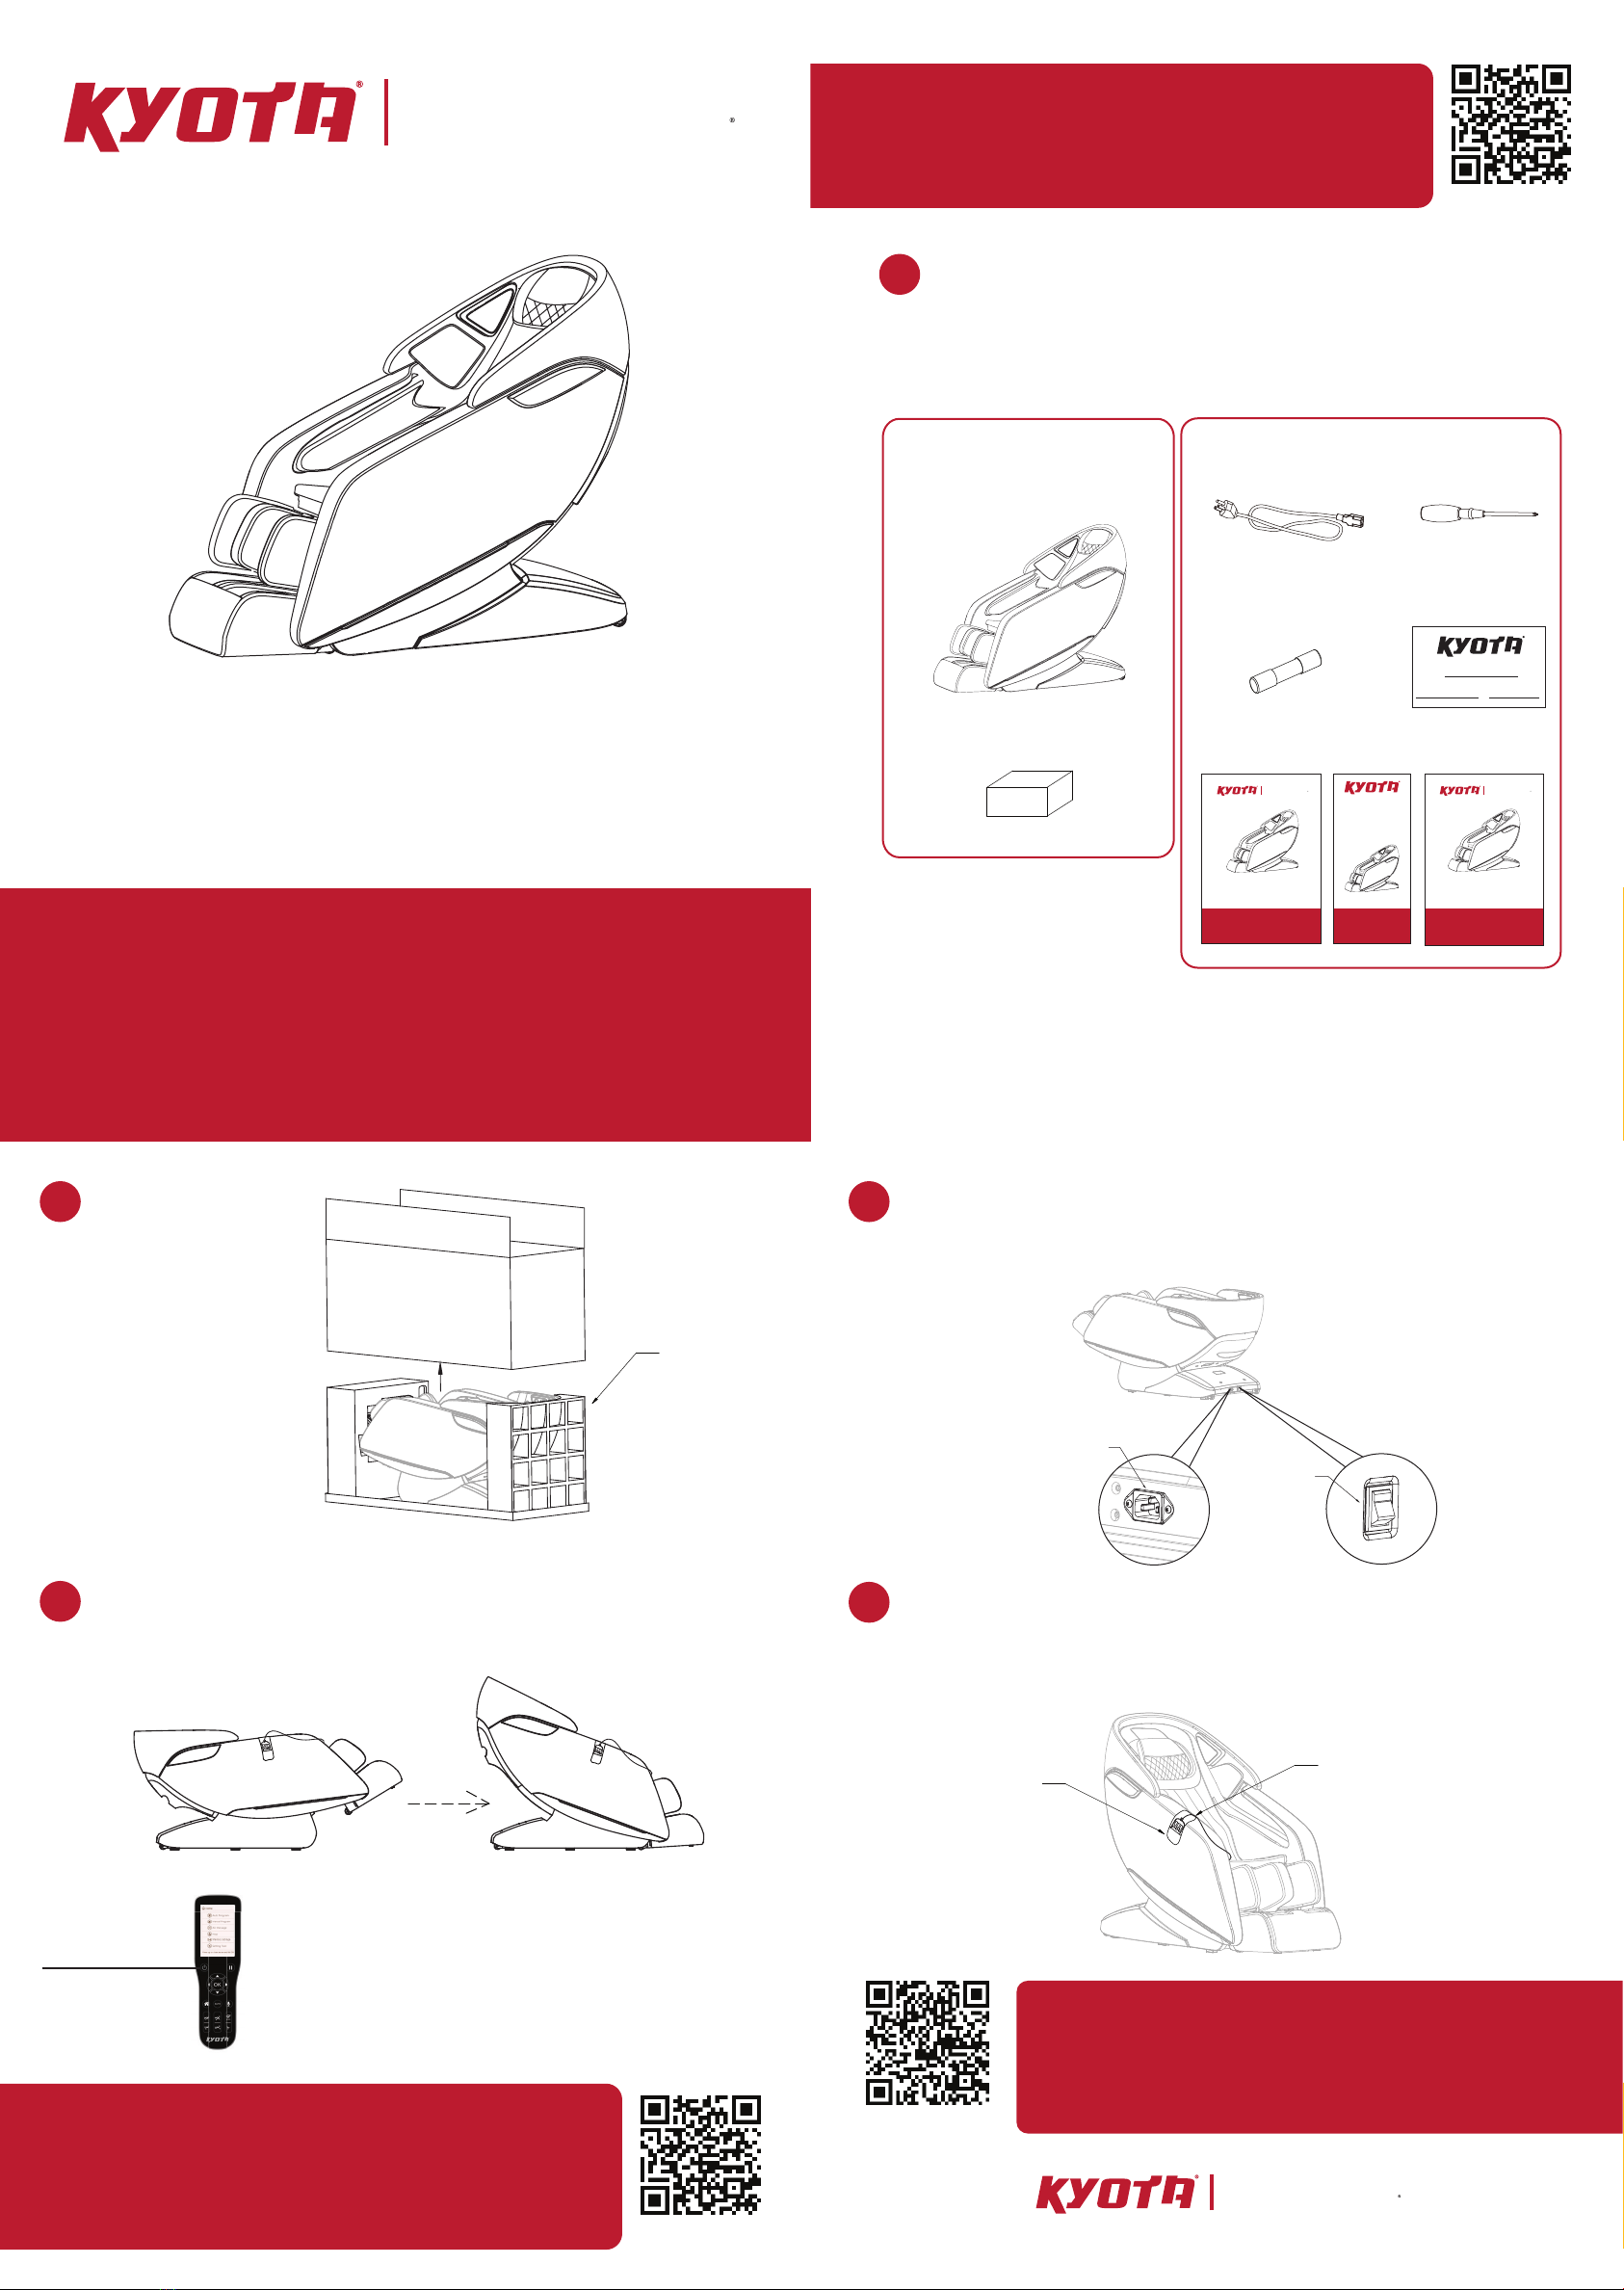
manuals.online logo
Brands
  1. Home
  2. •
  3. Brands
  4. •
  5. KYOTA
  6. •
  7. Massager
  8. •
  9. KYOTA Genki M380 User manual

KYOTA Genki M380 User manual

2Step 2:
Open the box and
remove packaging
materials. Remove
protective covering
from the chair. Packaging
materials
Step 3:
Connect the chairs power cord to a grounded 110V electrical outlet and
plug it into the respective port on the back side of the base of the chair.
Flip the main power switch on.
3
Power cord port
Main power
switch
Step 4:
Press the power button on the remote control once to turn on,
then once more to bring the chair into upright position.
4
SCAN CODE
The Genki massage chair is 29.5" wide and will pass thru doorways 30"
(may need to remove door) or greater. Though not recommended, you
can further reduce the chair width to 28.82" by removing the arm panels.
Go to https://kyotamassagechairs.com/assembly-tutorials for Arm
panel removal instructions. Alternatively, scan the QR code to go directly
to the URL above. 72 Stard Road, Seabrook, NH 03874 | (800) 242-0761 | www.kyotamassagechairs.com
Version 2.4
Review chair for smooth operation. If things are not operating
correctly, review all assembly steps. Call Kyota support at
800 242-0761 if you need live US-based support.
You are done; time for a Massage!
Power on the
remote and select
AUTO program to
start a session.
SCAN CODE
Register your product at www.kyotamassagechairs.com/
warranty/registration to ensure it is in our system.
This will simplify the warranty process should you ever need it.
Alternatively, scan the QR code to go directly to the URL above.
Step 5:
To attach the remote control pouch, locate the velcro tab located under
the top of the right arm panel and attach the pouch so that it hangs off
the outer edge of the armrest. Your chair is now complete. Sit in and
enjoy the comfort of your new Kyota massage chair.
5
The World’s Most
Advanced Massage Chairs
Register now to take full advantage of your
four year limited warranty at:
www.kyotamassagechairs.com/Warranty
Full owners manual
available at:
www.kyotamassagechairs.com/Manual
For additional assistance
visit our website at:
www.kyotamassagechairs.com
Or call: 1-800-242-0761
Philips Screw
Driver
Power Cord
Accessory Bag
Warranty
Card
Box 1:
Chair Body &
Accessory Bag
Accessory Bag
Chair Body
Quick Start
Guide
Genki M380
Massage Chair
Assembly Guide
Genki M380
Massage Chair
1Step 1:
Carefully check box contents to the detail below, making sure all
contents are accounted for.
If anything is missing, please contact Kyota Massage Chairs
at 800 242-0761. Do not return to the place of purchase.
SCAN CODE
Before assembling your chair, watch an assembly video at:
www.kyotamassagechairs.com/assembly-tutorials
Alternatively, scan the QR code to go directly to the URL above.
Genki M380
Massage Chair
User Manual
The World;s Most
Advanced Massage Chairs
The World’s Most
Advanced Massage Chairs
Assembly Guide
Genki M380
Massage Chair
The World’s Most
Advanced Massage Chairs
Remote
control pouch
Velcro tab
Spare
Fuse
Step 1:
Using the remote control, press the foot adjust button to raise footrest all
the way up. Locate the hand wheel on the inside of the arm panel,
underneath the footrest and unscrew completely. Once hand wheel is
removed, use the remote control to lower footrest all the way back down.
1Step 2:
To remove the back cover of the chair, use the screwdriver provided to
unscrew the four back cover bolts. Once unscrewed, take off the back cover.
2
Step 3:
Locate the hand wheel located inside the chair body towards the top of
the arm panel. Unscrew completely.
3Step 4:
Locate and unattach the airtubes and electrical wiring located inside the
chair body. See diagram for reference.
4
Removing both arm panels will reduce the overall chair width from 29.5 inches to 28.82 inches.
Step 7:
Align and connect the two arm panel clips to the
hinges on the side of the chair body (location of
arm panel clips shown in step 6).Screw in the
two arm panel hand wheels - one in the footrest
well (see step 1 for location), one inside the back
of the chair body (see step 3 for location), then,
using the screwdriver provided, screw in the arm
panel bolt underneath the shoulder airbag cover
(see step 5 for location).
7Step 8:
Connect the arm panel airtubes and electrical
wiring found inside the back of the chair body (see
step 4 diagram for reference). Reattach the chair
body back cover to the chair body and fasten by
screwing in the back cover bolts (see step 2 for
location of back cover bolts).
8
To re-attach the arm panels...
left armrest in-take tube
left solenoid valve (white)
left LED light wire (red)
USB cable (yellow)
STEP 5:
Locate the shoulder airbag and unzip the shoulder airbag cover. Using
the screwdriver provided, unscrew the arm panel bolt inside the shoulder
airbag cover.
5STEP 6:
To unattach the arm panel from the chair body, get a good hold of the arm
panel and pull directly outwards, away from the chair.
6
Footrest
Hand wheel
Back cover
bolts
Back cover
Hand wheel
Shoulder airbag
cover zipper
Arm panel bolt
Shoulder airbag
Arm panel
Arm panel clip
Arm panel clip
Genki M380 Massage Chair – Arm Panel Removal Instructions
72 Stard Road, Seabrook, NH 03874 | (800) 242-0761 | www.kyotamassagechairs.com
Version 2.4
The World’s Most
Advanced Massage Chairs®

Other manuals for Genki M380

1

Other KYOTA Massager manuals

KYOTA Genki M380 User manual

KYOTA

KYOTA Genki M380 User manual

KYOTA Kansha M878 4D User manual

KYOTA

KYOTA Kansha M878 4D User manual

KYOTA Nokori M980 User manual

KYOTA

KYOTA Nokori M980 User manual

KYOTA Nokori M980 User manual

KYOTA

KYOTA Nokori M980 User manual

KYOTA Yutaka M898 User manual

KYOTA

KYOTA Yutaka M898 User manual

KYOTA M680 User manual

KYOTA

KYOTA M680 User manual

KYOTA Kokoro M888 4D User manual

KYOTA

KYOTA Kokoro M888 4D User manual

KYOTA M868 Yosei 4D User manual

KYOTA

KYOTA M868 Yosei 4D User manual

KYOTA Kofuko E330 User manual

KYOTA

KYOTA Kofuko E330 User manual

KYOTA Yugana M780 User manual

KYOTA

KYOTA Yugana M780 User manual

Popular Massager manuals by other brands

Medicare Technology comfy diamond Owner's handbook

Medicare Technology

Medicare Technology comfy diamond Owner's handbook

truMedic InstaShiatsu+ MC-750 installation guide

truMedic

truMedic InstaShiatsu+ MC-750 installation guide

SPARTAN sport 2778 operating manual

SPARTAN sport

SPARTAN sport 2778 operating manual

iRest C58S Operation instructions

iRest

iRest C58S Operation instructions

iComfort IC0906 user manual

iComfort

iComfort IC0906 user manual

GESS SKINNY CHIN manual

GESS

GESS SKINNY CHIN manual

HoMedics GSF-500H-EU instruction manual

HoMedics

HoMedics GSF-500H-EU instruction manual

Cenocco CC-9113 user manual

Cenocco

Cenocco CC-9113 user manual

HoMedics FM-10 instruction manual

HoMedics

HoMedics FM-10 instruction manual

Scarlett VitaSpa SC-FM20101 instruction manual

Scarlett

Scarlett VitaSpa SC-FM20101 instruction manual

HoMedics HMC-500 installation manual

HoMedics

HoMedics HMC-500 installation manual

Thomashilfen MiS ThevoautoActiv Instructions for use

Thomashilfen

Thomashilfen MiS ThevoautoActiv Instructions for use

ENJOY SJJ-7087 operating guide

ENJOY

ENJOY SJJ-7087 operating guide

Konig HC-MS70 manual

Konig

Konig HC-MS70 manual

HoMedics FBV-100 Instruction manual and  warranty information

HoMedics

HoMedics FBV-100 Instruction manual and warranty information

ReFa ACTIVE FIT instruction manual

ReFa

ReFa ACTIVE FIT instruction manual

KRHÜNER 52557 instruction manual

KRHÜNER

KRHÜNER 52557 instruction manual

PROZIS mini Quaik user manual

PROZIS

PROZIS mini Quaik user manual

manuals.online logo
manuals.online logoBrands
  • About & Mission
  • Contact us
  • Privacy Policy
  • Terms and Conditions

Copyright 2025 Manuals.Online. All Rights Reserved.