C-Tel CPS-Z User manual


Chap 1 Brief Introduction & Features..............................................................................................................................................3
1.1 System Overview................................................................................................................................................................3
1.2 Features ..............................................................................................................................................................................3
Chap 2 Installation & Connection....................................................................................................................................................4
2.1 System Appearance ............................................................................................................................................................4
2.2 Technical Parameter............................................................................................................................................................5
2.3 Attention.............................................................................................................................................................................5
2.4 Warning ..............................................................................................................................................................................5
2.5 Installation procedure.........................................................................................................................................................6
2.5.1 Connecting C.O. lines & extensions to the unit:......................................................................................................6
2.5.2 Zero-load power-on inspection:...............................................................................................................................6
2.6 Direct Access when Power Failure.....................................................................................................................................6
Chap 3 System programming...........................................................................................................................................................7
3.1 Before programming ..........................................................................................................................................................7
3.2 Basic Command..................................................................................................................................................................7
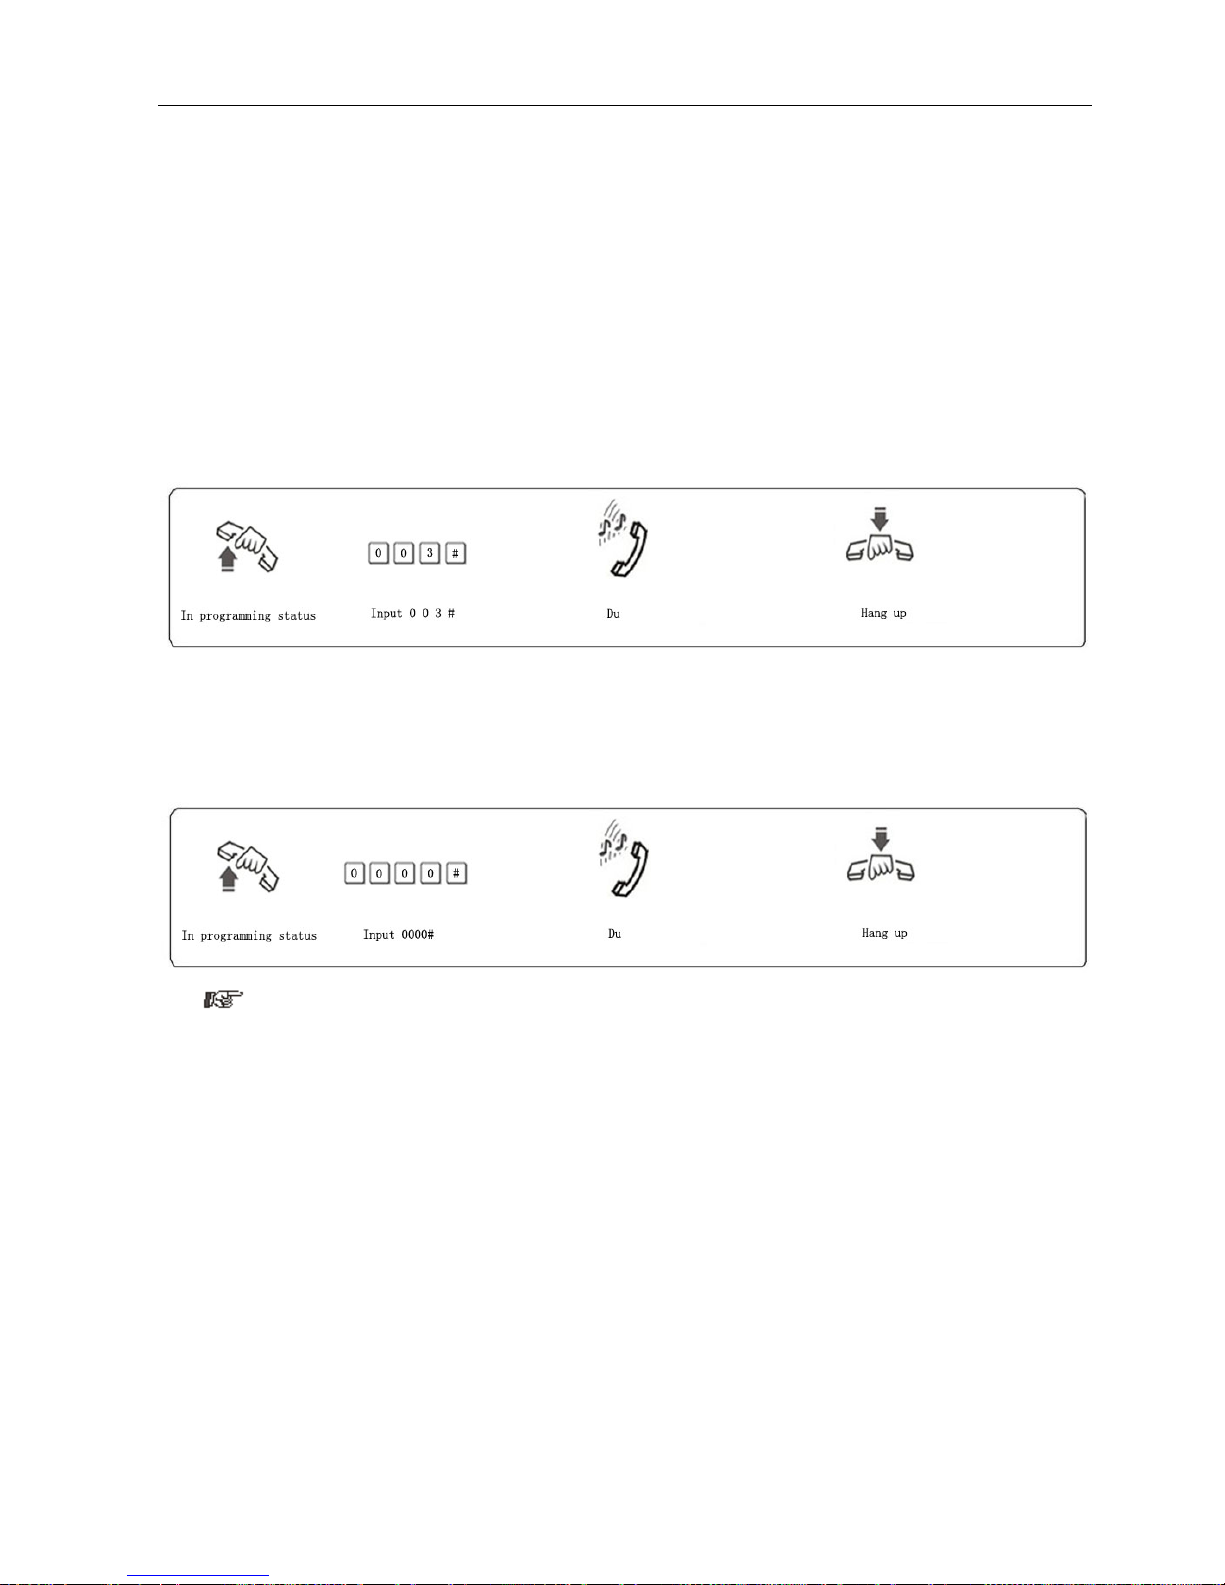
3.2.1 Enter into System Programming Status...................................................................................................................7
3.2.2 Flash Time Setting...................................................................................................................................................8
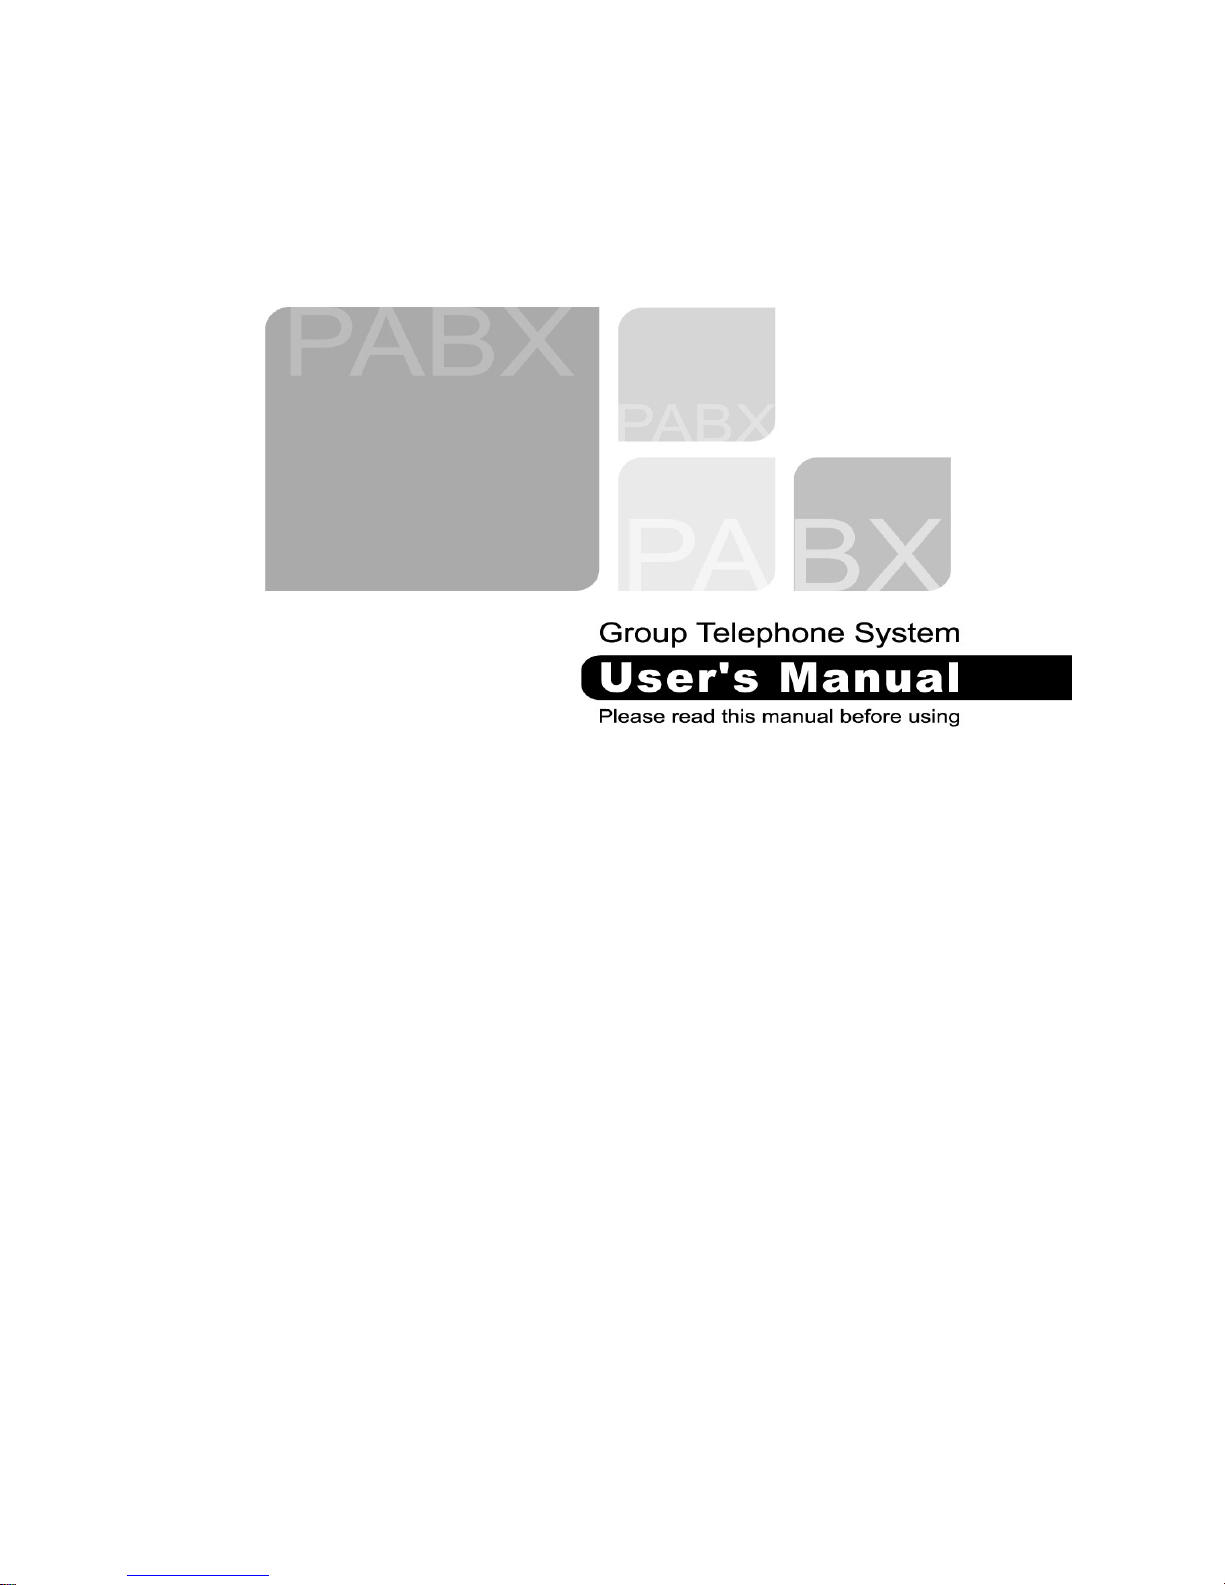
3.2.3System Return to Default Setting.............................................................................................................................8
3.3 Enable/Disable C.O. Lines .................................................................................................................................................8
3.3.1 EnableAll C.O. Lines..............................................................................................................................................8
3.3.2 DisableAll C.O. Lines.............................................................................................................................................9
3.3.3 Enable No. M C.O. Line (except 108)...............................................................................................................9
3.3.4 Disable No.M C.O. Line (except 108).....................................................................................................................9
3.4 Setting Operating mode (except 108).................................................................................................................................9
3.4.1 SettingAuto-attendant Mode (OGM) forAll C.O. Lines........................................................................................9
3.4.2 Setting Operator Mode forAll C.O. Lines.............................................................................................................10
3.4.3 SettingAuto-attendant Mode (OGM) for Certain C.O. line..................................................................................10
3.4.4 Setting Operator Mode for Certain C.O. line.........................................................................................................10
3.5 OGM (Outgoing Message) (except 108)..........................................................................................................................11
3.5.1 OGM (Outgoing Message) Recording...................................................................................................................11
3.5.2 Monitoring the recorded OGM..............................................................................................................................11
3.6 Monitoring the Holding Music (except 108)....................................................................................................................11
3.7 Setting Operator and Ring Ext..........................................................................................................................................12
3.7.1 Setting Operator (except 108).........................................................................................................................12
3.7.2 Assign Ringing Extensions for Certain C.O. Line.................................................................................................12
3.7.3 Disable Ringing Ext. for Certain C.O. Line ..........................................................................................................12
3.7.4 DisableAll Exts Ringing for Certain C.O. Line....................................................................................................12
3.8 Auto-attendant Mode no Answer Process (except 108)....................................................................................................13
3.8.1 Cut off C.O. Line...................................................................................................................................................13
3.8.2 Transfer to Operator...............................................................................................................................................13
3.9 Dialing-out Mode Setting.................................................................................................................................................13
3.9.1 Set Indirect-Dialing-Out Mode forAll Exts..........................................................................................................13
3.9.2 Set Indirect-Dialing-Out Mode for Certain Ext.....................................................................................................13
3.9.3 Set Direct-Dialing-Out Mode forAll Exts.............................................................................................................14
3.9.4 Set Direct-Dialing-Out Mode for Certain Ext. ......................................................................................................14
3.10 Call Restriction-Class Assignment.................................................................................................................................14
3.10.1 Class Assignment for All Extensions...................................................................................................................14
3.10.2 ClassAssignment for Certain Extension .............................................................................................................15
3.11 Setting Restriction Item (A/B)........................................................................................................................................15
3.11.1 Setting Restriction Item A....................................................................................................................................15
3.11.2 Clear Restriction Group of ItemA.......................................................................................................................16
3.11.3 ClearAll Restriction of Item A............................................................................................................................16
3.11.4 Setting Restriction Item B....................................................................................................................................16
3.11.5 Clear Restriction Group of Item B.......................................................................................................................17
3.11.6 Clear All Restriction of Item B............................................................................................................................17
3.12 Assign Special Calling-out Number...............................................................................................................................17
3.12.1 Assign Special Calling-out Number for Class 0..................................................................................................17
3.12.2 Clear Permission of Certain Group......................................................................................................................17

3.12.3 Clear All Permission............................................................................................................................................17
3.13 Calling Time Restriction Setting / Clear.........................................................................................................................18
3.13.1 Calling Time Restriction Setting .........................................................................................................................18
3.13.2 Clear Calling Time Restriction............................................................................................................................18
3.14 Allow Ext. to Use Certain C.O. Line / Restrict (except 108)..........................................................................................18
3.14.1 AllowAll Exts to Use Certain C.O. Line.............................................................................................................18
3.14.2 Allow Certain Ext. to Use Certain C.O. Line ......................................................................................................19
3.14.3 Restrict Certain Ext. to Use Certain C.O. Line....................................................................................................19
3.15 Flexible coding...............................................................................................................................................................19
3.15.1 Assign Extension Number (Freely Change the Exts. Number) ...........................................................................19
3.15.2 Restoring Original Extension Numbers...............................................................................................................20
Chap 4 Operating Instruction .........................................................................................................................................................21
4.1 Outward Call ....................................................................................................................................................................21
4.1.1 Outward Dialing 9 First (or Dialing Directly).......................................................................................................21
4.1.2 Outward Call by Choosing a Certain Line(except 108)...................................................................................21
4.1.3 Automatically Callback when Busy(except 108).............................................................................................22
4.2 Intercom Call....................................................................................................................................................................22
4.2.1 Intercom Call at Indirect-Dialing-Out Mode.........................................................................................................22
4.2.2 Intercom Call at Direct-Dialing-Out Mode ...........................................................................................................22
4.3 Answering call..................................................................................................................................................................23
4.3.1 Answering Calls at Operator Mode .......................................................................................................................23
4.3.2 Answering Calls at Auto-attendant Mode(except 108).....................................................................................23
4.3.3 Call Pick Up ..........................................................................................................................................................23
4.4 C.O. Line Reservation (except 108).................................................................................................................................23
4.5 Call Transfer.....................................................................................................................................................................24
4.6 Secretary Function (Outgoing Call Transfer Function)....................................................................................................24
4.7 Three Way Conference (1 C.O. Line and 2 Exts).............................................................................................................25
4.8 Call Forwarding (except 108)...........................................................................................................................................25
4.8.1 Setting Call Forwarding Directly...........................................................................................................................25
4.8.2 Clear Setting Call Forwarding Directly.................................................................................................................25
4.8.3 Call Forwarding When Ext is Busy or Nobody Available.....................................................................................26
4.8.4 Clear Setting Call Forwarding When Ext is Busy.................................................................................................26
4.9 Inquiry Functions (except 108).........................................................................................................................................26
4.10 Call All Extension (except 108)......................................................................................................................................26
4.11 Priority Access and Monitoring......................................................................................................................................27
4.12 Connect with Operator Directly (except 108).................................................................................................................27
4.13 Setting Don’t Disturb / Clear (except 108).....................................................................................................................27
4.13.1 Setting Don’t Disturb...........................................................................................................................................27
4.13.2 Clear Don’t Disturb .............................................................................................................................................27
Chap 5 Maintenance & Troubleshooting........................................................................................................................................28
5.1 Outgoing calls can’t be made ...........................................................................................................................................28
5.2 Outside calls can’t dial in .................................................................................................................................................28
5.3 Intercom can’t be made ....................................................................................................................................................28
Chap 6 Glossaries...........................................................................................................................................................................29
Chap 7 Default Settings..................................................................................................................................................................29
Chap 8 System Programming & Operation Instruction..................................................................................................................30
8.1 Index of Basic Operation..................................................................................................................................................30
8.2 Index of system programming..........................................................................................................................................31
2

Chap 1 Brief Introduction & Features
1.1 System Overview
With its design and manufacture according to G.712 and G.732 protocols of CCITT, the system integrates virtues of
various KTSs with advanced functions of PABX, and has unique advantage in innovation. As a type of new generation with
over 50 powerful functions for business and management, it has wide application in offices, enterprises, hotels……etc. In a
word, it is a ideal equipment for users to better communication conditions, improve work efficiency, control call fee payment,
and make office intelligent come true.
1.2 Features
1. Top-quality elements of system hardware, ISO 9000 standard, excellent circuit design. So a complete system is
of advanced technology and high integrated level.
2. Programming can be made by regular phone
3. Other normal functions:
●DirectAccesswhenPowerFailure ● Ringing Identify
●MemoryProtectwhilePowerOff ● CallPickup
●Call Transfer ● Music on holding
●FlashTimeChoice ● Outgoing Call Transfer
●Auto/Operator Mode (except 108)● Three Way Conference
●OutgoingMessageRecording (except108) ● C.O. Line Reservation(except 108)
●CallForwarding (except108) ●Operator Setting(except 108)
●AutoReportExt.Num(except108) ●Ringing Ext. Assign
●CallAllExtensions (except108) ●Multiple Dial-out Mode
●Priority Access and Monitoring ● Call Restriction Class
●DonotDisturb (except108) ● Assign Special Call out Number
●C.O.LineBooking(except108) ● Call Duration Control
● C.O.LineCallerID ● C.O. Line Group (Assign Ext. to C.O.)
● RemoteProgramming ●Flexible Coding (Change Ext. No.)
3

Chap 2 Installation & Connection
Before Installation
For easy and quick installation and connection, it is strongly recommended that the user read and follow the following
instruction carefully so as not to damage the system accidentally by incorrect operation.
2.1 System Appearance
Front View
Rear View
206 Rear View
308 Rear View
4

2.2 Technical Parameter
Power Supply Voltage ----------------AC 220V or AC 110V, 50-60Hz
Power Dissipation ----------------------≤20VA
Exchange Mechanism-----------------Analog spatial division
Type of Telephone-----------------------Dual Tone Multi-Frequency
Communications Lines------------------108---2(1 for Ext.,1 for CO line); 206---3; 308---7
IC Power Supply ------------------------±5V
Distortion ---------------------------------≤10%
Ringing Voltage -------------------------AC 70V±10% 50HZ
Crosstalk Attenuation -----------------≧70 dB
Transmission Loss---------------------- 0.37 dB
2.3 Attention
Please pay attention to the important items of installation:
1. The telephone exchange shall be installed in a stable indoor place with dry, ventilated environment. (Temperature
Range: 0-45 , Humidity Range: 20%℃-80%.Avoid straight sun shine or in the environment of flammable or caustic gas.)
Special telephone wire is preferable.
2. A marginal space around the exchange should be remained for heat sink, inspection and maintenance of the system.
3. A wall bore is available at the underside of mainframe for wall installation. Desk installation is also admitted. But the
contact of wall bolt and circuit board inside the mainframe should be avoided.
4. Please keep the exchange away from other equipment producing large electromagnetic disturbance (such as motor
and large transformer).
5. None of the wiring of any extension should share the pipeline with power supply or antenna. Neither should the
extension be close to antenna for air broadcasting (including short-wave).
6. Avoid damaging the power-supply cable. Keep it away from water. Encountering the leakage of water cut off the power
immediately.
7. Please don't impact or shake the exchange at any situation. Don't remove the exchange in working status.
8. If the wiring pipeline of the extension is disturbed by electromagnetic wave while substitution is unavailable in site,
special insulating wire for communication is suggested for substitution, also, the insulating net of which should be
grounded.
2.4 Warning
1. The wiring should not be done in thundering.
2. Avoid using telephone in thundering.
3. Please don't use the telephone in flammable and leaking gas environment.
4. Unless the equipment is disconnected, please don't touch the broken part of the wiring or any connection ends.
●Note: Lightning stroke is an accident, which will not be regarded as normal maintenance.
5

2.5 Installation procedure
2.5.1 Connecting C.O. lines & extensions to the unit:
1. Please connect the monomer-crystal with EXT. line and C.O. line separately;
2. Make sure to avoid short circuit.
3. Connecting extensions according to the in-dilated extension positions and C.O. lines to the corresponding line
ports on the unit.
2.5.2 Zero-load power-on inspection:
1. The operation voltage of this product is AC220V or AC110V. Check out the voltage of local power supply. A UPS
backup is highly recommended.
2. Plug in the power supply line, indicating normal power supply and working state of the machine.
3. Pick up the handset of extension 11. A sharper internal dial tone indicates that the system is working normally. You
can start to setup operation now.
2.6 Direct Access when Power Failure
The C.O. lines will be connected direct to the special Exts automatically when the power failure. The No.1 C.O.
line will be connected to Ext. 11 and No.2 to Ext.12, No.3 to Ext.13, So you only can use the Three Exts as normal
phone with direct C.O. line (206: Only No.1 C.O. line can be connected to Ext.11 directly, i.e. No.2 C.O. line
cannot be connected directly when there is power failure.)
For example when someone call in with No.1 C.O. line at the time of power failure, the Ext.11 will ring, you can
only pick up Ext. 11 and talk with the caller.
6

Chap 3 System programming
3.1 Before programming
●All the programming must be carried out on the extension 11, 12, 13, 14; all the programming must
be into system programming status.
●All the extensions must be of dual tone multi-frequency phone.
●You are allowed to operate one by one, and end the process by simply pressing #. You don’t have to
hang up if something wrong occurs, you could press * to restart.
●If programming-extension (11,12,13,14) is in Direct-Dialing-Out mode, you need to press * to enter
the internal system, then start programming.
●When the setting is finished, a long beep indicates that the setting is done correctly and saved in the
system. If instead an array of short chirps is heard, that would indicate an error occurred in the setting.
You need to check it out and reset the system. It is only after the end of the long beeps you can
continue another system operation.
●You must use “enable C.O. lines” command according to the actual trunk lines before using this
product, if you don’t enable any C.O. line, the system will consider there is no C.O. line and doesn’t
auto detect C.O. line (In default setting: 108 is in Enable status;206/308 are in Disable status)
How to programming
At first you must according 3.2.1 instruction enter into system programming status, and then you can
begin to program as the following instruction.
3.2 Basic Command
3.2.1 Enter into System Programming Status
Format: # *
Example: For programming the system, you should enter # * first.
1. You are required to dial: *#* in the Direct-Dialing-Out mode.
2.In default setting, 108 is Direct-Dialing-Out mode and 206/308 is Indirect-Dialing-Out mode .
3. Programming telephone is EXT11, or EXT.12, or EXT.13, or EXT. 14
7

3.2.2 Flash Time Setting
Format: 00F #
F=1 ---------0.8s
F=2 ---------1.0s
F=3 ---------1.2s
F=4 ---------1.5s
F=5 ---------1.8s
Explanation: F means the flash time.
Description: For active the hold and divert operating use.
In default setting: F=2 (1.0s)
Example: Set the flash time to 1.2S
3.2.3System Return to Default Setting
Format: 0000 #
Description: The system will restart with the default factory setting.
The command has no effect on the status of enabling/disabling C.O. line.
3.3 Enable/Disable C.O. Lines
You must use these commands according to the actual trunk lines before using this
product!!! If you don’t enable any C.O. line, the system will consider there is no C.O. line and
doesn’t auto detect C.O. line!!!
3.3.1 Enable All C.O. Lines
Format: 0600#
Description: Enable all C.O. lines
8

In default setting: 108 is in Enable status; 206/308 are in Disable status
3.3.2 Disable All C.O. Lines
Format: 0610#
Description: Disable all C.O. lines
3.3.3 Enable No. M C.O. Line (except 108)
Format: 060M#
Explanation: M: C.O. line No. M = 1 - 3
Description: Enable the M C.O. line
Example: You have 308 model product, you want use C.O. line 1 and C.O. line 2, and the line 3 is not in use.
3.3.4 Disable No.M C.O. Line (except 108)
Format: 061M#
Explanation: M: C.O. line No. M = 1 - 3
Description: Disable the M C.O. line
3.4 Setting Operating mode (except 108)
3.4.1 Setting Auto-attendant Mode (OGM) for All C.O. Lines
Format: 1 0 #
Description: allows all the C.O. lines in Auto-attendant Mode (DISA --Direct Inward System Access status). In this mode,
Caller will hear the OGM recorded message, while all extensions are in MUTE mode
9

1. If the caller doesn’t know the extension number, he cans inquiry the operator by dialing “0”.
2. Outgoing Message must be record when setting this mode.
3.4.2 Setting Operator Mode for All C.O. Lines
Format: 11#
Description: Allows all the C.O. lines in Operator mode. In this mode, the operator extensions and other ringing
extensions will ring when an incoming call is received.
3.4.3 Setting Auto-attendant Mode (OGM) for Certain C.O. line
Format: 10M #
Explanation: M: C.O. line No.1-No.3
Description: allows the No.M C.O. lines in Auto-attendant Mode (DISA --Direct Inward System Access status).
Example: Set C.O. line 2 and 3 in Auto-Attendant mode, other C.O. line in operator mode.
1. If the caller doesn’t know the extension number, he can inquiry the operator by dialing “0”.
2. Outgoing Message must be record when setting this mode.
3.4.4 Setting Operator Mode for Certain C.O. line
Format: 11M#
Explanation: M: C.O. line No.1-No.3
Description: allows the No.M C.O. line in Operator mode.
Example: Set C.O. line 1 and 3 in operator mode, other C.O. line in Auto-attendant mode.
10

3.5 OGM (Outgoing Message) (except 108)
3.5.1 OGM (Outgoing Message) Recording
Format: 12 #
Description: Used to record an outgoing message for Direct Inward System Access (DISA).
1. The recording time is a maximum of 12 seconds, “du” is heard to start recording and another “du” to end
recording;
2. The new message will overwrite the old one;
3. Please use high quality telephone to ensure high quality of recording;
4. If the caller dials a number before the system finishes playing the message, the system will terminate
playing the message, waiting for the caller to complete dialing;
5. The caller will be connected to operator if he dials 0 first for inquiry;
3.5.2 Monitoring the recorded OGM
Format: 13 #
Description: Confirms the recorded message in the OGM recording program, you can check if the recording is satisfied
or not, if not, you can record again.
3.6 Monitoring the Holding Music (except 108)
Format: 14 #
Description: Perform the music on holding melody or test the quality of telephone unit.
11

3.7 Setting Operator and Ring Ext.
3.7.1 Setting Operator (except 108)
Format: 15N #
Explanation: N: the Ext. line No., N=1-8
Description: To assign any Ext as the operator. In the default setting, Ext12 is the operator.
Example: Setting Ext.12 as operator
In operator mode, this programming doesn’t change the ringing extension assignment
3.7.2 Assign Ringing Extensions for Certain C.O. Line
Format: 3MN0#
Explanation: M: the C.O. line No. M=1 – 3; N: the Ext. line No. N= 1 - 8
Description: In operator mode when calling of No.M C.O. line come in, Exts N will ring at the same time.
Default setting: 108---All Exts will ring; 206/308--- Ext. 11 and Ext.12 will ring.
3.7.3 Disable Ringing Ext. for Certain C.O. Line
Format: 3MN1#
Description: Disable Exts N ring when calling of No.M C.O. line come in.
3.7.4 Disable All Exts Ringing for Certain C.O. Line
Format: 3M#
Description: Disable all Exts ring when calling of No.M C.O. line come in.
Example: Setting 16 and 17 ringing when the C.O. line 2 comes in.
12

1. This function must be in Operator Mode.
2. This programming only for C.O. line Incoming call. The extension which is not set ringing will ring under
Intercom Calling, Call Transfer.
3. This function is one way to set some extensions for not disturbed.
4. In Disable All status, the system will set all Exts. ringing automatically when the C.O. line comes in.
3.8 Auto-attendant Mode no Answer Process (except 108)
3.8.1 Cut off C.O. Line
Format: 160 #
Description: In auto-attendant mode, if the C.O. line doesn't dial the extension number over 5 seconds or more after
hearing the OGM, then the C.O. line will be cut off.
Default setting: The C.O. line will be cut off if no dialing.
3.8.2 Transfer to Operator
Format: 161 #
Description: In auto-attendant mode, if the C.O. line doesn't dial the extension number over 5 seconds or more after
hearing the OGM, then the C.O. line will be transferred to Operator.
3.9 Dialing-out Mode Setting
3.9.1 Set Indirect-Dialing-Out Mode for All Exts
Format: 21#:
Description: Indirect-Dialing-Out mode for all the Exts(dialing 9 for outgoing).
3.9.2 Set Indirect-Dialing-Out Mode for Certain Ext.
Format: 2N1#
13

Explanation: N: the Ext. line No., N = 1 - 8
Description: Indirect-Dialing-Out mode for Ext. N (dialing 9 for outgoing).
Example: Set Indirect-Dialing-Out mode for Ext.18
In default setting, 108 is Direct-Dialing-Out mode and 206/308 is Indirect-Dialing-Out mode
3.9.3 Set Direct-Dialing-Out Mode for All Exts
Format: 20#
Description: set Direct-Dialing-Out mode for all the Exts.
3.9.4 Set Direct-Dialing-Out Mode for Certain Ext.
Format: 2N0#
Explanation: N: the Ext. line No., N = 1 - 8
Description: set Direct-Dialing-Out mode for Ext.N.
Example: Set Direct-Dialing-Out mode for Ext.17
1. In Direct-Dialing-Out mode, extension make intercom call should dial *first, then dial the extension number.
2. No need dial 9 before outgoing call.
3.10 Call Restriction-Class Assignment
3.10.1 Class Assignment for All Extensions
Format: 40 L#
Explanation: L: class number, L= 0 - 6
Description: Assign dialing-out class L for all Exts.
L=1: no any restriction
L=2: call out with restriction of International long-distance dialing
L=3: call out with restriction of domestic long-distance dialing
L=4: call out with restriction initial of item A.
L=5: call out with restriction initial of item B.
14

L=6: only for intercom call
L=0: only for some special calling number
Example: Assign the calling class to be 3 for all extensions.
1. In default setting, the class for all extensions is 2
2. This command enables a user to set class restriction on extensions in a fast and convenient way, especially
when most extensions have the same class.
For example, if you want set extension 13 to class 3 and extension 18 to class 4,and the rest extensions to class 5,
then you can set the restriction rank to be 5 for all extensions and change the restriction class to 3 for extension
13 and 4 for 18
3.10.2 Class Assignment for Certain Extension
Format: 40 N L#
Explanation: N: the Ext. line No., N = 1 - 8
L:classnumber,L=0-6
Description: Assign dialing-out class L for certain Ext. N
Example: Assign class 3 for Ext.16
3.11 Setting Restriction Item (A/B)
3.11.1 Setting Restriction Item A
Format: 4 1 Q ABCD#
Explanation: ABCD: the initial digits of the calling number to be locked, it can be from 1-digit to 4-digits, it should be
ended with # if less than 4-digits.
Q --- The group series from 01 to 16.
Description: to restrict the call-out number starting with ABCD
Example: Ext.18 is be assigned dialing-out class 4, now you want Ext.18 can’t dial the numbers with initial digits –
573,168
15

1. Item A can lock 16 groups of initial digits.
2. Restrict Item A only work for dialing-out class 4.
3.11.2 Clear Restriction Group of Item A
Format: 41 Q #
Explanation: Q: The group series from 01 to 16.
Description: to clear the call-out restriction of certain numbers of group Q.
Example: you want to clear the call-out restriction of certain numbers with initial digits—573 of group 01,
3.11.3 Clear All Restriction of Item A
Format: 4 1 #
Description: to clear all the call-out restriction of certain numbers of item A
3.11.4 Setting Restriction Item B
Format: 4 2 Q ABCD#
Explanation: ABCD: the initial digits of the calling number to be locked, it can be from 1-digit to 4-digits, it should be
ended with # if less than 4-digits.
Q --- The group series from 01 to 16.
Description: to restrict the call-out number starting with ABCD
Example: Ext.16 is be assigned dialing-out class 5, now you want Ext.16 can’t dial the numbers with initial digits –
575,161
1. Item B can lock 16 groups of initial digits.
2. Restrict Item B only works for dialing-out class 5.
16

3.11.5 Clear Restriction Group of Item B
Format: 42 Q #
Explanation: Q: The group series from 01 to 16.
Description: to clear the call-out restriction of certain numbers of group Q.
3.11.6 Clear All Restriction of Item B
Format: 4 2 #
Description: to clear all the call-out restriction of certain numbers of item B
3.12 Assign Special Calling-out Number
3.12.1 Assign Special Calling-out Number for Class 0
Format: 4 3 P ABCD#
Explanation: ABCD: the initial digits of the calling number to be locked, it can be from 1-digit to 4-digits, it should be
ended with # if less than 4-digits.
P --- The group series from 01 to 16.
Description: Permit to dial the phone numbers starting with <ABCD> only.
Example: Ext.15 is be assigned dialing-out class 0, now you want Ext.15 can dial the numbers with initial digits –
0592,179
1. 16 groups of initial digits can be set.
2. This function only work for dialing-out class 0.
3.12.2 Clear Permission of Certain Group
Format: 43P #
Explanation: P: The group series from 01 to 16.
Description: to cancel the permission of certain calling-out numbers of group P
3.12.3 Clear All Permission
Format: 4 3 #
Description: to cancel all the permission of special calling-out numbers.
17

3.13 Calling Time Restriction Setting / Clear
3.13.1 Calling Time Restriction Setting
Format: 6NTT#
Explanation: N: the EXT No. (N = 1 – 8)
TT: the time restriction duration (2 digits), should be in 01-99 minutes.
Description: set the Ext N outgoing call duration to within TT minutes. This function can only limit the time of exterior
call.
Example: Set Ext.14 outgoing call duration to 8 minutes
3.13.2 Clear Calling Time Restriction
Format: 6N00#
Explanation: N : the EXT No. (N = 1 - 8)
Description: Clear the Ext N outgoing call duration restriction.
Example: Clear the Ext.14 outgoing call duration restriction.
3.14 Allow Ext. to Use Certain C.O. Line / Restrict (except 108)
3.14.1 Allow All Exts to Use Certain C.O. Line
Format: 7M#
Explanation: M: C.O. line No, M = 1 - 3
Description: This function allows Every Exts. can use C.O line M.
Example: Allow every exts. can use C.O. line 3
18

1. This function is for the outgoing call and can’t change the function of C.O line ringing assignment.
3.14.2 Allow Certain Ext. to Use Certain C.O. Line
Format: 7MN0#
Explanation: M: C.O. line No, M = 1 - 3 N: Ext. No, N = 1 - 8
Description: This function assigns the extensions N outgoing to use the certain C.O. line (M).
Example: Allow Ext.16 can use C.O. line 3
3.14.3 Restrict Certain Ext. to Use Certain C.O. Line.
Format: 7MN1#
Explanation: M: C.O. line No, M = 1 – 3 ; N: Ext. No, N = 1 - 8
Description: This function restrict the Ext. N to use C.O. line M
Example: Restrict Ext.18 can use C.O. line 2
3.15 Flexible coding
3.15.1 Assign Extension Number (Freely Change the Exts. Number)
Format: 9Nabcd#
Explanation: N : the extension series number, N = 1 - 8,
abcd: the new number, 1 to 4 digit number, if new Ext number not exceeding to 4-digit number, press #
in the end.
Description: Change old Ext number to new Ext number “abcd”
Example: Change Ext 16 to 806
19
Table of contents