C2Max XTREME HD User manual

USER MANUAL FOR
XTREME HD RECORDER

2www.c2max.com
INTRODUCTION
This user’s manual is designed to be a reference tool for the end user of the system.
Before installation and operation, please read the following safeguards and
warnings carefully.
• Placetheequipmentonahard,levelsurface.
• Donotplaceyourequipmentinaclosed-inwallunit,oronasoft,fabric
surface such as a bed, sofa, carpet, or a rug
• Leave10.2cm(4in)minimumofclearanceonallventedsidesoftheequipment
topermittheairowrequiredforproperventilation.Restrictingairowcandamage
theequipmentorcauseare.
• Ensurethatnothingrestsonyourequipment’scablesandthatthecablesare
notlocatedwheretheycanbesteppedonortrippedover.
• Keepyourequipmentawayfromradiatorsandheatsources.
• Keepyourequipmentawayfromextremelyhotorcoldtemperaturestoensure
thatitisusedwithinthespeciedoperatingrange.
• Moveequipmentwithcare;ensurethatallcastersand/orstabilizersarermly
connectedtothesystem.Avoidsuddenstopsandunevensurfaces.
Reproduction in whole or in part without written permission is prohibited.
Allrightsreserved.
Trademarks: All brand names and products are trademarks or registered
trademarksoftheirrespectiveowners.
Disclaimer: The information in this document is subject to change without notice.
The manufacturer makes no representations or warranties, either express or implied,
of any kind with respect to completeness of its contents.
Manufacturershallnotbeliableforanydamageswhatsoeverfrommisuseofthisproduct.
CAUTION
RISK OF ELECTRIC SHOCK
DO NOT OPEN
CAUTION:TO REDUCE THE RISK OF ELECTRIC SHOCK DO NOT
REMOVE COVER.NO USER SERVICEABLE PARTS INSIDE.
REFER SERVICING TO QUALIFIED SERVICE PERSONNEL.
WARNING: TO PREVENT FIRE OR SHOCK HAZARD, DO NOT
EXPOSE THIS UNIT TO RAIN OR MOISTURE
CAUTION:TO PREVENT ELECTRIC SHOCK, MATCH THE WIDE
BLADE OF THE PLUG TO THE WIDE SLOT AND INSERT FULLY.
The lightning flash with arrowhead symbol, within an equilateral triangle, is
intended to alert the user to the presence of un-insulated“dangerous voltage”
within the products’enclosure that may be of sufficient magnitude to constitute
a risk of electric shock.
The exclamation point within an equilateral triangle is intended to alert the user
to the presence of important operating and maintenance (servicing) instructions
in the literature accompanying the appliance.

3
www.c2max.com
THANK YOU FOR CHOOSING C2MAX
This manual was written for our 3.2 operating system and was accurate at time of release.
Howeverbecauseofcontinuouseortstoimproveandupgradeoursoftwareandproducts
somefeaturesofyourdevicemaynotbeincludedinthismanual.
Thismanualcoverstheoperatingsystemthatisontherecorderanddoesnotinclude
informationrelatingtoothersoftwaresuchasphone/tabletapplications.Foruptodate
manualsonothersoftwarepleasevisitoursupportpageonwww.c2max.com
YOUR SYSTEM INFORMATION
Thispageisforuniqueinformationrelatedtoyoursystem;thispageshouldbelledinby
your system integrator at the time of install.
DeviceModelNumber:
DeviceSerialNumber:
Amount of HDD Installed:
Date of Install:
InternalIPAddressofdevice:
HTTPPort:
TCPPort:
ExternalIPorDYNDNSAddress:
Installation Company:
Support Number:

4www.c2max.com
CONTENTS
1. Connections........................................................................................................................ 5
2. Mouse Operation...............................................................................................................6
3. System Start Up ................................................................................................................ 7
a.Start-up ........................................................................................................... 7
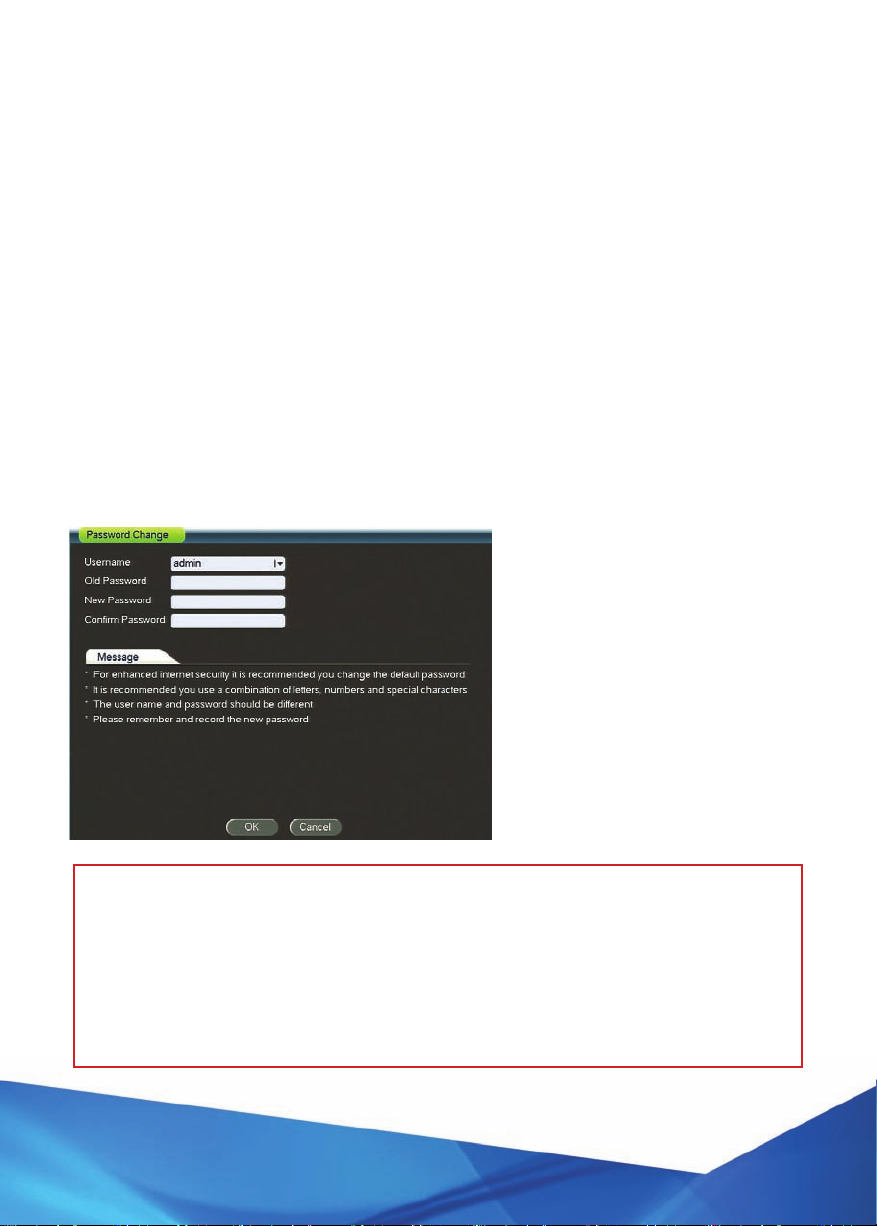
b.PasswordChange ....................................................................................... 7
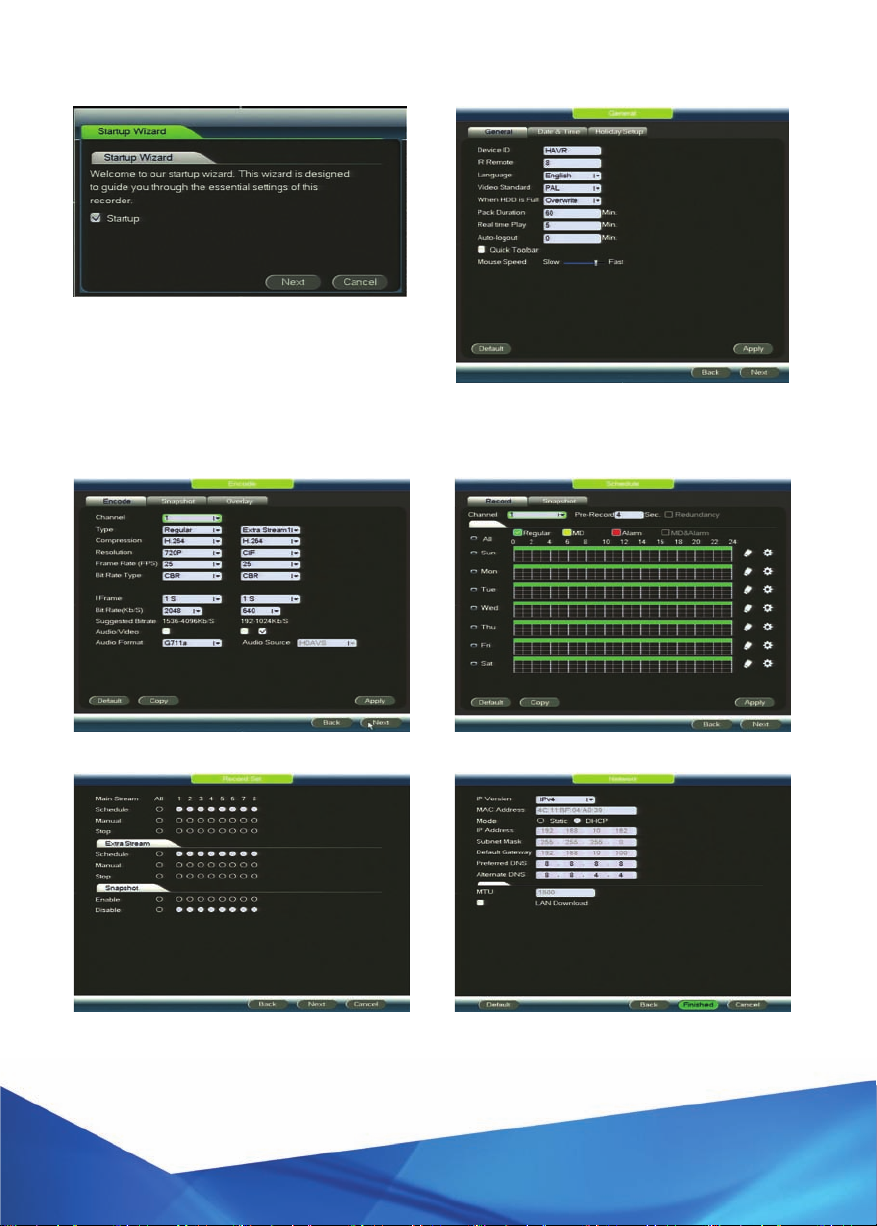
c.StartupWizard .............................................................................................8
d. On Screen Display Icons...........................................................................9
e. Quick Menu....................................................................................................9
f. System Login..................................................................................................9
g. Camera Toolbar.......................................................................................... 10
3. Main Menu............................................................................................................................11
4. ChannelType.....................................................................................................................12
a.ChangingfromCoaxtoUTPTransmission.......................................12
b.ChangingthesystemtoacceptIPCameras....................................12
c.AddingIPCameras....................................................................................12
5. Channel Names................................................................................................................ 14
6. Time Functions ................................................................................................................ 14
a. Setting the date the time ....................................................................... 14
b.SettingupDST(DaylightSavingTime)............................................ 14
c.SettingupNTP(NetworkTimeProtocol) ....................................... 14
7. Account Management....................................................................................................15
a.ChangingPasswords.................................................................................15
b. Adding Accounts ...................................................................................... 16
c.MakingCamerasCovert.......................................................................... 16
8. Recording Quality............................................................................................................18
9. Recording Schedule...................................................................................................... 20
a. Default Setup ............................................................................................. 20
b. Scheduling .................................................................................................. 20
c. Timeline Schedule Setup.........................................................................21
d. Manual Schedule Setup ...........................................................................21
10. RecordSet.........................................................................................................................22
11. EventSetup.......................................................................................................................23
e. Motion Detect ............................................................................................ 24
12. Playback............................................................................................................................ 26
a.BasicPlayback........................................................................................... 26
b.PlaybackControls.....................................................................................27
c.SmartPlayback ..........................................................................................28
d.Search/PlaybackFunctionList......................................................... 29
13. Backup 31
a. Backing up Video .......................................................................................31
b.ClipBackupviaSearch ...........................................................................32
c.FileBackupviaSearch ............................................................................33
d.PlayingBackupFiles............................................................................... 34
14. HardDriveManagement..............................................................................................35
a.FormattingHardDrives ..........................................................................35
15. Remote/NetworkAccess ......................................................................................... 36
b. Web Browser ............................................................................................. 36
16. SystemInfo ...................................................................................................................... 39
a. Info ................................................................................................................. 39
b. Alarm Status ..............................................................................................40
c.BPSInfo........................................................................................................40
d. Log.................................................................................................................40
e. Network Info................................................................................................ 41
17. Software ............................................................................................................................ 42
18. Troubleshooting ............................................................................................................. 43
19. ProductWarranty ...........................................................................................................47
20. TechnicalSupport...........................................................................................................47
21. Notes ............................................................................................................................. 48

5
www.c2max.com
1. CONNECTIONS
Belowisalistofconnectionsthatmaybefoundonyourdevicedependingonyourmodel.
Power Connectors
Thedevicewilleitherrequirepowerbyadirectpowerleadora
smallerDCPort.Inbothscenariosthepowerleadandorpower
supply will be included in the accessory box.
BNC Video Ports
Dependingonthemodelyoursystemwillhaveanumberofthese
connections;theseconnectionswillbelabelledonyourdevice
withnumbersandiftheyarevideoinputsoroutputs.
HDMI
UsethisvideooutputtoconnecttoaHDMonitor
VGA
UsethisvideooutputtoconnecttoaVGAMonitor
USB
Depending on your model the USBs will either be located on the
frontoratthebackofthedevice
Network Port
Thenetworkportisusedforconnectingyourdevicetothe
network for remote access.
E-Sata Port
Models with this port can backup and add external storage
Alarm I/O’s
Models with these connector blocks can accept alarm triggers
RS-232 Port
TheRS-232serialportisusedforadvanceddiagnostics

6www.c2max.com
1 2
3
2. MOUSE OPERATION
Thisdevicecanbecontrolledusingtheremotecontrol,frontpanelorbyusingtheUSB
mouse.HoweverwehavefoundthatusingtheUSBmouseistheeasiestandmostecient
wayofcontrollingthesystemwiththisinmindwehavecreatedthemanualbasedonusing
the system with the USB mouse.
Themouseoperatesonasimilarbasistowhatyouhaveonacomputer;leftandrightclick,
double click, click and drag and scrolling.
1. Left Click Button
a. Single Click
i.Clicktoopenthequicktoolbar
ii. Opening menus
iii. Checking a box
iv.Selectinglettersandnumbersontheon-screenkeyboard
b. Double Click
i.Bringingacamerafullscreenonlivevieworplayback
ii.Selectingaplaybackevent
iii. Opening certain sub menus
2. Right Click Button
a. Exitsanymenuorreopenspreviouswindow
b. Onliveviewitdisplaysquickselectoptions
3. Scroll Wheel
a. Scrollsthroughmenusoreventsinalist
b. Increasesordecreasesnumericvaluesininputboxes

7
www.c2max.com
3. SYSTEM START UP
a. Start-up
Yourdeviceisfullyoperationalandavailabletousewhenyouhearthebeep.
Atdefaultthesystemissettocontinuousrecordonallchannels,pleaseobservethenoti-
cation icons on each channel.
The default Operating System language will be English.
Thedevicewillbootupinitiallyinmulti-screenmodeandwillsavethelastcongured
screencongurationafterre-boots.YoucanalsosetupscreenlayoutfavouritesintheDis-
play menu.
The1stscreenthatwillappearwithbethepasswordchangerequest,werecommendthat
you follow this process and securely record any changes.
b. Password Change
Whenthesystembootsupforthe1sttimeyouwillberequestedtochangethedefault
administrator password for local and online access, the system will display the following
screen:
IMPORTANT!
It is highly recommended that you change all the default system passwords to
ensurethesecurityofthesystem.Pleasefollowtheinstructionsinthe“Account
Management” section of this manual in how to change passwords. Record any
changes and keep that information stored securely.
Ifanincorrectpasswordisentered3timesincorrectlywithina30minuteperiod
the system will lock the user account. If you are locked out of the system wait
30minutesorrebootthedevicebeforeattemptingtologinagain.
Factory default username
and passwords are as follows:
• Username:admin
Password:admin
• Username:guest
Password:guest

8www.c2max.com
c. Start-up Wizard
Afteryouhavechangedthedefaultsystem
password,astartupwizardwilllaunchto
guide you through some essential settings.
Clicknexttoenterthestartupwizard,the
system will ask you for the password.
Proceedtoenteryourpasswordand
enterthewizard.
1. GeneralMenuincludingDate
and Time Setup
2. Record Quality Settings
4. Enabling/DisablingRecording
Theabovearequicksettingsadjustmentsforessentialpartstoyoursystem,
formoreinformationonanyofthesemenuspleasevisittheindividual
chapters in this manual.
3. Record Schedule Setup
5. Network Settings

d. On Screen Display Icons
Wheninliveviewmodeyouwillseethefollowingiconsdisplayintheviewingwindowsof
each channel
1Channelisrecording 3VideoLossorNoCameraispluggedin
2Motionhasbeendetected 4CameraLockorCameraisin
privacymode
e. Quick Menu
Youcanaccessthequickmenubyrightclickinganywhereonthelivescreen.
Thequickmenugivesyouaccesstothesystemskeyfunctions.
• SingleView/Spilt:Selectacamerainfullscreenorselect
a multi display option
• PTZControl:MovementandControlforPTZenabled
cameras(notincluded)
• ColourSetting:Congurecoloursettingsforeachchannel
• Search/Playback:Viewrecordedvideofromthesystem
• Manual:Changerecordingsettingsforeachchannel
• MainMenu:AccesstothesystemsMainMenu
f. System Login
By default, the login password is the same as the user name, for example:
• Username:guest Password:guest
• Username:admin Password:admin
By default the system has two user names:
• guest=Limiteduseraccesstocertainpartsofthesystem
• admin=Fulladministratoraccesstoallfunctionsandusedastheremotelogin
Backspace/Delete
ConrmEntry/Closekeyboard
Change to capital letters etc.
Space
Byclickingonaeldsuchasapasswordortextentryitwilldisplaytheabovevirtual
keyboard.Thekeyboardoperatesjustlikearegularon-screenkeyboard,leftclicktoselect
individualcharactersandShifttochangetheletterstouppercasecharacters.
9
www.c2max.com

10 www.c2max.com
g. Camera Toolbar
Thecameratoolbarisusedtoperformquickactionsonaspecicchannelwheninliveview
mode.Toaccessthecameratoolbarmovethemousetothetopcentreofthechannelandit
will display options like this:
NOTE:Youmayneedtologininto
yoursystemandhaverightstouse
these functions.
Realtime Playback
Thisfunctionallowsyoutoviewthelast5~60minutesofvideofromthatselectedchannel.
Tooperatethisfunctionjustclickanditwillplaybackrecordedvideo(ifavailable)
from 5 minutes ago.
NOTE: At default the recorder will playback from 5 minutes ago, this can be increased up to
60minutesbychangingthevalueof‘RealtimePlay’inSettings>General
Digital Zoom
• Pressthebuttontoenabledigitalzoomonthechanneltheicon
will then change to
• Clickanddragaboxaroundtheareayouwanttozoominon
• Clickanddragtopantheselectedzoom
• Rightclicktoresetbacktofullview
• Clickagaintodisabledigitalzoom,theselectedareawillbeatthe
samezoomuntilyourightclickinsidethechannel.
NOTE:Youcanusedigitalzoomonmultiplechannelsatthesametime.
Usingthedigitalzoomdoesnotaecttherecordedvideo.
Realtime Backup
ThisfunctionallowsyoutorecordlivevideooftheselectedchanneldirectlyontoaUSB
device(notincluded)
1. InserttheUSBbackupdeviceintooneoftheUSBportsonthedevice
2. Clickonthebuttontobeginthereal-timebackup,theiconwillchangeto
if successful.
3. Clickagaintostopthereal-timebackup.

11
www.c2max.com
3. MAIN MENU
SEARCH
SETTING
INFO
BACK UP
CAMERA
EXIT
Search
Setting
General
Display Setup
PTZSetup
TextOverlay
Account Manage
Auto Maintain
BackupCong
Default
Upgrade
IPSettings
Ports
Wi-Fi
3G
PPPoE
DDNS
IPFilter
e-mail
FTP
UPnP
SNMP
Multicast
Alarm Centre
P2PSetting
Register
Schedule
HDD Manage
Record Set
Advanced
Quota Setup
Detect MD
Exception Setup
Event
Storage
Network
Info
Alarm Status
BPS Info
Network Info
Log
Back up
Encode/Overlay
Image
Channel Name
Exit
Audio/Video
Input Type
HD Info
Record Info
Version
Online Users
Net Load
Network Test
Shutdown
Logout
Reboot

12 www.c2max.com
4. CHANNEL TYPE
Yoursystemdependingonthemodelmaybeabletoacceptdierenttypesofcamera
technology.
GotoMainMenu>Camera>Encode/OverlayandthenselectInputType
a. Changing from Coax to UTP Transmission
Atdefaultyoursystemwillbedefaultedtobringingcamerasignalsviacoaxcable,ifyou
areusingUTPcablewithBalunsyoushouldselectUTPforthechannel.
b. Changing the system to accept IP Cameras
DependingonyourmodelyoumayalsohavetheabilitytoaddIPCamerastoyoursystem.
PleaserefertothespecicationsheetforthenumberofIPCamerasyoucanaddtothe
system.
ToaddanIPCamerasimplyclickIPonthelastchannelandclickapply.Thesystemwill
requestare-boottoapplythechanges.
c. Adding IP Cameras
Whenthesystemisre-bootedtherewillbeanewoptioninMainMenu>Cameracalled
RemoteDevicewhichwilldisplaythefollowingscreen
1. ClickIPSearchtondavailable
devicesonthenetwork
2. Highlighttherequireddevicethat
you wish to add
3. Click Add
4. Whenthedeviceisaddeditwill
appearintheAddedDevicelist
below
5. Whenadeviceissuccessfully
connected it will display a green light
in the status column

13
www.c2max.com
5.CHANNEL NAMES
Namethecamerastobemoredescriptivetothelocationofthecamerasoitis
easy to identify
1.Accessthemainmenuandgoto
Camera>ChannelName
2. Then enter the names for your cameras

6.TIME FUNCTIONS
Itishighlyrecommendyousetthesystemtimeonthedayofinstalltoavoidany
duplicationinles.
a. Setting the date the time
1. AccessthemainmenuandgotoSetting>General
2. Enter the current Date and Time according to the date and time format
3. ClickSavenexttothetime
Date and Time adjustment
SavebuttonforDateandTimeadjustments
SetupandofDST(DaylightSaving)
SetupandofNTP(NetworkTimeProtocol)
b. Setting up DST (Daylight Saving Time)
DSTsettingswillmovethetimeforwardandbackforsummertimeadjustments.Thesystem
willhavethesettingsforUKandIrelandSummerTimepre-lled.Usethetickboxtoenable
and disable this feature.
c. Setting up NTP (Network Time Protocol)
YoucanalsosyncyourdevicetoaninternetbasedNTPserver.Thesystematdefaultwill
haveanetworkbasedtimeserverpre-lled.Toenableticktheboxnextto“NTP”.
14 www.c2max.com

7. ACCOUNT MANAGEMENT
MainMenu>Setting>AccountManage
Everyuserinthesystemisinagroup,andreceivespermissiontoaccesssystemfunctions
based on their group settings.
The following user groups are setup at default in your system:
• admin:Accountsintheadmingrouphaveaccesstoallmenusandcan
control user accounts
• user:Accountsintheusergrouphavelimitedaccesstosystemmenus.
Youwillsee3usernamesintheaccountlist
• guest=Limiteduseraccesstocertainpartsofthesystem
• admin=Fulladministratoraccesstoallfunctions
• default=Thisisasystemaccountusedforautomatedtasksthatcanbesetupinthe
device,thisusernamewillnotbedisplayinthedropdownmenu
Whenaddingauseryoucancontrolpermissionstocertainpartsofthedevice(including
whichcamerastheusercanviewremotelyaswellaswhichchannelscanbeplayedbackon
thedevice)
a. Changing Passwords
1.AccessthemainmenuandgotoSetting>
Account Manage, then click the button
of the user name
2. Select the user you wish to modify from
the drop down list
3.TickthemodifyPasswordBox
4.UnderOldPasswordenterthe
previouspassword
5.UnderNewPasswordandConrm
Passwordenterthenewpassword
6.ClickSave
15
www.c2max.com

b. Adding Accounts
1.AccessthemainmenuandgotoSetting>AccountManage,thenclickAddUsertodis-
play the following screen:
2.Youcannowenterthedetailsforthe
new user account
a. User Name: Enter the desired username
b. Reusable: When this option is ticked it will
allow this user to login multiple times
simultaneously
c.Password:Enterapasswordforthe
account. Repeat password under
ConrmPassword.
d.Memo:Thiseldisoptionalandisa
description of the user account.
e. User MAC: Optional, this allows you to
enter the MAC address you permit to use
with this account.
f.Group:Selectthegroupyouwantthe
user to be part of.
3. In the bottom half of the screen, you can disable certain permissions for this user. De-
pendingonwhichgroupyouhaveselecteditwillautomaticallyselectallpermissionforthe
selectedgroup.Youcanonlyreducethepermissionsfortheaccount.
4. ClickSavetoaddtheuser.
c. Making Cameras Covert
Ifyouwantcertaincamerastobeincovert/privacymodeonbootupyoucanmodifythe
“default“username.Sowhenthesystembootsupyouwillseethecameralocksymbol
on the particular channels.
1. AccessthemainmenuandgotoSetting>AccountManage,thenclickModifyUserand
change the username to default from the drop down list to display the following screen:
2. Select Monitor from the tab selection
3. At default all channels will be ticked,
un-tickthecamerasyouwanttomakecovert
4.ClickSave
NOTE: When a user with access to the
channel is logged in they will see that
cameraonliveview,totestyourchanges
logout of the current username.
16 www.c2max.com

8. RECORDING QUALITY
To set the resolution and frames per second your system records at you need to go to the
following menu
Camera>Encode/OverlayandthenselectAudio/Videofromtheleftpanel
The adjustments that are made in
thismenualsoaecttheuencyand
qualitythatyouexperiencewhen
viewingthesystemremotely.
The system can stream and record
two separate streams
• MainStream–thisisthehigher
qualitystreamwhichyouuse
whenyouareusingthedevice
locally, the main stream settings
are located on the left
• ExtraStream–thisisthelower
qualitystreamwhichusesless
space on the HDD as well as
transmittingsmallerleswhen
accessingfromremotedevices
Channel-thisisthechannelyouaremodifying
Type–thisisthetypeofrecordingyouaremodifying,forexampleyousetthatRegular
(Constant)recordingatalowqualityandthensetthatMotionrecordsatahigherquality
Compression–H.264isacompressionusedforcompressingthelesize
Resolution–Thiswillvarydependingonthetypeofcamerayouhavebutwilldefaulttothe
highestquality,ifyouwanttosavespacelowerthesettings
Frame Rate (FPS)–thisindicatesthenumberofframesineachsecondofrecordeddata,
thishasvariablesettingadjustmentof1~25(PAL)
Bit Rate Type –youhavetheoptionofCBRorVBR,CBRbeingConstantandVBRbeing
variable.Thiswillaecttherecordingandstreamingqualityanduency
Bit Rate (Kb/S)–thisistheamountofdatathelessizeswilloccupyontheHDDaswellas
streamtoremotedevices
Audio/Video –thisistoenableanddisableaudioonboththemainandextrastream.You
alsohavetheoptionofdisablingthevideoonthe2ndstream.Youneedtohaveacamera
with microphone for the system to record audio
IMPORTANT NOTICE
WerecommendyoutesttherecordingqualityinPlaybacktoensureyouarehappy
withthechangesthathavebeenmade,ascertainsettingsinthismenuwillhavea
negativeimpactontherecordingquality.
17
www.c2max.com

18 www.c2max.com
9. RECORDING SCHEDULE
a. Default Setup
Atdefaultyoursystemissetuptoconstantrecord,sothismeanseverythingisrecording
24x7
Howeverthiswillalsorecordmotionactivitysuchastreesmovingandanimals,youcan
howeverchangetheregionthatitrecordsaswellasthesensitivityintheSetting>Event
menu.
b. Scheduling
TochangehowthesystemrecordsopenthemainmenuandgotoSetting>Storageand
select Schedule
Atdefaultyoursystemshouldjusthaveonecontinuousgreenbargoingacrosseachweek
day,whichsigniesthatthesystemisrecordingeverything24x7.
Manual Setting of Schedule Clears the current selection of the
selected type of recording for the
selected days
WhenyouseeGreenintheschedule Whenyouseeyellowintheschedule
it means the recorder is in constant it means during this period the
recording mode, so in the example recorder will record motion based
abovethesystemissettorecord activity,theparametersofthe
constantlyeverydayfrom sensitivityandregionsissetup
08:00~18:00 intheEventmenu
Red shows that the system will record Blue shows that the system will
alarmtriggers(thisisonlyapplicable recordwhenmotionor
tosystemswithalarmI/O’s) alarmisdetected

c. Timeline Schedule Setup
Channel Selection; before you begin customising the schedule select
the channel you want to customise. If you want to make the same
adjustment to all channels select All in the dropdown menu.
Pre-Record; thisadjustmentallowsyoutorecordthesceneupto30secondspriortothe
detectedactivity
Redundancy; ifthereismultipleHDDsinstalledthisselectionwillbecomeactive.Thisfunc-
tion allows you to record the same data onto both HDDs
1. Selectthedesiredchannelorallchannelsfromthedropdownmenu
2. Selecttheweekdaysbyselectingmultipleindividualdaysoralldays,
whenadayisselecteditwillhavethissymbol
3. Selectthetypeofrecordingyouwanttoeditfromtheselectionabovethetimeline
4. Clickandhighlightthetimelineintothetimesyouwanttorecord
5. Repeatforothercameras,recordingtypesordaysasrequired
6. ClickApplytosavethechanges
d. Manual Schedule Setup
1. Selectthedesiredchannelorallchannelsfromthedropdownmenu
2. Click the gear icon to the right of one
of the days you want to modify, this will
open a new window
3. Youcanpre-deneupto6periods,per
day and per channel. Begin by entering
astartandnishtimeforoneormore
periods
4. Selecttherecordingtypeyouwantduring
the period
5. Selecttheotherday(s)youwantthis
schedule also to run
6. ClickSavetoclosethiswindow
7. ClickApplytosavethechanges
19
www.c2max.com

10. RECORD SET
Thismenuallowsyoutoturnoandonrecordingforparticularchannels
Schedule–whenthechannelsaresettoscheduleitmeanstherecorderwillfollowwhat-
everissetintherecordschedule
Manual–thisisamanualoverridetoswitchtorecordingsetuptoconstant24x7
Stop–thisisamanualsettingtostoprecordingonselectedchannels,settingachannelto
Stopwillmeanitwon’trecordanyvideoforthatparticularchannel
20 www.c2max.com
Table of contents