CabanaCoast AXIS CANTILEVER User manual

AXIS CANTILEVER UMBRELLAS
Owner’s Manual

2
Congratulations on purchasing your Axis Cantilever Umbrella!
The Axis is manufactured using the highest standard materials and fabrics on the
market, and is perfectly designed to give you many years of enjoyment. The
following information is to inform you how to operate your Axis Cantilever
Umbrella to ensure trouble free use and ease of operation. Please follow these
instructions as they are designed to assist operation and prolong the life of your
umbrella.
GENERAL INFORMATION:
Your Axis Umbrella is principally intended for use in low to moderate wind
conditions and will provide you with many hours of protection from sun and
light rain. You will get maximum benefit from your umbrella when you use it in
accordance with our instructions and in the weather condition for which it was
designed.
Do not leave umbrella open when unattended, particularly in windy
conditions.
Your Axis Umbrella should be closed and securely strapped in strong
winds and adverse weather conditions.
Always secure your umbrella to an appropriate base.
Please avoid any modifications to your umbrella, except those
authorized CABANACOAST. Such modifications may void the warranty.
Make sure your Axis is dry and clean prior to storing away for extended
periods of time to prevent mold from developing.
Be careful when closing to ensure the canopy does not get caught or
“pinched” by the umbrella arms. This is particularly important before
storing the umbrella away for extended periods of time or if the
umbrella is to be laid horizontally for storage. Damage to the fabric
caused by “pinching” is not covered by the warranty.
Inspect the installation mount/base on a regular basis and tighten as
necessary.

3
SIMPLE MAINTENANCE PROCEDURES
In coastal or metropolitan environments, frequent washing of the
complete unit is very beneficial. Particularly the slider car, slider car
guide tracks, and rotating mechanism.
Should the 16 rotating mechanism stop pin holes become filled with
sand or dust etc., lifting your umbrella up off the spigot by 1” will allow
the dust cover to be lifted and the 16 holes can be cleaned. This will be a
two person operation.
Silicon spray in the slider car wheels will assist operation if required.
Fold the acrylic canvas as mentioned in “Closing the Axis” (Page 8). This
will prolong the new look of the canvas and prevent marking caused by
“pinching” in the alloy frame.
All parts are virtually maintenance free (e.g. aluminum, stainless steel,
etc.) However, it is recommended that if the umbrella is not to be used
for an extended period of time (winter months), to place the umbrella in
storage. You may even remove the spigot when the umbrella is not in
use, as it can be a tripping hazard.
FABRIC CARE
The best way to keep the fabric canopy looking good is to simply brush off dirt
before it becomes embedded in the fabric and wiping off any stain soon after it
occurs. The longer a stain remains on the fabric, the more difficult they can be to
remove.
Spot cleaning of stains using a soft bristle brush or sponge and a cleaning
solution of 1/4 cup mild soap, such as Woolite or Dawn dishwashing
liquid, per gallon of lukewarm water will remove most stains.
Spray the umbrella first with clean water. After cleaning, rinse with
water to remove all traces of soap. If a hose is used, avoid high pressure.

4
Let air dry and do not close the umbrella until the canvas is completely
dry.
For further cleaning instructions, refer to the fabric manufacturer’s care
instructions or contact CABANACOAST Customer Service.
The included protective cover should be used when the umbrella will not
be operated for an extended period of time.

5
GUIDELINES TO CONSIDER WHEN INSTALLING:

6
Your Axis Cantilever Umbrella is delivered fully assembled. There are four
different ways to install your Axis Cantilever Umbrella:
1. Installing on a wooden deck using a Deck Plate.
2. Installing on an existing concrete slab or pavers using a Deck Plate.
3. Installing into the ground (i.e. into a lawn, garden or paved patio) using the In-
Ground mount.
4. Installing on a free-standing base.
Prior to installing your installation mounts please read the important
information below:
CORRECT ALIGNMENT OF INSTALLATION OPTIONS: Your Axis Cantilever
Umbrella can rotate 360° and be locked in 16 different locations. This means
that every 22.5° of rotation there is provision to lock the umbrella. In most
situations there will be a preferred area over which you will predominantly want
shade. To ensure you have the ability to shade your preferred location you must
have one of the 22.5° rotation locking holes in line with this position. Please
have a look at the underside of your spigot to see these 16 locking holes
There is a locking hole in line with each of the 4 spigot bolt holes in the spigot
plate. There are also three intermediate holes between each of the spigot bolt
holes and these are marked with an indicator mark on the top of the spigot
plate.
To point your umbrella in the perfect direction or to have a symmetrical
installation (especially when installing square umbrellas) it is very important to
make sure you install the Base Plate or In-Ground mount square to the
direction that you predominantly want the umbrella to point.

7
There are four different ways to install your Axis umbrella. Select the installation
method from the following pages for the relevant instructions.
IN-GROUND INSTALLATIONS
Your umbrella comes with a spigot. Once you have installed the In-Ground
mount according to the instructions below, attach the spigot to the In-Ground
mount using the supplied Allen key and bolts. Once the concrete has fully cured,
lift the umbrella on to the top of the spigot. This is recommended as a two
person operation.
IMPORTANT: Be sure to have read “GUIDELINES TO CONSIDER WHEN
INSTALLING” (Pages 5-6) before beginning the installation process.
When installation is required in-ground (into soil or sand etc.), an in-ground
mount must be used. This is a Galvanized-steel mount which must be concreted
into position. Once you have decided on the location of the umbrella/in-ground
mount you will need to dig a hole in that location for a concrete footing to be
installed. Where terrain differs from thick clay to sand or fine soil then a
different sized footing hole must be prepared and a different volume of concrete
used. As a guide only; a hole 16” wide x 27.5” deep is recommended for heavy
clay terrain. If installing the mount into topsoil or sand, you will need a larger
hole and more concrete. We would recommend increasing the depth of the

8
hole, however, it’s best that you seek appropriate advice from a licensed
contractor for your specific circumstances. When pouring the concrete, it is
advisable to install a few lengths of re-bar into the concrete to prevent the
possibility of cracking in the future. Remember the depth of hole is more
important than width, and it is much easier to make the hole large at the time of
installation than to try and re-stabilize the in-ground mount should it start to
move at a later date.
•TIP: Remember the depth of hole is more important than width, and it is
much easier to make the hole large at the time of installation than to try and re-
stabilize the in-ground mount should it start to move at a later date.
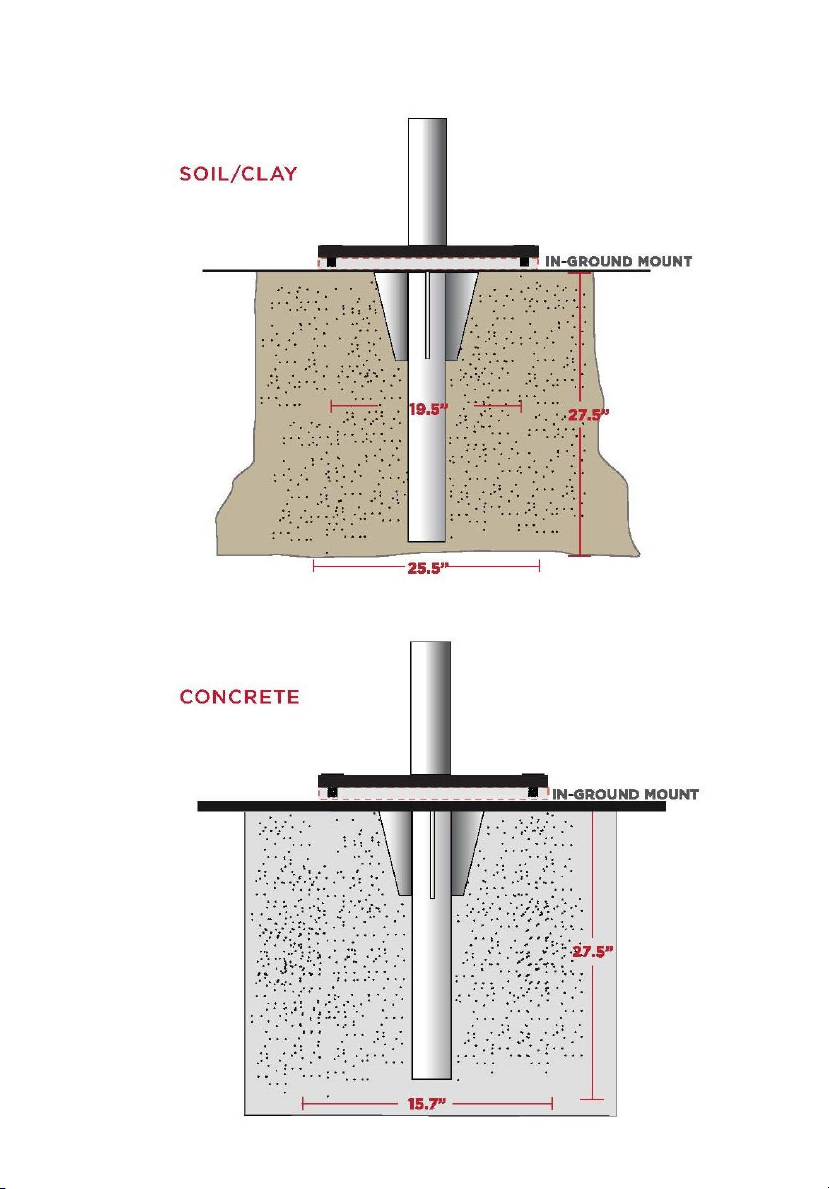
If installing into a paved patio, you may need to remove some pavers/tiles to
facilitate the in-ground mount and have them cut and reinstalled back around
the circular in-ground mount plate to give a clean, flush installation. When
setting the in-ground mount into concrete, the top surface of the mount should
be at the same level as your patio surface, so that if the umbrella is removed or
relocated, then the face of the mount is flush to your surface.
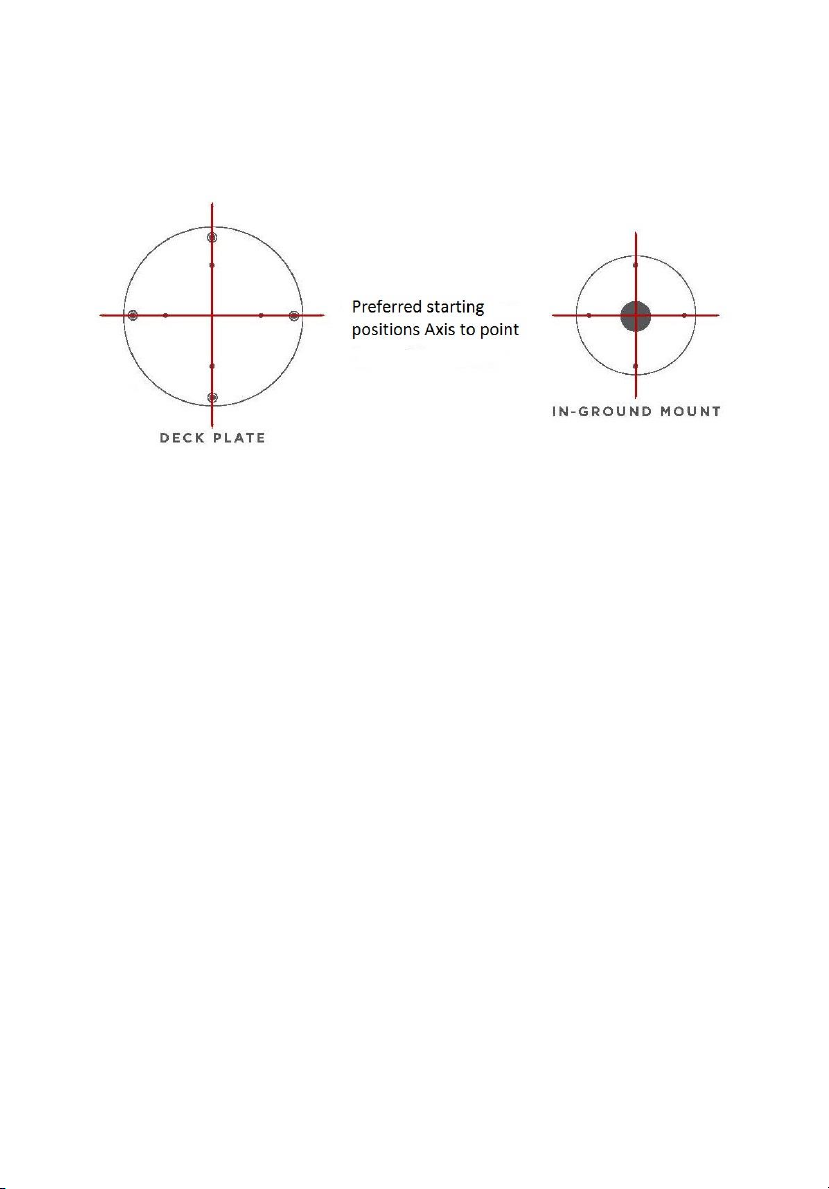
IMPORTANT: Align one of the screw holes in the top of the spigot with your
desired 12 o’clock position on the umbrella. Assure that the in-ground-mount
plate is level. After the in-ground mount has been installed and the correct
amount of time has passed for the concrete to harden and “cure”, you can
finally stand up your Axis umbrella on the mount.
Now that your In-Ground mount is installed and you’re ready to attach your Axis
spigot, you will need to remove the four “grub-screws” that are installed in the
four spigot-bolt holes in the in-ground mount. Lift the Axis umbrella and spigot
on top of the mount. It will take two people to complete this. One person can
hold the umbrella in the upright position while the second person finds and
locates the four holes for the spigot bolts. Screw in all four spigot bolts loosely
by hand. Once all four spigot bolts are in then you can use the supplied allen key
to tighten up the bolts. Now you can carefully open your umbrella for the first
time.

9

10

11
SURFACE INSTALLATIONS
Your umbrella comes with a spigot. Once you have installed the Deck Plate
mount according to the instructions below, attach the spigot to the Deck Plate
mount using the supplied Allen key and bolts. This is recommended as a two
person operation.
IMPORTANT: Be sure to have read “GUIDELINES TO CONSIDER WHEN
INSTALLING” (Pages 5-6) before beginning the installation process.
INSTALLING ON A WOOD DECK USING A BASE PLATE:
To install your Axis umbrella onto a wood deck the following instructions should
be followed. Installing your Axis umbrella onto a wood deck you will need the
following:
Deck Plate and deck bolts (purchased by you or supplied by your hired
professional contractor)
A decently amp rated corded or cordless power drill.
A scrap piece of wood (to make a reinforcing “nog”) and suitable
hardware to secure the nog to the deck joists.
IMPORTANT: Your umbrella must be bolted down into a reinforced
“nog” that is fixed under the deck planks to the deck joist. The
umbrella must not only be fixed to the deck planking as this will
likely result in the deck planks “pulling up” and the umbrella falling
over in high winds.
Once you have decided on the location of the Axis/Deck Plate then use the four
outer holes in the deck plate as a template to start drilling each of the holes in
the deck. Make sure each of the four holes go through decking and miss the
joists. Using the four holes drilled in the deck as a guide, you now need to install
a reinforcing “nog”/brace hard up under the decking for the deck plate bolts to
be fixed into. It is recommended that two wood “nogs” or “braces” be secured
between the deck joists or bearers that form the structural frame of the deck.
Ideally the “nog”/brace should be two short lengths of 4”x4” wood posts side
by side, or alternatively two pieces of 2”x8” wood joists joined together for the
umbrella deck plate to bolt through. The “nog”/brace must then be securely

12
fixed to the deck frame/joists using suitable hardware. These may be large
galvanized nails, coach screws or builders brackets etc. If the installation is in a
sea spray zone or coastal environment then stainless steel hardware is
recommended.
You can now use the four holes already drilled in your decking and drill them all
the way through the newly installed “nog”/brace under the decking. Put the
deck plate in place and install purchased through the plate, decking and nog. Use
a washer and nut on the underside of the bolt under the deck and torque down
tight. After the deck plate has been securely fixed to the deck you should now
remove the four “grub bolts” that are installed in the four spigot-bolt holes. (The
purpose of these grub bolts is to keep dirt out of the threaded holes when not in
use). Attach the spigot to the deck plate using the supplied hardware and
tighten down with the supplied allen key. Lift the Axis umbrella onto the spigot
on top of the base plate. Now you can carefully open your umbrella for the first
time.

13
Your umbrella comes with a spigot. Once you have installed the Deck Plate
mount according to the instructions below, attach the spigot to the Deck Plate
mount using the supplied Allen key and bolts. This is recommended as a two
person operation.
IMPORTANT: Be sure to have read “GUIDELINES TO CONSIDER WHEN
INSTALLING” (Pages 5-6) before beginning the installation process.
INSTALLING ON A NEW CONCRETE SLAB:
To install your Axis umbrella onto an existing concrete slab you will need the
following: base plate, suitable concrete bolts (we recommend concrete bolts
approximately .5” x 4”:)
Deck Plate and deck bolts (purchased by you or supplied by your hired
professional contractor. (We recommend concrete bolts approximately
10 x 100mm)
A hammer drill with masonry bits.
A socket set
A trusted level.
IMPORTANT: Your umbrella must be bolted down into concrete at
least 4” deep. Keep a cushion of 6-8” from edge of concrete slab.
Once you have decided on the location of the Axis/Deck Plate then use the four
outer holes in the deck plate as a template to start drilling each of the holes in to
the concrete. Drill each of the four holes using a hammer drill, down to about .5”
deeper than the concrete bolt being used. This allows space for the bolt if dust
falls to the bottom of the hole. Drill the holes at the correct diameter for the
bolts provided. Use a level to ensure the base plate is level once all four holes
have been drilled. If the deck plate is not level, use galvanized or stainless steel
washers to level the deck plate on the concrete. Torque down the four bolts
through the base plate with washers (if needed) until they are fully wound in
and are tightly holding the deck plate.

14
After the deck plate has been securely fixed to the deck you should now remove
the four “grub bolts” that are installed in the four spigot-bolt holes. (The
purpose of these grub bolts is to keep dirt out of the threaded holes when not in
use). These grub bolts is to keep dirt out of the threaded holes when not in use).
Attach the spigot to the deck plate using the supplied hardware and tighten
down with the supplied allen key. Lift the Axis umbrella onto the spigot on top of
the base plate. Now you can carefully open your umbrella for the first time.
BASE OPTIONS
STACKING GALVANIZED STEEL PLATES:
Your umbrella comes with a spigot. Once you have properly stacked your G-
Plates with your threaded holes lined up on the bottom of the two above plates,
bolt your spigot and thread it through the bottom plate.
IMPORTANT: Be sure to have read “GUIDELINES TO CONSIDER WHEN
INSTALLING” (Pages 5-6) before beginning the installation process.

15
NOTE: To install your Axis umbrella onto your G-Plate stack, you’ll first need to
remove the “grub-screws” from the plate you wish to use on the bottom.
3x 40G Galvanized Steel Plates
6mm allen key to remove “grub-screws” (Supplied with your base
hardware)
A trusted level.
Once you have decided on the location of the Axis umbrella, make sure you have
an area of at least 42” in diameter for the base to rest, then place a plate into
position (This will be your bottom plate). You will need to remove the four outer
“grub-screws” exposing the threads (on the bottom plate only) before you
proceed to stack your second and third plates. Locate the “naked” (these holes
will be left open with no “grub-screws”) holes on your second plate and rotate
the plates to match the naked holes with the bottom plate’s threaded holes.
Proceed to do the same with your top third place.
At this point, you should have three stacked G-Plates. Bottom plate has removed
“grub-screws” and exposed threading. The top two plates have their “naked”
holes lined up with the bottom plates threaded holes.
Remove the spigot from your Axis mast and line up the 4-hole pattern to the
correct “naked” holes guiding down to threaded holes of the bottom plate. From
here, use the supplied counter-sunk bolts and drop them in the spigot and
torque down to the bottom plate.
IMPORTANT: Line up the “naked” holes to the threaded holes you’ve exposed
by removing the “grub-screws” from your bottom plate.

16
Rotate top two plates so that the naked threadless holes line up with the threaded hole of the
bottom plate.

17
Remove the spigot from the Axis mast and place on the g-plate stack. Using the supplied
hardware, bolt down through to the bottom plate.
From here you are ready to mount and enjoy your Axis Cantilever Umbrella.
OPENING THE AXIS CANTILEVER UMBRELLA
1. Remove the strap from the canopy.
2. Loosen Infinity tilt knob (Figure A) to assure slider car (19) is not locked in any
one position and moving freely.

18
3. Gentle spread “fluff” umbrella arms (Figure B). Insert crank handle (30) into
the mast and begin cranking in a clockwise rotation.
4. Continue cranking until umbrella is open and hub is either fully inserted into
the hub tube (9) or canopy fabric is straight and taut.

19
NOTE: Do not over crank.
5. Once the umbrella is fully open, hold the slider car knob (20) and slide the car
to the desired tilt position and tighten the knob (20) in a clockwise rotation until
it is secure.
IMPORTANT: Avoid extreme angles in any windy situations. Always set at 90°
when gusty or in moderate winds.
6. When the slider car is at its highest position (90°) the locking pin (20) will
automatically engage locking the canopy.
7. The tilt of the canopy can be adjusted as desired at any time by loosening the
slider car knob (20), pulling the locking pin outward (if it is engaged) and sliding
the slider car up and down the mast.
CLOSING THE AXIS CANTILEVER UMBRELLA

20
1. Loosen Infinity tilt (Figure A) knob (20) and slide the slider car to a lower
natural position.
2. Rotate the winder handle (30) counter-clockwise. The canopy will be begin to
fold in (Figure B), continue cranking until the canopy is mostly closed and the
arms are pointing almost vertically to the ground.
Table of contents
Popular Patio Furniture manuals by other brands

Sunjoy
Sunjoy 3PC OPEN WEAVE WICKER CHAT SET A202012100 Assembly instructions

Patio Premier
Patio Premier Caspian 203017 instruction manual

Palram
Palram CANOPIA STOCKHOLM How to assemble

Agio
Agio 2127261 Assembly instructions

Royalcraft
Royalcraft 735255 Assembly instructions

Tuuci
Tuuci TILT CANTILEVER Assembly & operating instructions