11
CAUTION
For Outdoor use only!
This appliance may not be used in an exterior enclosed balcony, porch or entertainment area!
IMPORTANT
Read these instructions for use carefully so as to familiarize yourself with the appliance before connecting it to
its gas container. Keep these instructions for future reference.
GB
1. General information
•This appliance has been designed to be used for outdoor cooking, specically for people who go camping to enjoy outdoor life and it
can also be used at home on your patio.
• Various food types can be prepared on this appliance. The Camp Chef is designed to utilise various cooking surfaces.
• Gas is supplied to the unit via a hose and regulator (Low Pressure model) or connects directly to a disposable cartridge (High Pressure
model). The hose and regulator can be connected to gas cylinder, a gas cartridge, or a CADAC Power Pak 1000 which is a unit that
takes two gas cartridges. (Not supplied with the appliance).
• The unit is easy to switch on, and to operate (Section 6) and the user can control the heat input with an adjustable valve.
• The unit is supplied with a convenient carry bag.
•This appliance complies with EN498:2012 and SANS 1539:2012
• When using a pot, the minimum recommended pot size is 150mm and maximum recommended pot size is 230mm.
•This appliance may only be used with an approved hose and regulator connected to a rellable cylinder complying with the local
regulation in force.
•The rellable cylinder is to be used
only in an upright position. Only to be
used with a gas cylinder that does not
exceed 500mm in height and 350mm
in width (including the regulator).
•Warning: Accessible parts may be very
hot. Keep young children away.
•Gas appliances require ventilation for
efcient performance and to ensure
the safety of users and other persons in
close proximity, therefor do not use the
appliance in an unventilated area. It is
intended for use outdoors only.
•Read these instructions carefully
before using the appliance.
•Use outdoors only!
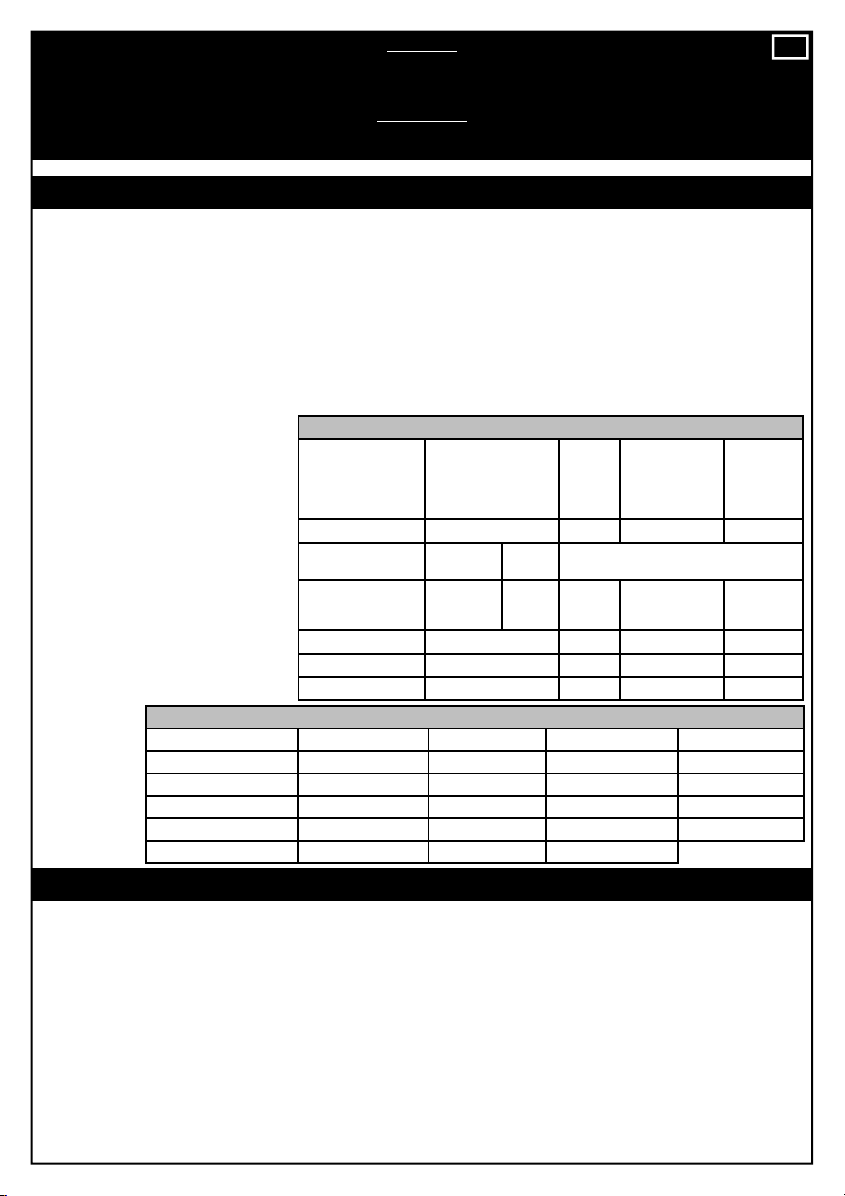
6530L0, 6530L1
Country of Use
BE, CH, CY, CZ, ES,
FR, GB, GR, IE, IT, LT,
LU, LV, PT, SK & SI
PL
BE, CY, DK, EE,
FR, FI, HU, IT,
LT, NL, NO, SE,
SI, SK, RO, HR,
TR, BG, IS,LU,
MT, & ZA
AT, CH, DE
& SK
Appliance Categories I3+(28-30/37) I3B/P (37) I3B/P (30) I3B/P (50)
Allowable gasses Butane Propane Butane, Propane or their mixture
Gas Pressure 28-30mBar 37mBar 37mBar
28-30mBar
(2.8kPa for South
Africa)
50mBar
Jet Number 0.65 0.59 0.65 0.56
Nominal Usage 130g/hr 130 g/hr 130g/hr 130 g/hr
Gross nom. heat input 1.8kW 1.8 kW 1.8kW 1.8 kW
Country Name and Abbreviations
AE = United Arab Emirates AL = Albania AT = Austria BE = Belgium CH = Switzerland
CZ = Czech Republic DE = Germany DK = Denmark ES = Spain FI = Finland
FR = France GB = United Kingdom GR = Greece HR = Croatia IT = Italy
JP = Japan KR = Korea NL = Netherlands NO = Norway PL = Poland
PT = Portugal RO = Romania RU = Russia RS = Serbia SI = Slovenia
SK = Slovakia SE = Sweden TR = Turkey ZA = South Africa
2. Safety Information
•Do not move the appliance during use.
•Turn off the gas supply at the gas cylinder after use.
•
The hose must be checked for wear or damage before every use and before connecting to the gas container.
•Do not use the appliance if it has a damaged or worn hose. Replace it.
•Do not use an appliance that is leaking, damaged or which does not operate properly.
•This appliance must be kept away from ammable materials during use. Minimum safe distances are: Above the appliance 1.2m. At the
rear and sides 600mm. (See Fig. 3)
•Ensure that the gas container is tted or changed outdoors, away from any sources of ignition, such as naked ames, pilots, electric res
and away from other people.
•Keep gas containers away from heat and ame. Do not place on a stove or any other hot surface.
•Ensure that the assembled product is stable and does not rock.
•In the event of light back (where the ame burns back and ignites at the jet), immediately turn off the gas supply by closing the control
valve on the gas container and then the appliance valve. After the ame is extinguished remove the regulator and check the condition of its
seal. Replace the seal, if in doubt. Re-light the appliance as described in section 6 below. Should the ame persistently light back, return
the product to your authorised CADAC repair agent.
503-0573 LEV12 (6530L0, 6530L1) Camp Chef LP - User Manual - (EU + SA).indd 1 15/08/2017 13:09:20


