CADDYDRIVER QR1X User manual

4
14
7
1
2
5
6
3
9
10
8
16
11
15
12
13
Parts List:
1 –Umbrella Holder
2 –Cell Phone/GPS Holder
3 –Cup Holder
4 –Scorecard/Golf ball Holder
5 –Accessory Station
6 –Remote Control
7 –Seat
8 –Stabilizer Wheel
9 –Timer function
10 –Manual Dial Throttle
11 –Power Button
Page 1

1. Assembly Instructions:
1. Unpack all items carefully and check parts.
2. Folding instructions:
3. Attach wheels to axles by pushing the easy release
knobs on the outside of the wheels and inserting the
wheels into the axle. Make sure to continue pushing
the easy release knobs on the outside of the wheels
while sliding the wheels into the axles. Test that the
wheels are locked in by giving each wheel a firm pull
to ensure it does not slide out of the wheel’s pin.
4. Attach accessories starting with the accessory
station. For further instructions click on the “support”
tab on our website www.caddydriver.com and scroll
down to the instructional videos section.
2. Handle Controls:
1. Distance (remote), 10/20/30(handle)
Auto Function
When pressed, the 10, 20, and 30 buttons will display
on the screen either an A, B, or C and your
Caddydriver will run for 10m, 20M, or 30M
respectively, and then stop automatically.
*Tip Always turn your remote control “OFF” when
you put it in your pocket to ensure if any buttons are
pressed while in your pocket the cart will not go
anywhere!
2. Power Button:
1. ON/OFF Button: Hold for 2 seconds until the lights
come on to turn your Caddydriver On and Off.
3. Speed Controller
Scrolling of the speed dial lets you choose your
preferred speed to suit your pace perfectly, and the
display will show the preferred speed. The speed level
is from 1 to 9.
4. GO/stop Button(handle):
Press to start your cart with the handle at the same
speed that it stopped. Or press to stop your cart.
5. LED Display:
The green, yellow, and red LEDs on the handle
indicate the level of charge of the battery. All on
indicates a high charge, just yellow and red indicates
medium charge and just red indicates a low charge.
*note –the cart should be in motion for the most
accurate reading.
Page 2

3. Operating Instructions
3.1. Operating your Caddydriver
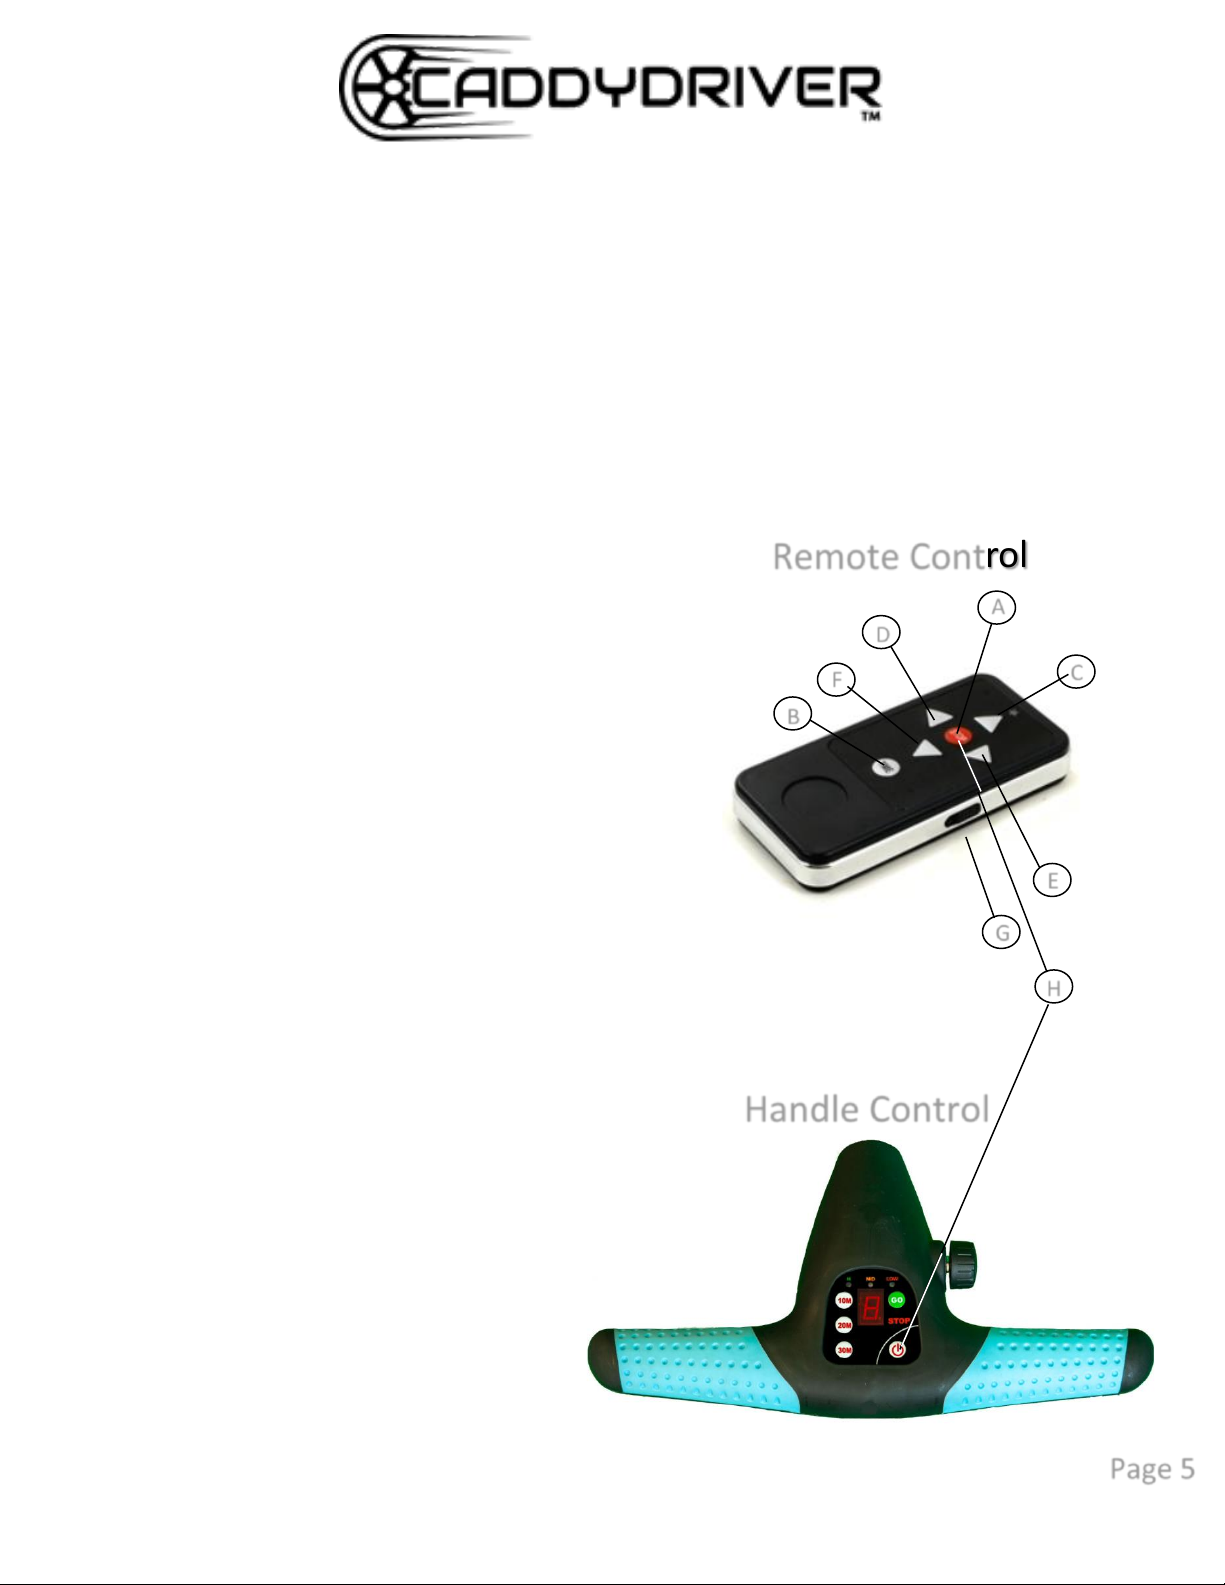
To turn the Caddydriver on, press the power button
for 2 seconds until the display screen turns on.
To move and speed up your Caddydriver with the
manual dial throttle, hold your Caddydriver’s handle
and turn the dial in a clockwise direction until you get
a desired speed.
To slow your Caddydriver down, turn the dial in a
counter-clockwise direction, and to stop you can
either turn the dial completely counter-clockwise
until you can no longer turn the dial, or you can press
the off button and it will fully stop.
3.2. How to Charge the Battery:
To charge the battery, plug the charger into the wall
outlet 1st (the charger will turn green), then connect
the battery to the charger(the charger will turn Red-
charging). Charging is complete once the LED light on
the charger changes from red to green. The battery
must be disconnected from the charger once it has
changed from red to green(the next morning is fine,
so long as the charger was Red to start).
Never leave the battery connected to the charger if
the charger is green!
Charging takes 4-6 hours depending on the depletion
level of the battery. Ensure all connections are
tightly secured as a loose connection will result in a
faulty charge.
3.3. Battery use and Care
PLEASE OBEY THESE PRECAUTIONS FOR
BATTERY USE & CHARGING
a) Do not charge the battery in a sealed container or
in an upside-down position, as it is recommended to
charge the battery in a well-ventilated area to prolong
the lifespan of the battery.
b) Do not charge the battery near a heater, or where
heat accumulation may occur.
c) Never touch the electric poles of the battery, as it
is a safety hazard.
d) The battery’s poles red color stands for positive,
and the black for negative. In case of battery
replacement please reconnect the poles of the
battery correctly. Otherwise, your Caddydriver could
suffer severe damage.
e) Charge the Lead battery after each round of golf as
the Lead batteries lifespan will be affected if it is
drained. The Lithium may be charged as needed.
f) If you do not use your Caddydriver for long periods
of time, please charge the battery every 6 weeks(Lead
battery, and every 8-10 weeks(lithium battery).
Always ensure the charger is red(charging) and always
disconnect the battery from the charger once the
charger has changed from red to green.
Page 3

4. General Maintenance
The steps below will ensure that you get a prolonged
and reliable life out of your Caddydriver.
1) The Caddydriver has been designed so that the user
can concentrate on playing golf, while the
Caddydriver does the work of carrying your bag. To
keep your golf Caddydriver looking its best, we advise
that you wipe any mud or grass from the frame,
wheel, and chassis after every round with a damp
cloth or paper towel.
2) To prevent moisture from entering the electronic
systems, motors, or gear boxes of the Caddydriver, DO
NOT use any high-pressure jet washers or hoses to
wash the Caddydriver.
3) Remove the rear wheels every few weeks and
remove any debris that might cause the wheels to
drag. If your wheels do not slide off the axle easily,
use steel wool to role around the axle to clear the axle
of debris.
4) Always disconnect the battery when you store the
Caddydriver. Always store the battery at 15 to 25c,
away from a heat source, in a dry place (not on a
concrete floor).
All these recommendations will help keep your
Caddydriver in top condition and ensure that it
remains your reliable partner, both on and off the
links.
5. Trouble Shooting Guide
1) Battery does not have power:
I) Check battery charge
II) Check all wiring connections and charger plug
III) Check battery voltage
2) Motor is running but wheels do not turn:
I) Check if wheels are secured to axle pin
3) Caddydriver pulls to left or right:
I) Adjust front wheel alignment with dial knobs (see
video under “support“tab at www.caddydriver.com).
II) Check if your golf bag has excess weight on one
side.
4) Remote does not work:
I) Check to ensure the remote is on (button on the
right side of the remote must be up/forward).
II) Change the batteries in the remote (2 X AAA).
III) Re-Sync the remote (see Sync instructions).
5) Dial throttle does not work:
I) Turn the dial counter-clockwise until it “clicks” to
“0”, then dial clockwise to run.
* Please do not hesitate to contact us with any issue:
Email: service@caddydriver.com
Tel: 1 877 522 1288
Page 4

6. Remote Control
Functions
A. Brake: To completely stop your
Caddydriver, press the red stop button in
the middle of the remote. Or press down
button “F” to reduce the speed as desired.
B. Dist: Press the Dist button on your
remote to have your Caddydriver move
forward for 10, 20, 30m (based on how
many times you click the Dist button), the
cart will stop automatically. Always ensure
your cart has stopped safely when using
this function. Always turn your remote off
“G” when putting it in your pocket to
ensure the cart will not move inadvertently.
C. Forward Arrow: Pressing the forward
arrow will set the Caddydriver in forward
motion. Increase speed by pushing multiple
times (1-9).
D. Left Arrow: Initiates left turns. When the
arrows are released the Caddydriver stops
turning and continues straight with the
original speed prior to turning.
E. Right Arrow: Initiates right turns. When
the arrows are released the Caddydriver
stops turning and continues straight with
the original speed prior to turning.
F. Backward Arrow: Pressing the back arrow
will decrease the speed or set the
Caddydriver in backward motion. Increase
speed by pushing multiple times (1-9).
G. ON/OFF Switch: On the side of the device,
move the switch to turn on/off the remote.
H. Sync: Press and hold the “STOP” button
on the remote transmitter, while pressing
and holding the power button on the handle,
after 3 seconds the LED lights will flash 4
times and your remote control is synced.
A
B
C
D
E
F
G
H
Remote Control
Handle Control
Page 5
Table of contents
Popular Outdoor Cart manuals by other brands

Clas Ohlson
Clas Ohlson 31-5246 quick start guide

John Lewis
John Lewis Riya 862 48203 instructions

FW
FW TITANIUM Series Assembly instructions

NewAge Products
NewAge Products Outdoor Kitchen SS 32 Bar Cart manual

DINO CARS
DINO CARS 02142 Assembly instructions

Cushman
Cushman MINUTE MISER Technician's repair and service manual