Cadillac ML-PAS-190402 User manual

Cadillac Manual Cadillac Manual
-- Escalade 2016~Escalade 2016~
-- CTS 2014~CTS 2014~
- MODEL : ML-PAS-190402
- DATE : 2020.04.06

IndexIndex
1. Main Spec
2. Block Diagram
3. Dimension
4. External Appearance
5. Connector Pin Assignment
6. Product Composition
7. DIP S/W Setting
8. Mode Change
9. Touch Control
10. OSD(On Screen Display) Control
11. Install Manual
12. Q & A

1. Main Spec.1. Main Spec.
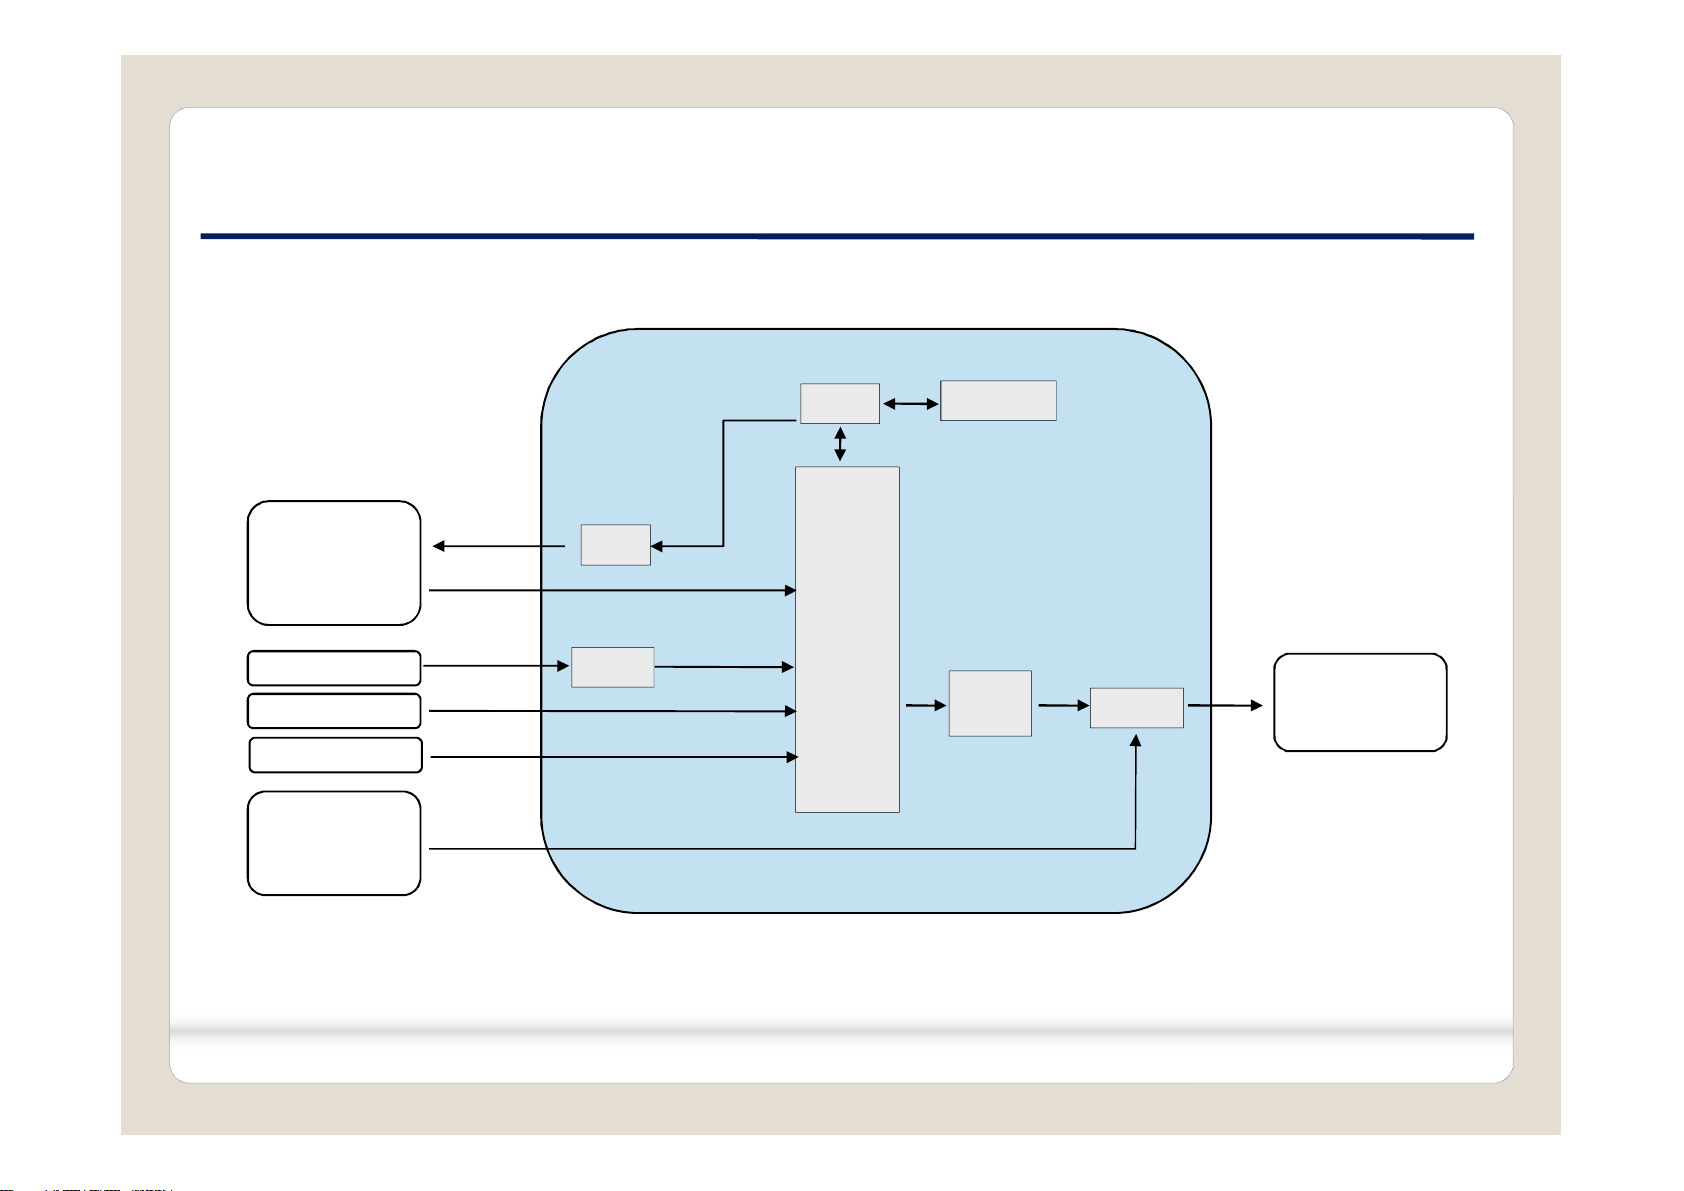
1. Input Spec. (MULTI VIDEO INTERFACE)
- 1 x Digital RGB Input (Navigation System output)
- 1 x Analog RGB Input (Navigation System output)
- 1 x CVBS(REAR CAMERA) Input. (Rear camera source)
- 1 x CVBS(FRONT CAMERA) Input. (Front camera source)
- 1 x LVDS Input. (Car Command System)
2. Output Spec.
- 1 x LVDS Output (LCD Operation)
- 1 x Vertual Analog Touch (Navigation System source)
- 1 x Uart Digital Touch (Navigation System source)
3. Power Spec.
- Input Power : 8VDC ~ 24VDC
- Consumption Power : 12Watt, Max
4. Switch Input mode
- Possible to select CAR model while switching mode by DIP S/W
- By button on the Commander in the car via CAN

DIGITAL RGB
2. Block Diagram2. Block Diagram
Scaler
MCU
INTERFACE
CAR
COMMAND
SYSTEM LVDS
RGB
NAVIGATION
SYSTEM
EEPROM
FRONT CAMERA LVDS
TX
CAR
TFT-LCD
REAR CAMERA
RELAY
D/A
LVDS

3. Dimension3. Dimension
161 mm
83mm
26mm
* This can change under manufacturer’s circumstance
161mm * 83mm * 26mm

4. External Appearance 4. External Appearance
POWER/CAN
Rear
Front
TOUCH
Digital
RGB
Analog
RGB LVDS
IN
LVDS
OUT
LED PROGRAM
DIP S/W
IMAGE

4. External Appearance 4. External Appearance
LED
PROGRAM
DIP S/W IMAGE
POWER/CAN
Rear
Front
TOUCH
Digital
RGB
Analog
RGB LVDS
IN
LVDS
OUT

5. Connector Pin Assignment5. Connector Pin Assignment
*NAVI Connect
① R DATA (Red)
②G DATA (Green)
③B DATA (Blue)
④SYNC (White)
⑤GND (Black)
⑥DVB-T IR (Green)
⑦DVD IR (Orange)
① ② ③ ④ ⑤ ⑥ ⑦
*Touch Connect
① Y-
②X-
③Y+
④X+
① ② ③ ④
*POWER Connect
1. Battery (Yellow)
2. Battery (Yellow)
3. Rear-DET (Brown)
4. Front-DET (Blue)
5. LIN-IN (Green)
6. N.C
7. LIN-OUT (White)
8. N.C
1 15
2 16
9. LIN (Purple)
10. SWC (Orange)
11. ACC (Red)
12. Rear-VCC (Red)
13. Front-VCC (Red)
14. Mode (Green)
15. GND (Black)
16. GND (Black)

6. Product Composition6. Product Composition
Interface 1 EA
Power Cable 1 EA
OSD Board 1 EA
RGB NAVI Cable(7pin) 1 EA
LVDS Cable 1 EA
Touch convertor Cable(KD-900) 1 EA

6. Product Composition 6. Product Composition OptionOption
Interface 1 EA AUX Cable 1 EA HDMI Cable 1 EA
10
Microphone 1 EA
* CarPlay Set Sales(option)
Power Cable (500mm) 1 EA ACC Board 1 EA

7. DIP S/W Setting7. DIP S/W Setting
* ON : DOWN , OFF : UP
PIN FUNCTION DIP S/W Selection
1 NAVI ON : Not Used
OFF : Used
2 AV1 (DVB-T) ON : Skipping Video
OFF : Display
3 AV2 (DVD) ON : Skipping Video
OFF : Display
4 N.C
5 N.C
6
CAR type SEL Right Picture7
8
* DIP S/W Example
ESCALADE 2016~
CTS 2014~

* 화면 전환 방법
•You can select between two methods when changing the
screen by pressing HOME button.
- Double : Press Home button twice quickly.
- Long : Press and hold Home button.
8. Mode Change8. Mode Change

9. Touch Control9. Touch Control
Press and hold for more than 11 seconds on
NAVI, DVB-T, DVD screen.
(Note that it only works the first time after
switching screens)
+ Touch according to the shape coordinates.
13
Touch control - Calibration
OR
OSD menu -> Utility -> Calibration

9. Touch Control9. Touch Control
Press Touch(Anywhere)
Press Icon
DVB-T DVD
DVB-T/DVD Control

10. OSD(On Screen Display)10. OSD(On Screen Display) ControlControl
Mode State
First Menu Second Menu Third Menu
OSD Control Board
15
MENU When there is no OSD screen, pressing OSD ON
When OSD screen is displayed, press OSD EXITT
SEL Item Selection, Value Selection
UP Item up
Increase selected value
DOWN Item down
Decrease selected value
MENU SEL UP DOWN

10. OSD(On Screen Display)10. OSD(On Screen Display) ControlControl
16
OSD Option
First
Menu Second Menu Third
Menu Description
Option
NAVI COM
HMS
FINE
:
Set up manufacturer of
woodworking device for
UART Touch use
OFF Disable feature
RearCam-Type
OEM Original Camera
ExtDevice Equipped with external
camera
RearCam-Power
ON + 12V continuous supply
AUTO + 12V supply only in Rear
camera mode
OFF + 12V off
RearCam-Det
PDC
Detected by CAN
-It is operated by parking
sensor
GEAR Detected by CAN
- It works on reverse signal.
WIRE Detected by Rear-Det Wire
FrontCam-Type
OEM Original Camera
ExtDevice Equipped with external
camera

10. OSD(On Screen Display)10. OSD(On Screen Display) ControlControl
17
First
Menu Second Menu Third
Menu Description
Option
FrontCam-Power
ON + 12V continuous supply
AUTO + 12V supply only in Front
camera mode
OFF + 12V off
FrontCam-Det CAN Detected by CAN
WIRE Detected by Front-Det Wire
FrontCam-RcvOpt ON
After RearCam shows
FrontCam and returns to
previous state
OFF Disable feature
B/T Call ON Switch to OEM screen when
you call
OFF Disable feature
ChgMode Opt
Double Press "HOME" button twice
to switch screens
Long Press and hold the "HOME"
button to switch screens
OSD Option

10. OSD(On Screen Display)10. OSD(On Screen Display) ControlControl
18
First
Menu Second Menu Third
Menu Description
Option
Key_Off ON Switch to OEM screen when
key off
OFF Disable feature
Reset Execute Option Menu all Reset
OSD Option

8. OSD(On Screen Display)8. OSD(On Screen Display) ControlControl
* Bluetooth Screen switching method
Bluetooth Phone UsageDisable Bluetooth Phone
NAVI
AV1(DVB-T)
AV2(DVD)
OEM
Call
NAVI
AV1(DVB-T)
AV2(DVD)
Ending

10. OSD(On Screen Display)10. OSD(On Screen Display) ControlControl
20
OSD Option -> FrontCam-RcvOpt
0 second = FrontCam-RcvOpt menu OFF
1~30 second = FrontCam-RcvOpt menu ON & time control
Front Camera Auto Mode
OEM
NAVI
AV1(DVB-T)
AV2(DVD)
REAR FRONT
OEM
NAVI
AV1(DVB-T)
AV2(DVD)
Select time of display
1~30 second
Other manuals for ML-PAS-190402
1
Table of contents