CAE SoundCam Series User manual

SoundCam product manual

Manual SoundCam 2
Content
1About these instructions..................................................................... 3
1.1 Performance description.............................................................. 4
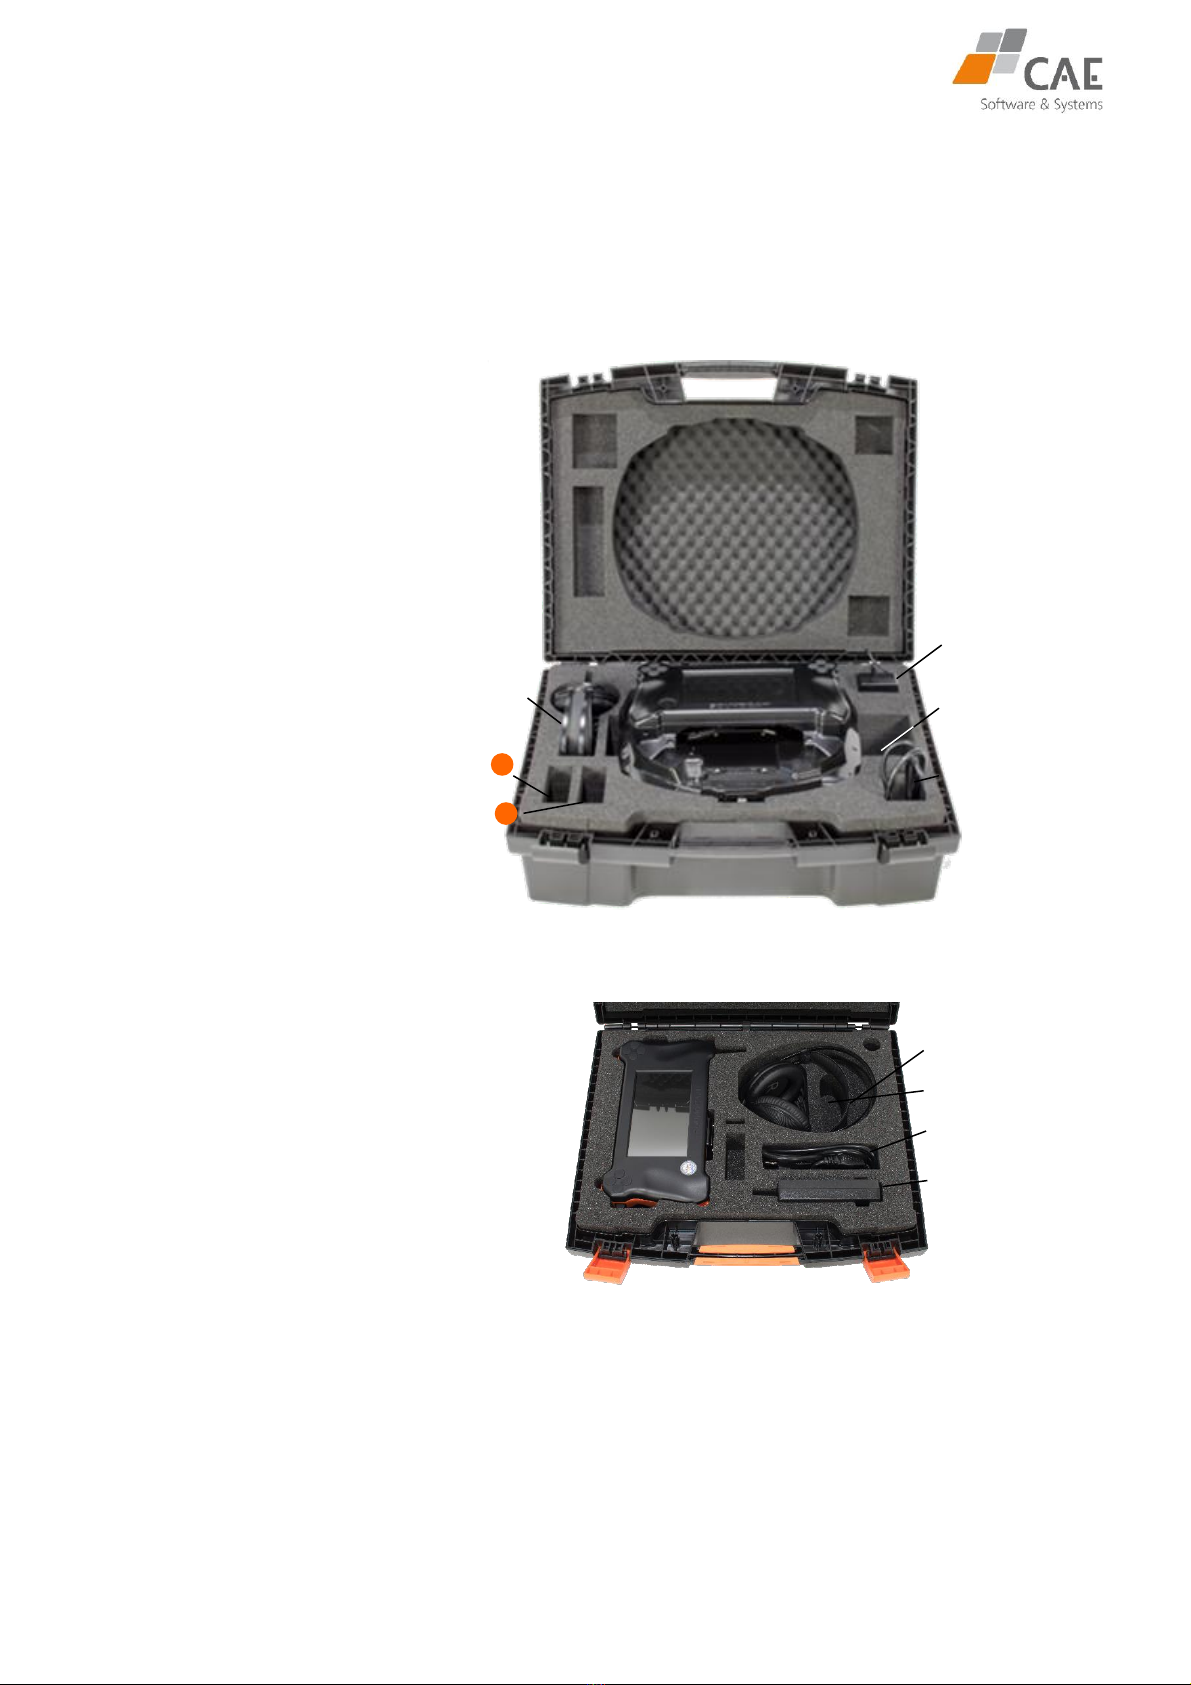
1.2 Scope of delivery.......................................................................... 4
2Security............................................................................................... 5
2.1 Intended use................................................................................ 5
2.2 General sefety insturctions........................................................... 5
3Controls .............................................................................................. 8
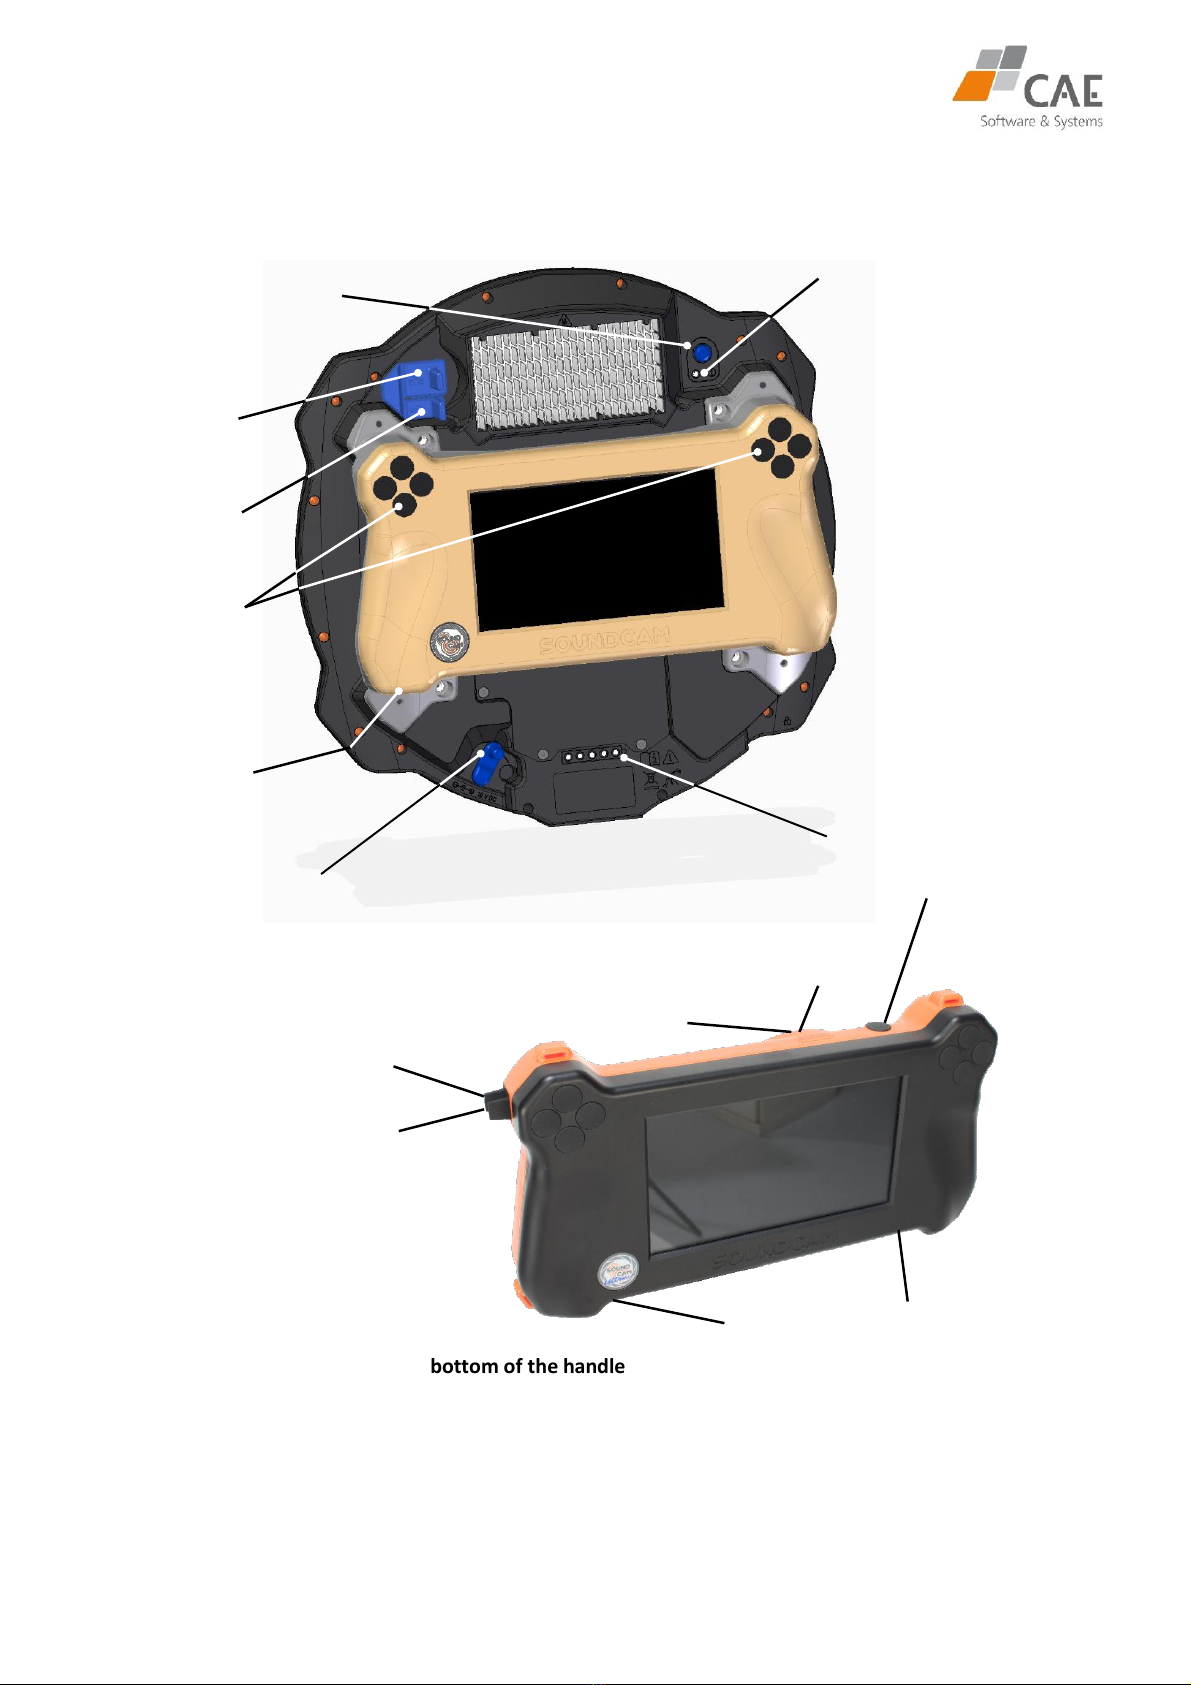
3.1 Hardware..................................................................................... 8
3.2 Software ...................................................................................... 9
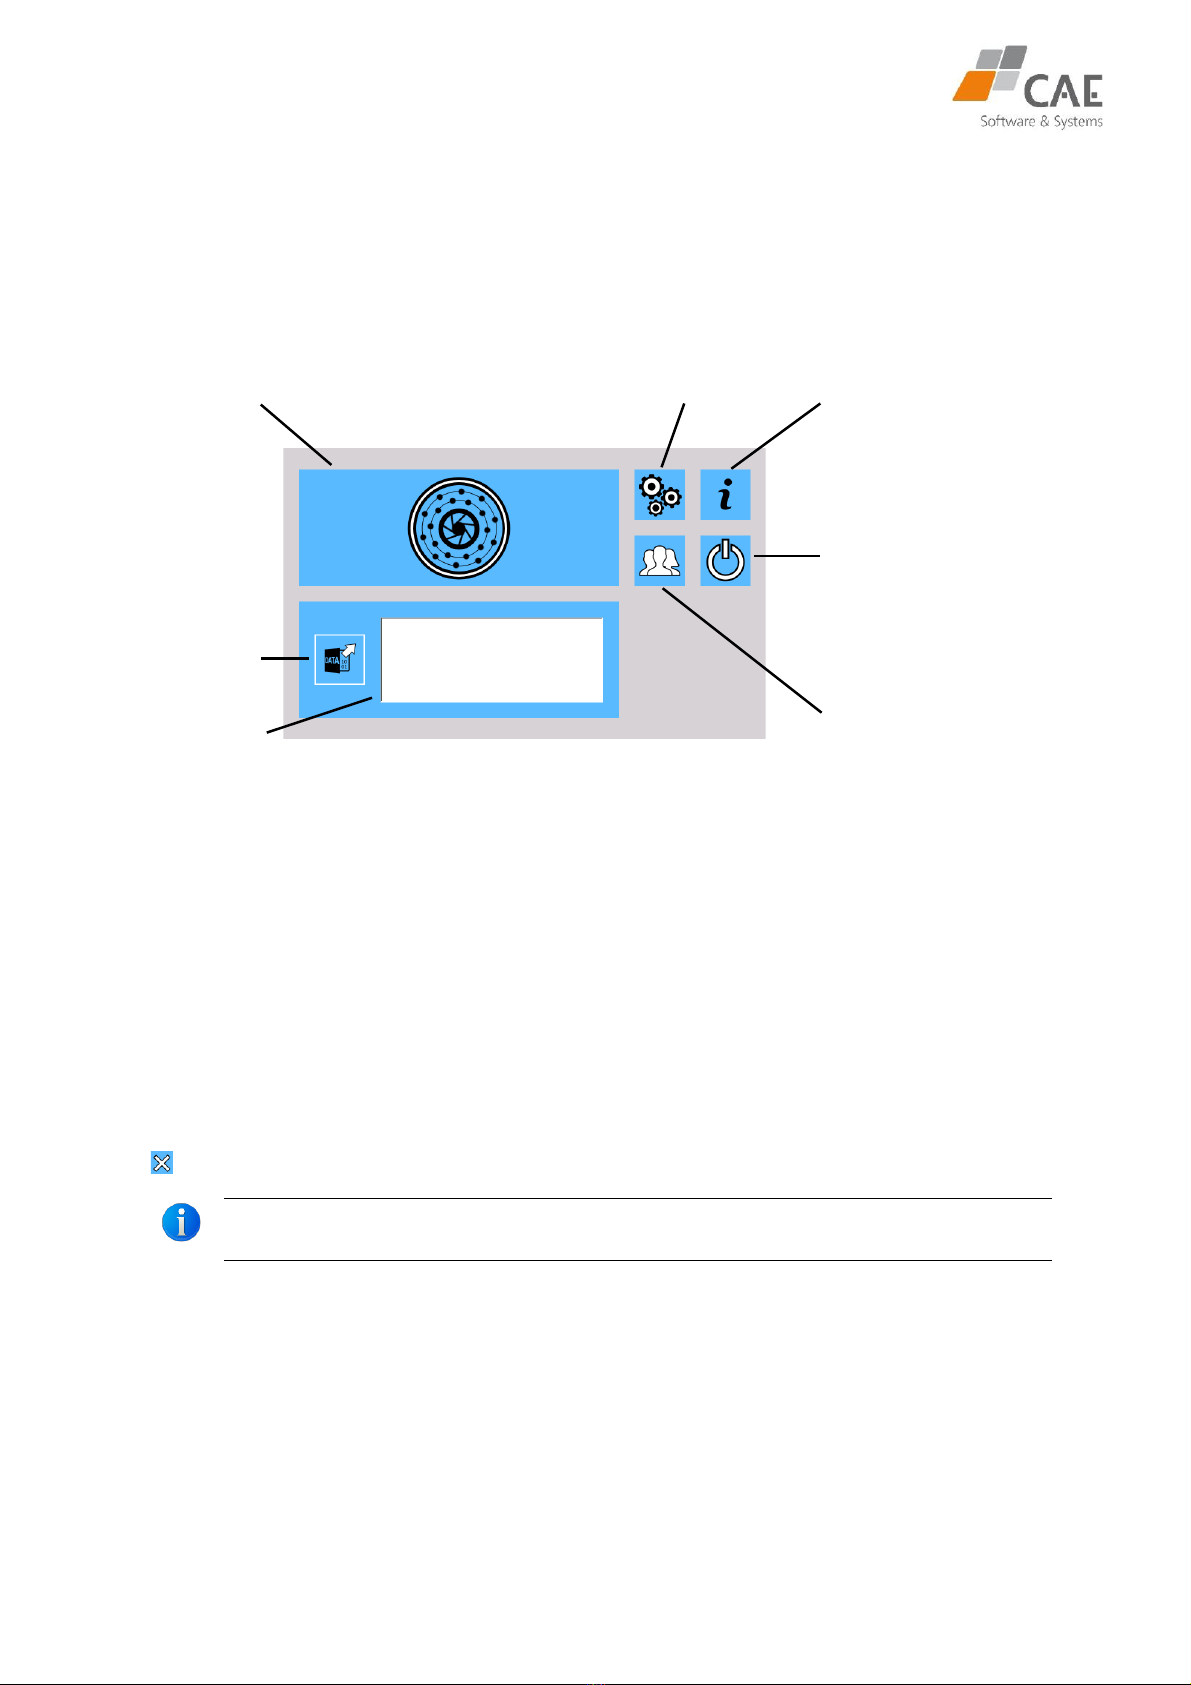
3.2.1 Start menu of the SoundCam .....................................................9
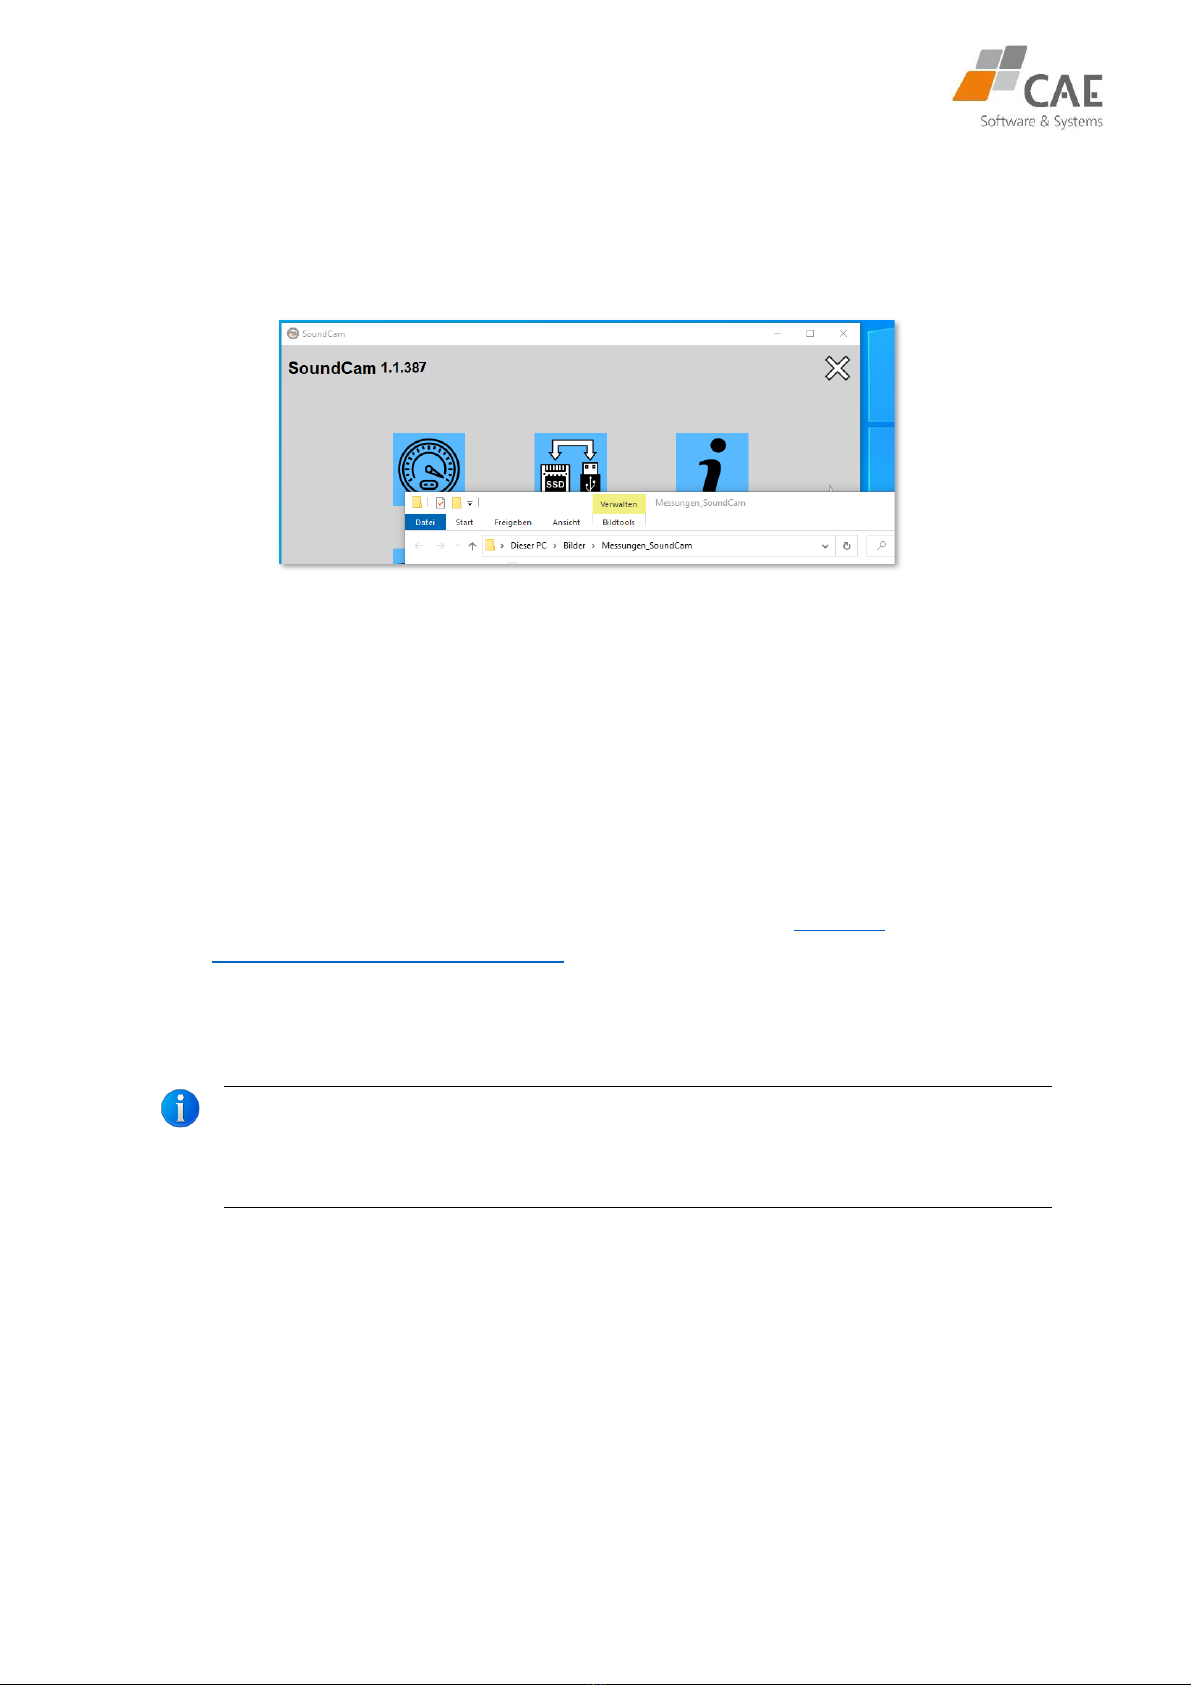
3.2.2 SoundCam as a PC application..................................................10
4Perform measurements .................................................................... 11
4.1 Settings...................................................................................... 12
4.1.1 Distance .....................................................................................13
4.1.2 Scaling ........................................................................................13
4.1.3 Frequency filter .........................................................................15
4.1.4 Recording time ..........................................................................16
4.2 Listening - focused sound ........................................................... 16
4.3 Triggering recordings (self-timer) ............................................... 18
4.4 Long-term measurement (LTM).................................................. 22
4.5 Save measurement..................................................................... 23
5Analyse measurement ...................................................................... 24
5.1 Display window and view options............................................... 25
5.2 Timeline control......................................................................... 29
5.3 Working with markers................................................................ 30
6Export functions................................................................................ 30
6.1 Creating a Video......................................................................... 31
6.2 Screenshots................................................................................ 32
6.3 Press the button in the left sidebar............................................. 32
7Working with profiles ....................................................................... 33
7.1 Select and load profiles .............................................................. 34
7.2 Create a new profile................................................................... 35
7.3 Reset to factory settings............................................................. 35
8Other settings ................................................................................... 36
8.1 The Settings Menu ..................................................................... 36
8.2 Connecting to a PC ..................................................................... 42
8.3 Software update ........................................................................ 43
9Troubleshooting................................................................................ 44
10 Storage.............................................................................................. 45
10.1Notes for reliable operation of the device .................................. 45
11 Cleaning............................................................................................ 46
12 Note on environmental protection................................................... 47
13 Technical........................................................................................... 47
Declaration of Conformity ..................................................................... 48
Imprint................................................................................................... 48

Performance description
Manual SoundCam 3
1About these instructions
Read this manual carefully and follow the instructions given.
This will provide you with usable measurement results and ensure safe, reliable operation as well as
a long service life of the device.
Keep the manual in a safe place. If you pass the device on, also give this manual with it.
The instructions for operating the SoundCam are based on the control via the integrated touch
screen.
When connected to a personal computer, the functions can also be controlled via the PC application
SoundCam.exe. Its user interface differs only slightly from the SoundCam touchscreen in terms of
functionality. Where necessary, the manual points out deviating operating methods.
Marking symbols and notes
Warning - general danger!
Warnings that you must follow to avoid injury, personal injury and damage to
property.
Warning - Danger due to electric current!
Attention!
Important information that you should follow to avoid damage to property, faults or
malfunctions.
Useful information on the operation of the SoundCam and technical background.

Performance description
Manual SoundCam 4
1.1 Performance description
The SoundCam is a portable, stand-alone device. It is used to localise sound sources in a frequency
range of up to 24 kHz (SoundCam) or 100 kHz (SoundCam 2.0 & SoundCam Ultra). The sound is
visualised as an acoustic image.
This can be interpreted and analysed on the device itself or on a computer.
(1) Power supply unit
(2) Recess fort he tripod
(3) Mains cable
(4) Headphones
(5) Carrying strap
(6) Tripod accessories
1.2 Scope of delivery
The SoundCam comes with a matching power supply and power cord. A case containing headphones,
strap and tripod (tripod not included with SoundCam Ultra) is optionally available.
Figure 1: SoundCam with carrying case (58 x 39
x 27 cm)
5
6
Figure 2: SoundCam Ultra with carrying case
(51 x 43 x 19 cm)
v

Intended use
Manual SoundCam 5
2Security
2.1 Intended use
With the unit in its original configuration and with the help of the installed proprietary software, you
can locate sound sources indoors or outdoors. It is suitable for both commercial and private use.
2.2 General sefety insturctions
The unit is built according to the current state of the art and is safe to operate. Nevertheless, there
are residual dangers. Read and observe the safety instructions to avoid hazards. CAE Software und
Systems GmbH accepts no liability for personal injury or damage to equipment caused by failure to
observe safety instructions.
Figure 3: Safe use - always be aware of your surroundings

General sefety insturctions
Manual SoundCam 6
Warning!
In case of improper use - danger due to electrical voltage!
oDo not open the unit, make any modifications or repairs to the unit, its
components and accessories.
Attention!
Cleaning and storage.
oAlways handle your appliance with care, follow the instructions in
Chapters 9 and 10
Among other things:
oTo clean, wipe the outer surface with a soft, lint-free cloth.
oDo not touch the diaphragm of the microphones. Do not clean the device
with strong, aggressive, corrosive or solvent-based cleaning liquids.
oDo not clean with high-pressure cleaners or other machines. Do not clean
with compressed air.
oStore the unit with charged battery in a dry and clean place.
Warning!
Safe use of the power supply unit!
oUse only power supplies that were purchased when your SoundCam was
delivered or from CAE or authorised dealers.
oOnly draw power from AC mains, not from other power sources such as
inverters or generators.
Warning!
Damage due to improper handling of batteries, risk of explosion!
oThe unit contains a rechargeable battery. To avoid personal injury,
damage to property and the environment, do not remove it. Avoid
damaging the battery with sharp objects or disposing of it in a fire.
oDo not expose the unit to direct sunlight for long periods of time.
oBattery replacement by the user is not intended. If you see the need for
replacement, contact your CAE partner.
Caution!
Trip hazard!
oWhen setting up experiments, ensure that cables are laid securely.
oWhen using a tripod, ensure a safe stand on solid ground and do not leave
the unit unattended

General sefety insturctions
Manual SoundCam 7
Warning!
Mindfulness prevents injuries!
oWhen using the SoundCam in a non-stationary position, always be aware
of your surroundings, especially car traffic and terrain conditions.
oThe SoundCam is not a toy. Only allow children to operate the device
under the supervision of knowledgeable persons.
Warnung!
Areas subject to explosion hazards!
oDo not use the unit in areas with explosive atmospheres (such as fuel and
chemical storage areas or areas where the air contains chemicals or
particles, such as fine dust or metal powder).
Caution!
Malfunctions due to heat accumulation!
oThe device may become warm during normal use.
oIf possible, place your device on a stable work surface that allows
sufficient air circulation under and around the device.
oDo not cover the device with pillows, blankets or any other soft material.
This may block the airflow, causing the unit to overheat.

Hardware
Manual SoundCam 8
3Controls
3.1 Hardware
(1) On/off switch
(2) Status-LED
(3) Battery level indicator
(4) Power connector
(5) Headphone jack on the bottom of the handle
(6) Function keys - user-definable in the settings menu
(7) USB-port
(8) Ethernet port
Figure 4: Controls of the SoundCam and SoundCam Ultra

Software
Manual SoundCam 9
3.2 Software
3.2.1 Start menu of the SoundCam
Start the SoundCam by pressing and holding the on/off switch for at least 2 seconds. A green flashing
of the status LED indicates that the system is booting.
After booting complted this menu is displayed:
(1) Switch to main menu
(2) Make settings
(3) System information and update
(4) Switch off the unit
(5) Profile settings
(6) Display / select stored measurements
(7) Open measurements
From the other menus, you can return to the previous menu at any time by pressing the
–Button.
To switch off the unit, press and hold the on/off switch until all LEDs oft he charging indicator
have gone out
You will find an overview of the settings menus (2) in the chapter The Settings Menu on p. 36
Figure 5: Start menu

Software
Manual SoundCam 10
3.2.2 SoundCam as a PC application
The functions of the SoundCam can also be controlled via the SoundCam.exe application on a
PC.
Data from measurements with the SoundCam can be stored in any location from within the
application.
With the PC application, measurements with a duration longer than 60 seconds are possible.
Via the Ethernet interface and with the help of the SoundCam application, the SoundCam can
be connected to any computer in your local network.
The PC version of the SoundCam is intended for use with a Windows operating system.
oDownload the .zip archive of the PC software from the website www.cae-
systems.de/en/soundcam-owners.html.
o Unpack the archive at your prefered storage location.
o Start the file SoundCam.exe (for example via Windows Explorer).
If the application cannot connect to the SoundCam, make sure that the communication is
not blocked in the firewall. Windows 10 usually indicates this with a message when the
application is called up. Configure the firewall setting accordingly or contact your system
administrator.
How to connect the SoundCam to the PC is described in chapter Connecting to a PC on page 42.
Figure 6: Windows user interface - example section
Data transmission with self-defined path

Software
Manual SoundCam 11
4Perform measurements
A sound source is to be localised.
1 . Call up the main menu via the button (1) in the start menu (illustration 4):
The SoundCam is ready to record when - Button (start menu) in the side menu is filled in red.
2 . Touch this to start a measurement.
The acoustic image and the graphic representation of the continuous spectra appear in the display
area.
Figure 8: Selection of the operating mode.
If you have an ultrasound-capable SoundCam (SoundCam 2.0 / SoundCam Ultra), you can long-click
(Windows: right-click) on the "Start measurement" button to open a context menu (see Figure 8) in
which you can select the measurement mode.
Measuring range up to 24 kHz.
Measuring range up to 100 kHz.
End measurements
To stop the measurement, touch
The recorded measurement is now available for analysis (see "Analyse measurement", p. 24). To do
this, press the playback button that is now activated in the left side menu.
Before your next measurement, remember to save the completed measurement so that you can
view it again later (see "Save measurement", p. 23).
Basic functions:
Start measurement
(Wait for activation)
Screenshot
Set marker
Open
measurements
Save measurement
Turn lighting on/off
Playback
Acoustic
image
Frequency
spectrum
Display range
Figure 7: Main menu
Sonogram

Settings
Manual SoundCam 12
4.1 Settings
It is worthwhile to make some situational settings on the unit to get good results quickly. These
settings can be made before or during the measurement.
The following pages describe in detail the settings that you can access via the buttons on the
right-hand side of the screen (see Figure 9).
Setup optimisation: Even with usually small dynamic ranges used for visualisation, reflections
of sound waves can become visible as a sound source in the acoustic image. See Figure 10. If
the reflections are not the subject of the measurement, take care to dampen reflecting
surfaces in the field of view.
Figure 9: Setting options on the main menu
Measurement
settings:
Frequencyfilter
Distance
Scaling
Sound level
Recording time
Figure 10: The noise originates from the side of the
enclosure. The signal registered at the
bottom of the picture is sound reflected from
the tabletop..

Settings
Manual SoundCam 13
4.1.1 Distance
For this as well as for all other settings listed in this section, you will find the respective button
in the right-hand side menu.
1 . Tap the Button
2 . Set the distance to the sound sourece using the slider in the drop-
down menu.
3 . The slider must be released , only then is the value set.
Or:
1 . Tap in the field above the slider and enter the value using the virtual
keyboard that appears.
2 . Press „Enter“. The minimum settings is 10 cm.
If the origin of the sound is unknown, a setting of 100 cm (factory setting)
or above is not critical.
Only for more precise location of an identified source at close range do
you have to adjust the distance setting.
Changes to the setting are not possible in the analysis after the measurement has been completed.
4.1.2 Scaling
Three different modes are available.
Tap on the blue highlighted field (1) in the drop-down menu to change the scaling mode. The
modes change cyclically.
- Scaling mode „Auto“
The sound source that produces the strongest level in the set frequency
band (see Frequency filter, p. 15) is shown. The image area with the highest
level is assigned the colour white, the level at the lower limit of the set
dynamic range a dark blue.
In a complex acoustic environment, adjust the dynamic range setting for
selective localisation. Here, the use of the "Smart" scaling mode can also be
advantageous.

Settings
Manual SoundCam 14
- Scaling mode „Smart“
Smart mode provides suppression of background noise that would result in
a diffuse image.
The level of background noise is determined continuously. Raised by the
"crest value" - adjustable between 5 and 15 dB in the drop-down menu - the
result is the dynamic threshold value.
If the level exceeds the dynamic threshold value, the acoustic image is
displayed according to the set dynamic range, as in the "Auto" mode.
Otherwise, the dynamic threshold is interpreted as the maximum level.
Subtracting the set dynamic range results in the threshold below which the
signal is not visible in the acoustic image.
Compare the signals Q1 and Q2 in the graph (Figure 11).
Ensure that the dynamic range shown does not extend into the background noise, the crest value
should always be greater than the dynamic value.
- Scaling mode „Off“
This mode allows comparative measurements with a reference level. If the
user has not set a value for the maximum, it is determined automatically.
You can change this value by making an entry in the "Maximum" field.
A favourable initial value can also be determined from a stored
measurement.
Changes to the scaling mode and dynamic range are also possible afterwards when analysing the
measurement results.
Running measurements:
Maximum = Maximum value of the last 10
seconds.
Sonst:
Maximum = maximum value of the entire
measurement.
Figure 11: Scaling in smart mode

Settings
Manual SoundCam 15
4.1.3 Frequency filter
Lower selectivity when low frequencies are set.
The condition for the development of low-frequency noise components is a larger radiating
area. The resulting large colour area can cover several high-frequency noise sources that
could possibly be located more precisely.
The lower slider is highlighted in red at a setting below 1 kHz to make this clear.
In new measurements you can adjust the frequency filter step by step to achieve a
satisfactory selectivity.
The button at the top left (see Figure 12 - Figure 14) switches between different methods for
entering the minimum and maximum filter frequency:
Manual:
Adjusting the filter frequencies with the slider.
If you hold the frequency slider (see Figure 12) to the left of the centre, you
can adjust the upper and lower cut-off frequencies separately.
If you touch the slider to the right of the centre, you can change the upper
and lower cut-off frequencies together and at the same time while
maintaining the relative distance between the minimum and maximum filter
frequencies.
Alternatively, the desired frequencies can also be entered directly into the
fields above the slider.
Octave filter:
The minimum and maximum filter frequency can be set by selecting one or
more frequency bands directly following each other (see Figure 13 and
Figure 14).
Third octave filter
1/3 octave filter:
Changes to the setting are not possible in the analysis after the measurement has been completed.
Figure 12: Manual
frequency selection
Figure 13: Frequency selection
(octaves)
Figure 14: Frequency
selection (third-octaves)

Listening - focused sound
Manual SoundCam 16
4.1.4 Recording time
Here you set the maximum recording time for your measurement.
oSelect a recording time of 10, 30 or 60 seconds.
The measurement data is only stored permanently after the save function has
been activated (see Save measurement, p. 23).
Note that the time required to save or open a file increases proportionally to
the set recording duration.
When using the PC application, longer recording durations (up to 180 s) are
possible.
The capacity of the internal memory of 32 GB is sufficient for about
400 recordings with a duration of 10 s, 80 recordings of 60 s, or 25000
screenshots.
4.2 Listening - focused sound
In addition to visualisation in the acoustic image, you can use the audio output of the
SoundCam. This is a suitable method for localising a known sound in a complex acoustic
environment.
Here, the focus is on the center of the acoustic image, and the surrounding sound is suppressed
(local sound).
Connect headphones. The socket is located on the device on the underside of
the left handle (see Figure 4, p. 8).
Warning!
Excessive sound pressure can cause hearing damage. You should
only use the headphones at high volume for short periods of time
and otherwise set an appropriate volume.
i. If is displayed in the menu, the output is muted. This corresponds to
the factory setting of the SoundCam.
1 . Touch this button.
2 . Now adjust the playback volume with the slider.
3 . With the measurement running, point the SoundCam at the object to
be measured and „scan“ it.
Extensive calculations take place. Therefore, the audio signal is output with a slight delay.

Listening - focused sound
Manual SoundCam 17
Further setting options:
The global spectrum is the unaveraged, A-weighted spectrum of the raw signal from a single
microphone (microphone 0).
The local spectrum is the unaveraged, A-weighted spectrum of the delay and sum
beamformed noise signal focused on the centre of the display (local / focused sound,
corresponding to the audio output).
Audio output is activated.
Audio output is disabled.
The audio output and the local spectrum are filtered according to the set
minimum and maximum frequency (see Figure 15).
The audio output and the local spectrum are not filtered.
(see Figure 16).
Figure 15: Local spectrum filtered
Figure 16: Local spectrum
unfiltered

Triggering recordings (self-timer)
Manual SoundCam 18
4.3 Triggering recordings (self-timer)
This function enables the SoundCam to automatically save sections of these measurements
while the measurement is running. You can configure the trigger yourself.
Trigger method „acoustic image“
Parameters:
Pre-trigger time
The period before the trigger point that is covered by the recording.
Post-trigger time
The period after the trigger point that is covered by the recording.
Trigger level
Limit value above which the trigger is released.
Please note that you are working with the acoustic image as the trigger.
Accordingly, the trigger can only react to events within the minimum and
maximum filter frequency.
The trigger is activated as soon as the trigger level entered in the dialogue box (see Figure 17) is
reached or exceeded during the measurement.
A marker is then automatically set to mark the event in the measurement.
As soon as the follow-up time has elapsed, the section of the measurement given by the trigger
time plus the pre- and post- time is automatically saved.
The appropriate trigger level for the application can be determined, for example, with
the help of a previous measurement.
Figure 17: Settings menu for the trigger

Triggering recordings (self-timer)
Manual SoundCam 19
Trigger method „Spectrum“
With this triggering method, the spectrum serves as the trigger.
In contrast to the triggering method acoustic image, where a single trigger level is sufficient,
several trigger points (trigger level / frequency) are defined for the triggering method spectrum.
A reference spectrum is generated from these reference points.
The trigger is activated as soon as at least one value of the current spectrum is greater than or
equal to the corresponding value in the reference spectrum.
A marker is then automatically set to mark the event in the measurement.
As soon as the post time has elapsed, the section of the measurement given by the trigger time
plus the pre- and post time is automatically saved.
Set the desired values for frequency and level by tapping in the spectral diagram.
The last measurement or the currently loaded measurement is displayed.
The individual curves - time cursor, maximum, average and minimum - can be shown or hidden
by tapping the legend entry of the same colour at the top right of the screen.
When tapping a point in the diagram, the fields for frequency and level (6) take on its values. The
values can also be entered manually in the fields.
By pressing the button–(3) the values are entered as interpolation points in the trigger curve.
By tapping on a grid point (1), you select it. You can also use the direction buttons (2) to switch
between grid points and view their values. By dragging on the touch screen or changing the values
(6) you change them.
Pressing the button (4) removes a previously selected interpolation point, (5) irreversibly
removes all previously entered interpolation points.
Return to the start menu to apply the trigger (self-timer) to the measurements.
Figure 18: Setting options of frequency-dependent
triggering / self-triggering

Triggering recordings (self-timer)
Manual SoundCam 20
Brief overview for the trigger method Spectrum.
Pre-trigger time
The period before the trigger point that is covered by the recording.
Post-trigger time
The period after the trigger point that is covered by the recording.
Adding the current coordinates (frequency / level) as marker point.
Removes a previously selected marker point.
Select the previous marker point.
Select the next marker point.
Delete all markers.
Time cursor
Show/hide the spectrum in which the time cursor is currently located.
Maximum
Show / hide the maximum curve.
This curve is based on the last measurement.
Mean value
Show / hide the mean value curve.
This curve is based on the last measurement.
Minimum
Show / hide the minimum curve.
This curve is based on the last measurement.
This manual suits for next models
3
Table of contents