CalDigit T4 User manual

User Manual
For more information visit www.caldigit.com
RAID

2
CalDigit
Contents
1. Introduction 03
Package Contents 06
T4 Diagram 07
2. Using the T4 08
Installing the Software 08
Connecting the T4 09
Create a RAID 10
RAID 0 or RAID 1 11
RAID 5 14
Replacing the T4 Drive Module 18
Turning o the T4 20
3. CalDigit Drive Utility 21
4. Technical Support & Warranty Information 22

3
CalDigit
1. Introduction
The CalDigit T4 is a compact 4-bay storage solution for users who not only require outstanding
performance, but also the ultimate protection for their important data. The T4 is a RAID 5 device
that delivers great performance whilst at the same time giving users single drive redundancy for
their valuable data. The T4 is equipped with Thunderbolt 2 and is compatible with both 3.5”HDD
and SSDs, making it the ideal solution for 4K workows that demand high performance storage
devices. Also capable of RAID 0, 1, and JBOD modes, it is ideal for users who need a exible 4-bay
RAID device.

4
CalDigit
Please read the T4 manual thoroughly and familiarize yourself with the product before use.
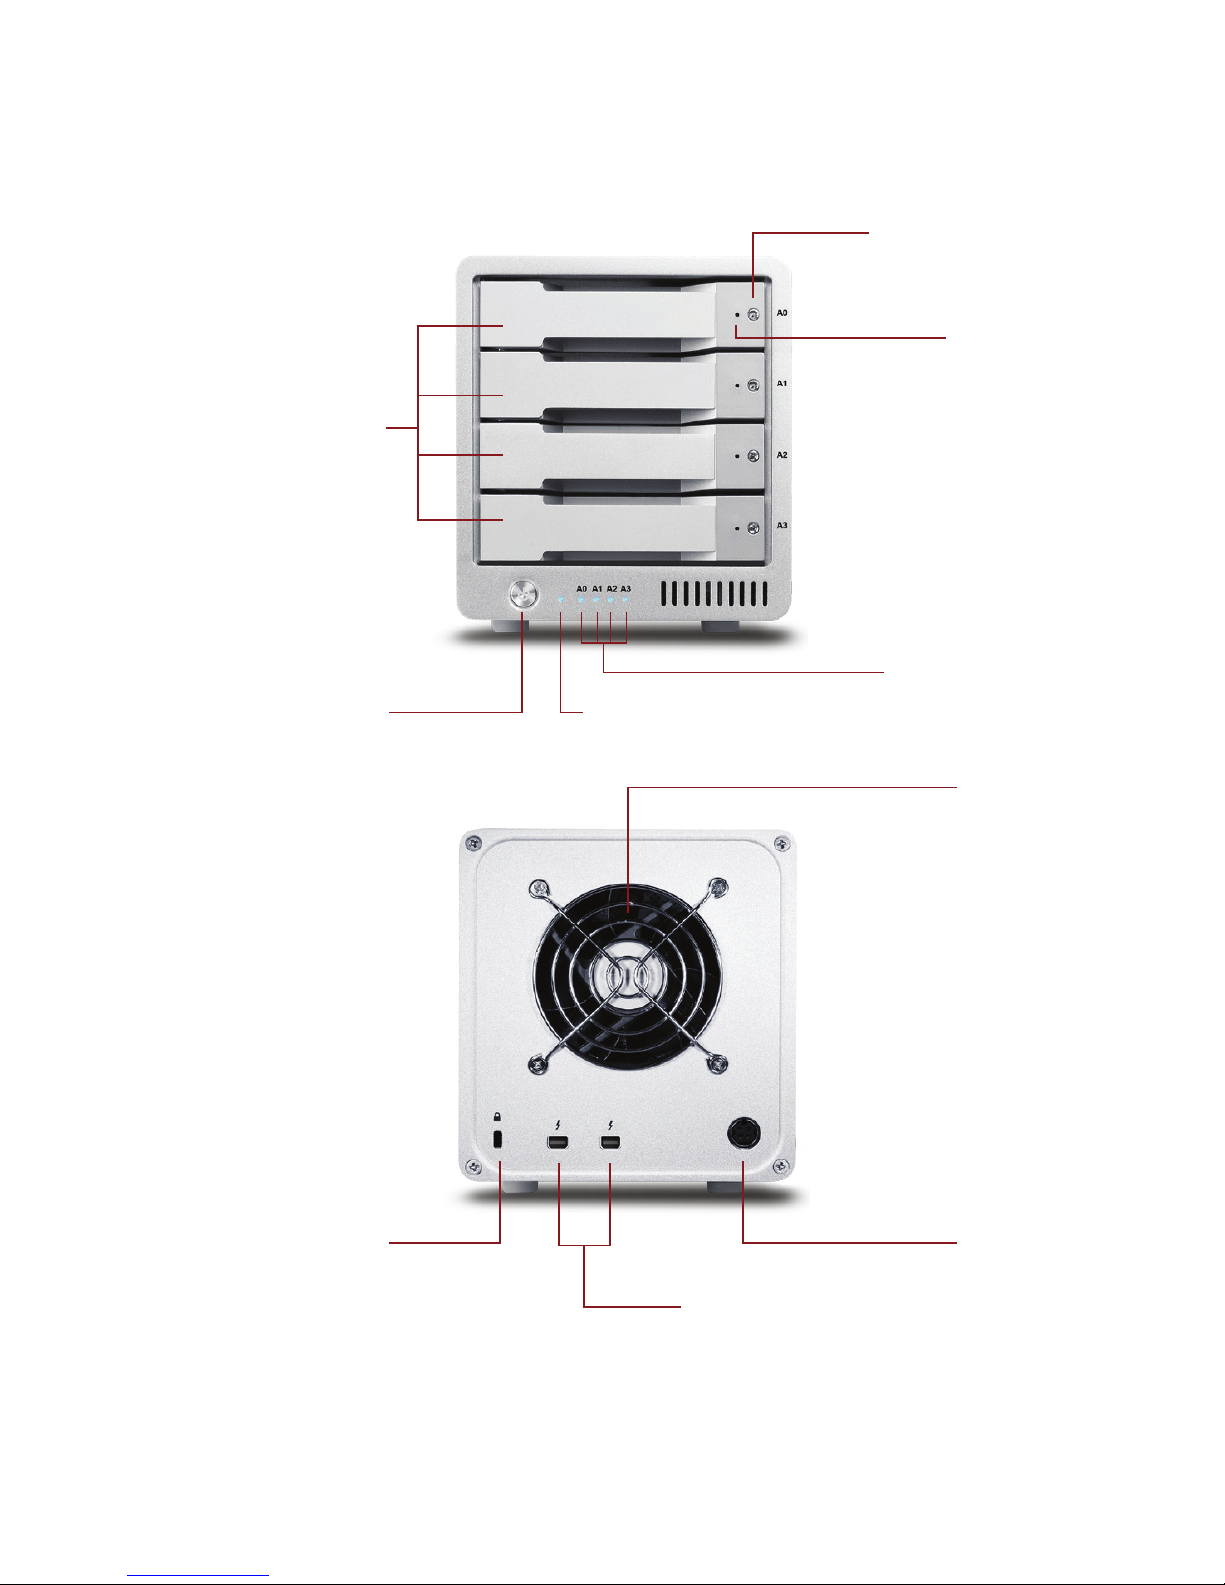
Only use the T4 in an area with sucient ventilation. Make sure that the fan is not obstructed
to ensure proper air ow, which is essential for heat dissipation. Do not leave or use the T4
near a heat source or direct sunlight.
Avoid using the T4 in extremely hot or cold environments as it will increase the likelihood of
premature drive failure. The safe operating temperature ranges from 40F - 95F (4.4C-35C).
Avoid using the T4 in humid environments. Moisture and condensation can accumulate in
the drive and damage the electrical components, resulting in unit failure and catastrophic
data loss.
Only use the power adapter that has been supplied with the T4. An excessive or inadequate
power supply can result in unstable performance, data corruption, or drive failure.
Make sure to transport your T4 with care. Hard drives are sensitive to shock and rough
handling, and can result in degrading performance or disk failure.
Keep the T4 away from liquids and moisture. Exposure to liquids on the T4 can result in
damaging the unit, electric shock, and result in a re hazard. If your T4 gets wet while it is
still o, do not turn it on.
In the case of any issues with the device, do not attempt to repair or open the T4 yourself.
Doing so can result in personal injury, damaging the device, and will void the warranty. If you
have any issues, please contact CalDigit technical support.
All electrical devices are susceptible to failure. In order to protect yourself against sudden
data loss, it is highly recommended that you create at least two backups of your data. If you
will be sending a drive back to CalDigit for service, please make sure you have backed up
your data beforehand. CalDigit cannot guarantee the integrity of data on drives that are
returned to us. CalDigit cannot make provisions for data recovery or be held liable for any
data loss.
General Use Warnings
Safety Warnings

5
CalDigit
The T4 unit comes with a standard, 5 year limited warranty.
The HDDs come with a 3 year limited warranty.
Burst transfer rates will vary from one computer to another. Depending on the host conguration,
average speeds are usually lower.
Weight varies by conguration and manufacturing process.
The use of this product is subject to acceptance of the software license agreements
included. This product contains electronic documentation.
1TB (Terabyte) = 1000GB (Gigabyte) = 1,000,000,000 bytes. Total accessible capacity var-
ies depending on operating environment (typically 5-10% less).
IMPORTANT

6
CalDigit
Package Contents
1 1 x T4 RAID
2 4 x CalDigit universal drive modules
3 1 x Drive module pin release key
4 1 x Drive module lock key
5 1 x Power supply
6 1 x AC cord
1
5 6
2
43

7
CalDigit
T4 Diagram
Exhaust Fan
AC Power In
Dual Thunderbolt™ 2 Ports
Kensington Lock
Removable Drive Module
Power LED
LED Status Lights
Front Side Power Button
Drive Module Lock
PIN Release

8
CalDigit
2. Using the T4
Installing the Software
1Install the CalDigit Drive Utility Software from the CD that was included with the T4. The
installer can also be downloaded from www.caldigit.com/support.asp. This installation package
will also install the drivers necessary to operate the T4.
NOTE The driver and software must be installed in order for your computer to
recognize the T4.

9
CalDigit
Connecting the T4
1Turn on the computer, make sure you have logged into the OS.
2Connect a Thunderbolt cable* from your computer to the T4.
3Connect the power supply to the T4.
4Press the T4’s power button and it will boot. You will see it mount and it will be ready for use.
34
*Thunderbolt cable sold separately.

10
CalDigit
Create a RAID
NOTE TheT4 comes formatted as a RAID 0 using Apple’s HFS+ le system. Windows
operating systems are not currently supported.
Striped RAID Set - RAID 0 - distributes data evenly across all drives in RAID 0. Use this mode
for increased performance. RAID 0 provides no protection against drive failure. It is highly
recommended to have a backup when using the T4 in RAID 0.
Mirrored RAID Set - RAID 1 - creates identical copies of data across all drives in the RAID 1 volume.
RAID 1 is ideal for back up and archiving. This is the most secure form of RAID but does not oer
any performance increase.
Parity Striped RAID Set - RAID 5 - creates identical copies of data across all drives in the RAID 5
volume. Users that require a combination of performance and protection will opt for RAID 5. RAID
5 oers single drive redundancy along with the performance of a striped set. In the unlikely event
of a single drive failure, the data will remain intact and accessible.
Concatenated Disk Set - SPAN (non-RAID) - drives work together but data is not distributed
evenly. After the rst drive in the SPAN set is lled, data then gets saved to the following drive.
SPAN does not oer any performance gains but is useful when using drives of dierent capacities.
It is highly recommended to have a backup when using SPAN because it does not oer any form
of data protection.

11
CalDigit
1Launch the CalDigit Drive Utility Software
Mac OS X - RAID 0 or RAID 1
WARNING Deleting the RAID set will delete all data on the T4.
Back-up your data before proceeding.
2Click on the “Disk Utility” button on the left hand side of the window.
3Click the “RAID Management” button and then click on “Delete RAID Sets”. Then click on “Yes”
to proceed and the current RAID set will be deleted.
If the T4 is currently in a RAID set, users will need to delete the current RAID before creating a new
RAID set. If your T4 is not congured into a RAID set you can skip to step 4.

12
CalDigit
5Check all of the drives that you would like to include in the RAID set and select “create”.
Drives are numbered from top to bottom (A0 top, A1 A2 middle, A3 bottom).
4Go back into the“Disk Utility” tab and select “Create New RAID Set”. Select the RAID mode you
would like to create.

13
CalDigit
6The RAID will be created and the T4 will mount on your computer.

14
CalDigit
RAID 5
1Launch the CalDigit Drive Utility Software
2Click on the “Disk Utility” button on the left hand side of the window.
3Click the “RAID Management” button and then click on “Delete RAID Sets”. Then click on “Yes”
to proceed and the current RAID set will be deleted.
If the T4 is currently in a RAID set, users will need to delete the current RAID before creating a new
RAID set. If your T4 is not congured into a RAID set you can skip to step 4.
WARNING Deleting the RAID set will delete all data on the T4.
Back-up your data before proceeding.

15
CalDigit
5Check all of the drives that you would like to include in the RAID set and select “create”.
Drives are numbered from top to bottom (A0 top, A1 A2 middle, A3 bottom).
4Go back into the “Disk Utility” tab and select “Create New RAID Set”. Then Select RAID 5.

16
CalDigit
You can go to the “Device list” to check status of RAID 5.
6Once the RAID has been created open OS X Disk Utility (Finder-Applications-Utilities-
Disk Utility) and highlight the T4 RAID.

17
CalDigit
7Select the “Partition” tab. Here you can change the options such as partition name, number
of partitions, and le system type. Once you have selected your options, conrm by selecting
the partition button. Once the partition has been created, theT4 will mount on your computer
and will be ready for use.

18
CalDigit
1
2
Insert the drive key into the lock on the front of the drive module and turn clockwise to unlock it.
Insert the drive pin into the pin release until the handle of the drive module pops open.
Replacing the T4 Drive Module

19
CalDigit
3
4
Pull the drive module from the T4 enclosure.
Insert the new drive in the same orientation as the drive you removed. The key holes should be
on the same side as the drive labeling. Push the drive in all the way and then press in the drive
module handle until it locks securely into place. Please do not use excessive force to insert the
drive or you can damage it. The new drive will mount onto your OS.

20
CalDigit
5To lock the new module into place, insert the drive key into the lock and turn counterclockwise.
1
2
Right click on the T4 volume icon and click “Eject CalDigit T4”. It is important that the T4 is
ejected prior to shutting down to prevent directory/data corruption.
After the T4 dismounts, press and hold the power button until the power LED turns o.
Turning o the T4
CalDigit T4
21
Table of contents
Other CalDigit Enclosure manuals
Popular Enclosure manuals by other brands

Pentair
Pentair Hoffman JIC manual

StarTech.com
StarTech.com SAT3510U2V manual

StarTech.com
StarTech.com SAT2510U2F instruction manual

Leviton
Leviton Opt-X 5WMNT-1C Instructions for use

HighPoint
HighPoint RocketStor 6674T Quick installation guide

Dallmer
Dallmer Stausafe F Original installation and operating instructions

Hubbell
Hubbell Killark SJIC Series INSTALLATION, OPERATION & MAINTENANCE DATA SHEET

CommScope
CommScope NOVUX Compact Closure 100 Series installation instructions

Vortice
Vortice HRI MINI CB Instruction booklet

Ventev
Ventev Rajant KM3-ES-2450 troubleshooting guide

FRIEDHELM LOH
FRIEDHELM LOH RITTAL 7888.390 Assembly and operating instructions

CRU Dataport
CRU Dataport DE100 Series manual