9/32
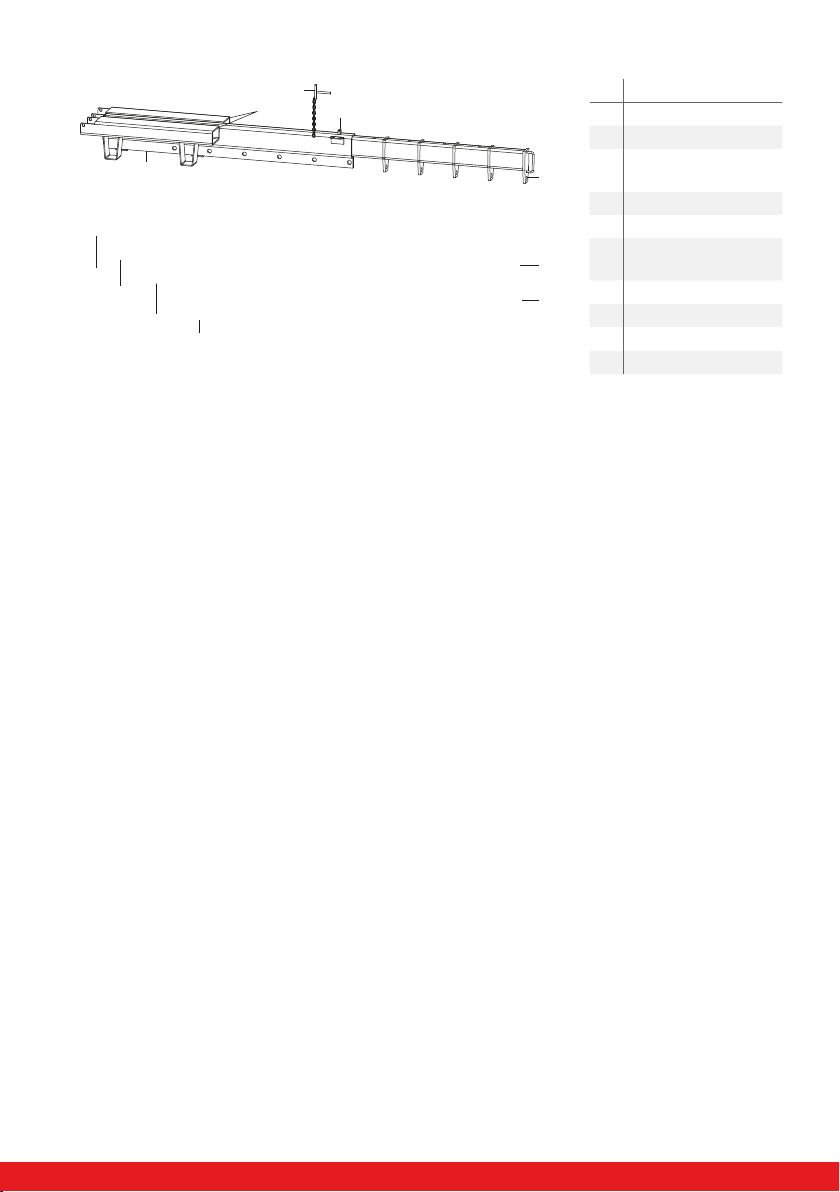
2.3. Placement of the decals
The safety and warning labels should be placed as described in the pictures below. See chapter 3 for
the explanation of the safety warnings. If the decals are damaged or missing, replace them.
1
5
2
34
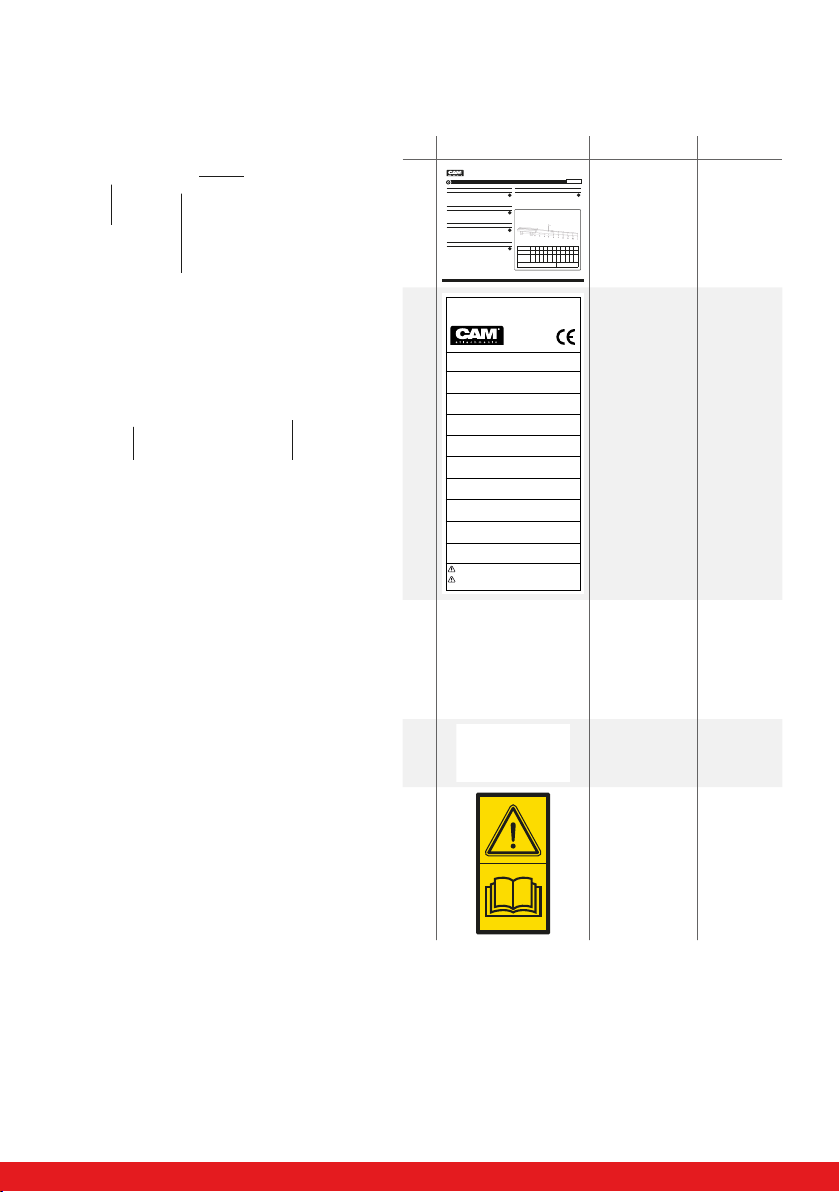
N° Decal Explanation Reference
1
Nom: POTENCETÉLESCOPIQUE 2 TONNES
Procédure: 1. Fourchesdoivent se trouver complètement dans profile A
2. Verrouillezavec goupille B
3. Accrochezla charge au crochet C
4. Verrouilleztoujours Ie bras escamotable avec goupille D
5. Rouleztoujours à une vitesse de 5 km/h au maximum
6. IIest interdit de faire des mouvements de frein brusques avec une charge pendant au bras
7. Lebrasne peut être utilisé que pour lever des charges, et non pas comme attache-remorque ou pour tirer des charges
Name: TELESCOPICCRANE JIB MANUAL 2T
Procedure: 1. Forksmust be completely in profile A
2. Boltwith pin B
3. Hangthe load to hook C
4. Boltthe extendible arm always with pin D
5. Driveat a speed of maximum 5 km/hour
6. Shortbrake moves are forbidden when a load is on the crane jib
7. Thecrane jib can only be used to lift loads and cannot be used as a hook or to move loads
Name: TELESKOPLADEGERÄT2 TONNEN
Verfahren: 1. Gabelnmüssen sich ganz in Profil A befinden
2. VerriegelnSie mit Bolzen B
3. HängenSie die Last an Haken C
4. VerriegelnSie den ausziehbaren Arm immer mit Bolzen D
5. FahrenSie mit einer Geschwindigkeit von maximal 5 km/St
6. KurzeBremsbewegungen mit einer Last am Kranarm sind verboten
7. DerKranarmkan nur zum Heben von Lasten benutzt werden, und nicht als Zughaken oder um Lasten zu ziehen
Nombre: CARGADORTELÉSCÓPICO 2 TONELADAS
Procedimiento: 1. Lashorquillas deben estar completamente en el perfil A
2. Cerradascon el pasador B
3. Cuelgeel peso en el gancho C
4. Bloqueéel brazo extensible siempre con el pasador D
5. Noconduzca a una velocidad mayor de 5 Km. / hora
6. Movimientoscortos de freno con carga en el brazo de la grúa están prohibidos
7. EIbrazo de grúa sólo puede ser utilizado para elevar cargas y no puede ser utilizado para arrastrar cargas
FR NL
D
GB
ESP
Position/Posición/
Positie
1234567891011
Capacity/Capacité/
Kapazität/Capacidad/
Capaciteit(kg)
2000 1800 1600 1200 900 600 500 400 350 280 200
Loadcenter/
Centrede charge/
Lastschwerpunkt/
Centrode carga/
Laadzwaartepunt(mm)
500 750 1000 1250 1500 1750 2000 2250 2500 2750 3000
FIXEDARM/BRAS FIXE/FESTER ARM/BRAZO FIJO/VASTE ARM
EXTENSIBLEARM/BRAS EXTENSIBLE/
AUSZIEHBARERARM/BRAZO EXTENSIBLE/
UITSCHUIFBAREARM
CALABM_2006001 • REF 31601963
INSTRUCTIONS
CAMATTACHMENTS®
Brabantstraat 15 • 8790 Waregem • Belgium
T +32 56 43 42 11 • F +32 56 43 44 88
REF107TA6410
Naam: TELESCOPISCHEKRAANARM 2T
Procedure: 1. Vorkenmoeten volledig in profiel A zitten
2. Vergrendelmet pin B
3. Hangde last aan haak C
4. Vergrendeluitschuifbare arm altijd met pin D
5. Rijtegen een snelheid van maximaal 5 km/uur
6. Korterembewegingen met een last aan de kraanarm zijn verboden
7. Dekraanarm kan enkel gebruikt worden om lasten te heffen en kan niet gebruikt worden als trekhaak of om
lastente trekken
Sticker_2ton_LABEL_062020_31601963.indd 1 22/06/2020 14:53
Quick
instructions
guide.
166TA3449
2
TYPE
TYP
MODEL
MODÈLE - MODEL
MODELL
SERIENR.
N° SÉRIE - SERIAL NBR.
SERIENNUMMER
BOUWJAAR
ANNÉE DE CONSTRUCTION
YEAR OF CONSTRUCTION - BAUJAHR
GEWICHT
POIDS - WEIGHT
EIGENGEWICHT kg
ZWAARTEPUNT
C.D.G- CENTRE OF GRAVITY
EIGENSCHWERPUNKT mm
VOORBOUWMAAT
ÉPAISSEUR - THICKNESS
VORBAUMAßmm
NOM. VERMOGEN
CAP. NOM.
TRAGFÄHIGKEIT kg-l
LASTZWAARTEPUNT
C.D.G. CENTRE - LOAD CENTRE
LASTSCHWERPUNKT mm
MAX. WERKDRUK
PRESSION MAX. DE SERVICE
MAX
.
WORKPRESSURE
-
MAX
.
ARBEITSDRUCK
bar
TVH 644478
Manufactured outside the EU for:
TVH PARTS HOLDING NV
Brabantstraat 15 • 8790 Waregem • Belgium
Controleer de restcapaciteit van de heftruck met uitrusting.
Vérifiez la capacité résiduelle du chariot avec l’equipment. Check the residual capacity of the
truck with the equipment. Beachten Sie die restliche Tragfähigkeit des Staplers mit Vorbau.
Niet met waterstraal reinigen.
Ne pas laver avec jet d’eau. Do not wash with water jet. Nicht mit Wasserstrahl reinigen.
With this type
plate you can
identify your
product.
166TA3445
3Take care to
avoid being
struck by or
walking into
an overhead
load.
123TA5325
4Crushing
hazard.
162TA9232
5Read the
instructions
from the
manual before
use.
138TA3912