CAMBRIDGE EDGE M User manual

1
EDGE M
Manual Generated: 16/08/2022 - 03:01

2
Table of Contents
EDGE M 3 ...............................................................................................................................................................................................................................
Introduction 4 .......................................................................................................................................................................................................................
What’s included with the EDGE M? 5 ................................................................................................................................................................................
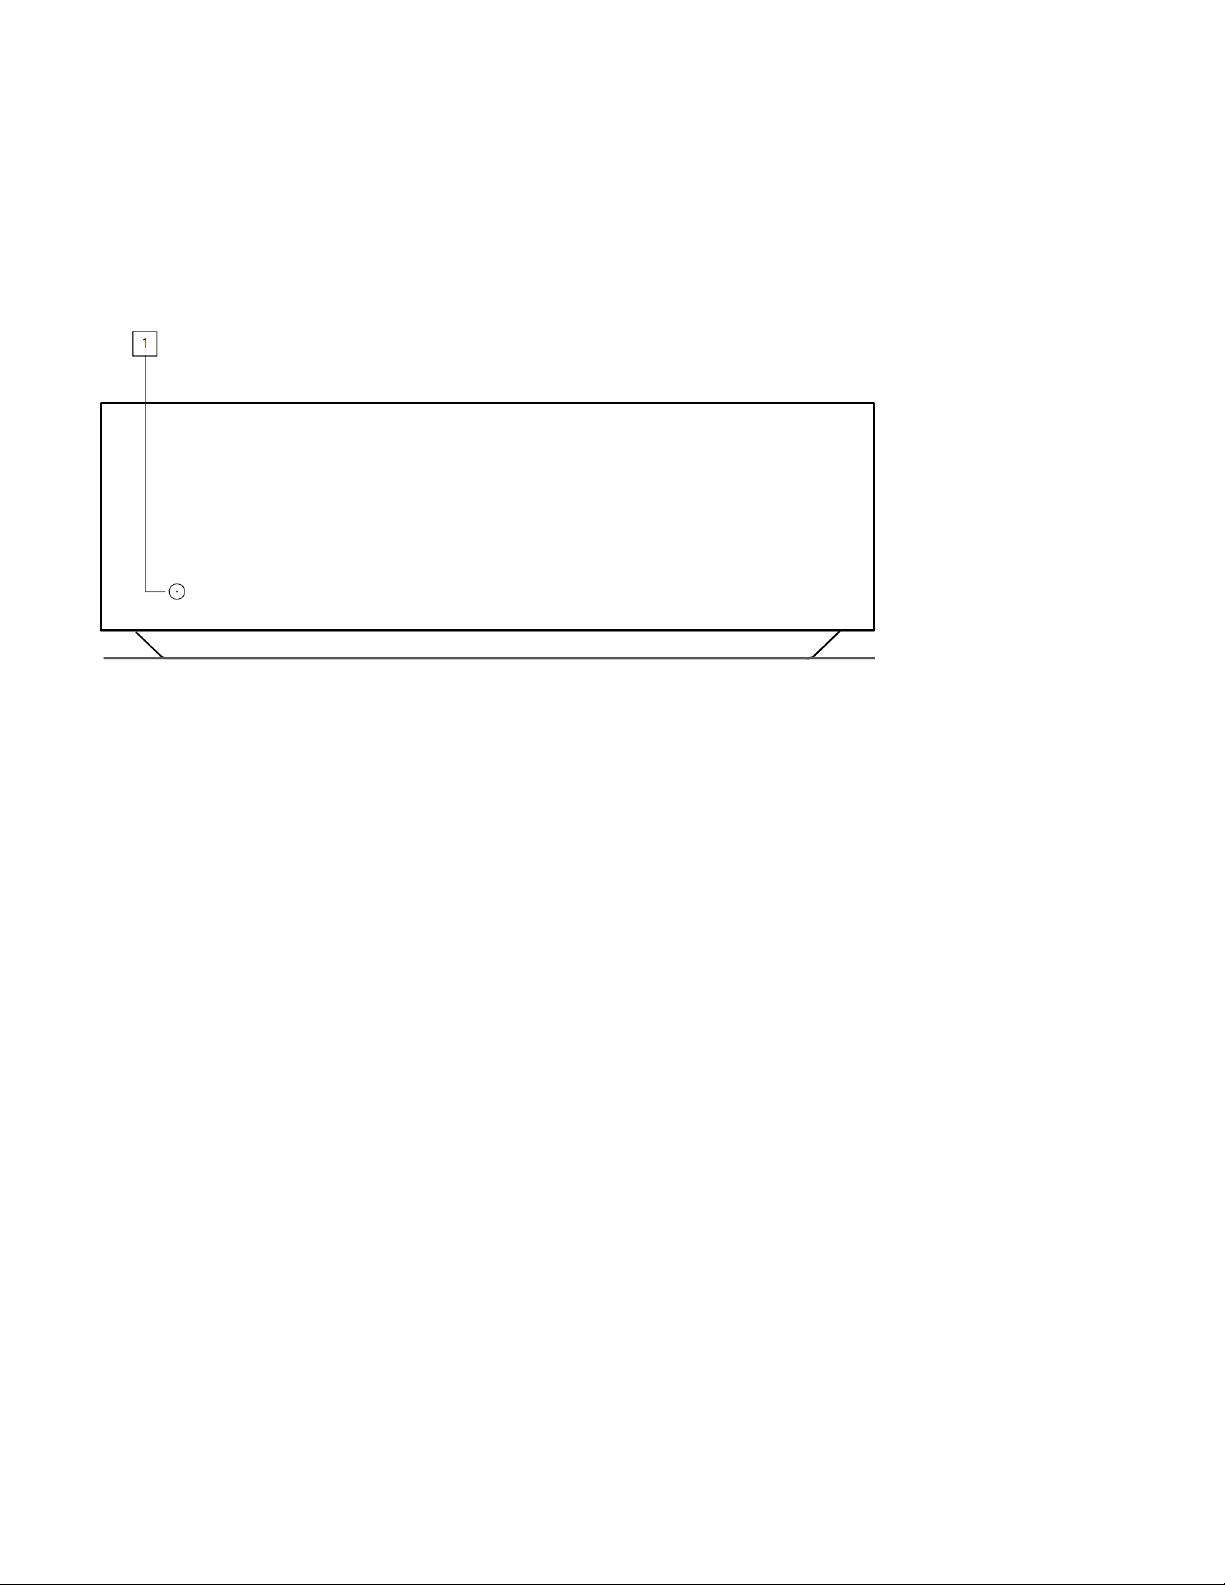
Front panel 6 .........................................................................................................................................................................................................................
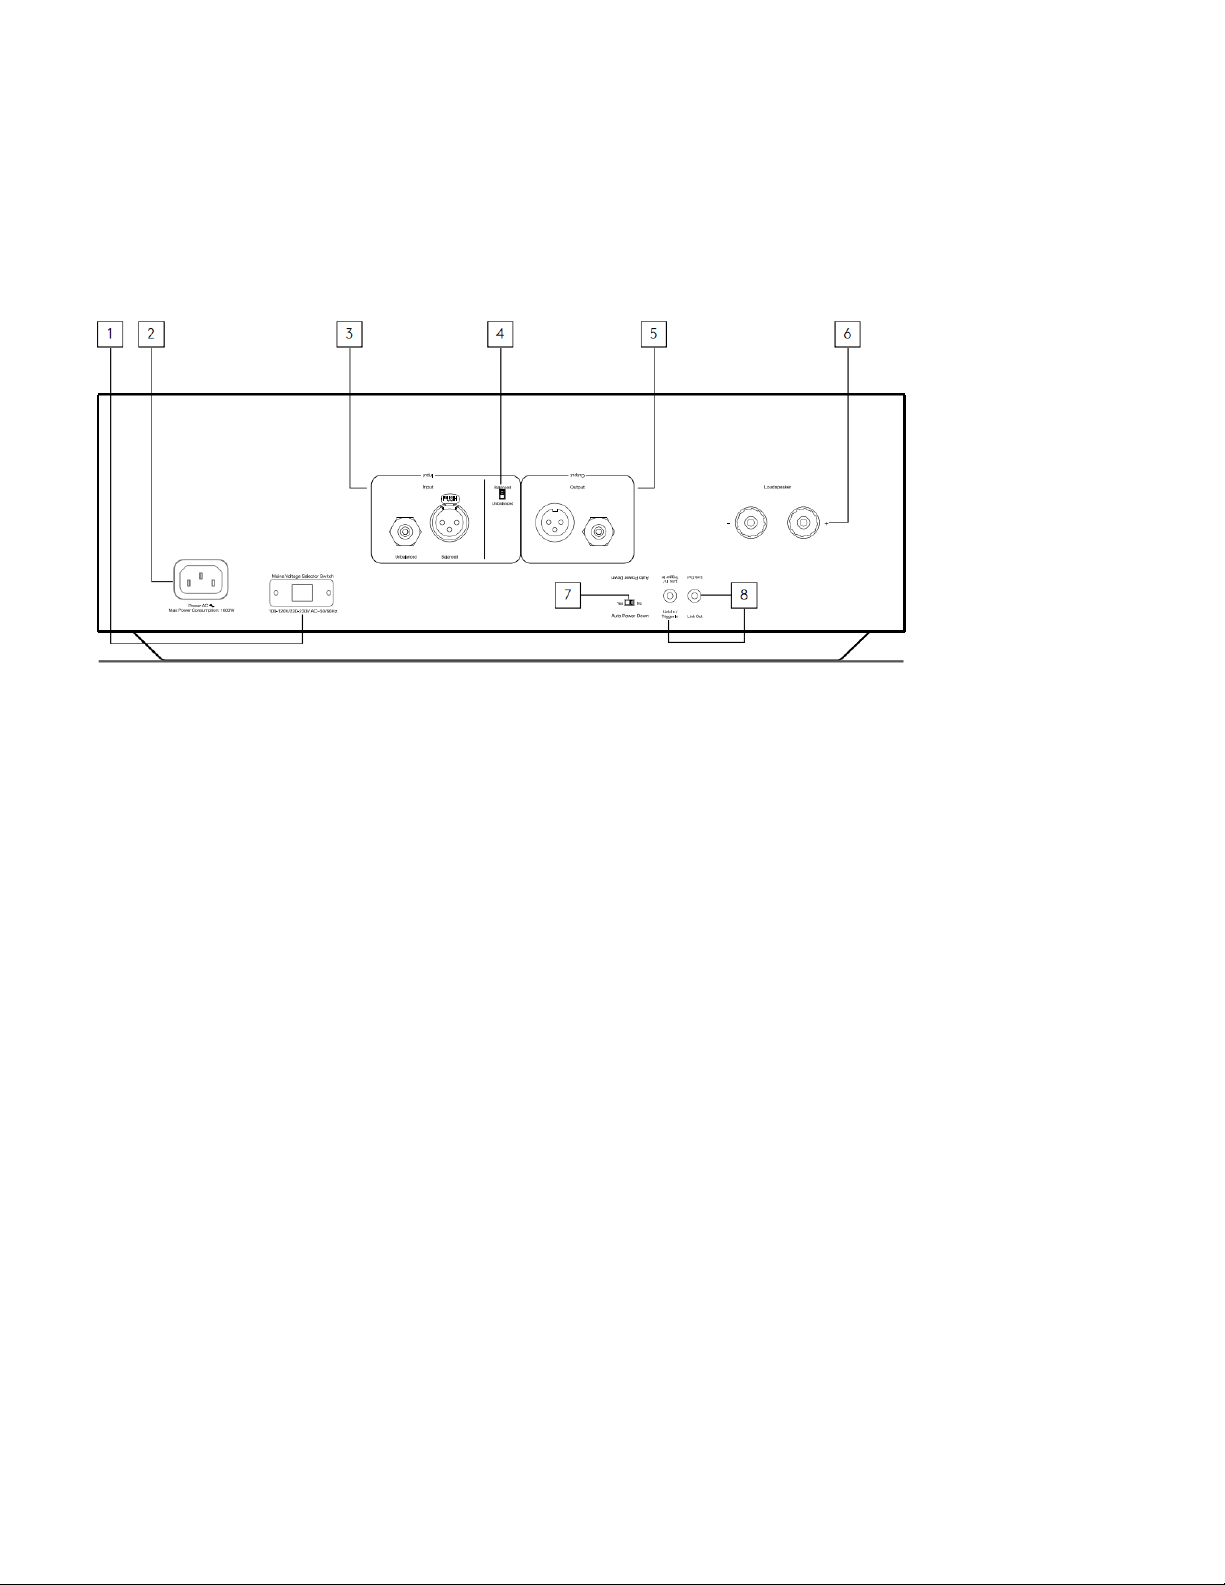
Rear panel connections 7 ....................................................................................................................................................................................................
Getting connected 9 ............................................................................................................................................................................................................
Power syncing 12 .................................................................................................................................................................................................................
Protection circuitry 13 .........................................................................................................................................................................................................
Troubleshooting 14 ..............................................................................................................................................................................................................
Technical specifications 15 .................................................................................................................................................................................................
Frequently Asked Questions (FAQ) 17 ..............................................................................................................................................................................

3
EDGE M
Last updated: August 9, 2022 05:03. Revision #5716
Users Manual

4
Introduction
Last updated: August 9, 2022 05:03. Revision #5706
This guide is designed to make installing and using this product as easy as possible. Information in this document has been carefully checked for
accuracy at the time of printing; however, Cambridge Audio’s policy is one of continuous improvement, therefore design and specifications are subject to
change without prior notice.
This document contains proprietary information protected by copyright. All rights reserved. No part of this manual may be reproduced by any
mechanical, electronic or other means, in any form, without prior written permission of the manufacturer. All trademarks and registered trademarks are
the property of their respective owners.
© Copyright Cambridge Audio Ltd 2022.
For upcoming news on future products, software updates and exclusive offers, make sure you register your product
at https://www.cambridgeaudio.com/register

5
What’s included with the EDGE M?
Last updated: August 9, 2022 05:03. Revision #5707
Inside the box of your EDGE M you will receive:
EDGE M Monoblock Power Amplifier1.
UK power cord (Depending on which country the EDGE M was purchased in)2.
EU power cord (Depending on which country the EDGE M was purchased in)
CU power cord (Depending on which country the EDGE M was purchased in)
JP power cord (Depending on which country the EDGE M was purchased in)
Link Cable3.
Instruction Manual4.
Warranty Card5.
Welcome Letter6.
Unboxing Card 7.

6
Front panel
Last updated: August 9, 2022 05:03. Revision #5708
1. STANDBY/ON - Switches the unit between Standby mode (indicated by dim LED) and On (indicated by bright LED). Standby mode is a low power
mode where the power consumption is less than 0.5 Watts.
AUTO POWER DOWN (APD)
The product will automatically switch to standby mode after inactivity of 20 minutes. To enable or disable this function, use the APD switch located on
the rear of the unit.
AUTO POWER UP (APU)
This product will automatically switch back on if it detects audio signal and will resume normal function. Auto Power Up will only work after the product
has Auto Powered Down on the same input.

7
Rear panel connections
Last updated: August 9, 2022 05:03. Revision #5709
1. VOLTAGE SELECTOR SWITCH
Note: For use by Cambridge Audio service personnel only!
2. AC POWER SOCKET
3. BALANCED/UNBALANCED INPUTS - The XLR input is balanced and the RCA input is unbalanced.
4. BALANCED/UNBALANCED SWITCH - Select depending on whether a source is connected to the balanced XLR or unbalanced RCA input.
Note: There will be no sound from the amp if the correct input isn’t selected. If a source is connected to the balanced input, for example, ensure that the
balanced switch has been selected.
5. LOOP OUT - The XLR output is balanced and the RCA output is unbalanced.
6. SPEAKER TERMINALS
Note: When using a banana plug, make sure the speaker terminals are completely tightened before inserting the plug.

8
Connect the wires from your left channel loudspeaker to the left positive and negative terminals and the wires from the right channel loudspeaker to the
right positive and negative terminals.
In each case, the red terminal is the positive output and the black terminal is the negative output.
Care should be taken to ensure no stray strands of wire short the speaker outputs together. Please ensure that the loudspeaker terminals have been
tightened completely to provide a good electrical connection.
It is possible for the sound quality to be affected if the screw terminals are loose.
7. AUTO POWER DOWN (APD) SWITCH - Switches to enable or disable the Auto Power Down function. When enabled, the amplifier will automatically
switch to standby mode after inactivity of 20 minutes.
8. LINK - Refer to the 'Power syncing' section of this manual for more information.

9
Getting connected
Last updated: August 9, 2022 05:03. Revision #5710
LOUDSPEAKERS
Check the impedance of your speakers. You can use types with an impedance of between 4 and 8 Ohms.
The red coloured speaker terminals are positive (+) and the black speaker terminals are negative (-). Make sure the correct polarity is maintained at
each speaker connector or the sound can become weak and “phasey” with little bass.
USING BARE WIRE CONNECTIONS
Prepare the speaker cords for connection by stripping off approximately 10mm (3/8”) or less of the outer insulation. More than 10mm could cause a
short circuit. Twist the wires tightly together so there are no loose ends. Unscrew the speaker terminal, insert the speaker cable, tighten the terminal
and secure the cable.
Note: All connections are made using standard loudspeaker cable.
USING BANANA PLUGS
We recommend using Banana plugs with our units to establish a secure connection and ensure there are no loose strands of wire that may cause
unwanted noise or interference.
Once you have stripped the outer insulation of the cable and twisted the wires as indicated below, securely connect these to your banana plugs and
push the plug in as far as possible without applying excessive force.
Note: When using a banana plug, make sure the speaker terminals are completely tightened before inserting the plug.

10
BASIC CONNECTIONS
Balanced stereo connections:
The diagram below shows a basic balanced stereo connection between two EDGE M amplifiers and the EDGE NQ. In this stereo connection each Edge M
drives one speaker.
The Balanced/Unbalanced switch on the Edge M must be switched to the ‘Balanced’ position.

11
Unbalanced stereo connections:
The diagram below shows a basic unbalanced stereo connection between two EDGE M amplifiers and the EDGE NQ. In this stereo connection each Edge
M drives one speaker.
The Balanced/Unbalanced switch on the Edge M must be switched to the ‘Unbalanced’ position.

12
Power syncing
Last updated: August 9, 2022 05:03. Revision #5711
Use the Link wire between two EDGE M amplifiers to synchronise power on/standby. When you turn one EDGE M On/Off, the second EDGE M will also
turn On/Off.
TRIGGER IN
The EDGE M can also be connected to the trigger control output of home automation equipment to control the power state of the EDGE M. The input
level should be between 5V and 12V

13
Protection circuitry
Last updated: August 9, 2022 05:03. Revision #5712
The EDGE M includes Amplifier Protection Circuitry to detect faults with Over Temperature, DC and Over Current. If any of these faults are detected the
LED standby button will turn red.
Over Temperature
Over temperature is caused by a combination of high listening levels and low impedance speakers. The EDGE M includes temperature detection which
constantly monitors the heat generated by the output transistors.
If the monitored temperature reaches a high level (suitably within the limits of the output devices) the amplifier will automatically switch into a fault
mode to protect itself from damage.
If the loudspeaker impedance is low the temperature of the amplifier may rise faster as the amplifier is working harder. If the amplifier is mounted in a
cabinet or the ventilation slots are obstructed the over temperature detection may activate/reactivate after a short listening time.
Remedy - Leave the unit for 15 minutes to cool down before pressing the Standby button to resume normal operation.
If the unit has not fully cooled down then the temperature may reach the limit soon after the amplifier is powered up.
DC
EDGE M offers loudspeaker protection if the output of the amplifier goes to a high constant voltage (DC) because of some internal fault. This is a rare
fault, although detecting it will protect your loudspeakers from damage.
Remedy - Due to the necessary sensitivity of the DC protection circuit, extremely hard clipping of the amplifier may cause DC protection to be
triggered. If this fault occurs, please contact your dealer for service or our support team https://www.cambridgeaudio.com/gbr/en/support-query.
Over Current
EDGE M offers V/I (voltage/current) protection by constantly monitoring the output transistors to keep them working inside their Safe Operating Area
(SOA). The SOA is a set of limits given by the output transistor manufacturer to ensure reliability. The V/I protection has been incorporated within the
amplifier circuitry to provide a fast response to temporary overload conditions. When the V/I protection is triggered the unit will continue to operate but
distortion may be heard as the unit protects the output transistors.
Remedy - Reduce the volume. If distortion is still present, check the speaker connections and impedance ratings.

14
Troubleshooting
Last updated: August 9, 2022 05:03. Revision #5713
There is no power
Ensure the AC power cord is connected securely.
Ensure the plug is fully inserted into the wall socket and is switched on.
Check fuse in the mains plug or adaptor.
There is no sound
Make sure the unit is not in Standby mode.
Check that source component is properly connected.
Check that your speakers are properly connected.
Ensure that the correct input has been selected via the Balanced/Unbalanced switch.
If possible, use different interconnect cables and speaker cables.
Check your source devices’ volume control to ensure this is not muted.
Check with alternative source device.
There is no sound on one channel
Check speaker connections.
Check interconnects.
There is weak bass or diffused stereo imaging
Ensure that speakers are not wired out of phase.
There is a loud buzz or hum
Ensure no interconnects are loose or defective.
The LED standby button is red
Check the ‘Protection Circuitry’ section for troubleshooting steps.

15
Technical specifications
Last updated: August 9, 2022 05:03. Revision #5714
Continuous power output:
200W RMS into 8 Ohms
350W RMS into 4 Ohms
THD (unweighted):
<0.002% 1kHz at rated power (8 Ohms)
<0.02% 20Hz – 20kHz at rated power (8 Ohms)
Frequency Response:
<3Hz – >80kHz +/-1dB
S/N ratio (ref 1W into 8 Ohm):
>93 dB
S/N ratio (ref max power):
>115 dB
Gain:
28dB (RCA)/ 22dB (XLR)
Input sensitivity:
1.6V RMS (RCA) / 3.5V RMS (XLR)
Input impedances:
balanced 47k Ohm
unbalanced 47k Ohm
Inputs:
Balanced, Unbalanced
Outputs:
Speaker, Loop out
Max power consumption:
1000W
Standby power consumption:
<0.5W
Dimensions:
150 x 460 x 405mm (5.9 x 18.1 x 15.9")
Weight:

16
23.6kg (52.0lbs)

17
Frequently Asked Questions (FAQ)
Last updated: August 9, 2022 05:03. Revision #5715
What impedance Speakers can I use with the EDGE M?
You can use speakers with an impedance between 4-8 Ohms with the EDGE M. The EDGE M outputs 200W RMS into 8 Ohms and 350W RMS into 4 Ohms.
What amplification class does the EDGE M use?
The EDGE M uses Class XA amplification. For Class XA, the crossover point is moved so that both sets of transistors are always on until the signal
reaches a loud enough level.
This means that for low level signals, the amplifier is essentially operating as a Class A amplifier and it is only when the signal is sufficiently loud enough
that the transistors switch over. Any crossover distortion is therefore masked within the signal.
Table of contents
Other CAMBRIDGE Amplifier manuals