Camp Chef SHP60 User manual

ANSI Z21.89-2017 CSA 1.18-2017
Outdoor Cooking Specialty Gas Appliance
OUTDOOR COOKERS
WARNINGS & INSTRUCTIONS
MODELS: SHP60, SHP80, SHP100

2
WARNING
FOR OUTDOOR USE ONLY
DANGER
If you smell gas:
• Shut off gas to the appliance at the tank
• Extinguish any open flame.
• If odor continues, keep away from the
appliance and immediately call your fire
department.
Failure to follow these instructions could
result in fire or explosion which could cause
property damage, personal injury or death.
WARNING
• To installer or person assembling this
appliance: Leave this manual with this
appliance for future reference.
• To consumer: Keep this manual with this
appliance for future reference.
This instruction manual contains important
information necessary for the proper
assembly and safe use of this product. Read
and follow all warnings and instructions
before assembling and using this appliance.
Do not discard this instruction manual.
WARNING
Take care the openings at side and rear of
the appliance are not obstructed, or that air
flow is restricted by placing items or other
appliances close to, or adjacent to openings.
Do not build this appliance into a cavity or
enclosure.
DANGER
• Never operate this appliance unattended.
• Never operate this appliance within 3
m / 10 ft of any structure, combustible
material or other gas cylinder.
• Never operate this appliance within 7.5 m
/ 25 ft of any flammable liquid.
• Never allow oil or grease to get hotter
than 200°C / 400°F. If the temperature
exceeds 200°C / 400°F, or if oil begins to
smoke, immediately turn burner or gas
supply OFF.
• Heated liquids remain at scalding
temperatures long after the cooking
process. Never touch cooking appliance
until liquids have cooled to 45°C / 115°F
or less.
• If a fire should occur, keep away from
appliance and immediately call your fire
department. Do not attempt to extinguish
an oil or grease fire with water.
Failure to follow these instructions could
result in fire, explosion or burn hazard
which could cause property damage,
personal injury or death.
WARNING
1. Do not store or use gasoline or other
liquids with flammable vapors in the
vicinity of this or any other appliance.
2. An LP cylinder not connected for use
shall not be stored in the vicinity of this or
any other appliance.
WARNING
This appliance is not for frying turkeys. This
appliance must only be used for heating water.
WARNING
Do not place an empty cooking pot on the
appliance or allow a filled pot to boil dry
while appliance is in operation. Use caution
when placing anything in the cooking pot
while the appliance is in operation.

3
Item Part Number Description Quantity
1 SHP60-1 SHP60 Stove asm 1
2 SHP100-2 Match holder 1
3 SHP100-3 SHP Bolt plate 1
4 SHP100-4 SHP ignitor cover 1
5 SHP100-5 SHP Ignitor 1
6 SHP100-6 SHP Electrode 1
7 SHP100-7 SHP burner 1
8 SHP100-8 SHP Regulator 1
Item Part Number Description Quantity
9 SHP100-9 SHP Heat Shield 1
10 SHP60-2 60 QT pot lid 1
11 SHP60-3 60 QT strainer 1
12 SHP60-5 60 QT pot 1
13 SHP100-14 Hardware Kit:
M5 X 8
M6 X 16
4
6
1
2
3
4
5
6
7
8
9
10
11
12
REPLACEMENT PARTS MODEL SHP60

4
Item Part Number Description Quantity
1 SHP80-1 SHP80 Stove asm 1
2 SHP100-2 Match holder 1
3 SHP100-3 SHP Bolt plate 1
4 SHP100-4 SHP ignitor cover 1
5 SHP100-5 SHP Ignitor 1
6 SHP100-6 SHP Electrode 1
7 SHP100-7 SHP burner 1
Item Part Number Description Quantity
8 SHP100-8 SHP Regulator 1
9 SHP100-9 SHP Heat Shield 1
10 SHP80-2 80 QT pot lid 1
11 SHP80-3 80 QT strainer 1
12 SHP80-5 80 QT pot 1
13 SHP100-14 Hardware Kit
M5 X 8
M6 X 16
4
6
1
2
3
4
5
6
7
8
9
10
11
12
REPLACEMENT PARTS MODEL SHP80

5
Item Part Number Description Quantity
1 SHP100-1 SHP100 Stove asm 1
2 SHP100-2 Match holder 1
3 SHP100-3 SHP Bolt plate 1
4 SHP100-4 SHP ignitor cover 1
5 SHP100-5 SHP Ignitor 1
6 SHP100-6 SHP Electrode 1
7 SHP100-7 SHP burner 1
Item Part Number Description Quantity
8 SHP100-8 SHP Regulator 1
9 SHP100-9 SHP Heat Shield 1
10 SHP100-10 100 QT pot lid 1
11 SHP100-11 100 QT strainer 1
12 SHP100-13 100 QT pot 1
13 SHP100-14 Hardware Kit
M5 X 8
M6 X 16
4
6
SHP100
12
3
4
5
6
7
8
9
10
11
12
REPLACEMENT PARTS MODEL SHP100

6
1. Do NOT leave this appliance unattended
while in use. The user must remain in the
immediate area of the product and have
a clear view of the product at all times
during operation.
2. Keep children and pets away from burner
at all times.
3. The use of alcohol, prescription or non-
prescription drugs may impair your ability
to properly assemble or safely operate
this appliance.
4. For OUTDOOR use only. Do NOT use in
a building, garage or any other enclosed
area. Do NOT use in or on recreational
vehicles or boats. NEVER use this
appliance as a heater.
5. Do not operate appliance under ANY
overhead construction. Keep a minimum
clearance of 3 m / 10 ft from the sides,
front and back of appliance to ANY
construction. Keep the area clear of all
combustible material and flammable
liquids, including wood, dry plants and
grass, brush, paper, and canvas.
6. Use ONLY on a level, stable non-
combustible surface like bricks, concrete
or dirt. Do NOT use this appliance on any
surface that will burn or melt like wood,
asphalt, vinyl, or plastic.
7. Keep the fuel supply hose away from any
heated surfaces.
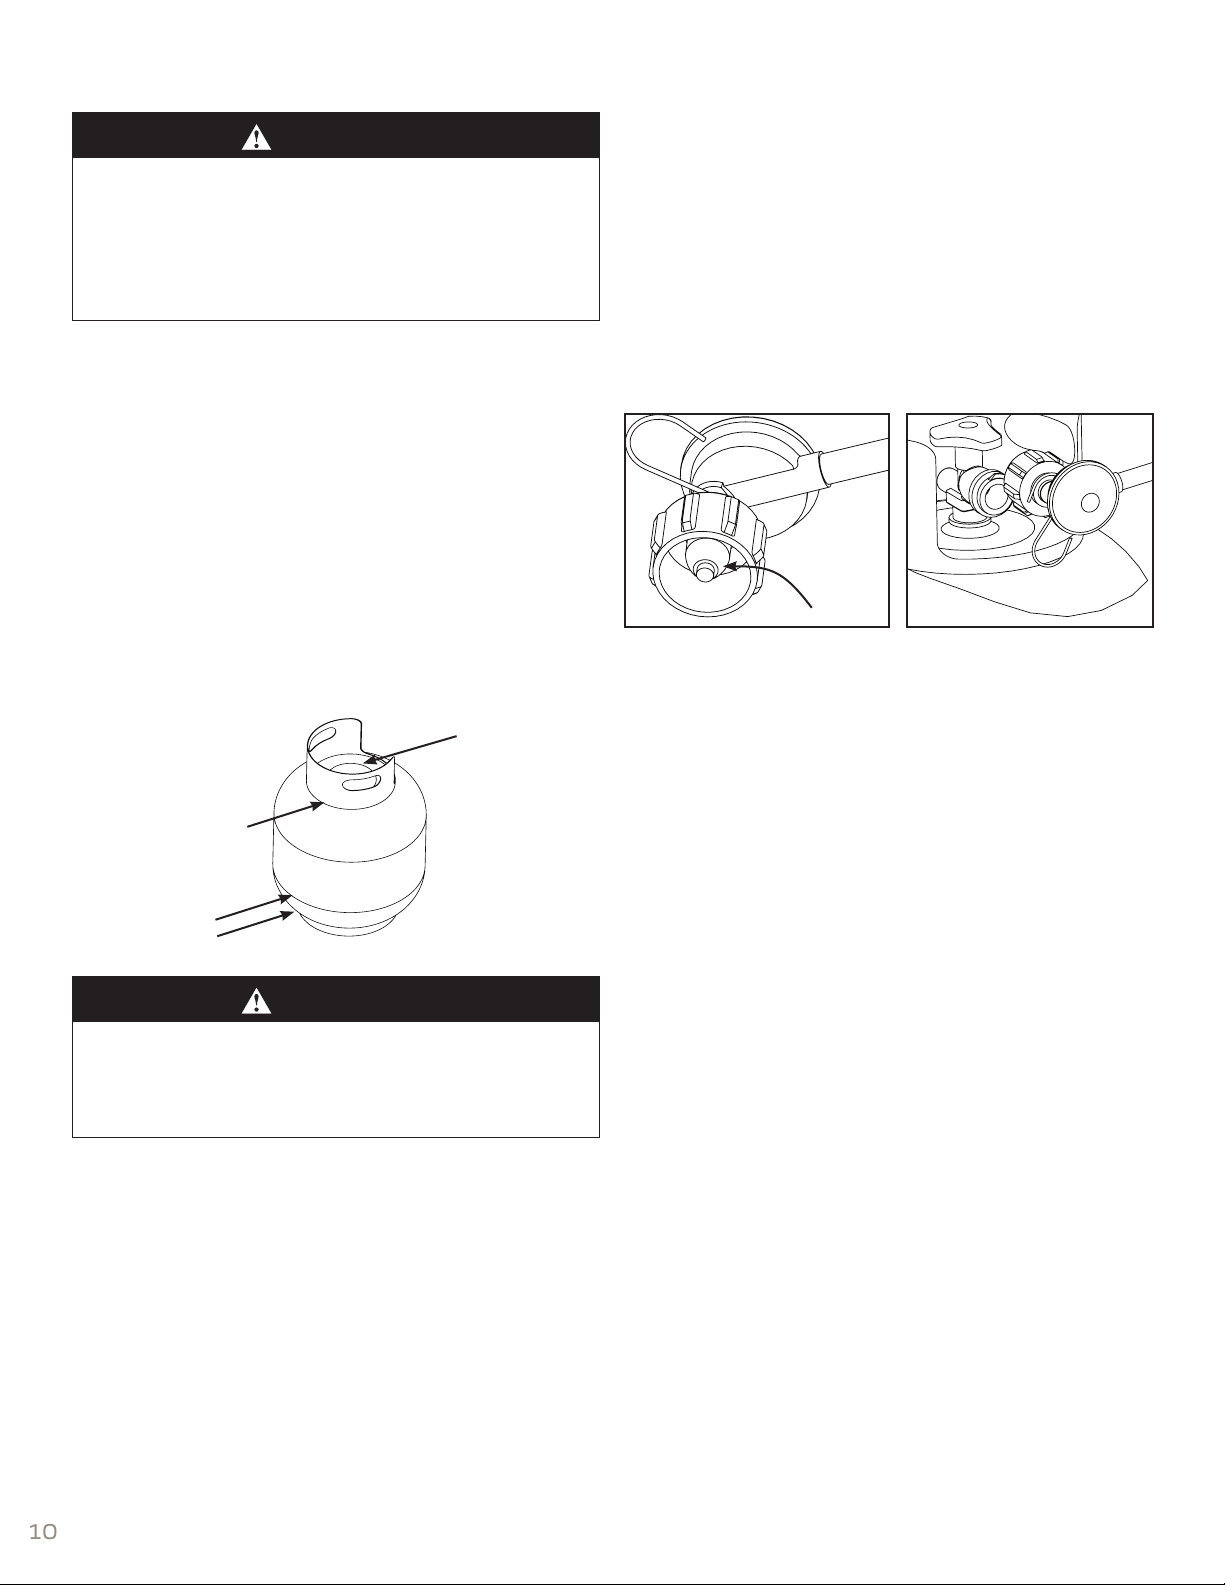
8. To prevent accidental fires, before using
the appliance ensure that the hose is not
damaged and all joints and connections
are not leaking by turning on the cylinder
valve, leave the burner valve closed, and
apply a soapy solution to the joints and
connections. If a continuous hissing sound
is heard, or if the soapy solution bubbles,
there is a leak. Do not use the appliance if
there is a leak. Replace the faulty parts.
9. Extinguish all open flames before
connecting the gas supply to the
appliance and before checking for leaks.
10. In the event of fire do NOT attempt to
extinguish with water. Use a Type BC dry
chemical fire extinguisher or smother fire
with dirt, sand or baking soda.
11. NEVER overfill the cooking pot water.
Follow instructions in this manual for
establishing proper water levels.
12. Never drop food or accessories into
hot cooking liquid. Lower food and
accessories slowly into the cooking liquid
in order to prevent splashing or overflow.
When removing food from the appliance,
care shall be taken to avoid burns from
hot cooking liquids. Once food is removed
from pot, do not allow pot to boil dry.
13. DO NOT place an empty cooking vessel
on burner while in operation. Do not allow
a filled pot to boil dry while appliance is
in operation. Use caution when placing
anything in the cooking vessel while
burner is in operation.
14. In the event of rain, hail, sleet or other
forms of precipitation, IMMEDIATELY turn
off burner(s) and gas supply, then cover
cooking vessel. Do NOT attempt to move
the appliance or the cooking vessel.
15. Avoid bumping or impact with the
appliance to prevent spillage or splashing
of hot cooking liquid.
16. Do NOT move the appliance when in use.
Allow unit to cool to 45°C / 115°F before
moving or storing.
17. This appliance will be hot during and after
use. Use insulated oven mitts or gloves for
protection from hot surfaces or splatter
from cooking liquids. Wear close-toed
shoes when operating appliance.
18. In case there is a fire, call the local fire
department. Stay clear from flames. Do
not attempt to extinguish an oil or grease
fire with water.
IMPORTANT SAFETY WARNINGS

7
19. Use only accessories, such as
cooking vessels recommended by the
manufacturer, to allow safe and proper
performance of the product. Never use
a cooking vessel larger than the capacity
and diameter recommended by the
manufacturer:
• SHP60: 17.3"
• SHP80: 18.9"
• SHP100: 20.1"
20. This product is not intended for
commercial use.
21. Do not put a cover or anything flammable
on the appliance while it is in use or hot.
22. Always cover the appliance, with patio
cover (if supplied), when not in use.
23. In the event the appliance has been
exposed to water, tilt the appliance
forward and allow water to drain from the
burners before attempting to ignite.
• Use appliance only with LP (propane) gas
and the regulator/valve assembly supplied
with the appliance.
• Installation must conform with local codes,
or in their absence with National Fuel Gas
Code, NFPA 54/ANSI Z223.1. Handling
and storage of LP cylinders must conform
to LP Gas Code NFPA/ANSI 58. Appliance
is not for use in or on recreational vehicle
and/or boats.
• Do not modify this appliance. Modifications
will result in a safety hazard.
• Apartment Dwellers: Check with
management to learn the requirements
and fire codes for using an LP Gas
appliance at an apartment. If allowed, use
outside on the ground floor with a 3 m /
10 ft clearance from walls or rails. Do NOT
use appliance on or under any apartment,
condominium balcony or deck.
• Non-rechargeable batteries are not
to be recharged. Batteries are to be
inserted with the correct polarity.
Exhausted batteries are to be removed
from the product. DO NOT DISPOSE OF
BATTERIES IN A FIRE. BATTERIES MAY
EXPLODE OR LEAK.
• Always have a BC or ABC fire extinguisher
readily available when cooking.
• This appliance is not designed for use with
natural gas.
• Before opening LP tank valve, check the
coupling nut for tightness. When appliance
is not in use, turn off control valve and LP
tank valve on supply cylinder.
• Never use LP tank if visibly rusted,
damaged, or out of date.
• If you notice grease or other hot material
dripping from appliance onto valve, hose
or regulator, turn off gas supply at once.
Determine the cause, correct, clean and
inspect valve, hose and regulator before
continuing. Perform a leak test.
• The regulator may make a humming or
whistling noise during operation. This
will not affect the safety or use of the
appliance.
• Clean and inspect the hose before each
use of the appliance. If there is evidence
of abrasion, wear, cuts or leaks, the hose
must be replaced prior to the appliance
being put into operation. See product
sheet for hose and regulator information.
• Do not block holes in bottom or sides of
appliance.
• Never operate appliance with LP tanks out
of correct position specified in Assembly
Instructions.
• Use caution when in close proximity to
appliance. Falling or tripping neat the
gas appliance may result in splashing
or igniting of hot cooking liquids and
potentially cause personal injury or
property damage.

8
WARNING: Hose is a trip hazard.
24"/61cm
• Always close LP tank valve and remove
coupling nut before moving LP tank from
specified operating position.
• NEVER store a spare LP tank under
or near appliance or in enclosed areas.
NEVER fill the cylinder beyond 80% full.
An overfilled spare LP tank is hazardous
due to possible gas released from the
safety relief valve. Failure to follow these
instructions exactly could cause a fire
resulting in death or serious injury.
• If you see, smell, or hear escaping gas,
immediately get away from the LP tank/
appliance and call your fire department.
• The minimum outside operating
temperature of this appliance is 32˚ F
(0˚ C). Never use this appliance when the
temperature is below this minimum.
• The appliance and LP tank must be
arranged so that any wind blows heat from
the appliance AWAY from the LP tank.
• All spare LP tanks must have safety caps
installed on the LP tank outlet.
LP Tank Removal, Transport and Storage
• Turn OFF all control valves and LP tank
valve. Turn coupling nut counterclockwise
by hand only – do not use tools to
disconnect. Place dust cap on cylinder
valve outlet whenever cylinder is not in
use. Only install the type of dust cap on the
cylinder outlet valve that is provided with
the cylinder valve. Other types of caps or
plugs may result in leakage of propane.
• A disconnected LP tank in storage or
being transported must have a safety cap
installed (as shown).
Do not store an LP tank in enclosed
spaces such as a carport garage, porch,
covered patio or other building. Never
leave an LP tank inside a vehicle, which
may become overheated by the sun.
• Do not store LP tanks in an area where
children play.
• When the appliance is not in use, the gas
must be turned off at the supply cylinder.
• Supply cylinders must be stored outdoors
out of the reach of children, and shall not
be stored in a building, garage, or any
other enclosed area.
• Storage of an appliance indoors is
permissible only if the cylinder is
disconnected and removed from the
appliance.

9
LP Tank
The LP tank used with your appliance must
meet the following requirements:
• The tank must be approximately 31.1
cm/12 in diameter x 46 cm/18.25 in tall
with a marked 9.07 kg / 20 lb LPG capacity
or 21.6 kg / 47.6 lb water capacity as
stated by the tank manufacturer.
• Be constructed and marked in accordance
with specifications for LP tank of the U.S.
Department of Transportation (DOT) or
the National Standard of Canada, CAN/
CSA-B339, Cylinders, Spheres and Tubes
for the Transportation of Dangerous
Goods.
• The propane cylinder used with this
appliance must include a collar to protect
the cylinder valve.
LP tank valve must have:
• Type 1 outlet compatible
with regulator or
appliance.
• Safety relief valve.
• UL listed Overfill
Protection Device (OPD).
This OPD safety feature
is identified by a unique triangular hand
wheel. Use only tanks equipped with this
type of valve.
• LP tank must be arranged for vapor
withdrawal.
LP (Liquefied Petroleum Gas)
• LP gas is non-toxic, odorless and colorless
when produced. For Your Safety, LP gas
has been given an odor (similar to rotten
cabbage) so that it can be smelled.
• LP gas is highly flammable and may ignite
unexpectedly when mixed with air.
LP Tank Filling
• Use only licensed and experienced dealers.
• LP dealer must purge tanks before filling.
• Dealer should NEVER fill LP tank more
than 80% of LP tank volume. Volume of
propane in tanks will vary by temperature.
• A frosty regulator indicates gas overfill.
Immediately close LP tank valve and call
local LP gas dealer for assistance.
• Do not release liquid propane (LP) gas
into the atmosphere. This is a hazardous
practice.
• To remove gas from LP tank, contact an
LP dealer or call a local fire department for
assistance. Check the telephone directory
under “Gas companies” for nearest
certified LP dealers.
LP Tank Exchange
• Many retailers that sell appliances offer
you the option of replacing your empty LP
tanks through an exchange service. Use
only those reputable exchange companies
that inspect, precision fill, test and certify
their cylinders. Exchange your tank only for
an OPD safety feature-equipped tank as
described in the “LP Tank” section of this
manual.
• Always keep new and exchanged LP tanks
in upright position during use, transit or
storage.
• Leak test new and exchanged LP tanks
BEFORE connecting to appliance.

10
LP Tank Leak Test
WARNING
Appliance must be leak checked outdoors
in well-ventilated area, away from ignition
sources such as gas fired or electrical
appliances. During leak test, keep
appliance away from open flames or sparks.
For your Safety
• Leak test must be repeated each time LP
tank is exchanged or refilled.
• Do not smoke during leak test.
• Do not use an open flame to check for
gas leaks.
Use a clean paintbrush and 50/50 soap and
water solution. Use mild soap and water. Do
not use household cleaning agents. Damage
to gas train components can result. Brush
soapy solution onto all weld seams and entire
valve area.
WARNING
If “growing” bubbles appear, do not use
or move the LP tank. Contact an LP gas
supplier or your fire department.
Connecting Regulator to Appliance
Use an adjustable or 19 mm / 3/4 in wrench
to connect the regulator hose to the cooking
system. Tighten securely with wrench. Do not
use appliance before checking for leaks. See
section Leak Testing.
Connecting Regulator to the LP Tank
Only use the pressure regulator and hose
supplied with this appliance.
1. Place LP tank on a secure, level, and
stable surface.
2. Turn control valve to the OFF position.
3. Turn LP tank OFF by turning hand wheel
clockwise to a full stop.
4. Remove the protective cap from LP
tank valve.
(C) Hold coupling nut
and regulator as shown
for proper connection
to LP tank valve
(B) Nipple has to be
centered into the LP
tank valve
5. Hold regulator, insert nipple (B) into LP
tank valve. Hand tighten coupling nut,
holding regulator in a straight line (C) with
LP tank valve so as not to cross thread the
connection.
6. Turn the coupling nut clockwise to tighten
to a full solid stop. The regulator will seal
on the back-check feature in LP tank
valve, resulting in some resistance. An
additional one-half to three quarters
turn is required to complete connection.
Tighten by hand only – do not use tools.
NOTE: If you cannot complete connection,
disconnect regulator and repeat steps 5
and 6. If you are still unable to complete the
connection, do not use this regulator!
• Do not insert any foreign objects into the
valve outlet. You may damage the valve
and cause a leak. Leaking propane may
result in explosion, fire, severe personal
injury, or death.
• Never attempt to attach this appliance
to the self-contained LP gas system of a
camper or trailer or motor home.

11
Hose Check
• Before each use, check to see if hoses
are cut or worn. Replace damaged hose
assembly before using appliance. Use
only valve/hose/regulator specified by
manufacturer. See product sheet for hose
and regulator information.
WARNING
Do not attempt to adjust the burner. It is
preset to the factory specifications
SCALE 0.250
SEE DETAIL B
DETAIL B
SCALE 0.500
Instructions for lighting burner:
Do not lean over LP cooker while lighting.
Read all instructions before lighting and only
light burner outdoors.
1. Remove all appliances and pots from the
burner to create a free flow of air.
2. Turn control valve(s) to OFF position.
3. Ensure a minimum of 24 inches (61 cm)
separate the LP tank and the appliance.
4. Slowly open LP bottle valve.
5. Press and continually hold the ignition
button while rotating the the regulator
control knob until burner is lit.
6. When the burner is lit, turn the regulator
control knob to the desired heat output
position between ON and OFF.
WARNING
Appliance must be leak checked outdoors
in well-ventilated area, away from ignition
sources such as gas fired or electrical
appliances. During leak test, keep
appliance away from open flames or sparks.
NOTE: represents off.
Leak Testing
1. Turn all control valve(s) to OFF.
2. Be sure regulator is tightly connected to
LP tank.
3. Slowly open LP tank valve by turning hand
wheel counter clockwise. If you hear a
rushing sound, turn gas off immediately.
There is a major leak at the connection.
Correct the leak before proceeding.
4. Brush 50/50 soap and water solution
onto indicated connections shown.
SEE DETAIL A
DETAIL A
SCALE 0.500
5. If “growing” bubbles appear, there is a
leak. Close LP tank valve immediately
and retighten connections. If leaks
cannot be stopped, do not try to repair.
Call for replacement parts. Order new
parts by giving the serial number, model
number and name of items needed to the
Service Center.
6. Always close LP tank valve after
performing tank leak test by turning hand
wheel clockwise.
WARNING
• Do not use appliance until leak checked.
• If you cannot stop a gas leak,
immediately close LP tank valve and call
LP gas supplier or your fire department!

12
Instructions for lighting burner with match:
Do not lean over LP cooker while lighting.
Read all instructions before lighting and only
light burner outdoors.
1. Remove all appliances from the burner to
create a free flow of air.
2. Turn control valve(s) to OFF position.
3. Slowly open LP bottle valve.
4. Light a long match (fireplace match) and
place it over burner. If using a short match,
place the unlit match into the match holder
then light the match. Slowly rotate the the
regulator control knob until burner is lit.
SCALE 0.250
5. If ignition does not occur in 5 seconds,
turn the burner control(s) off, wait
5 minutes, and repeat the lighting
procedure.
When burner flame is accidentally
extinguished
1. Turn off LP tank by turning clockwise to a
full stop.
2. Turn regulator control knob
counterclockwise to the OFF position.
3. Inspect the hose and make sure
connections are complete. After waiting
5 minutes, restart the appliance following
“INSTRUCTIONS FOR LIGHTING
BURNER.”
Turning LP Cooker Off
• Turn regulator control knob
counterclockwise to the OFF position.
• Turn LP tank OFF by turning hand-wheel
clockwise to a full stop.
Burner Flame Check
• Light burner. You should see a smaller
flame in the LOW position than seen on
HIGH. Always check flame prior to each
use. A blue flame with little or no yellow
flame provides the best heat. Curing of
paints and parts will produce an odor only
on first use.
WARNING
All cleaning and maintenance should
only be done when the appliance is cool
and with the fuel supply turned off at the
LP cylinder. DO NOT clean any part in a
self-cleaning oven. The extreme heat will
damage the finish.
Cleaning The Burner
NOTE: Spiders and small insects can spin
webs and build nests inside the burner. This
especially occurs in late summer and fall
before frost when spiders are most active.
These nests can obstruct gas flow and cause
a fire in and around the burner and orifice.
Such a fire can cause operator injury and
serious damage to the appliance. To help
prevent a blockage and ensure full heat
output, clean and inspect burner tube often
(once or twice a month). NOTE: Water or air
pressure will not normally clear a spider web.

13
SCALE 0.250
Steps for cleaning the Burner:
1. Disconnect the regulator hose from the
burner tube.
2. Look inside the burner tube for nests,
webs, or mud.
3. To remove the gas flow obstructions, use
a flexible venturi brush or bend a small
hook on one end of a long flexible wire or
use an air hose.
4. Inspect and clean the burner if needed.
5. When the burner is reassembled, align
the threads of the regulator hose to the
center line of the burner tube and tighten
with a wrench.
Cleaning and Maintenance
Correct care and maintenance will keep your
appliance operating smoothly. Clean regularly
as determined by the amount of use. NOTE:
Clean the entire appliance each year and
tighten all hardware on a regular basis (1-2
times a year or more depending on usage).
Cleaning should be done where detergents
won’t harm patio, lawn, or the like.
Suggested Cleaning Materials:
• Mild dish washing liquid detergent
• Wire brush
• Nylon cleaning pad
• Hot water
• Paper clip
• Soft brass bristled brush
Confirm that all components are completely
dry after cleaning and before storing.
Always allow appliance to cool to 115˚ F (46˚
C) before cleaning.
Component Cleaning:
• BURNER: Wire brush loose corrosion from
burner exterior. Clean clogged gas port
holes with an opened paper clip. Replace
corroded or damaged burners that would
emit excess gas.
• COOKING SURFACES, POTS AND PANS:
Clean the cooking surface with soapy
water and a nylon cleaning pad.
• If cooking pots have black soot cooked on
the outside, it can be scrubbed off with
steel wool. DO NOT spray oven cleaner
on aluminum cooking pots to remove
grease or soot as it will cause the finish to
become dull.
• If food remains stuck to the basket, place
in hot water and allow to soak. After
cooling, scrub with nylon pad.
• If hard water causes darkening on the
interior of the cooking pots, fill to the level
of the darkened area with a mixture of
water, cream of tartar and vinegar (1 qt of
water, 2 Tbsp of cream of tartar, 1/2 cup
of vinegar), and boil for 10 minutes.
• After appliance has cooled, wipe areas
where paint and finish have burned off to
minimize rusting.

14
Why won’t my burner light? • Make sure your regulator is fully tightened on the propane tank. Try
unscrewing and re-tightening the coupling nut.
• Make sure your LP tank has propane.
• Make sure you press and hold the ignition button on ignition. It may
take a few clicks for the gas to catch fire.
• Check that the electrode is sparking. To do this, make sure the valve
is closed on your tank. Hold the ignition button while looking into
the burners. You should see a spark coming out of the electrodes. If
there is no spark, check the following:
1. Make sure the battery was installed correctly with the + end
toward the battery cap.
2. Try replacing the battery.
3. Unscrew and reinstall the battery cap. Ensure the threads
engage and the cap is tightened all the way down.
4. Ensure the wire connections are tight.
My burner lights, but why won’t it
stay lit?
• Ensure that your tank has propane.
• The burner may struggle to stay lit in windy conditions. If it is windy,
allow the appliance to cool and try moving to a less windy location.
• Try adjusting the regulator knob and cooking at a different
temperature
My burner lights but there isn’t
enough heat coming out, why won’t
the flame get bigger?
• Try turning the regulator knob clockwise to allow more gas flow.
• Your appliance may be in low flow. Try the following:
1. Turn off the regulator knob and tank valve.
2. Disconnect the regulator and wait 1 minute.
3. Reconnect the regulator to the tank and slowly open the valve
on the propane tank.
4. Now relight and it should be out of low flow.
TROUBLESHOOTING

15
SERVICE AND WARRANTY
3 YEAR LIMITED WARRANTY (from date of purchase)
Camp Chef No-Hassle Limited Warranty:
Here at Camp Chef we stand by our products, quality controls, and take pride in our customer service. Because of
this, your new Camp Chef product comes with a No-Hassle Limited Warranty. For Hassle-Free warranty service, be
sure to register your products at campchef.com/productregistration. We warrant that our products will be free from
defects in all materials and workmanship (excluding paint and finish) for the Warranty Coverage Period described
below. This warranty is extended only to the original consumer purchaser. During the Warranty Coverage Period,
we will (at our sole option) replace any defective part or product covered by this warranty when provided with proof
of purchase. The replacement will be without charge.
Required Maintenance:
Clean your product after each use to maintain its finish and prolong its lifespan. Wipe away all grease and ashes.
Keep metal products free of moisture, salts, acids and harsh fluctuations in temperature. Product paint and other
finishes are not covered by this warranty. The exterior finish of the product will wear down over time. For these
reasons, the limited warranties do not cover rust or oxidation.
Coverage Details:
Warranty does not cover normal wear of parts or damage caused by misuse, abuse, overheating and alteration.
No alterations are covered in this warranty. Camp Chef is not responsible for any loss due to neglectful operation.
Furthermore, this warranty does not cover products damaged or rendered defective due to accident, misuse,
abuse, modification, water damage, neglect, improper handling or storage, improper maintenance or installation,
or exposure to weather, natural disasters such as earthquakes, hurricanes, tornadoes, floods, lightning, fires, or
failure to follow instructions for use. Without limiting the exclusions stated above, warranty does not cover; paint
damage caused by (i) high temperatures, (ii) UV exposure, (iii) excessive humidity, (iv) chlorine, (v) industrial fumes,
(vi) fertilizers, (vii) lawn pesticides, (viii) salt, (ix) other substances, (x) normal wear and tear; and warping of the drip
tray or heat baffle. Camp Chef takes every precaution to utilize materials and finishes that retard rust and stand up
to normal use.
ANY WARRANTIES IMPLIED BY LAW SHALL IN NO EVENT EXTEND BEYOND DURATION OF THIS EXPRESS
WARRANTY. Some States do not allow limitations on how long an implied warranty lasts, so the above limitation
may not apply to you. REPAIR OR REPLACEMENT AS PROVIDED HEREIN IS YOUR EXCLUSIVE REMEDY
FOR ANY DEFECTIVE PRODUCT. IN NO EVENT SHALL WE BE LIABLE FOR ANY SPECIAL, INCIDENTAL OR
CONSEQUENTIAL DAMAGES OF ANY KIND ARISING OUT OF THE PURCHASE OR USE OF THIS PRODUCT,
WHETHER BASED UPON CONTRACT, TORT, STATUTE OR OTHERWISE. Some states do not allow the exclusion
or limitation of incidental or consequential damages, so the above limitation or exclusion may not apply to you. This
warranty gives you specific legal rights, and you may also have other rights which vary from State to State.
Because Camp Chef cannot control the quality of products sold by unauthorized sellers, this limited warranty
applies only to Products that were purchased from Camp Chef or a Camp Chef authorized seller in the United
States, unless otherwise prohibited by law. Camp Chef reserves the right to reject warranty claims from purchasers
for Products purchased from unauthorized sellers, including unauthorized Internet sites. Please keep all original
sales receipts from the authorized dealer. Proof of purchase is required to obtain warranty services. Any parts or
products returned without written authorization will be discarded without notice.
To obtain warranty services submit a warranty request at www.campchef.com/customer-service/product-
warranty or call (800) 650-2433. Our English speaking Product Specialists are happy to help.
Warranty applies to the United States and Canada.
If you have other products/category questions check out our Frequently Asked Questions page.
WARRANTY PERIODS AND COVERAGE
Warranty Period Components Coverage
1 year All parts Material and manufacturing defects

www.CampChef.com | 1.800.650.2433 • Camp Chef is a registered trademark of Logan Outdoor Products ©2023
• Patent Pending • 301 Camp Chef Way, Hyde Park, UT 84318, USA • 0323_PGSHP60_80_100_Booklet_EN
This manual suits for next models
2
Table of contents
Other Camp Chef Cooker manuals
Popular Cooker manuals by other brands

Mora
Mora MEC 56103 Operating and maintenance instructions

UNITED
UNITED UFG-60302 user manual

Zline
Zline 30" Installation guide and user's manual

Zanussi
Zanussi ZCI660MBC user manual

AGA
AGA R3 100-4i User's guide & installation instructions

GIGA
GIGA ICPE4 Installation, operating, & maintenance instructions