Candy CRU164 Mounting instructions

REFRIGERATOR
USER’S OPERATION MANUAL

2
CONTENTS
WARNING AND IMPORTANT INFORMATION.............................................3
INSTALLATION....................................................................................................................4
Positioning............................................................................................................................4
Cleaning the interior prior to use..........................................................................................5
Installation instructions:...................................................................................................5
View of the appliance.....................................................................................................10
Changing over the freezer compartment door......................................................11
OPERATION AND FUNCTIONS............................................................................11
Operation-temperature regulation.............................................................................11
Storing food and drink....................................................................................................12
Food shelves .....................................................................................................................12
Positioning inner door trays.........................................................................................12
Storing frozen food/freezing fresh food ...................................................................12
IMPORTANT......................................................................................................................12
Defrosting the appliance ...............................................................................................12
Refrigerator lamp.............................................................................................................13
Periods of disuse..............................................................................................................13
Troubleshooting................................................................................................................13

3
WARNING AND IMPORTANT INFORMATION
These warnings have been drawn up to ensure the safety of the user and others.
Please read this instruction booklet carefully before installation and using the appliance,
and always keep it together with the appliance for future reference.
zDisconnect the main plug before carrying out any cleaning or maintenance operations
(e.g. lamp replacement on relevant models).
This appliance has been designed to be used exclusively by adults.
Ensure that children do not play near or with the appliance. Never allow children to sit
on the drawers or hang on the appliance doors.
Aqualified technician must carry out all modifications to the electrical mains to enable
appliance installation.
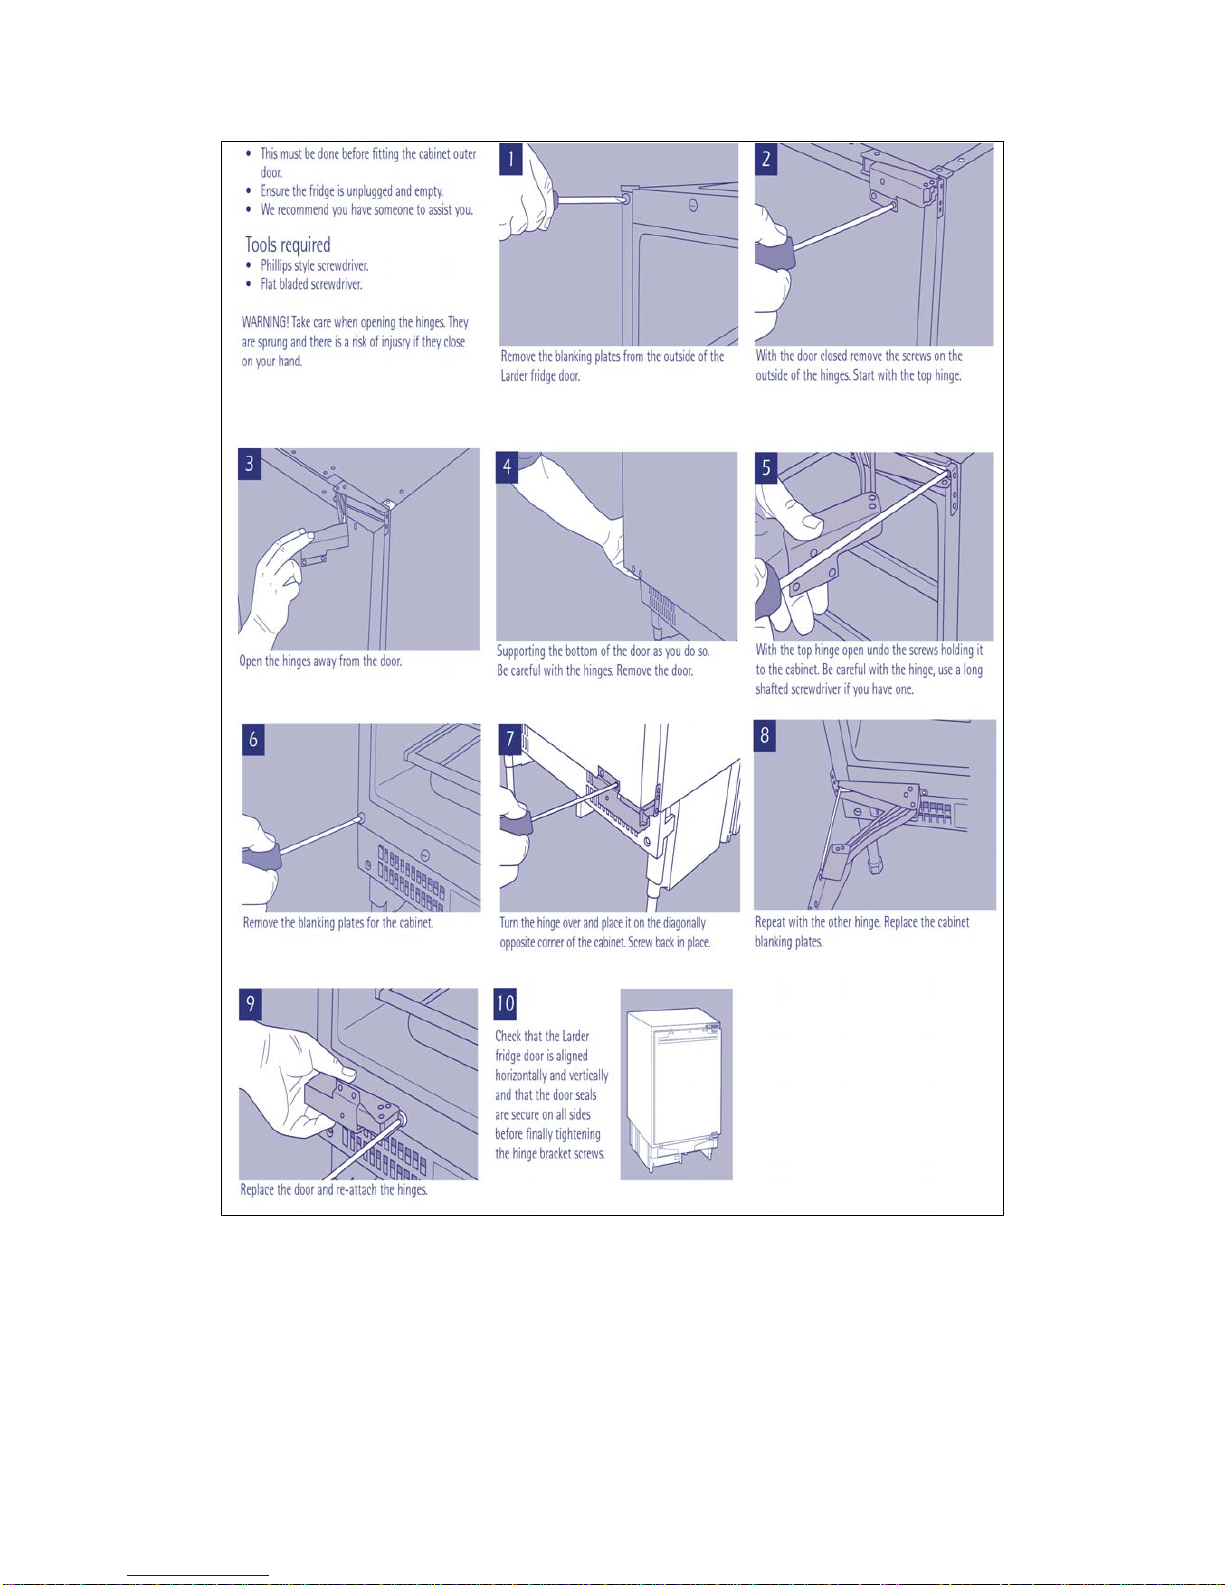
Do not put your fingers near the hinge which would be wounded to your fingers.
zOn completion of installation, check that the appliance is not standing on the power
cable.
zThe appliance should be left for 2 hours after installation before it is turned on, in
order to allow the refrigerant to settle.
zThis appliance is designed for domestic use only, specifically for the storage of edible
foodstuffs only.
zDuring the normal operation, the condenser and compressor located at the rear of the
appliance can reach higher temperatures; ensure that installation is carried out
according to the instructions in this booklet. Insufficient ventilation will impair
operation and damage the appliance. Never cover or obstruct the ventilation slats on
the appliance.
zNever use the base, drawers, doors etc. to stand on or as supports.
zNever transport the appliance in a horizontal position, because the oil in the
compressor may flow into the refrigerant circuit.
zAll refrigerators and freezers have surfaces those are subject to frosting. Depending
on the model, this frost can be removed automatically (automatic defrosting) or
manually when necessary. Never attempt to remove frost with sharp objects as this
may damage the evaporator and impair the efficiency of this appliance. Let the frost
thaw naturally; never use hot water.
zNever put sparking drinks or bottles of water in the lower temperature compartments
(freezer/cooler).
zWe strongly advise against putting hot liquid or food in the refrigerator or filling with
the ridded containers.
zNever attempt to repair the appliance alone. Repairs carried out by unqualified
persons can cause serious damage; always contact the nearest service center and
use original spare parts only.
zNever carry out any modifications to your appliance.
zThe refrigerant and insulation in this appliance do not contain any harmful gases to
the ozone or which contribute to the greenhouse effect. However, disposal must be
carried out in compliance with the relative standards regarding protection of the
environment.

4
zUnits are supplied with isobutene (R600a). In any case the label inside the unit shows
the type of refrigerant used. All units must be transported and installed with the
utmost care since any exclusive knocking or shaking could damage the refrigerating
circuit.
zFailure to comply with the above mentioned requirement might result in the unit not
being able to function with either R134a or R600a. Further more, in the presence of
R600a,any damage to the refrigerating circuit could lead to the risk of explosion
caused by outside sparks or flames.
In the event of damage, contact the nearest service center, ventilate the room where
the machine is located and avoid exposure to flames or any repair work on the unit.
Caution do not use electrical equipment inside the food storage compartment.
zA transparent polythene film protects the side panels and door on the appliance. This
film must be removed prior to installation. The film guarantees intact finished surfaces
of the appliance and prevents scratches or other damages during transport. Simply
remove by hand and dispose of as recyclable plastic material.
INSTALLATION
Positioning
Position the appliance away from sources of heat such as stoves, radiators, direct sunlight
etc. Maximum performance and safety are guaranteed by maintaining the correct indoor
temperature for the class of unit concerned, as specified on the rating plate.
Climate classification Ambient temperature
SN 10~32℃
N 16~32℃
ST 16~38℃
T 16~43℃
Appliances must not be exposed to rain. Sufficient air must be allowed to circulate in the
lower rear section of appliances, as poor air circulation can affect performance. Built-in
appliances should be positioned away from heat sources such as heaters and direct
sunlight.
Electrical connection
Before connecting the appliance to the power supply, ensure that the voltage and
frequency as indicated on the data plate correspond to those of the electrical mains.
A deviation of –6V to +6V is admissible with respect to the rated voltage. For operation
with other voltage supplies, a right autotransformer is required.
Always connect the appliance to an useful earthing system
For the above, if the main supply is not earthed, connect the appliance to a separate
earthing system. Consult a specialized technician to carry out the latter in compliance with
current standards.
The manufacturer declines all responsibility for failure to observe the above accident
prevention standards.

5
Cleaning the interior prior to use
Prior to use, clean all internal parts with warm water and neutral detergent to remove the
“new” odor and dry thoroughly. Never use abrasive detergents and/or powders that can
damage the appliance.
Installation instructions:
Before installing, carefully read the instruction in order to avoid a certain number of
problems.
Fig 2 -Dimensions of mounting slot
Fig 3 -Height regulation
Fig 4 -Installation of the appliance under the worktop
Fig 5 -Fastening the appliance under the worktop
Fig 6 -Door exchange
Fig 7, Fig 8 –Mounting the kitchen cabinet door

6

7

8
6

9
7
8

10
View of the appliance
Freezer Chamber
Crisper
Drawer
Rack Cover
Lower rack on the door
Crisper
CoverDrawer
Upper rack on the door
IceTray
Temperature Regulator
Shelf
How to remove the shelf from the appliance
The shelf may be placed randomly upon any of the guide slots inside the appliance. It is
protected against sliding out.
In case you want to adjust the shelves or remove the shelves from the appliance.
1、Lift the shelf by hand and pull it towards you until it reaches the crack in the guide slot.
2、Lift the shelf up and pull it out inclined between the door and appliance.
Reinsertion is carried out in the opposite procedure.

11
Changing over the freezer compartment door
Open the freezer compartment door a little way Using a small screwdriver, press the
spring in the opening of the lower door bearing slightly upwards and take the door bearing
out complete with the door.
Position the covering cap (M) on the opposite side Turn the freezer compartment door
through 180 and fit the lower door bearing into the lower bearing cavity of the freezer
compartment door.
Lift the freezer compartment door a little way upwards, fit it into the upper door bearing,
and at the same time insert the lower door bearing into the square hole.
Small upward and downward adjustments of the freezer compartment door will make
fitting easier.
OPERATION AND FUNCTIONS
Operation-temperature regulation
To switch on the appliance, turn the thermostat knob clockwise from “0”(stop)to the
required cooling temperature:
zLower number=less cool
zHigher number=cooler
Freezers can be fitted with indicator light as follow: orange light for continuous functioning,
green light for normal functioning, red alarm light when the temperature is too high. The
internal appliance temperature is maintained constant automatically. An intermediate
thermostat setting is generally recommended.
zAt higher thermostat settings with higher ambient temperature and a large amount
of stored food, operation may be continuous with the formation of frost or ice on the
cooler walls.
zIn this cases, position the thermostat knob at a lower setting on some models
M

12
Storing food and drink
For optimal use of the refrigerator compartment observe the following instructions:
Never put hot liquid or food in the refrigerator while evaporating;
Cover or wrap food prior to storage (food containing spices in particular);
Arrange food so that air can circulate freely inside the compartment.
Meat (all types): wrap in protective material and store up to 1-2days maximum.
Cooked food and cold meals etc must be covered well and stored in any position in the
refrigerator.
Fruit and vegetables should be cleaned and stored in the relative drawer.
Bananas, potatoes, onions and garlic should be stored in the refrigerator unless
rewrapped.
Food shelves
The walls of the cold storage area are equipped with guides to enable insertion of the
grids or shelves in various positions as required.
Positioning inner door trays
Inner door trays can be inserted in various positions. To change the position proceed as
follows:
Pull the tray up out of its seat and refit in the new position.
The upper tray can be removed to ensure thorough cleaning when required.
Storing frozen food/freezing fresh food
Appliances with compartments with the symbol can be used to store frozen food for a
maximum time of one month. Appliances with the symbol are suitable for storing
frozen food but not for freezing fresh food, while appliance with symbol are
suitable for both uses.
To store frozen food, ensure that the retailer has previously stored it correctly.
The interval between purchase and placing the food in the freezer should be the minimum
possible.
Never exceed the storage period indicated on the food packaging.
Only open the freezer door when necessary and as briefly as possible.
In the event of operation after prolonged periods of disuse, take care to set the
thermostat knob to the highest setting, and switch on the appliance under no-load
conditions for 2-3 hours, then place food in the refrigerator as required and adjust
the thermostat knob to an intermediate setting.
Appliances with compartments that have no symbol are unsuitable for freezing fresh foods
and for storing frozen food.
IMPORTANT
zIf the food stored in the freezer compartment is unintentionally defrosted, e.g. due to
a power failure, it should be consumed within a short interval even if not completely
thawed. The food may also be refrozen after being cooked ( appliance).
zBrief interruptions (up to 6-8 hours) do not affect frozen food.
Defrosting the appliance
The rear wall of the fridge covers with frost when the compressor is
running, and defrosts when the compressor is off. The water from the
thawing frost evaporates by itself.

13
Defrosting the freezer compartment
During use and when the freezer compartment door is opened, moisture is deposited in the
freezer compartment as frost. Remove this frost from time to time with the soft plastic
scraper. Under no circumstances use hard or pointed objects to remove frost.
The freezer compartment should always be defrosted when the layer of frost has reached a
thickness of approx. 4 millimeters; however at least once a year. A good time for defrosting
is when the appliance is empty or contains only little food.
Warning!
Do not use electrical heating appliances or any other mechanical or artificial devices to
speed up the defrosting process, with the exception of those recommended in these
operating instructions.
Do not use defrsosting sprays, they can be hazardous to your health
Refrigerator lamp
The central section of the thermostat box is fitted with a lamp for internal lighting. If
replacement is required, disconnect the appliance from the power supply, remove the
protection grille from the thermostat unit and unscrew the lamp. Replace with a version with
the same voltage, refit the grille on the thermostat unit and connect up to the power supply.
Periods of disuse
In the event of prolonged periods of disuse, clean thoroughly after emptying, disconnect
the appliance from the power supply and leave the door ajar to avoid the formation of
unpleasant odors.
Troubleshooting
Defective operation of the appliance is not always due to a technical fault but is always
due to a technical fault but is often caused by incorrect installation or use. To avoid
unnecessary technical assistance and relative expenses we recommend the following
procedures.

14
If after the above checked there is still a fault calling your local service center.
In-guarantee customer should ensure that the above checks have been made as the
engineer will make a charge if the fault is not a mechanical or electrical breakdown.
Symptom What to do
Check that the power supply is not disconnected
Check the thermostat is not set to “0 ”;
Check that the plug is inserted correctly into the mains
socket;
Check that automatic cut-out on the mains line has not
tripped or that a fuse has blown;
Appliance operation failure
Check that the power cable is not faulty.
Check that the door close properly;
Check that air can circulate freely;
Check the thermostat setting is correct;
Check the refrigerator is not positioned close to the heat
sources;
Internal temperature is not
sufficiently cool
Check the condenser is clean;
Internal temperature is too
low Check that the thermostat setting is correct.
Adjust the thermostat to give correct temperature control.
Check that the door is closed.
Large quantities of food have recently been placed in the
cabinet / and or door is frequently opened.
The compressor runs
continuously
Check that air ventilation is not obstructed.
Internal lamp does not
work
Check that the appliance is switched on. Otherwise
disconnect the plug from the mains socket, remove the
projection grille from the thermostat unit and check that the
light is tightened correctly. Replace any defective light
bulbs with a new 15W bulb that has the same voltage as
that indicated on the data plate inside the unit.
Table of contents
Other Candy Refrigerator manuals

Candy
Candy CBL3519FW User manual

Candy
Candy CBL3518F/L User manual

Candy
Candy BCBF 174 FTK User manual

Candy
Candy RSOP122N User manual

Candy
Candy CIO225NE User manual

Candy
Candy CCE3T618FW User manual

Candy
Candy CHTOP482SN User manual

Candy
Candy CCE4T618ES User manual

Candy
Candy RDCS 4152 W User manual

Candy
Candy CHASD4385EWC User manual

Candy
Candy CVTOS 542WH15 User manual

Candy
Candy CVS 1745BWDK User manual

Candy
Candy DOUBLE DOOR User manual

Candy
Candy CCTOS 502WHN User manual

Candy
Candy CFBD 2450/2E User manual

Candy
Candy CFBD2650E/1 User manual

Candy
Candy CDNF 3800 E User manual

Candy
Candy CVS 6184X User manual

Candy
Candy CFQQ5T817EPS User manual

Candy
Candy CCE3T620FW User manual