Canon EOS C300 Mark II Instruction sheet

PUB. DIM-1139-000
Jp
En
Fr
De
It
Es
Ru
Kk
はじめにお読みください
Read This First
À lire en premier
Zuerst lesen
Leggere per primo
Lea esto primero
Прочитайте сначала эту информацию
Алдымен келесі ақпаратты оқыңыз
Zh
使用前须知
初版:2015.08.01
© CANON INC. 2015 PUB. DIM-1139-000
PRINTED IN JAPAN • IMPRIMÉ AU JAPON • IMPRESO EN JAPÓN
在使用本产品之前,请务必先仔细阅读本使用说明书。
请务必妥善保管好本书,以便日后能随时查阅(保留备用)。请在充分理解内容的基础上,正确使用。

2
本機の使いかたについては、付属のC300 Mark II使用説明書*(以降、「カメラの使用説
明書」と記載)をご覧ください。本書では、PLレンズマウント(以降、「PLマウント」)の
使いかたやEOS C300 Mark II PLの制限事項について説明します。
* EFレンズマウントを搭載するEOS C300 Mark IIの説明書です。大部分の記載は本機(PLマウント搭載モデル)と
共通です。
█レンズを取り付ける
レンズの取り付け/取り外しを行うときの注意事項については、カメラの使用説明書の「レンズを
準備する」をご覧ください。
各部の名称
バヨネットリングレバー
位置決めピン
バヨネットリング
PLレンズマウント

3
Jp
PLレンズを取り付ける
位置決めピン
1バヨネットリングレバーを反時計回りに回
して、PLマウントからボディキャップを取
り外す(a)
2レンズの凹部を位置決めピンに合わせて、
レンズをマウントに差し込む(b)
3バヨネットリングレバーを時計回りに回し
て、レンズを固定する(c)
PLレンズを取り外す
1バヨネットリングレバーを反時計回りに回
して(a)、PLレンズを取り外す(b)
2PLマウントにボディキャップを取り付ける
(c)

4
█PLマウントで使用できない機能
PLマウントにPLレンズを装着しているときは、次の機能が使用できません。
■アイリスの調整。
■マニュアルフォーカス以外のフォーカス調整。
このほかの使用できない機能については、以下に詳細に記載します。
使用できないメニュー項目と設定値
次のメニュー項目と設定値は表示されません。
メニュー 設定項目 詳細項目 設定値
vカメラ設定
測光方式
AE AEシフト
AEレスポンス
Iris
モード
Irisステップ
Iris表示
Zoom連動F値補正
フォーカス
AFモード
AF枠位置
AF枠サイズ
顔検出&追尾
顔検出AF
AFスピード
AFスピード適用条件
AFレスポンス
周辺光量補正
色収差補正
¢映像/端子設定 Custom Display 1
測光方式
焦点距離
フォーカスモード
Iris
レンズ
アシスト設定 フォーカスガイド

5
Jp
メニュー 設定項目 詳細項目 設定値
システム設定
アサインボタン ―
One-Shot AF、AFロック、
Focus Guide、顔検出AF、
顔検出&追尾、追尾、
Push Auto Iris、Irisモード、Iris+、
Iris−、AEシフト+、AEシフト−、
バックライト、スポットライト
Custom Function
カメラ電子ダイヤル Iris
グリップ電子ダイヤル Iris
電源オフ時のレンズ収納
Firmware レンズ
=カメラの使用説明書の「メニュー一覧」
使用できないアサインボタンの機能
前述した「使用できないメニュー項目と設定値」の表に記載したアサインボタンの各機能は使用で
きません。なお、次のボタンは、初期状態では「(未設定)」に設定されます。
■PUSH AUTO IRIS /カメラアサイン10ボタン
■ONE-SHOT AF /カメラアサイン11ボタン
■FOCUS GUIDE /グリップアサイン1ボタン
表示されない画面表示
次の画面表示は、撮影時の画面、再生時の画面、カメラステータス画面で表示されません。
焦点距離、フォーカスモード、顔検出AF、測光方式、レンズ警告、各種AF枠、アイリス/
F値(T値)、AEシフト
=
カメラの使用説明書の「撮影時の画面表示」、「再生時の画面表示」、「カメラステータス
画面」
使用できないブラウザーリモートの機能
■アイリス/ AEシフトの調整。F値/ T値の表示
■フォーカスの調整(マニュアル調整を含むすべてのフォーカス調整機能)
■ズームの調整
■ライブビュー表示がOFFのときのレンズ情報の表示
使用できないリモートコントローラー RC-V100(別売)のボタン/ダイヤル
■AUTO IRISボタン、IRISダイヤル
■AFボタン、FOCUSダイヤル
■ZOOMダイヤル

6
その他の制限事項
■表示パネルのF値/ T値の表示は表示されません。
■メタデータとしてクリップに記録されるカメラ設定情報中のレンズ情報は、記録・表示され
ません。
█主な仕様 (差分情報)
寸法と重量
外形寸法(幅×高さ×奥行き) サムレスト装着時:
約 149×183×188 mm
グリップ装着時: 約 190×183×188 mm
撮影時総重量
本体、グリップ、モニターユニット使用時*: 約 3315 g
本体、グリップ、モニターユニット、ハンドルユニット、ブラケット、
六角穴付きボルト5本使用時*: 約 3665 g
* いずれもバッテリーパックBP-A30、CFastカード2枚、ユニットケーブル
2本を含む
本体質量 (本体のみ) 約 2000 g
レンズマウント交換サービスについて
C300 Mark II PLの レンズマウント を、EFレンズマウント(シネマロ ッ クタイプ )に 交 換 す る こ と
ができます。また、EFレンズを装着してオートフォーカス機能/デュアルピクセルフォーカス
ガイドを使用するには、キヤノンのサービス拠点にてデュアルピクセルCMOS AFの調整を行う
必要があります(有償)*。詳しくは、お買い求めの販売店にお問い合わせください。
* 過去に調整を実施したことがあるカメラを除く。

2
En
Important information about the EOS C300 Mark II PL
Thank you for purchasing the Canon EOS C300 Mark II PL. For full details about using the
camera, please refer to the supplied EOS C300 Mark II Instruction Manual* (hereafter,
simply “Instruction Manual”). This booklet explains how to use a PL lens and details
applicable restrictions and other main differences from the explanations in the Instruction
Manual.
* The instruction manual for the model with an EF lens mount. Most of the information in that manual
applies also to this model (with a PL lens mount).
Attaching and Removing a PL Lens
The precautions to follow when attaching/removing a PL lens are the same as explained
for an EF lens. Refer to
Preparing the Lens
in the Instruction Manual.
Names of Parts
1
2
3
4
1 Bayonet ring handles
2 PL Lens index pin
3 Bayonet ring
4 PL Lens mount

3
Important information about the EOS C300 Mark II PL
Attaching a PL Lens
1 Holding a bayonet ring handle, turn the
bayonet ring counter-clockwise to remove the
camera’s body cap.
• Remove also the dust caps from the lens.
2 Attach the lens to the camera aligning a groove
on the lens with the PL lens index pin on the
mount.
3 Turn the bayonet ring clockwise to fix the lens
in place.
Removing a PL Lens
1 Holding a bayonet ring handle, turn the
bayonet ring counter-clockwise to release the
lens.
• Remove the lens and replace the dust caps.
2 Replace the body cap on the camera and turn
the bayonet ring clockwise to fix it in place.
Camera Functions Not Available when Using a PL Lens
When a PL lens is attached to the camera, the following functions will not be available.
• Aperture adjustment
• Focus functions except for manual focus and two focus assistance functions, peaking
and magnification.
Unavailable Menu Settings
The following submenus and settings will not appear in the menu. Refer also to
Menu
Options
in the Instruction Manual.
• The following submenus under [vCamera Setup]:
[Light Metering], [AE], [Iris], [Focus], [Periph. Illum. Corr.], [Chromatic Aberr. Corr.].
• The following settings under [¢Picture/Terminals Setup] >[Custom Display 1]:
[Light Metering], [Focal Length], [Focus Mode], [Iris], [Lens].
• [ Assistance Functions] >[Focus Guide].
햲
햳
햴
PL lens index pin
햲
햳

4
En
Important information about the EOS C300 Mark II PL
• [ System Setup] menu
- The following functions for assignable buttons ([ System Setup] >[Assignable
Buttons]):
[One-Shot AF], [AF Lock], [Focus Guide], [Face AF], [Face Det. & Tracking], [Tracking],
[Push Auto Iris], [Iris Mode], [Iris +], [Iris –], [AE Shift +], [AE Shift –], [Backlight],
[Spotlight].
- The following options under [ System Setup] >[Custom Function]:
[Camera Control Dial]/[Grip Control Dial] >[Iris], [Retract Lens].
- [ System Setup] >[Firmware] >[Lens].
Assignable Buttons
In addition to the unavailable functions for assignable buttons mentioned above, the
default function assigned to the following assignable buttons will be [(NONE)]. That is, at
initial values, pressing the buttons will have no effect. Still, you can use them as assignable
buttons by assigning a function to them.
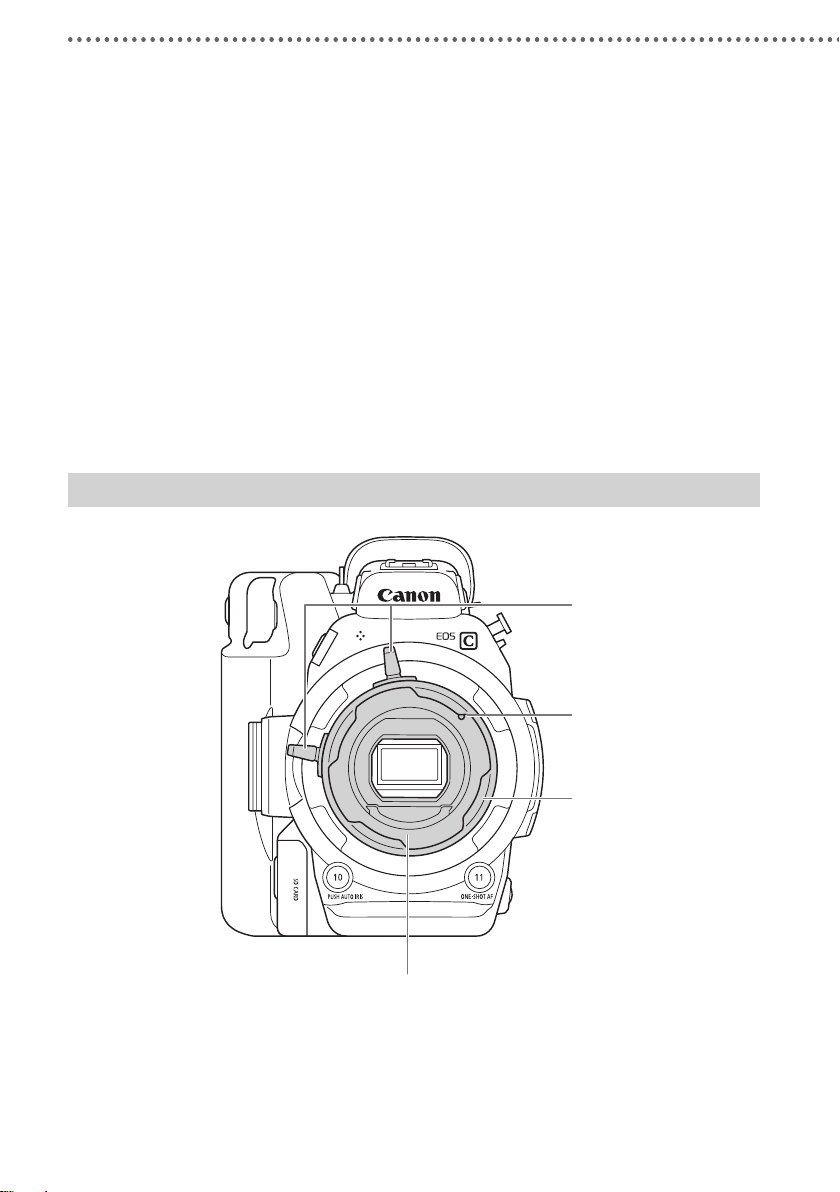
For the location of the buttons, refer to
Names of Parts
in the Instruction Manual.
• PUSH AUTO IRIS button / Assignable button Camera 10
• ONE-SHOT AF button / Assignable button Camera 11
• FOCUS GUIDE button / Assignable button Grip 1
Onscreen Displays
The following onscreen displays (icons and indications) will not appear on the screen.
Related information will also not appear on the various status screens. Refer to
Onscreen
Displays
,
Displaying the Status Screens
in the Instruction Manual.
Browser Remote
The following Browser Remote functions are not available.
• Aperture and AE shift adjustment
• Focus adjustment (including manual focus)
• Zoom adjustment
• Lens information (when live view is turned off) and the aperture value will not be
displayed
• Focal length • Lens error warning
• Focus mode • Various focusing frames
• Face detection and Face AF • Aperture value
• Light metering mode • AE shift

5
Important information about the EOS C300 Mark II PL
Remote Controller
The following buttons and dials on the optional RC-V100 Remote Controller will have no
effect on the camera.
• AF button and FOCUS dial
• AUTO IRIS button and IRIS dial
•ZOOMdial
Other Restrictions
• The aperture value will not be displayed on the rear panel.
• No lens information will be recorded in the camera data part of the clip’s metadata or
displayed as part of it.
Additional Specifications
The following specifications only add information relevant to the C300 Mark II PL camera
model. For the full list of specifications, refer to
Specifications
in the Instruction Manual.
• Dimensions (W x H x D)*
Minimal configuration with thumb rest: 149 x 183 x 188 mm (5.9 x 7.2 x 7.4 in.)
Configuration with grip unit and grip belt: 190 x 183 x 188 mm (7.5 x 7.2 x 7.4 in.)
•Weight*
Camera unit only: 2,000 g (4.4 lb.)
Camera with grip unit and monitor unit**: 3,315 g (7.3 lb.)
Camera with grip unit, bracket, handle unit and monitor unit**: 3,665 g (8.1 lb.)
* All measurements and weights are approximate.
** Working configuration includes also battery pack (BP-A30 x1), recording media (CFast card x2), and
unit cables (x2).
NOTES
• You can have the lens mount of an EOS C300 Mark II PL camera replaced by an EF lens
mount with Cinema Lock. After the replacement, the Dual Pixel CMOS AF function has
to be adjusted at a Canon Service Center* (for a fee) before you can use the camera’s
autofocus functions or the Dual Pixel Focus Guide. For details, consult the retail dealer
from whom you purchased the camera or contact a Canon Service Center.
* Except for cameras for which this adjustment has been performed previously.

2
Fr
Informations importantes à propos de l’EOS C300 Mark II PL
Nous vous remercions d’avoir acheté la Canon EOS C300 Mark II PL. Pour des
explications détaillées sur l’utilisation de la caméra, veuillez consulter le mode d’emploi
fourni pour l’EOS C300 Mark II* (dénommé ci-après « mode d’emploi »). Cette brochure
explique comment utiliser un objectif PL et décrit en détail les restrictions applicables et les
autres principales différences par rapport aux explications du mode d’emploi.
* C’est le mode d’emploi pour le modèle avec une monture d’objectif EF. La plupart des informations de
ce mode d’emploi s’appliquent également à ce modèle (avec une monture d’objectif PL).
Fixation et retrait d’un objectif PL
Les précautions à suivre lors de la fixation et du retrait d’un objectif PL sont les mêmes
que celles à respecter pour un objectif EF. Reportez-vous à
Préparation de l’objectif
dans
le mode d’emploi.
Nom des pièces
1
2
3
4
1 Anses de la bague à baïonnette
2 Broche d’index d’objectif PL
3 Bague à baïonnette
4 Monture d’objectif PL

3
Informations importantes à propos de l’EOS C300 Mark II PL
Fixation d’un objectif PL
1 Maintenez l’une des anses de la bague à
baïonnette et tournez la bague à baïonnette
dans le sens inverse des aiguilles d’une montre
pour retirer le bouchon du boîtier.
• Retirez également les couvercles anti-
poussière de l’objectif.
2 Fixez l’objectif à la caméra en alignant la
rainure sur l’objectif avec la broche d’index de
l’objectif PL sur la monture.
3 Tournez la bague à baïonnette dans le sens
des aiguilles d’une montre pour bien mettre en
place l’objectif.
Retrait d’un objectif PL
1 En maintenant l’une des anses de la bague à
baïonnette, tournez la bague à baïonnette dans
le sens inverse des aiguilles d’une montre pour
libérer l’objectif.
• Retirez l’objectif et replacez les couvercles
anti-poussière.
2 Replacez le bouchon du boîtier sur la caméra
et tournez la bague à baïonnette dans le sens
des aiguilles d’une montre pour le mettre en
place.
Fonctions de caméra indisponibles lors de l’utilisation d’un
objectif PL
Lorsqu’un objectif PL est fixé à la caméra, les fonctions suivantes ne seront pas
disponibles.
• Réglage de l’ouverture
• Fonctions de mise au point, sauf pour la mise au point manuelle et deux fonctions
d’assistance de mise au point, compensation et grossissement.
햲
햳
햴
Broche d’index de
l’objectif PL
햲
햳

4
Fr
Informations importantes à propos de l’EOS C300 Mark II PL
Paramètres de menu indisponibles
Les sous-menus et les paramètres suivants n’apparaitront pas dans le menu. Reportez-
vous également à
Options de menu
dans le mode d’emploi.
• Les sous-menus suivants sous [vConfiguration caméra] :
[Mesure lumière], [AE], [Iris], [Mise au point], [Correct.Illum.Peri.], [Corr. aberrat. chrom.]
• Les paramètres suivants sous [¢Configuration image/prises] >[Custom Display 1] :
[Mesure lumière], [Dist. Focale], [Mode de mise au point], [Iris], [Objectif].
• [ Fonctions d’assistance] >[Guide de mise au point].
• Menu [ Configuration système]
- Les fonctions suivantes pour les touches attribuables ([ Configuration système] >
[Touches attribuables]) :
[One-Shot AF], [Mémo AF], [Focus Guide], [Face AF], [Détection visage & suivi], [Suivi],
[Push Auto Iris], [Mode Iris], [Iris +], [Iris –], [Décal. AE +], [Décal. AE -], [Contrejour],
[Éclair.spot].
- Les options suivantes sous [ Configuration système] >[Custom Function] :
[Molette contrôle caméra]/[Molette contrôle manette] >[Iris], [Objectif rétracte].
- [ Configuration système] >[Firmware] >[Objectif].
Touches attribuables
En plus des fonctions non disponibles pour les touches attribuables mentionnées ci-
dessus, la fonction par défaut attribuée aux touches attribuables suivantes sera
[(AUCUNE)]. Cela signifie que, aux valeurs initiales, appuyer sur les touches n’aura aucun
effet. Toutefois, vous pouvez les utiliser comme touches attribuables en leur attribuant une
fonction.
Pour en savoir plus sur l’emplacement des touches, reportez-vous à
Nom des pièces
dans le mode d’emploi.
• Touche PUSH AUTO IRIS / touche attribuable de caméra 10
• Touche ONE-SHOT AF / touche attribuable de caméra 11
• Touche FOCUS GUIDE / touche attribuable de manette 1
Affichages à l’écran
Les affichages à l’écran suivants (icônes et indications) n’apparaitront pas à l’écran.
De même, les informations liées n’apparaitront pas sur les différents écrans de statut.
Reportez-vous à
Affichages à l’écran
, A
ffichage des écrans de statut
dans le mode
d’emploi.
• Distance focale • Avertissement d’erreur d’objectif
• Mode de mise au point • Différents cadres de mise au point
• Détection de visage et AF visage • Valeur de l’ouverture
• Mode de mesure de la lumière • Décalage AE

5
Informations importantes à propos de l’EOS C300 Mark II PL
Navigateur Distant
Les fonctions de Navigateur Distant suivantes ne sont pas disponibles.
• Réglage de l’ouverture et du décalage AE
• Ajustement de la mise au point (y compris la mise au point manuelle)
• Ajustement du zoom
• Les informations d’objectif (lorsque la vue en direct est désactivée) et la valeur
d’ouverture ne seront pas affichés.
Télécommande
Les touches et les molettes suivantes de la télécommande RC-V100 optionnelle n’auront
aucun effet sur la caméra.
• Touche AF et molette FOCUS
• Touche AUTO IRIS et molette IRIS
• Molette ZOOM
Autres restrictions
• La valeur d’ouverture ne sera pas affichée sur le panneau arrière.
• Aucune information d’objectif ne sera enregistrée dans la partie de données de caméra
des métadonnées du clip ou affichée comme en faisant partie.
Caractéristiques supplémentaires
Les caractéristiques suivantes apportent des informations uniquement applicables au
modèle de caméra C300 Mark II PL. Pour obtenir la liste complète des caractéristiques,
consultez la section
Caractéristiques
dans le mode d’emploi.
• Dimensions (L x H x P)*
Configuration minimale avec le support de pouce : 149 x 183 x 188 mm
Configuration avec la manette et la sangle de poignée : 190 x 183 x 188 mm
•Poids*
Caméra uniquement : 2000 g
Caméra avec manette et écran de contrôle** : 3315 g
Caméra avec manette, crochet, poignée et écran de contrôle** : 3665 g
* L’ensemble des mesures et des poids sont approximatifs.
** La configuration de travail inclut également la batterie d’alimentation (BP-A30 x1), le support
d’enregistrement (carte CFast x2) et les câbles de l’unité (x2).

6
Fr
Informations importantes à propos de l’EOS C300 Mark II PL
NOTES
• Vous pouvez remplacer la monture d’objectif d’une caméra EOS C300 Mark II PL par
une monture d’objectif EF avec verrouillage cinéma. Après le remplacement, la fonction
Dual Pixel CMOS AF doit être réglée dans un centre de service après-vente Canon* (des
frais sont applicables) avant de pouvoir utiliser les fonctions de mise au point
automatique ou le guide de mise au point Dual Pixel de la caméra. Pour de plus amples
informations, consultez le détaillant où vous avez acheté la caméra ou contactez un
centre de service après-vente Canon.
* Sauf pour les caméras pour lesquelles ce réglage a été réalisé auparavant.

2
Wichtige Informationen zur EOS C300 Mark II PL
Vielen Dank für den Kauf der Canon EOS C300 Mark II PL. Eine vollständige
Beschreibung zum Gebrauch der Kamera finden Sie in der mitgelieferten EOS C300
Mark II-Bedienungsanleitung* (nachstehend als „Bedienungsanleitung“ bezeichnet).
Diese Kurzanleitung erklärt, wie ein PL-Objektiv verwendet wird und führt geltende
Einschränkungen und die wichtigste Unterschiede zu den Erklärungen in der
Bedienungsanleitung auf.
* Die Bedienungsanleitung für das Modell mit einem EF-Objektivanschluss. Die meisten der
Informationen in dieser Anleitung treffen auch für dieses Modell zu (mit einem PL-Objektivanschluss).
Anbringen und Entfernen eines PL-Objektivs
Beim Anbringen und Entfernen eines PL-Objektivs sind dieselben Vorsichtsmaßnahmen
wie beim Anbringen und Entfernen eines EF-Objektivs zu beachten. Beachten Sie den
Abschnitt
Vorbereiten des Objektivs
in der Bedienungsanleitung.
Bezeichnung der Teile
1
2
3
4
1 Bajonettringgriffe
2 Führungsstift für PL-Objektiv
3 Bajonettring
4 PL-Objektivanschluss

De
3
Wichtige Informationen zur EOS C300 Mark II PL
Anbringen eines PL-Objektivs
1 Halten Sie einen Bajonettringgriff, und drehen
Sie den Bajonettring gegen den Uhrzeigersinn,
um die Gehäusekappe zu entfernen.
• Entfernen Sie auch die Staubkappen vom
Objektiv.
2 Bringen Sie das Objektiv an der Kamera an,
und richten Sie eine Rille am Objektiv auf den
PL-Objektivführungsstift am Anschluss aus.
3 Drehen Sie den Bajonettring im Uhrzeigersinn,
um das Objektiv zu arretieren.
Entfernen eines PL-Objektivs
1 Halten Sie einen Bajonettringgriff und drehen
Sie den Bajonettring gegen den Uhrzeigersinn,
um das Objektiv zu lösen.
• Entfernen Sie das Objektiv und bringen Sie
die Staubkappen wieder an.
2 Setzen Sie die Gehäusekappe wieder auf die
Kamera und drehen Sie den Bajonettring im
Uhrzeigersinn, um sie zu befestigen.
Bei Verwendung eines PL-Objektivs nicht verfügbare
Kamerafunktionen
Wenn ein PL-Objektiv an der Kamera angebracht ist, stehen die folgenden Funktionen
nicht zur Verfügung:
• Blendenkorrektur
• Scharfstellfunktionen außer dem manuellen Fokus und den Scharfstellhilfe-Funktionen
Peaking und Vergrößerung.
햲
햳
햴
Führungsstift für PL-Objektiv
햲
햳

4
Wichtige Informationen zur EOS C300 Mark II PL
Nicht verfügbare Menüeinstellungen
Die folgenden Untermenüs und Einstellungen werden nicht im Menü angezeigt. Siehe
hierzu auch den Abschnitt
Menüoptionen
in der Bedienungsanleitung.
• Die folgenden Untermenüs unter [vKamera-Setup]:
[Lichtmessung], [AE], [Iris], [Fokus], [Vignettierungskorr], [Farbfehlerkorrektur].
• Die folgenden Einstellungen unter [¢Bild-/Anschlüsse-Setup] >[Custom Display 1]:
[Lichtmessung], [Brennweiten], [Fokus-Modus], [Iris], [Objektiv].
• [ Hilfsfunktionen] >[Fokusassistent].
• [ System-Setup]-Menü
- Die folgenden Funktionen für freie Tasten ([ System-Setup] >[Freie Tasten]):
[One-Shot AF], [AF Sperre], [Focus Guide], [Ges.-AF], [Gesichtserk./-verfolg.],
[Verfolgung], [Push Auto Iris], [Iris-Modus], [Iris +], [Iris –], [AE-Shift +], [AE-Shift –],
[Gegenlicht], [Spotlight].
- Die folgenden Optionen unter [ System-Setup] >[Custom Function]:
[Kamerawahlrad]/[Wahlrad seitl. Griff] >[Iris], [Objektiv einziehen].
- [ System-Setup] >[Firmware] >[Objektiv].
Freie Tasten
Neben den oben genannten nicht verfügbaren Funktionen für freie Tasten ist den
folgenden freien Tasten die Standardfunktion [(KEINE)] zugewiesen. Das bedeutet, dass
die Betätigung dieser Tasten im Ausgangszustand wirkungslos ist. Sie können sie jedoch
als freie Tasten verwenden, wenn Sie ihnen eine Funktion zuweisen.
Die Position dieser Tasten finden Sie im Abschnitt
Bezeichnung der Teile
in der
Bedienungsanleitung.
• PUSH AUTO IRIS-Taste/Freie Taste Kamera 10
• ONE-SHOT AF-Taste/Freie Taste Kamera 11
• FOCUS GUIDE-Taste/Freie Taste Seitlicher Griff 1
Bildschirmanzeigen
Die folgenden Bildschirmanzeigen (Symbole und Anzeigen) werden nicht auf dem
Bildschirm angezeigt. Auch in den Statusfenstern werden die entsprechenden
Informationen nicht angezeigt. Beachten Sie den Abschnitt
Bildschirmanzeigen
,
Anzeigen
der Statusfenster
in der Bedienungsanleitung.
•Brennweiten
• Fokus-Modus
• Gesichtserkennung und Autofokus für
Gesichter
• Lichtmessungsmodus
• Objektivfehlerwarnung
• Verschiedene Rahmen für die
Scharfeinstellung
•Blendenwert
•AE-Shift

De
5
Wichtige Informationen zur EOS C300 Mark II PL
Fernsteuerung via Browser
Die folgenden Funktionen von Fernsteuerung via Browser sind nicht verfügbar.
• Blendenkorrektur und AE-Shift-Einstellung
• Scharfeinstellung (einschließlich manueller Scharfeinstellung)
• Zoom-Einstellung
• Objektivdaten (wenn die Live-Ansicht deaktiviert ist) und Blendenwert werden nicht
angezeigt
Fernbedienung
Die folgenden Tasten und Wahlräder auf der optionalen Fernbedienung RC-V100 sind an
der Kamera wirkungslos.
• Taste AF und Wahlrad FOCUS
• Taste AUTO IRIS und Wahlrad IRIS
•WahlradZOOM
Andere Einschränkungen
• Der Blendenwert wird nicht auf der Rückseitenanzeige angezeigt.
• Es werden keine Objektivdaten im Kameradatenbereich der Metadaten des Clips
aufgezeichnet oder als deren Bestandteil angezeigt.
Weitere technische Daten
Die folgenden technischen Daten sind zusätzliche Informationen, die nur für das
Kameramodell C300 Mark II PL relevant sind. Die vollständige Liste der technischen Daten
finden Sie im Abschnitt
Technische Daten
in der Bedienungsanleitung.
• Abmessungen (B x H x T)*
Minimale Konfiguration mit Daumenauflage: 149 x 183 x 188 mm
Konfiguration mit Seitengriff und Griffriemen: 190 x 183 x 188 mm
•Gewicht*
Nur Kamera: 2000 g
Kamera mit Seitengriff und Monitor**: 3315 g
Kamera mit Seitengriff, Anbauplatte, Tragegriff und Monitor**: 3665 g
* Alle Maße und Gewichte sind ungefähre Angaben.
** Zur Arbeitskonfiguration gehören auch Akku (BP-A30, 1x), Speichermedium (CFast-Karte, 2x) und
Gerätekabel (2x).

6
Wichtige Informationen zur EOS C300 Mark II PL
HINWEISE
• Sie können den Objektivanschluss einer Kamera EOS C300 Mark II PL gegen einen EF-
Bajonettanschluss mit Cinema Lock austauschen lassen. Nach dem Austausch muss
die Dual Pixel CMOS AF-Funktion in einem Canon-Kundendienstzentrum kostenpflichtig
eingestellt werden, ehe Sie die Autofokusfunktionen oder den Dual Pixel Focus Guide
der Kamera verwenden können. Um Einzelheiten zu erfahren, wenden Sie sich an den
Händler, von dem Sie die Kamera erworben haben, oder an ein Canon-Kundendienst-
zentrum.
* Gilt nicht für Kameras, bei denen diese Einstellung bereits ausgeführt wurde.
Other manuals for EOS C300 Mark II
4
Table of contents
Languages:
Other Canon Camcorder manuals

Canon
Canon SCOOPIC 16M User manual

Canon
Canon VM-E70 User manual

Canon
Canon ZR100 User manual

Canon
Canon DC10 - TC Converter User manual

Canon
Canon MVX10i User manual

Canon
Canon DIM-787 User manual

Canon
Canon UC 5 Hi User manual

Canon
Canon UC-V30 Hi8 User manual

Canon
Canon Elura 70 User manual

Canon
Canon 4063B001 User manual

Canon
Canon VIXIA HF R50 User manual

Canon
Canon Vixia HV40 User manual

Canon
Canon VIXIA HF R80 Parts list manual

Canon
Canon Vixia mini X User manual

Canon
Canon MV650i User manual

Canon
Canon XC10 User manual

Canon
Canon VIXIA HF M30 User manual

Canon
Canon Optura Pi User manual

Canon
Canon VIXIA HF M30 User manual

Canon
Canon E 500 User manual