Cansonic UltraDash C1 User manual

1080P FULL HD DASHCAM
INSTRUCTION MANUAL

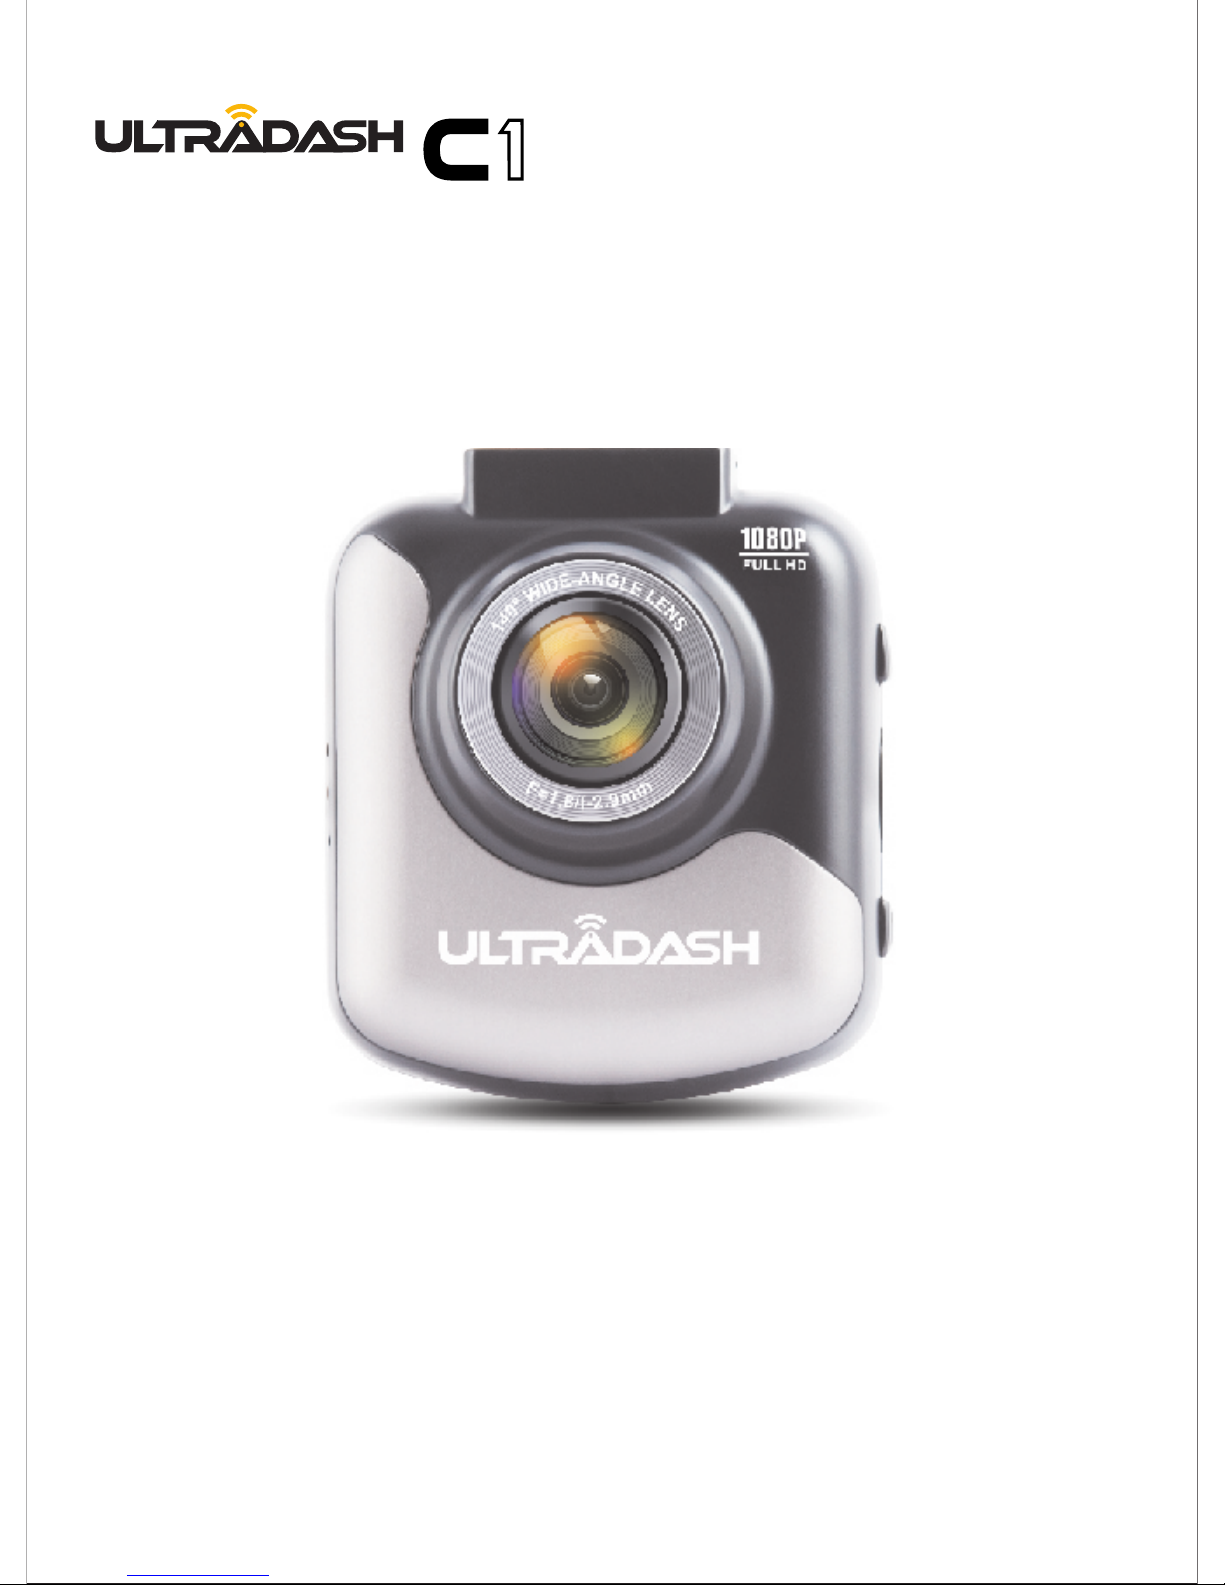
Congratulations on the purchase of your new UltraDash C1 camera! We’d like to thank
you for your purchase. We strive to bring you the highest quality products, allowing you
to capture every memory. We know you’ll love using your UltraDash!
With new technology readily available, the creators of Cansonic have developed an easy
to use camera for everyday use. The UltraDash C1 allows its user to record files in 1, 3, or
5 minute lengths. These files are easy to download to your home desktop or personal
laptop. In most instances, the video files are easily played on your mobile device.
While most cameras traditionally use the entire capacity of the Micro SD card until it is
removed, UltraDash automatically deletes the oldest file to create space for the new video.
UltraDash C1 offers three modes:
1. Video Mode: Video mode will set to default when the camera is active.
2. Photo Mode: The UltraDash C1 setting takes still photographs.
3. Playback Mode: Users can view all previously recorded videos and photos taken.
FEATURES:
Automatic Start/Stop Technology:
Maintain full focus on the road! The vehicles ignition will let the camera turn on while
connected to your vehicles 12 V outlet or cigarette lighter socket. When the vehicle is
turned off, the camera will automatically shut down, preserving camera power for those
moments you are not connected to a direct line of power.
1. Reduce the amount of sky in the picture. By adjusting the camera towards the road,
the automatic exposure compensation will be focused on the road and not the light
from the sky.
2. Position the camera in the center of the dash. If you place the camera behind the
rearview mirror, you will avoid all distractions from the road.
3. Remove any objects that will obstruct your shot such as the protective lens cover.
Clear vision will allow you to record everything in one shot.
The UltraDash C1 lets users adjust camera settings to get the perfect shot. For a great
photo every time, here are a few tips from the designers:
ADDITIONAL TIPS
Full optimization of memory card:
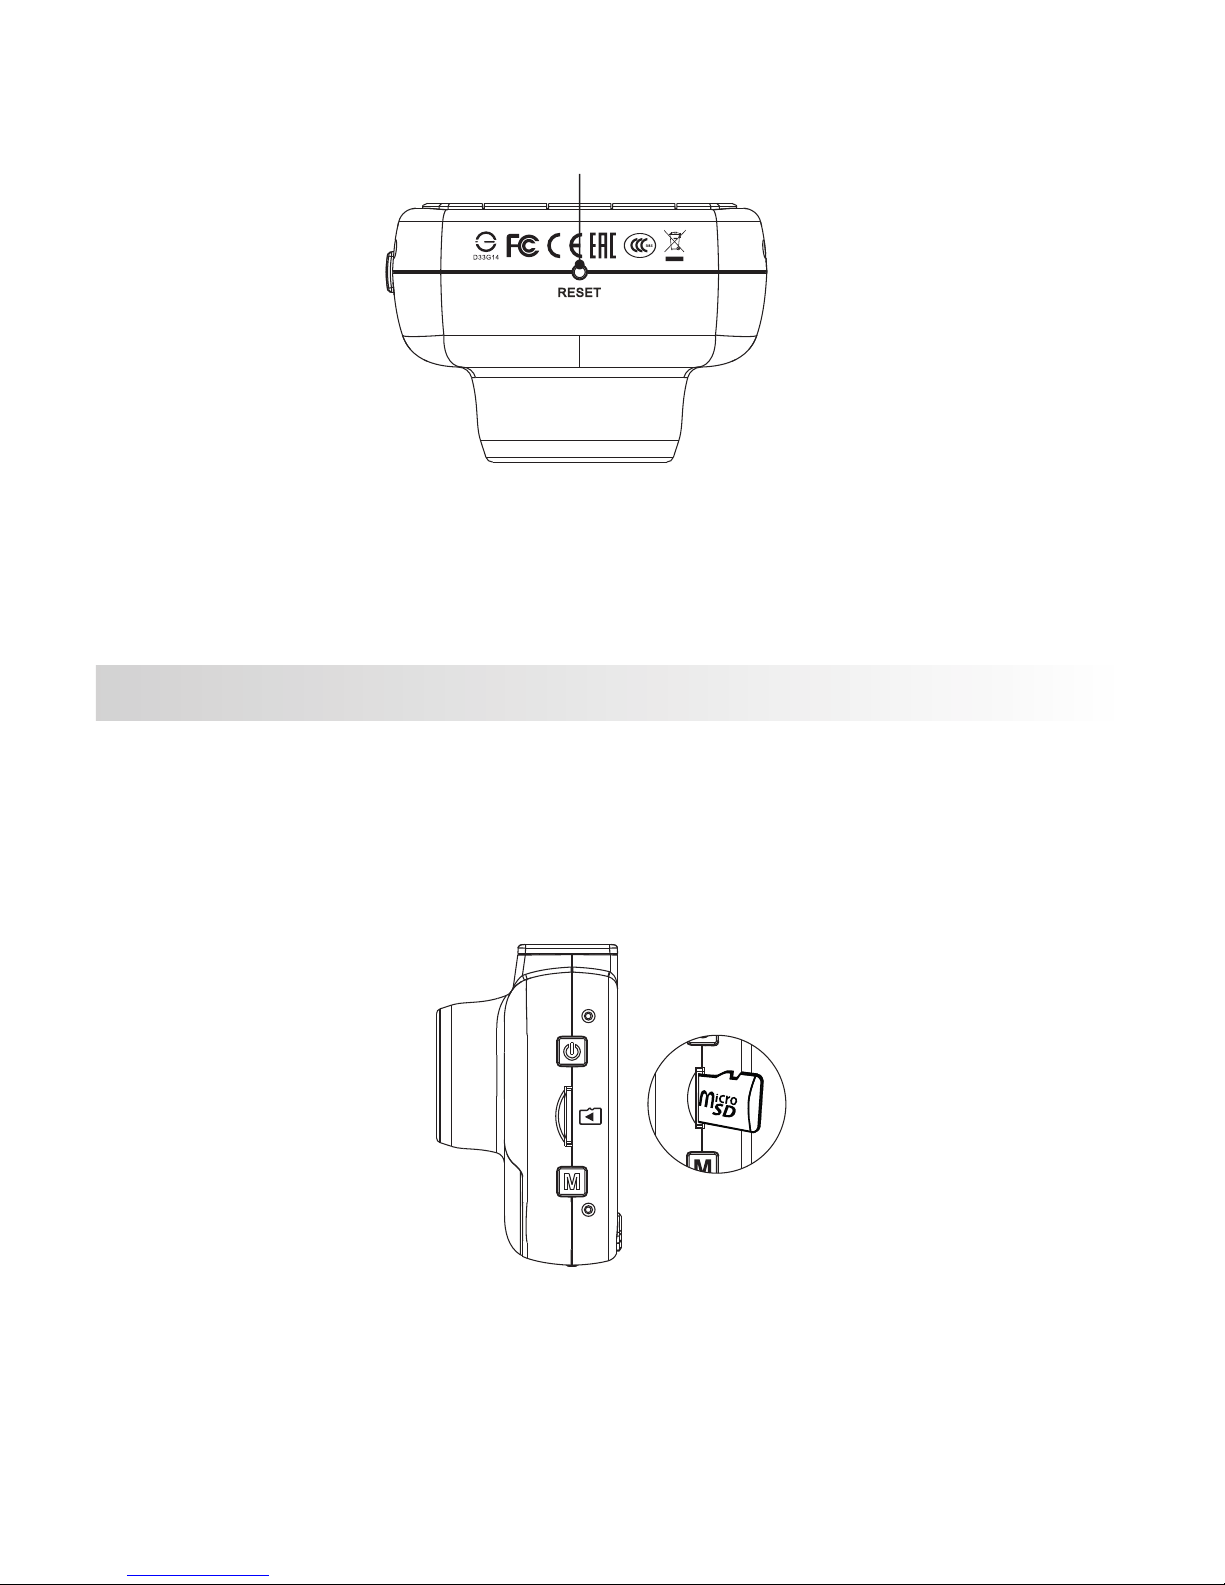
1. Before removal of the memory card from the UltraDash C1, be sure to turn off the
camera. Leaving the camera on while removing its memory card may lead to eased
or corrupt files.
2. Format memory card to UltraDash C1 settings by clicking MENU button twice, then
choosing the format option. You will now be able to fully use all the memory power
your Micro SD card is set to hold.
3. By reformatting your memory card every 2-3 weeks, your memory card will
continue to be fully utilized. Only do this AFTER you've downloaded any files from
the card to your computer, as formatting the card will remove all content.
EASY TO USE
The following instructions are written for optimized use of your UltraDash C1 camera.
Each of the default settings have been designed to achieve the highest quality video while
maintaining peace of mind when the camera is on.
It is not recommended you adjust the default settings.
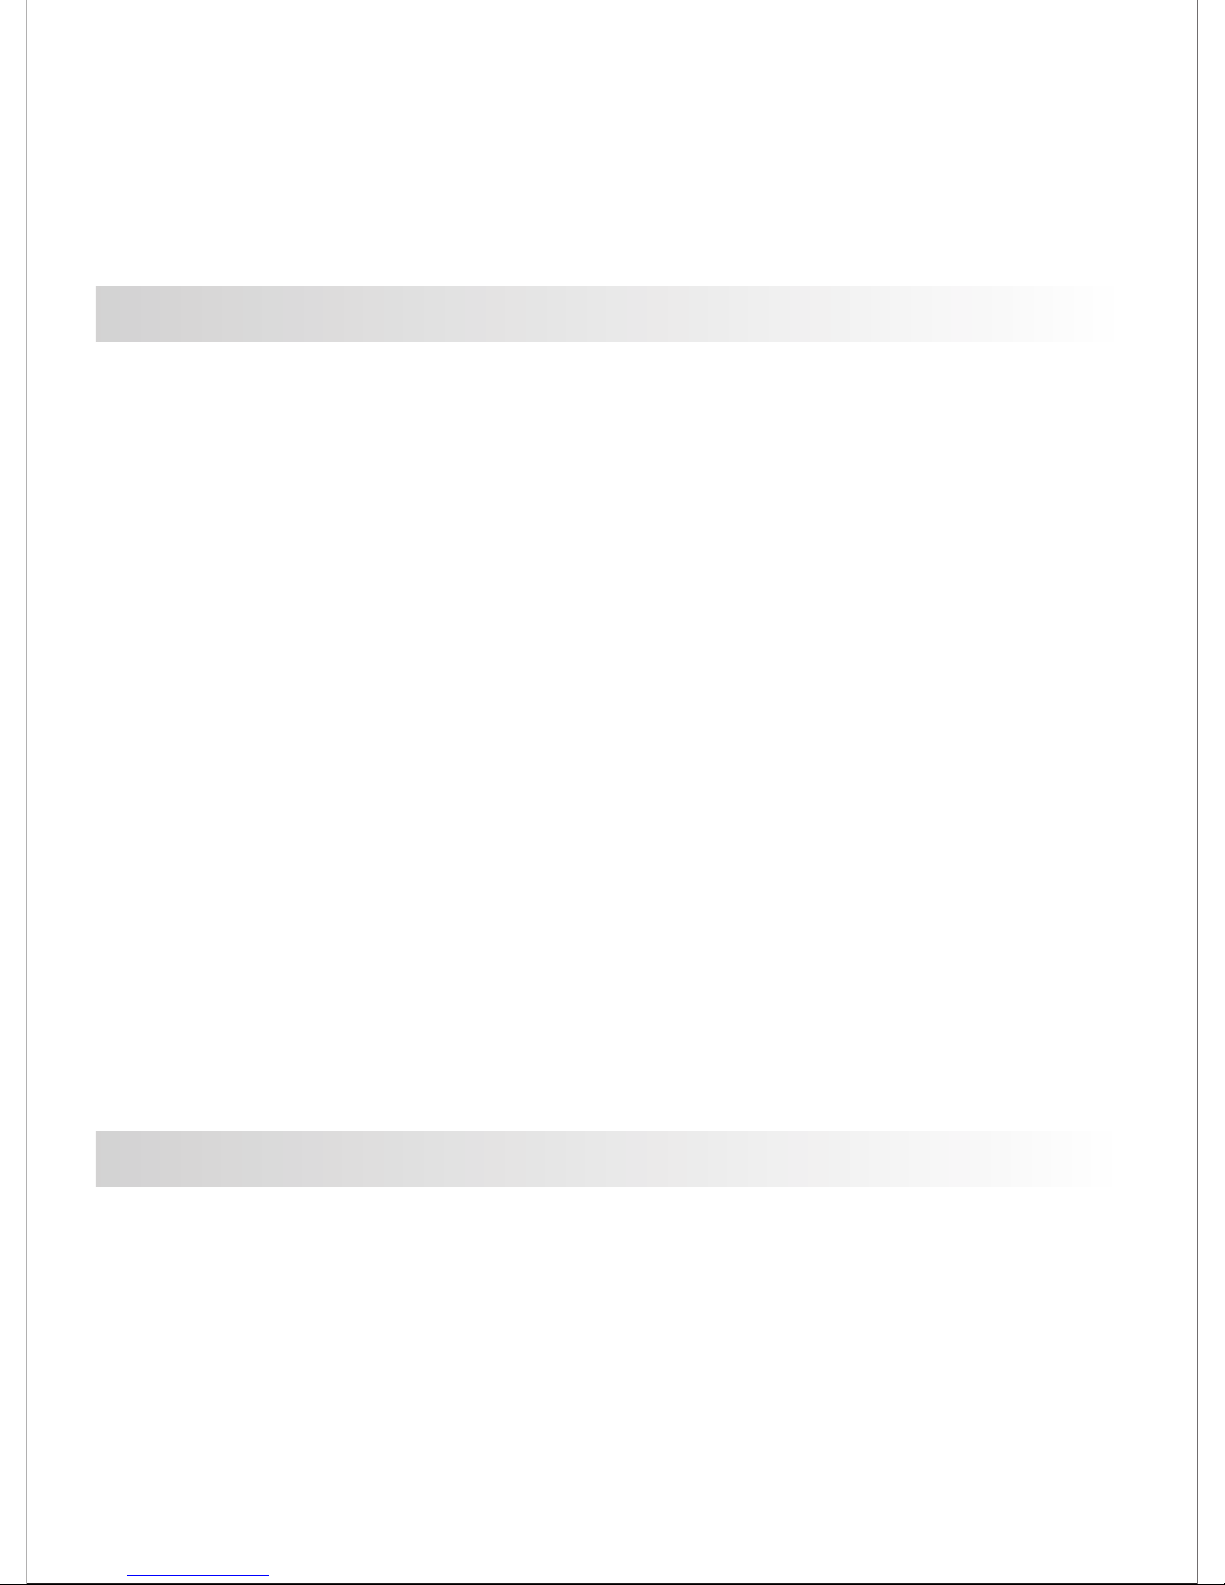
01

TABLE OF CONTENT
The UltraDash C1..................................................................................................01
Precautions 03..........................................................................................................
Product Specs 05......................................................................................................
Package Contents 06.................................................................................................
Product Features 06..................................................................................................
Camera Parts & Controls 07.......................................................................................
In-Vehicle Installation 09............................................................................................
Video Mode 16..........................................................................................................
Video Menu 17..........................................................................................................
Photo Mode 19..........................................................................................................
Photo Menu 20..........................................................................................................
Playback Mode 21.....................................................................................................
Setup Menu 26..........................................................................................................
USB Storage & PC Camera 27....................................................................................
Video & Audio Output 27.............................................................................................
Troubleshooting 29....................................................................................................

Please read the following instructions carefully. Proper Use of the UltraDash C1
is necessary in order to avoid operational problems that may occur.
WARNING:
DO NOT expose UltraDash C1 to moisture under any circumstance. The camera is
NOT WATERPROOF and will become defective and may put the user at risk of electric
shock or fire exposure.
DO NOT use UltraDash C1 for any illegal purpose or to infringe on another individual’s
rights.
When audio is being recorded, we recommend you allow any and all persons near the
UltraDash C1 know that they are being recorded. You can disable the microphone on
the camera.
CAUTION:
Do not perform any activities or services with the device unless you are qualified to
control the object. Misuse of the UltraDash C1 may result in electric shock or fire
exposure. AVOID ANY uses of the camera that are not listed in the manual.
If your UltraDash C1 needs service repairs, please visit a qualified technician to
perform the necessary repairs:
UltraDash C1 has had exposure to water (rain, all forms of water, ETC.)
UltraDash C1 operating system is not functioning properly
UltraDash C1 does not turn on properly
Liquid Crystal Display (LCD)
UltraDash C1 is equipped with an LCD screen for easy viewing. The screen has a
multi-layer complex component that contains nearly 600,000 pixels. The pixels the
screen projects may fail as a result of: Defective Problems or Prolonged Exposure to the
sun. Product life may also be a cause for screen failure. One pixel is equivalent to
0.0001% of total screen exposure. One-pixel failure per year during the operational life
of the UltraDash C1 is standard and should not be cause for concern.
Proper Use of UltraDash C1
The following instructions are listed for exclusive use of the UltraDash C1.
Please read all instructions to prolong camera use and effectiveness.
• Remove packaging and ensure the windshield is clear of dirt and debris before you
install your dash camera mount.
• Avoid any and all distractions in regards to technology, IT’S THE LAW.
Any obstruction of drivers’ view of the road may result in fines. Ensure the UltraDash
C1 is placed clear of your view of the road, as well as out of the way of airbags in the
event of an accident.
• Disconnect the UltraDash C1 adaptor when the vehicle is not in use. By doing so,
you will avoid camera damage as well as hazards such as fires and electrocution.
• Avoid viewing the camera playback feature while operating a vehicle. It is illegal and
may result in a fine or even death.
• Avoid adjusting the camera settings while driving. It is dangerous and illegal.
OBEY THE LAW!
Cleaning
Proper maintenance of the UltraDash C1 is essential to allow for full optimization of the
camera. Maintenance suggestions are:
PRECAUTIONS
03

• Clean the device with a soft dry cloth. For tough dirt, please use a small quantity of
water and a neutral detergent. Clean with a soft cloth.
• Avoid contact with the UltraDash C1 lens as damage may be caused.
• When necessary, clean the lens carefully by using lens cleaning fluid and a soft cloth.
04

Power Requirements
Power Supply
(Car power cable)
Recording Resolution
Screen Size
Screen Resolution
Screen Ratio
SD Card
(Recommended Type)
SD Card Recorded File
Capacity
(based on default settings)
Recording Format
Video / Audio Out
Unit Dimensions
Unit Weight
Model Number / Name UltraDash C1
5V / 1.5A; 12-24V DC
6G / 140° / F1.8
1080P @ 30fps (default)
2.0”
960 (W) X 240 (H) pixels x RGB
4:3
16-128GB SDHC, Class 10 (48mb/s), for best results
use a recognized brand
MOV
2.5mm Jack (Video / Audio)
2.4 x 2.1 x 1.4 inches (6.1 x 5.4 x 3.6 cm)
0.14 pounds ( 65 g )
Sensor Resolution Sony Exmor, 2M Pixel
Card Reader Micro SD, Class 10, up to 128GB
Input: 12-24V DC
Output: 5V DC
Fuse Type: 32mm/2A
Power Input Built-in super capacitor
Lens
Type/Angle/Aperture
8GB Micro SD = 60 mins of recording
(60 x 1 minute recordings)
16GB Micro SD = 120 mins of recording
(120 x 1 minute recordings)
32GB Micro SD = 240 mins of recording
(240 x 1 minute recordings)
64GB Micro SD = 480 mins of recording
(480 x 1 minute recordings)
128GB Micro SD = 960 mins of recording
(960 x 1 minute recordings)
PRODUCT SPECS
05

06
PACKAGE CONTENTS
Please check the contents of your UltraDash product.
* Product appearance may differ slightly to that shown above.
UltraDash C1 Suction mount Car Power Cable USB Cable 3M Adhesive
Mount
Cable Clips
PRODUCT FEATURES
- 2.0” LCD Color Screen
We developed a screen that perfectly fits your camera, without any loss of resolution.
This design allows you to use the playback feature, instantly letting you view the shot you
just captured.
- Quick Release Magnetic Mount
We know how difficult it is to maintain focus with movement. We developed a mount that
is uniquely designed for easy attaching and removing so you can focus on capturing the
perfect shot.
- G sensor/File Protection
The UltraDash C1’s built-in sensor detects an outside force, forcing the camera to save
what has been just shot. The file can also be manually saved. By pressing our easy to
access button around the screen, you are able to save an individual file.
- Automatic Start/Stop Tech
UltraDash C1 comes with built-in sensors that automatically turn the camera on and off
with the vehicle.
- Built-In Microphone & Speaker
A built-in microphone and speaker come standard. The feature also works with the
camera’s playback feature.
- GPS Data (Optional)
UltraDash C1 is able to record your location and speed while filming with the magnetic
GPS mount. (sold separately, please see Cansonic website for more detail).
- Parking Mode (Optional)
The UltraDash C1 has a sleep mode, but a unique feature enables the camera to
automatically record 30 seconds of video if there is any physical movement of the vehicle.
This feature requires hardwiring to permanent power.
(sold separately, please see Cansonic website for more detail).

1 2 3 4 5
6
7
1. Menu Button
Press this button to open the menu of the current mode. Press this button twice to
enter the general setting menu.
2. Up/Mute Button
Up
Navigate up within menus or go to the previous file in playback mode.
Mute
Turn on or off the audio recording function while in video mode.
3. Record/OK Button
Record
In Video mode, press to start or stop recording.
In Photo mode, press to take a photo.
OK
The confirm button used to select options in menus.
4. Down/Screen Off Button
Down
Navigate down within menus or go to the next file in playback mode.
Screen Off
Turn on/off the LCD screen.
5. File Protect Button
Simply press the button and to protect the current video file from overwriting.
Note:
- If the button is pressed within the first third of a video clip, the previous clip will
also be protected.
- If the button is pressed within the final third of a video clip, the next clip will also be
protected (if recording continues).
CAMERA PARTS & CONTROL
07

08
6. Screen
UltraDash C1 is equipped with a standard 2.0” LCD color screen to let you view
7. Status LED Indicator
Red: Power On
Red (Flashing): Recording
Blue: Charging
8
9
10
8. Power Button
Press and hold the button for 2 seconds to turn the camera on/off.
9. Micro SD Card Slot
Insert your micro SD card here. Push your memory card into the slot until you hear a click.
10. Mode/Screen Shot Button
Mode
This button allows you to navigate between video, photo and playback modes.
Screen Shot
While you are recording in video mode, press down on the button and you will be able to
take a screenshot of the current frame.
11. Connector Port
Attach the magnetic connector to the connector port.
8. DC-IN/Data transfer Port
By connecting the UltraDash C1 with the supplied car power cable you are able to charge
the camera. This will also be utilized to let you connect the USB cord to your PC. You can
either connect the car power cable with the device or magnetic connector.
13. Microphone
Built-in microphone for audio recording.
14. AV Outlet
This feature is available to connect your UltraDash C1 to your television by using the
AV Cable (sold separately)
12
13
14
11

15
15. Reset Button
On the rare occasions the camera has a problem, use the reset button to shut
camera. Simply press the reset until the camera turn offs and press power button to
turn on.
down the
For the first installation, follow the instructions below:
1. INSERT YOUR MICRO SD CARD INTO THE UltraDash C1
The UltraDash C1 is designed to allow a standard Micro SD card to record your
footage. Before installing, make sure the gold end of the card is facing the LCD
screen. Once it’s aligned with the slot, push the card in and listen for the CLICK
that will confirm it is secure.
TIP:
- If you cannot hear the CLICK, take a small coin by the edge and push on the outside
end of the card until the sound is made.
- Remember: DO NOT REMOVE OR INSERT THE MEMORY CARD WHILE THE
ULTRADASH C1 IS TURNED ON.
IN-VEHICLE INSTALLATION
09

2.1 CONNECT THE UltraDash C1 TO THE MAGNETIC MOUNT
Attach the UltraDash C1 onto (e) the magnetic connector on the mount.
Make sure you align the camera within the connector port for proper installation.
2.
2.2 REPLACE THE SUCTION MOUNT WITH THE 3M ADHESIVE MOUNT (OPTIONAL):
(a) Suction release tab
(b) Locking lever
( ) Locking ring
(d) Power socket
(e) Magnetic Connector
Suction Mount 3M Adhesive Mount
c
There are two types of mounts included in the package. One is a suction-cup and the
other is a 3M-adhesive type. The suction mount makes it easier to attach and detach
from the windshield while the adhesive mount provides more solid support for the
camera.
The magnetic connector is already installed on the suction mount. If you prefer using
the 3M adhesive mount, please follow the guide below:
10

How to use the 3M Adhesive Mount:
I. Loosen the (c) locking ring on the suction mount and pull the (e) magnetic
connector out.
ii. Next, loosen the (c) locking ring from the 3M adhesive mount, and plug the
(e) magnetic connector into the 3M adhesive mount.
iii. Clean the installation area on the windshield and peel off the plastic covering.
Adhere it to the windshield.
Loosen
Tigten
3. ATTACH THE MOUNT TO THE WINDSHIELD & START RECORDING
Remove the protective plastic film and select a location on the windshield where
won’t distract you. Then, put the suction mount in place.
Release the (b) locking lever from the mount by pulling down on it. Hold the
suction mount in place and press against the window. While holding it in place,
pull the (b) release lever back to lock the mount.
it
11

TIPS:
- When selecting a location for the suction mount, make sure it’s on a glass surface
that is smooth and free of paint.
- Before mounting, clean the area with a dry/clean cloth and add a small amount of
moisture to the windshield. This allows a stronger bond to form between the glass
and the suction mount.
- Remember to place the mount within the area of the vehicle’s windshield wipers.
- The (a) suction release tab allows you to release the cup from the glass to readjust
your camera placement.
4. ADJUST THE ANGLE
Loosen the (c) locking ring and adjust the camera to the angle you want.
When you find the perfect angle, remember to tighten the (c) locking ring again.
5. CONNECTING TO CAR POWER OUTLET
Connect the power cable that is in the package to your vehicle’s 12 V outlet.
The provided cable clips can help you keep the power cable neat.
12
Plug the power cable into the (d) power socket of the mount or camera.
This will allow the camera to begin charging.
Left-hand Drive Right-hand Drive

6. THE FIRST-TIME SETUP
When connecting the power, the UltraDash C1 will turn on and display the first-time
setup guide below.
- Select the Language
English
Simplified Chinese
Traditional Chinese
En
Zh
Cn
- Select the Country and Time Zone
United State
Canada
China
Mexico
United State (EST)
United State (CST)
United State (MST)
United State (PST)
13
- Set the Time and Date
Language
Press OK to continue.
Select Country
Press OK to continue.
Select Time Zone
Press OK to continue.
11 : 17 : 01
07 / 04 / 2018
MM/DD/YY
Set Time & Date

- Select the Speed Unit
MPH
KMH
mph
kmh
TIP:
You can reset the settings either by operating inside of the SETUP MENU, or by
restoring defaults.
From now on, the UltraDash C1 will automatically turn on and start recording once
power has been made available from the 12 V outlet. Just start the vehicle and start
driving!
-If there is no 12V outlet or cigarette lighter for your vehicle, use the included USB
power cord.
-DO NOT wire the UltraDash C1 directly to the car cigarette outlet or any 12 V outlet.
Doing so will result in permanent damage to the camera.
-The UltraDash C1 has a hardwire kit available from the Cansonic official website
that will directly connect to your vehicle’s fuse box. This will allow you to have your
12 V outlet available for other use.
Please read carefully and follow the instructions below to help you operate UltraDash
C1 safely.
14
Press OK to continue.
Select Speed Units

WARNING:
ALWAYS pay attention to the road ahead of you. Driving with distractions on the road may
result in penalties, accidents, or even death. PLEASE DRIVE CAREFULLY.
Always place the mount in a location that will not obstruct the driver's view of the road.
We recommend you place the mount behind the rearview mirror on the passenger side,
within the windshield wiping area.
DO NOT place the camera in front of the driver’s side.
DO NOT place the mount within the airbag deployment area or near any mirrors.
DO NOT operate the UltraDash C1 while driving. Remember, the camera will
automatically record when the vehicle engine has started.
PLEASE place the camera where the power cable is easily concealed and will not
distract the driver. Avoid areas such as the steering wheel, pedals, or gear shifter.
PLEASE remember to clean the area where the mount’s suction cup will be placed.
PLEASE adjust your camera settings before you begin driving.
CAM clearly needs to view through CAM clearly needs to view through
Left-hand Drive Right-hand Drive
15

The following information will help you better understand the icons in VIDEO MODE
their relative functions. Some icons show up only when corresponding functions are
activated.
and
1 2 3 4 6
9
10
11
12
13
8
5 7
1. Mode: Indicates the UltraDash C1 is in video mode.
2. Resolution: displays the current resolution.
3. G Sensor: The current sensitivity level of G-Sensor.
4. Video Length: The duration of each video clip.
5. Exposure: Indicates the current exposure level settings.
6. GPS: If this icon flashes, it indicates UltraDash C1 is locating GPS signal.
When the GPS signal is found, the icon will stop flashing and remain stable on
the screen. (Optional)
7. Recording Duration: This will indicate the length of the current recording.
8. Parking Mode Sensor: Indicates the current sensitivity level for parking mode
function. (Optional)
9. File Protection: Indicates the current video clip is protected.
10. Date: Displays current date.
11. Time: Displays current time.
12. Microphone: When the audio recording function is off, there will be a red line
across the icon.
13. Power Status: Indicates if the camera is charging or not.
UltraDash C1’s default settings have been set for you to use the camera without needing
to change the settings.
If you need to make adjustments to the settings, the following instructions will help you.
16
07/04/2018
11:17:01
00:00:59
FHD
1080P
P
VIDEO MODE

Access the VIDEO MENU by pressing the MENU button while in VIDEO MODE.
Video Length
Exposure
Parking Mode Sensor
Resolution
OK Enter MENU Back
1080P
P
Use the UP and DOWN buttons to select setting options and press the OK button to enter
the sub-menu.
Once you access the sub-menu, highlight the desired setting and press the OK button to
confirm your selection and to return to the VIDEO MENU.
Press the MENU button twice to return to video mode.
TIP:
- You are not able to access the UltraDash C1 menu while the camera is recording.
•
OPTIONS: 1080P 30fps/720P 60fps
• Video Length: Set the length for each individual video clip. The video recorded by
UltraDash C1 will be split and stored as individual video clips. The loop recording
function will automatically overwrite the oldest and non-protected video clip when the
memory card is full.
OPTIONS: 1 Minute (default)/3 Minutes/5 Minutes
• Exposure: Adjust exposure levels settings.
OPTIONS: +2/+1/ 0 (default)/-1/-2
• Parking Mode Sensor: If the parking mode sensor is turned on, C1 will enter sleep
mode when the vehicle is turned off or when C1 loses its power supply.
In the sleep mode, if C1 detects any external forces, it will automatically turn on and
take a 30 second video and turn off afterward. The videos taken in this situation will all
be protected. You can adjust the sensitivity for the parking mode force sensor here.
The parking mode feature requires the hardwiring to permanent power.
(Hardwire kit is sold separately)
OPTIONS: On/Off (default)
Resolution: Choose the video resolution.
17
VIDEO MENU

• G Sensor: G sensor is the sensor that can detect forces. When it senses any forces,
it will protect the current file automatically. Adjust the sensitivity of G sensor here.
OPTIONS: High/Medium (default)/Low/Off
• GPS: Turn the GPS function ON or OFF. (GPS mount is sold separately.)
OPTIONS: On/Off (default)
• Speed Units: Adjust the unit for speed data.
OPTIONS: MPH (default)/KMH
• Screen Saver: UltraDash C1 has a function to let the screen shut down after a period of
inactivity. Press any button to re-activate the display.
OPTIONS: 30 Seconds/2 Minutes/Off (default)
• UltraDash Stamp: Turn the UltraDash logo stamp ON or OFF on the recorded files.
OPTIONS: On (default)/Off
Time & Date Stamp: Turn ON or OFF the date stamp mark on the recorded files.
OPTIONS: On (default)/Off
• Information Stamp: Turn the Information stamp including the acceleration, speed
data on the recorded files ON or OFF.
OPTIONS: On (default)/Off
• License Plate Stamp: Input your license plate number to put your license plate
stamp on the recorded files.
NOTE: When you are in the SETUP MENU -> Restore Defaults, you will be able to
restore all the settings to UltraDash C1’s default settings.
18

While in VIDEO MODE, press down on the MODE button to enter PHOTO MODE.
In PHOTO MODE, you are able to take stationary photos.
The following instructions will explain the icons in PHOTO MODE.
Some icons show up only when corresponding functions are activated.
1 2
345
1. Mode: Indicates when the UltraDash C1 is in photo mode.
2. Exposure: Indicates the current exposure level settings.
3. Time: Displays current time.
4. Date: Displays current date.
5. Charging Indicator: Indicates if the camera is charging or not.
07/04/2018
11:17:01
PHOTO MODE
19
Table of contents
Other Cansonic Dashcam manuals