manuals.online logo
Brands
  1. Home
  2. •
  3. Brands
  4. •
  5. Capital
  6. •
  7. Stove
  8. •
  9. Capital SIRIUS User manual

Capital SIRIUS User manual

Solid Fuel Stoves Manual vI2. Issued - 28/11/2014 (392)
'SIRIUS' S LID FUEL HEATING
ST VES - 'SIERRA' INSET MULTI-
FUEL M DELS
Incorporating GH-T Firebox
INSTALLATI N AND PERATING INSTRUCTI NS
LEAVE THIS D CUMENT WITH THE H USEH LDER!
All these Stoves exceed the safety and performance requirements of European Standards
Intermittent burning solid fuel roomheaters for installation with a single dedicated chimney.
Independently tested in 2010 by SGS Approved Laboratory No 0 08
Inset Stove with GHT-T Firebox
Fuel Wood (Beech) Mineral Fuel (Anthracite)
Test Standard EN 13229
Test Cycle 1.0 kg per 45 mins 0.7 kg per 1.01 hrs
Settings Primary=0, 2nd=25% Primary 100%, 2nd 0.5 cm
Flue Draught Pa (ins WG) 12 Pa 12 Pa
Efficiency % 82.2% 77%
Recommended Output Rating kW 4.9 kW 4.9 kW
Mean Flue Gas Temp Rise ºC 218 °C 279 °C
Minimum air entry requirement 2750 mm²
Minimum Clearance to combustibles (allow min 50 mm clearance to non-combustibles) When fitted in masonry fireplace,
15cm at sides, 30cm above
Emissions as
if 02=13%
NOx mg/m³ 77 mg/m³ NPD
CO % 0.3% 0.0 %
CxHy mg/m³ NPD NPD
Gas flow g/sec 3.9 g/sec 5.2 g/sec
Smoke Emission mg/m³ 142 mg/m³ NPD
I declare that this information is true, these products meet the requirements of Harmonised Standards and are fit for sale.
Signed on behalf of the manufacturer by Glyn Hughes, Design Engineer, at Winster, Derbyshire, England 28. Nov. 2014
Read these instructions! Use only recommended fuels!
This document, when completed by the installer, constitutes part of a 'Hearth Notice' for purposes of
Building Law. It must be left with the householder and placed where it can easily be found.
INSTALLED AT LOCATION:
BY:
EMERGENCY CONTACT:
Flue Draught
measured on
commissioning:
Fuel used on
commissioning
I definitively assert that this installation is safe, has been lit and demonstrated to the
householder, conforms with current building regulations and with these instructions
SIGNED: DATE:
T FIND A QUALIFIED INSTALLER, FUEL SUPPLIER or CHIMNEY SWEEP, C NTACT:
UK: The Solid Fuel Association, 7 Swanwick Court, Alfreton, Derbyshire DE55 7AS Tel:0845- 01-440 www.solidfuel.co.uk
RoI: Irish Nationwide Fireplace Organisation, 1 2 Capel Street, Dublin 1 Tel:01-801-5959 www.fireplace.ie
www.capitalfireplaces.co.uk
Capital Fireplaces, Unit 12, Henlow Ind Est, Henlow Camp, Beds SG1 DS UK
Tel: 014 2-813138 Tel: 01204-8 8-550
This Inset Stove incorporating the GH-T firebox may be used in smoke control areas when operated strictly in accordance
with these instructions and with the attached Soliftec Smoke Advice Sheet No1 (www.soliftec.com/smokeadvice.htm), when
burning:
UK: Untreated wood logs or authorised smokeless fuels (Exempted from s20 of the Clean Air Act 1993)
RoI: Wood logs, smokeless fuels or peat bri uettes, but not petroleum coke (Control of Atmospheric Pollution Regulations, 1970)
1
Pa
WG
Building regulations are available at www.soliftec.com
AB UT Y UR INSET ST VE
This Inset is a solid multi-fuel heating stove designed to fit into
masonry fireplaces. It has convection chambers behind, above, at
the sides and even underneath the firebox to collect hot air and
distribute it into the room so that it is every bit as efficient, or more
so, than a free-standing stove.
INSTALLING a stove is a 'controlled service', the law expects that
it is either supervised by a qualified installer or that the building
inspector is informed. Check with your local authority.
ASBEST S: Your stove does not contain asbestos, but take care
to avoid disturbing asbestos in an old installation.
WEIGHT: Your stove is heavy (94kg) take great care when moving
it and ensure that the intended fireplace can support the weight-
consider fitting a load distributing plate.
Y UR CHIMNEY, by becoming warm, makes the gas inside it
rise, pulling fresh air into the stove to make it work. It must:
•Generate a draught in use of at least 12Pa (0.05ins wg)
•Be capable of withstanding the temperatures generated.
•Be absolutely incapable of leaking fumes into the dwelling
•This may commonly be achieved by it:
•Being at least 5m high.
•Terminating at least 1m above any roof ridge.
•Having an internal cross-section equivalent to never less than
125mm diameter, and never more than 0.14m² (eg 375 x
375mm)
•Being free from even the slightest crack or source of leakage.
•Having no bends sharper than 45º.
•Being swept and entirely free of obstructions
•Being connected only to this one appliance.
•Being of thick masonry or otherwise highly insulated.
•Conforming to local building regulations.
Special rules apply where the flue passes through timber, thatch or
other vulnerable materials- take specialist advice.
Although it is possible to access the chimney through the fire with
the throat plate removed, fit hatches to provide access if needed.
Y UR FIREPLACE: Stoves become VERY hot, the setting must
be made entirely of durable fireproof materials. Thin (<50mm)
stone slabs risk cracking unless cut into sections to allow for
expansion and backed with a heat resistant concrete. Even
beyond the safety clearance items can still become very hot - take
great care in siting wax, paper etc.
AIR SUPPLY: Your stove needs air to breathe - there should be a
permanent fresh air supply into the space in which it is installed
equal to about 550mm² for each kW of nominal output.
This degree of air can often be provided by leakage around door
frames etc, especially in older buildings. It is commonly accepted
that this alone may suffice for appliances below about 5kW output.
It must be a matter for the judgement of the installer as to whether
an extra permanent air vent is required. Where is needed, it is
wise to fit an outside vent as close to the fire as possible, to
prevent unpleasant draughts. An extractor fan, or another fuel-
using appliance in the same building, can remove this air.
FITTING
This model can fit straight into a standard British or Irish fireplace
conforming to BS1251 & BS8303. The fireplace can be of any
shape, but will always have:
• Have an opening width (A) of between 400 and 420mm,
• An opening height (B) of between 540 and 5 0mm,
• A flat area (C) extending 70mm around the opening
• A hearth extending at least 225mm in front of the fire (D), without
obstructions to prevent the door opening
(The fireplace will become VERY hot - Where thin slabs of mineral
material (marble, limestone etc) are used to face a fireplace, we
recommend using 5 separate panels, as shown, to allow for
differential expansion.)
The Inset will fit directly into any correctly constructed fireplace
with the fireback (E) broken up and removed, so that a clear, level
depth of at least 2 0mm is available.
The stove must be firmly fixed in place through the fixing hole(s)
(G) BOTH in the base AND against the face of the fireplace.
Screws are provided for use in sound masonry, but, depending on
the substrate, other fixings may need to be substituted.
This stove is double-cased - it is not necessary to fill any small gap
behind the appliance – larger gaps should be filled with rubble,
vermiculite granules or mineral fibre wool.
It is highly advisable, where fitted into a masonry flue, to form a
smooth mortar flaunching between the flue outlet and the flue.
With care, this can be done through the flue outlet.
A soft seal is fixed to the back seating surface of the stove. A thicker seal for rough materials such as stone is available from your
dealer. Pull off top and push stove into the opening. Screw to the masonry of the fireplace at the F UR points arrowed (two through
the base, two above the fire opening) and proceed with the fix as shown below.
Suitable masonry fireplace.
Opening width (A) 400 to
420mm, height (B) 540 to
5 0mm. Flat area (C) extending
70mm around the opening, a
hearth extending at least
225mm in front of the fire(D),
without obstructions to prevent
the door opening.
'FIREPLACE SEAL' METH D:
Fix the four bolts
to hold the stove
in place and,
through the flue
outlet, fill any gap
behind with
vermiculite
granules topped
with mortar.
Carefully check
that the fire has an
absolutely airtight
seal against the
fireplace.
FAST-FIX 'CHIMNEY SEAL' METH D:
Obtain a PD-Q flue
connector. Fit the flue
pipe, or 150mm flexible
liner, into the chimney
and fasten its loose end
to the PD-Q connector,
sealing well with fire
cement. Fix the four
bolts to hold the stove.
Smear a little fire
cement around the flue
outlet and bolt the
connector and pipe
back in place from
inside. Check that the
pipe forms a clear route
from stove to chimney
terminal with no leaks
into the masonry space.
Whichever method is used it is imperative that: (1) The route for gases from the stove to the chimney terminal is completely air-tight;
even the tiniest gap or crack can spoil the updraught. Seal all joins with fireproof cement and/or heatproof rope. (2) It is possible to
sweep the entire length- access doors may be required. (3) The entire construction is of durable fireproof materials. (4) It is wise to fit a
CO alarm.
2
THIS APPLIANCE BEC MES EXTREMELY H T
AND CAN PR DUCE P IS N US GASES.
A fire-guard should be used if children or the infirm are
present. The installer is required to EXACTLY follow
these instructions and to completely comply with all
local, national and international standards.
CHECK THE INSTALLATI N !
Once installed, light the fire, demonstrate it to the householder and
check that:
1) It burns controllably and does not emit fumes to the room
2) The route for gases from the stove to the chimney terminal is
completely airtight, unobstructed and able to be swept.
3) The entire construction is of durable fireproof materials.
4) The flue presents a draught in use of at least 12Pa
LIVING WITH Y UR ST VE
Every fuel, chimney and condition of use is different. Only
experience will show which are the best settings for you.
LIGHTING If lighting after a period of non-use, do check that the
flueways and chimney are completely clear. Empty the ashes.
Place two or three firelighters
close together, or screwed-up
paper covered with dry sticks, at
the back of the grate and light
them. When they are burning well
gently fill the fire with dry fuel,
close the door and set the air
control slides to the 'high' (right)
position. When the fire is burning
well, move the controls to the
lowest practical setting.
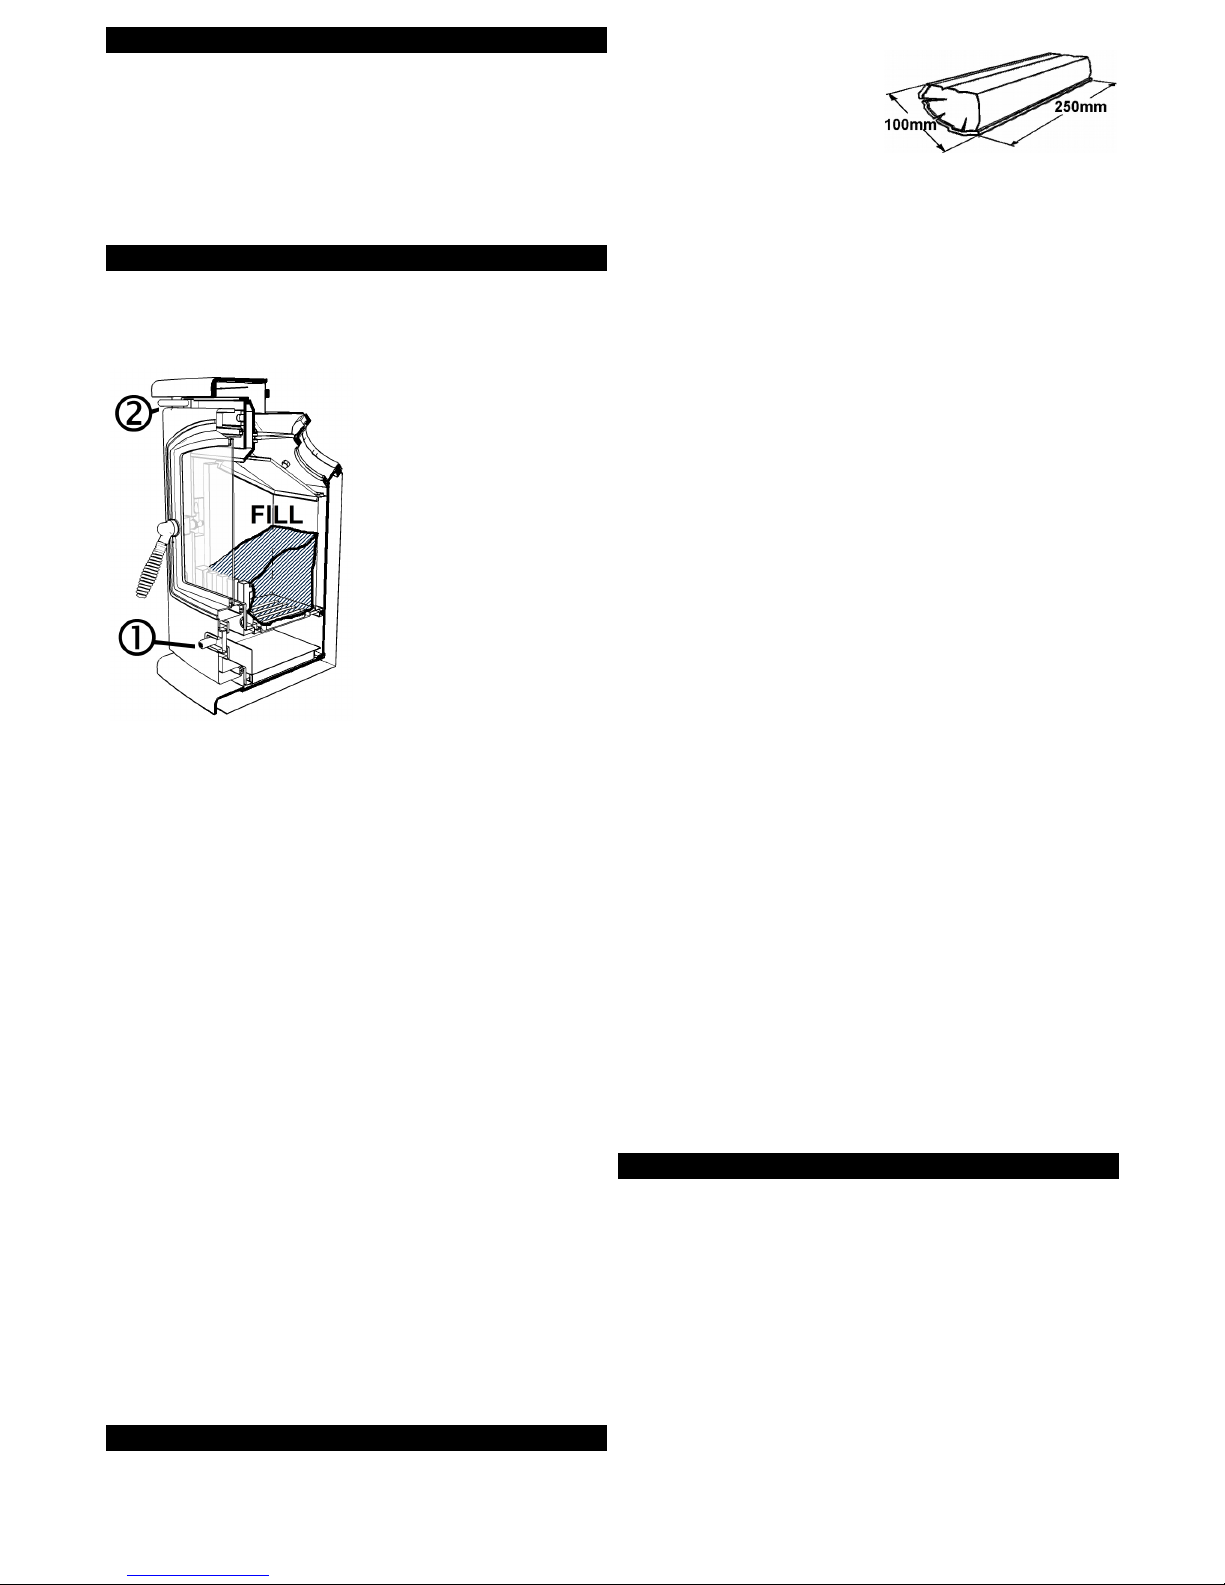
FILLING: Don't fill above the
level shown in the diagram.
C NTR L How fast the fire
burns depends on how much air
reaches the fuel. The stove has
two air controls, one below the
window ('primary'(1)) and one
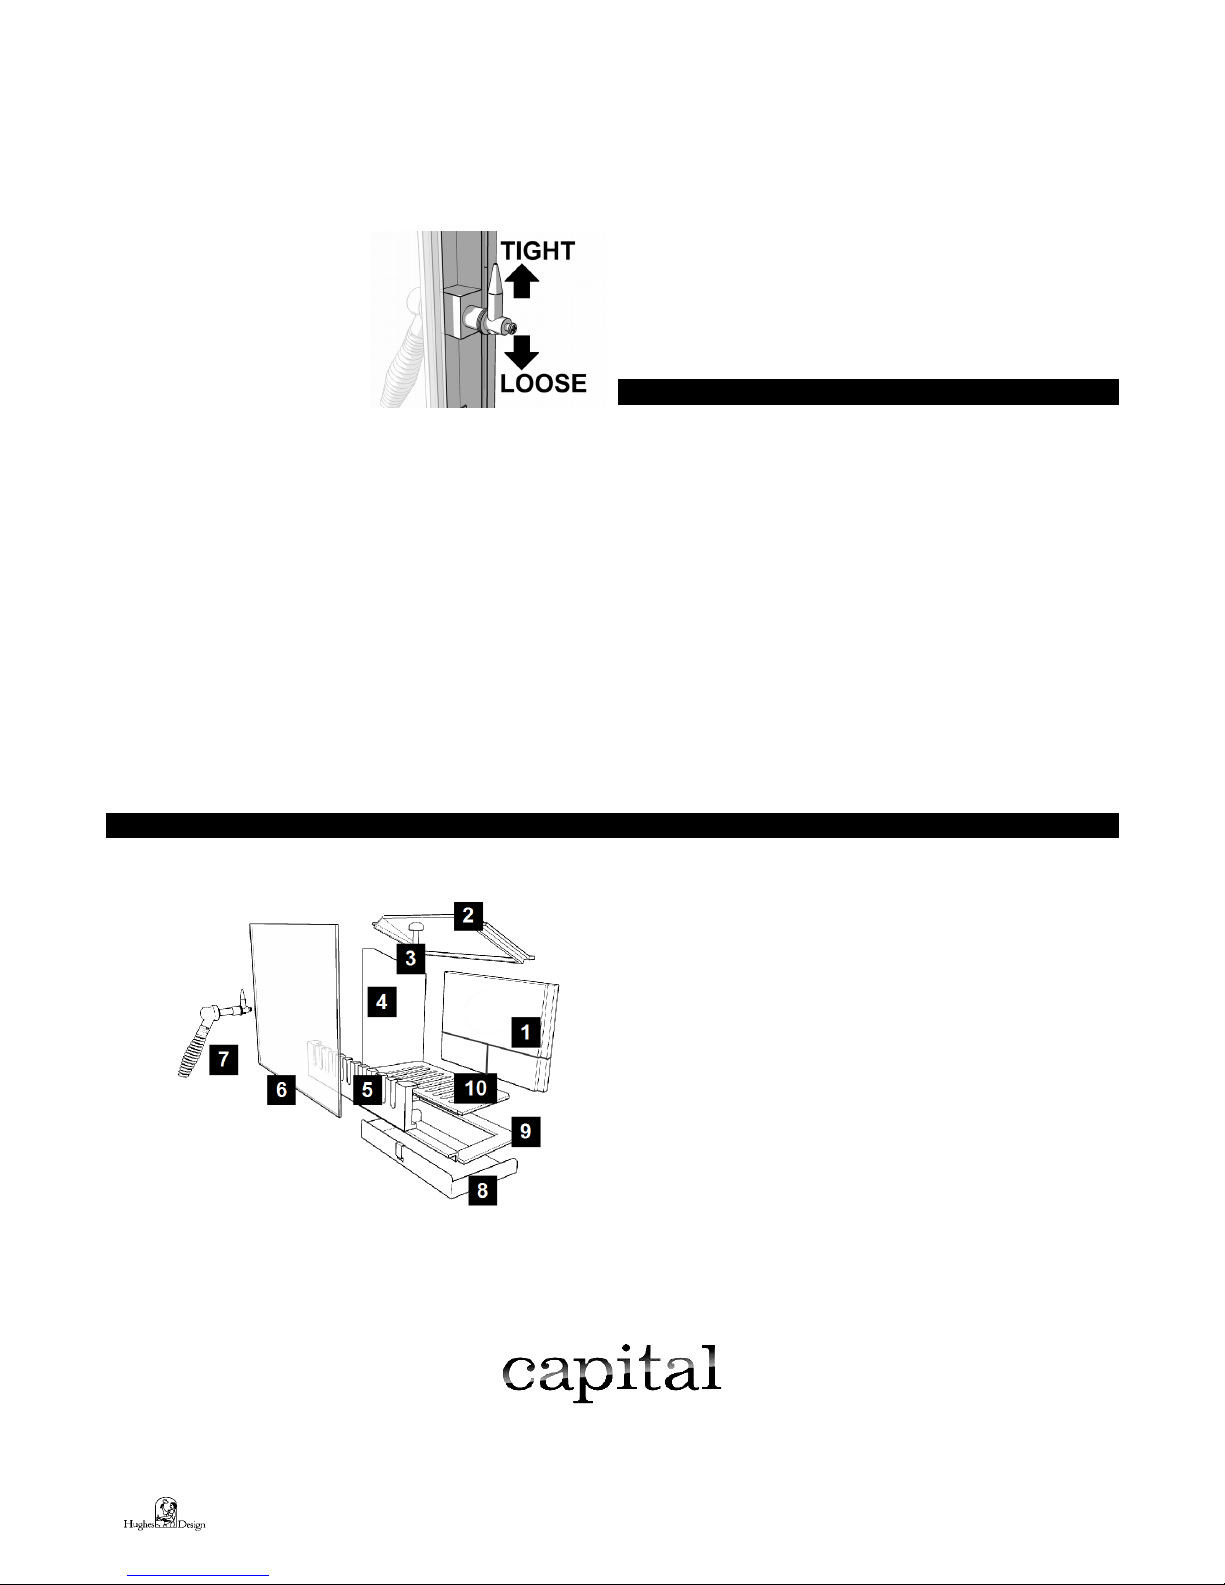
above ('airwash control(2)). Move the slides to the right for highest
output, to the left for 'low'. They can get very hot, so move them
only with the handle supplied.
Our tests indicate highest efficiency on wood with the primary (1)
about ¼ open and the airwash (2) barely open. Anthracite works
best with the airwash closed and the primary 1/3 open. But the
best settings for you will depend on your fuel, air supply and flue
draught and can only be found from experience.
EMPTYING ASHES use the door handle tool to open the door. Stir
the fire with a poker. Use the angled ashpan tool to lift out the
ashpan. Remember to let ash cool before disposing in plastic
sacks or dustbins. There is no need to empty every last speck, but
ash from mineral fuels should never be allowed to build up so that
it comes into contact with the underside of the grate.
EXTENDED BURNING Allow the fire to burn down to a low, hot
firebed. Empty the ash and fully fill with hard fuel such as
anthracite (c30mm size is best). Set the air control to 'low' and
your stove can burn for up to ten hours without attention.
KEEPING THE WIND W CLEAN Simply operating the stove for a
few minutes at high output will often burn-off any deposits left by
tarry or wet fuels. Severe stains can be removed when cold with a
domestic bleach cleaner. The window is not glass but a
transparent ceramic, it may develop tiny hairline cracks, these are
harmless, and a characteristic of the toughest and most heat-
resistant material known. Reduce the risk of staining by using only
very dry fuel and keeping the airwash control slightly open.
PENING THE D R This stove is designed to be operated only
with the door closed. Open the door very slowly to minimise fume
emission and prevent hot fuel falling out. Remember that the
whole stove becomes extremely hot. Pull the door handle off when
not being used to prevent it overheating.
SUMMER SHUT D WN: Before a long period of non-use, empty
fuel and ash, remove the throat plate and leave all the air controls
open to allow ventilation to reduce condensation.
FUELS
There is no 'perfect' fuel, so we strongly recommend that you try a
selection of fuels (or mixtures) to find which suits you best. Do
avoid dusty materials like sawdust, they can burn far to violently.
SM KE C NTR L: In certain
areas special rules apply to reduce
smoke nuisance. Check with your
local authority.
W D only emits as much carbon
to the atmosphere as the tree took in when growing, so wood is
considered the 'carbon neutral' fuel. When wood is cut down its
cells are full of water. Burning such wet or 'green' wood wastes
heat in making steam and produces flammable, acidic tars which
will cling to, and rapidly damage, your stove and chimney. Split
logs will typically take two years to become reasonably dry, round
logs very much longer. Cracks in the ends, a hollow sound when
tapped and bark falling away are all signs that a log may be ready
for use. The fine, white residue produced when wood burns is not
ash, but the remains of cell walls which can burn if kept hot
enough, so don't de-ash the fire until absolutely necessary when
using wood.
For best performance, and always for low smoke emission:
Split logs lengthways for drying
• Use logs no bigger than about 100mm x 250mm
• Ensure logs are absolutely dry (less than 20% moisture)
• Fill the stove criss-cross, so air can circulate between logs.
• Fill 'little and often'
• Always have the airwash control (2) at least a little open.
• When first lighting, or reviving a fire from embers, use only very
small, thin, dry, sticks.
J INERY WASTE Dry wood offcuts will burn well, but don't expect
softwood waste to burn as cleanly or for as long as hardwood logs.
PEAT: Sod turf must be thoroughly dry. BNM peat briquettes are
approved for use in Smokeless Zones in the RoI.
LIGNITE (not smokeless) is a natural mineral, between peat and
coal. It lights easily and burns well, but produces much ash
H USEC AL or BITUMIN US C AL (not smokeless) makes
lots of tarry smoke and large volumes of flammable gas which
make it difficult to control and risk explosions. Despite its low cost,
it rarely represents value for money. Don't use housecoal.
ANTHRACITE (Smokeless) is a natural hard, shiny form of coal.
Slow to light, it can burn for very long periods with great heat.
Despite its high price-per-bag it generally works out to be one of
the cheapest of all fuels. Use the 'small nuts' size.
C KE (Smokeless) is coal from which the smoke has been
removed. Sometimes difficult to light, it burns very cleanly.
BRIQUETTES Are compressed blocks of fuel, generally able to
burn for long periods and remarkable for their consistency.
'Homefire' and 'Phurnacite' are smokeless types while other
brands are made from lignite, peat or housecoal.
PETR LEUM C KE sold as 'Petcoke', 'Longbeach' and other
names, is made from oil, should not be used, it will rapidly degrade
interior parts.
H USEH LD WASTES Some plastics give off toxic fumes when
burned and remember that batteries and aerosols explode! The
stove is not an incinerator, so only ever use the recommended
fuels and NEVER use liquid fuels in any form.
PR BLEMS?
Problems like those listed here are usually due to some difficulty
with the installation, chimney or fuels, so please check back
through this leaflet carefully. If necessary seek specialist advice.
SM KE FR M THE CHIMNEY It is quite normal for a little smoke
to be emitted from the chimney when the fire is cold. Use only
VERY dry wood or smokeless fuels.
DAMAGED LINERS The stove gets very, very hot inside, it is
quite usual for the replaceable liners to crack or craze. They need
only be replaced when they have almost completely disintegrated.
Help them last longer by using only very dry fuel.
P R HEAT UTPUT: A stove can heat a typical room of about
12m³ volume for each kW of output, so a 5kW model can heat up
to (12 x 5) 3m³, a room of about 5m square. The actual size
depends on the insulation and air-change ratio of the room. To
attempt to heat a larger room will result in excessive fuel
consumption and damaging overheating.
3
LACK F C NTR LLABILITY Wood and some other fuels may
burn excessively until the gases in them have been used up. You
can reduce this effect by making sure that the fire is set to 'low' for
a while before refuelling and checking that the door seals fully
DIFFICULTY BURNING F R EXTENDED PERI DS If the fire
goes out with fuel still in the firebox, then this is probably because
too little air has been reaching it, try leaving the air controls open a
little more. Check that the door seals are sound and that there are
no cracks or gaps anywhere in the flue. For longest burning, we
recommend hard fuels such as anthracite.
THE D R CATCH may need
adjusting as the rope seal 'beds
down'. Simply loosen the screw at
the end of the shaft and move the
tapered pin as shown. Re-tighten
the screw.
C NDENSATI N onto cool
surfaces inside the stove can be
severe if fuel is in any way damp.
Use only very dry fuel.
VER-FIRING: It is possible to leave the fire too long with the
controls set too high leading to 'over firing', seen as glowing metal
parts, excessive chimney temperature and risk of parts failing or
chimney fires. Always set controls to the lowest practical setting.
SM KE C MING INT R M Fumes are poisonous- smoke
emission must NEVER be tolerated, causes might be:
NEW STOVE: There is often a smell and sometimes visible fumes
as the paint cures. This normally stops after an hour or so.
INADEQUATE SEALS: Are all flue pipes and connectors
absolutely gas-tight? Even the tiniest crack or gap can spoil the
draught. Does an inset appliances fully seal against the fireplace?
BLOCKED THROAT PLATE: Has soot and ash collected on the
'throat plate' above the inner back part of the firebox?
UNSUITABLE, BLOCKED OR UN-SWEPT CHIMNEY: The first
requirement for correct operation is a sound chimney. Check the
requirements earlier in this document and in any case of doubt
engage a professional sweep or chimney engineer.
POOR AIR SUPPLY: Lack of air to the fire is a common cause of
smoking and poor performance. Air supply problems may be
worse in certain wind conditions (often incorrectly ascribed to
'downdraught', which is in fact very rare), where air can be sucked
out of the room. The answer is to fit an air vent, as near to the fire
as possible, facing into the usual wind direction.
DOWNDRAUGHT: Wind can blow down a chimney if there is
something higher nearby such as a tree, hill or high building.
Fitting an anti-downdraught cowl to the chimney top can cure this.
Types which cannot be swept through are not recommended.
POOR CHIMNEY DRAUGHT- Chimney draught in use MUST be
at least 12Pa.
CHIMNEY FIRE: In the rare event of deposits inside the chimney
igniting (roaring sound + dense smoke and sparks from the
chimney) immediately close the door, shut all air controls and call
the fire brigade. Prevent fires by using very dry fuel and having
your chimney swept regularly.
MAINTENANCE
M NTHLY- With the fire cold, remove, clean and refit the throat
(or 'baffle') plate below the flue outlet. Check that the flue is clear
and unblocked, and that the door seals are sound.
ANNUALLY- SWEEP THE CHIMNEY The entire length of the
chimney from stove to outlet should be swept annually, more often
if smoky fuels are used.
NEW PARTS Your stove has been extensively tested for safety -
please don't try to modify it and always obtain genuine spare parts.
SURFACE FINISH Wipe the stove body with a slightly damp cloth
when cool. NEVER use aerosol spray or wax near the hot fire –
they can ignite. Painted steel parts can be refurbished using
special spray paint.
Your stove generates VERY high temperatures. Eventually the
internal parts will require replacement . Help parts to last by:
• Using only recommend, very dry, fuels.
• Emptying the ash very regularly when using mineral fuel -never
allow it to touch the underside of the grate.
• Cleaning the throat plate regularly.
• Avoiding 'over-firing'
PARTS AND ACCESS RIES
When ordering parts, you have the Sirius Sierra Inset Stove
Wearable parts
1Replaceable Lining brick set - Rear
2Throat (baffle) Plate
3Hinge Pin
4Replaceable Lining brick, left or right
5Front firebar
6Window
7Door catch Assembly
8Ashpan
9Grate Frame
10 Grate
Touch-up paint, black
Rope seal kit
Sirius Stoves are designed and developed in England, tested in The Netherlands. They are cast using Australian iron and assembled in China from
components manufactured in Japan, China, the USA and the UK
www.capitalfireplaces.co.uk
Capital Fireplaces, Unit 12, Henlow Ind Est, Henlow Camp, Beds SG1 DS UK
Tel: 014 2-813138
4
The GH-T stove designs are registered at the UK Patent Office and protected by Copyright © and UK Design Right, Glyn Hughes 200 -2014. Certain parts are UK Patent Applied
For. This document printed 28/11/2014. We are always striving to improve these products and may change their specification without notice.

This manual suits for next models

1

Other Capital Stove manuals

Capital Sirius 405 User manual

Capital

Capital Sirius 405 User manual

Capital SL ECO Series User manual

Capital

Capital SL ECO Series User manual

Capital FIREFOX 8 ECO User manual

Capital

Capital FIREFOX 8 ECO User manual

Capital SIRIUS TRADITIONAL User manual

Capital

Capital SIRIUS TRADITIONAL User manual

Popular Stove manuals by other brands

Avalon Rainier 945 owner's manual

Avalon

Avalon Rainier 945 owner's manual

Zibro TOSCA operating manual

Zibro

Zibro TOSCA operating manual

Ravelli HRV 140 Touch quick start guide

Ravelli

Ravelli HRV 140 Touch quick start guide

Enviro C-10804 owner's manual

Enviro

Enviro C-10804 owner's manual

Plamen International Trenk Installation and operating instructions

Plamen International

Plamen International Trenk Installation and operating instructions

ECCO STOVE 730EC2 manual

ECCO STOVE

ECCO STOVE 730EC2 manual

HotHouse HH18Bi Installation and operating instructions

HotHouse

HotHouse HH18Bi Installation and operating instructions

Tschirhart's Cunningham instructions

Tschirhart's

Tschirhart's Cunningham instructions

The Auckland CL Installing and operating insructions

The Auckland

The Auckland CL Installing and operating insructions

Kingsman FV200 installation instructions

Kingsman

Kingsman FV200 installation instructions

Hunter Herald Inset 5 Installation and operating instructions

Hunter

Hunter Herald Inset 5 Installation and operating instructions

Westfire UNIQ37 Installations

Westfire

Westfire UNIQ37 Installations

Pisla HTT DEEP FOREST ECO Installation and operation manual

Pisla

Pisla HTT DEEP FOREST ECO Installation and operation manual

Tiger SUPERCLEAN operating instructions

Tiger

Tiger SUPERCLEAN operating instructions

Dimplex ELECTRALOG CS3311 Service manual

Dimplex

Dimplex ELECTRALOG CS3311 Service manual

TONWERK T-Sky eco2 operating instructions

TONWERK

TONWERK T-Sky eco2 operating instructions

Chesney's BEAUMONT Installation & user manual

Chesney's

Chesney's BEAUMONT Installation & user manual

Extraflame ANGY user manual

Extraflame

Extraflame ANGY user manual

manuals.online logo
manuals.online logoBrands
  • About & Mission
  • Contact us
  • Privacy Policy
  • Terms and Conditions

Copyright 2025 Manuals.Online. All Rights Reserved.