12 13Instruction manual RiF1796 Instruction manual RiF1796Please keep this instruction manual for future reference Please keep this instruction manual for future reference
ELECTRICAL CONNECTION
For your safety please read the following information
WARNING:
This appliance must be earthed.
This appliance operates from 220-240 volts and should be protected by a 13 amp fuse
in the plug.
The appliance is supplied with a standard 13 amp 3-pin mains plug fitted with a 13-amp fuse.
Should the fuse require replacement, it must be replaced with a fuse rated at 13 amp and
approved to BS1362.
If the mains plug which is fitted is unsuitable for the socket outlet in your home or is removed
for any other reason, please follow the instructions below on how to wire a 13 amp 3 pin plug.
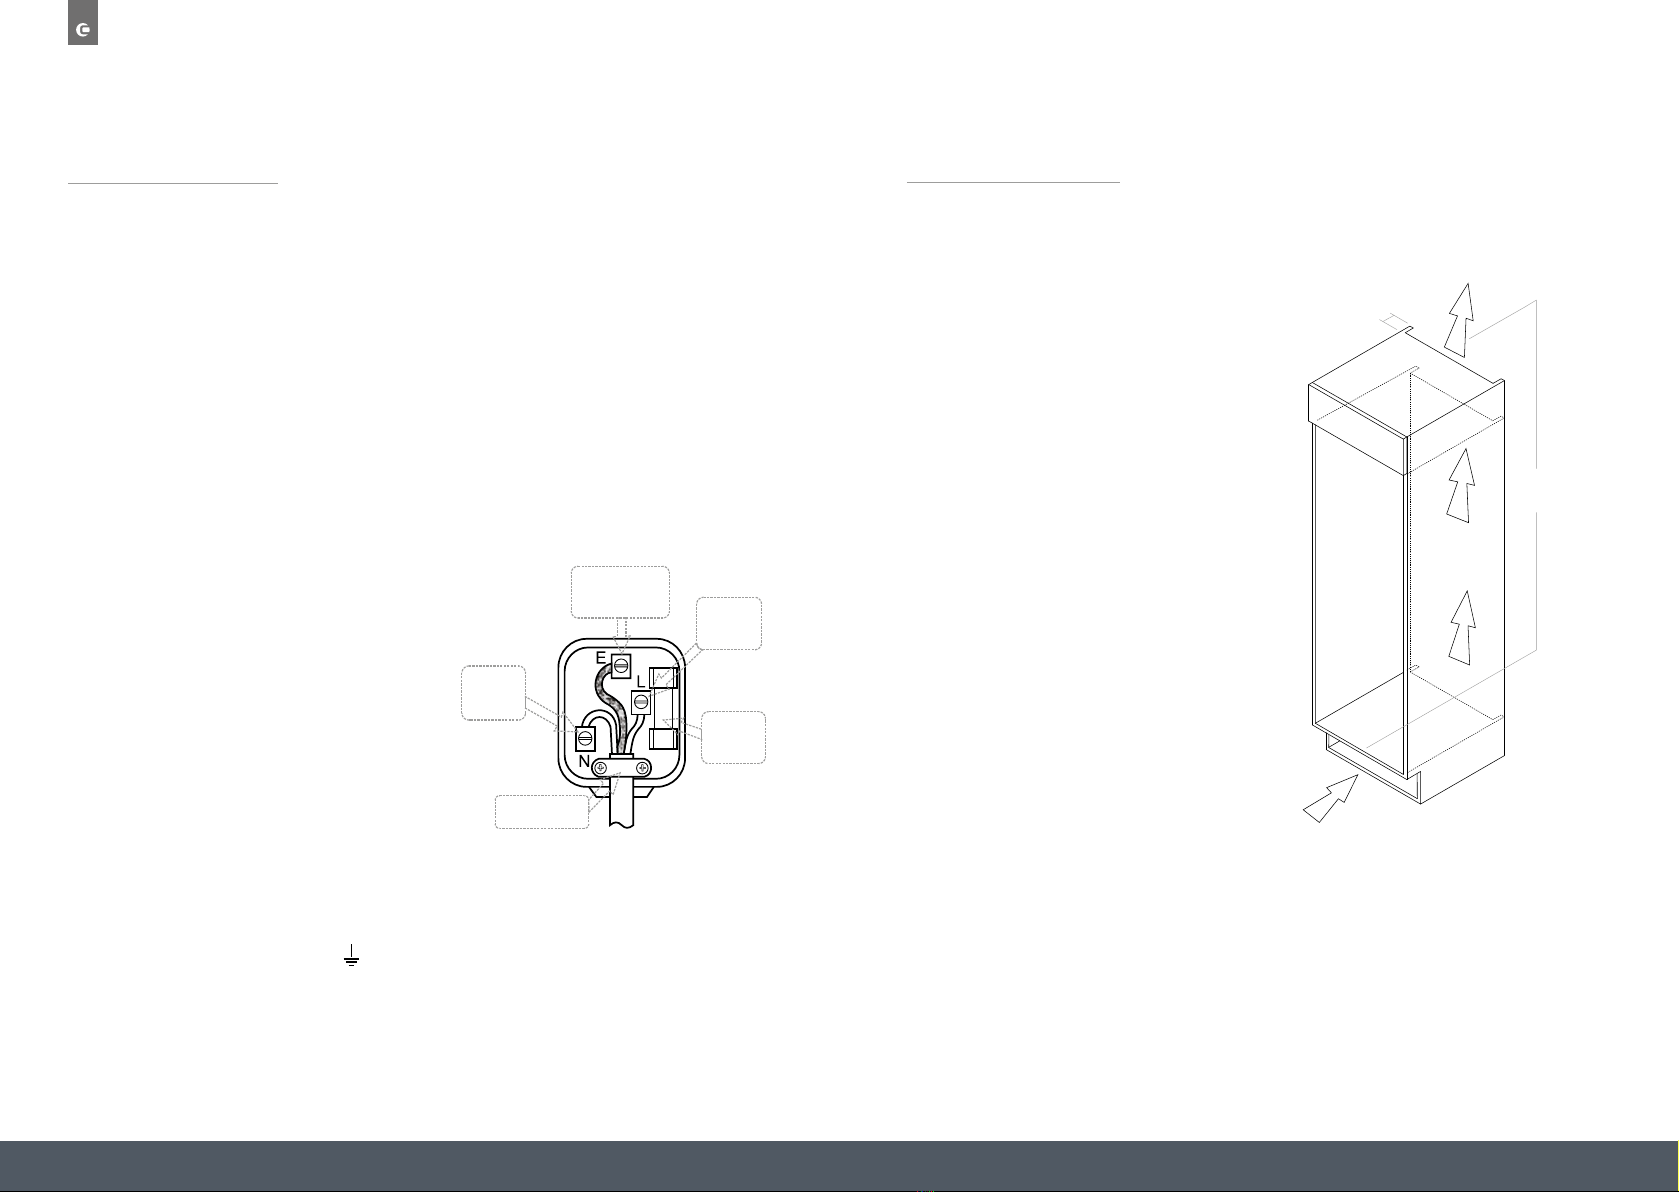
HOW TO WIRE A 13 AMP PLUG.
IMPORTANT:
The wires in the mains lead on this appliance are
coloured in accordance with the
following code:
Green and Yellow - Earth
Blue – Neutral
Brown – Live
As the colours may not correspond with the markings identifying the terminals in your plug
proceed as follows.
The green and yellow wire must be connected to the terminal in the plug which is marked with
the letter E or with the earth symbol
9
ELECTRICAL CONNECTION
For your safety please read the following information
WARNING:
This appliance must be earthed.
This appliance operates from 220-240 volts and should be protected by a 13 amp fuse in the plug.
The appliance is supplied with a standard 13 amp 3-pin mains plug fitted with a 13-amp fuse.
Should the fuse require replacement, it must be replaced with a fuse rated at 13 amp and
approved to BS1362.
If the mains plug which is fitted is unsuitable for the socket outlet in your home or is removed for
any other reason, please follow the instructions below on how to wire a 13 amp 3 pin plug.
HOW TO WIRE A 13 AMP PLUG.
IMPORTANT:
The wires in the mains lead on this appliance are coloured in accordance with the following code:
Green and Yellow - Earth
Blue – Neutral
Brown – Live
As the colours may not correspond with the markings
identifying the terminals in your plug proceed as
follows.
The green and yellow wire must be connected
to the terminal in the plug which is marked
with the letter E or with the earth symbol
or coloured green and yellow.
The blue wire must be connected to the terminal
marked N.
The brown wire must be connected to the terminal marked L.
You must make sure the lead is firmly secured under the cord clamp.
GREEN/YELLOW
Earth
BROWN
Live
FUSE
13 Amps
BLUE
Neutral
Cord Clamp
RI5505 Fridge Freezer Instruction Manual.indd 9RI5505 Fridge Freezer Instruction Manual.indd 9 05/02/2020 14:3005/02/2020 14:30
or coloured green and yellow.
The blue wire must be connected to the terminal marked N.
The brown wire must be connected to the terminal marked L.
You must make sure the lead is firmly secured under the cord clamp.
9
ELECTRICAL CONNECTION
For your safety please read the following information
WARNING:
This appliance must be earthed.
This appliance operates from 220-240 volts and should be protected by a 13 amp fuse in the plug.
The appliance is supplied with a standard 13 amp 3-pin mains plug fitted with a 13-amp fuse.
Should the fuse require replacement, it must be replaced with a fuse rated at 13 amp and
approved to BS1362.
If the mains plug which is fitted is unsuitable for the socket outlet in your home or is removed for
any other reason, please follow the instructions below on how to wire a 13 amp 3 pin plug.
HOW TO WIRE A 13 AMP PLUG.
IMPORTANT:
The wires in the mains lead on this appliance are coloured in accordance with the following code:
Green and Yellow - Earth
Blue – Neutral
Brown – Live
As the colours may not correspond with the markings
identifying the terminals in your plug proceed as
follows.
The green and yellow wire must be connected
to the terminal in the plug which is marked
with the letter E or with the earth symbol
or coloured green and yellow.
The blue wire must be connected to the terminal
marked N.
The brown wire must be connected to the terminal marked L.
You must make sure the lead is firmly secured under the cord clamp.
GREEN/YELLOW
Earth
BROWN
Live
FUSE
13 Amps
BLUE
Neutral
Cord Clamp
RI5505 Fridge Freezer Instruction Manual.indd 9RI5505 Fridge Freezer Instruction Manual.indd 9 05/02/2020 14:3005/02/2020 14:30
VENTILATION REQUIREMENTS
VENTILATION REQUIREMENTS
The main consideration when installing
a refrigeration product into a cabinet is
ventilation. The heat removed from the
appliance needs to be dissipated into the
room. Failure to correctly ventilate the
product can result in increased running
costs and premature failure. It will also
invalidate the guarantee provided with
the appliance.
An air intake in the plinth is required to
allow for the correct air flow (recommended
500mm x 75mm). If preferred a decorative
stainless steel plinth grille is available,
product code: GRILL/ SENSE600.
This can be purchased from your retailer or
www.caple.co.uk.
To ensure the correct operation of the
appliance it is important the top of the
housing is not blocked off. The top of
the cabinet needs to be vented into the
room,the recommended minimum size of
the vent opening is 500 x 75mm.
There should also be space at the rear
of the cabinet to allow the cool air to be
drawn over the condenser. This should also
be at least 500mm x 75mm. The more air
available to circulate the product, the more efficiently it will operate.
min.
75mm
Ventilation space at
rear to allow heat
dissipation from the
condenser
Plinth ventilation
min. 200cm2
Air flow
Air flow
min.75mm
RIL1795_Larder Instruction Manual.indd 23 07/02/2017 10:35