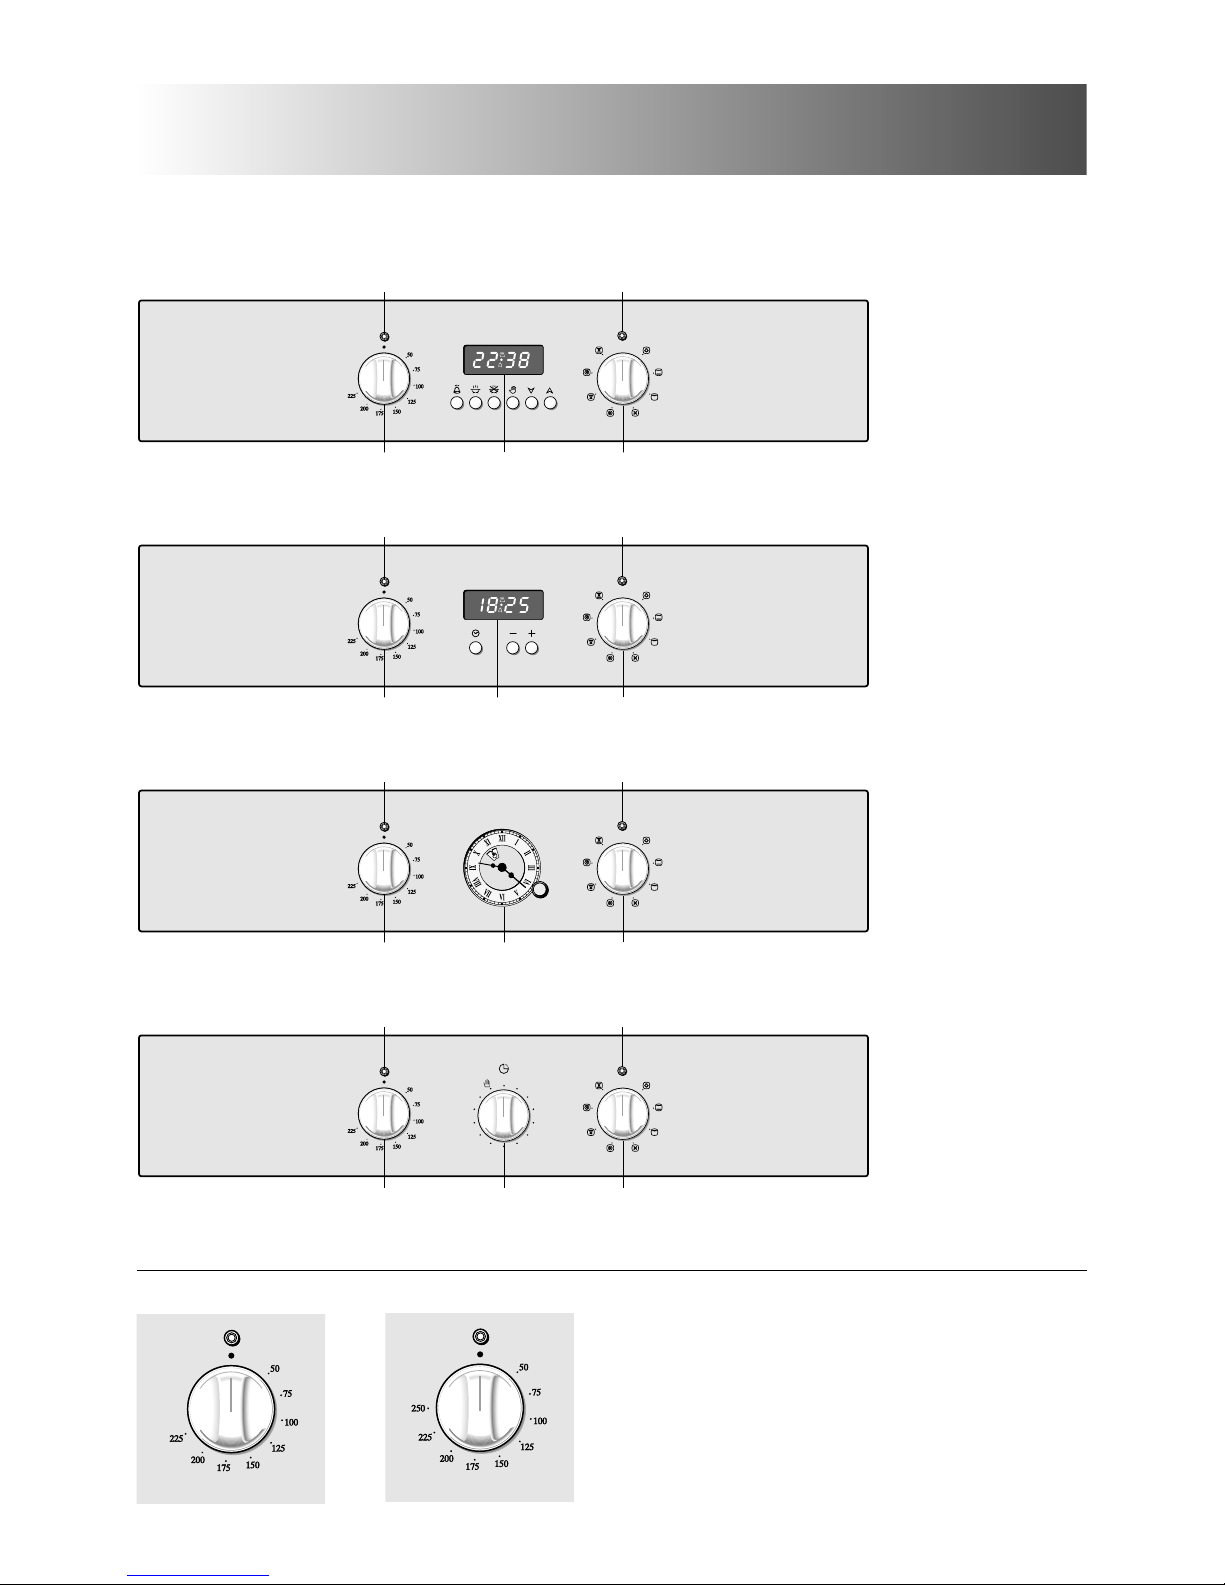
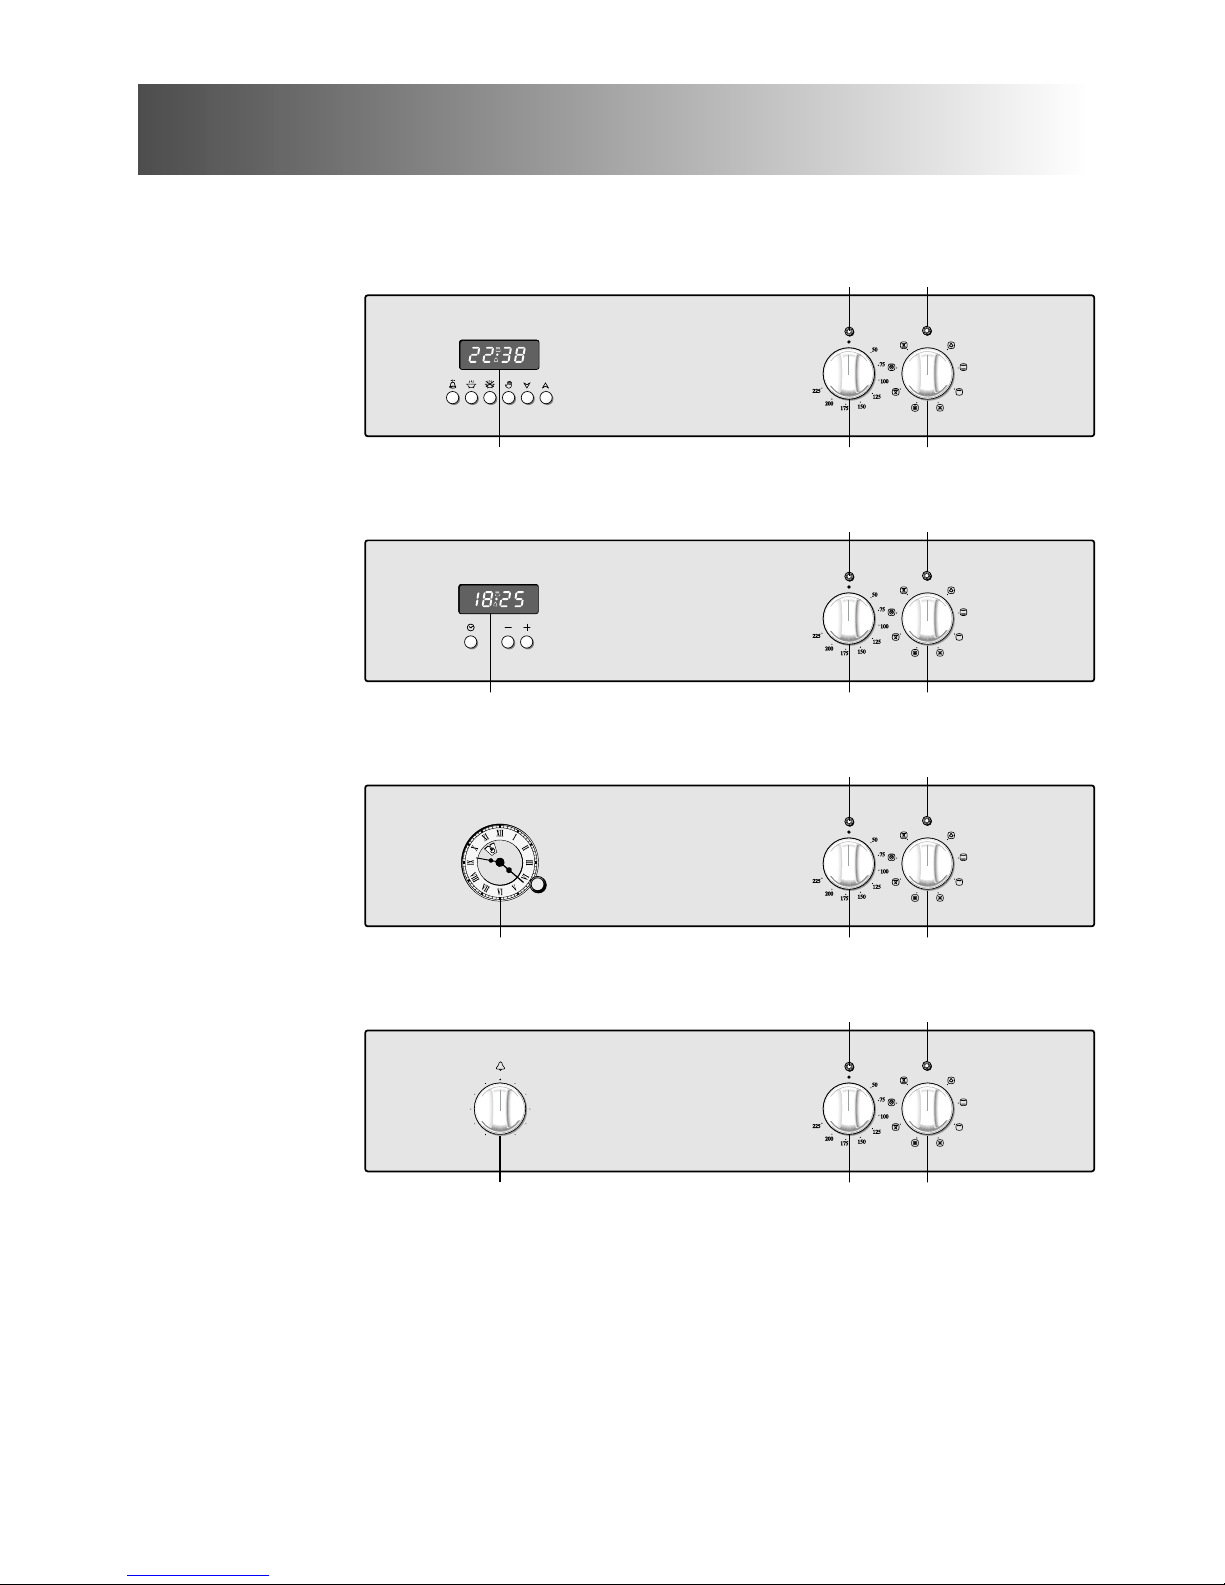
Caple MULTIFUNCTION OVENS User manual

MULTI-FUNCTION
OVENS
Instruction for the use - Installation advice
KEEP IN A SAFE PLACE
Before operating this oven,
please read these instructions carefully

2
Dear Customer,
Thank you for having purchased and given your pref-
erence to our product.
The safety precautions and recommendations reported
below are for your own safety and that of others. They
will also provide a means by which to make full use of
the features offered by your appliance.
Please preserve this booklet carefully. It may be useful
in future, either to yourself or to others in the event that
doubts should arise relating to its operation.
This appliance must be used only for the task it has
explicitly been designed for, that is for cooking food-
stuffs. Any other form of usage is to be considered as
inappropriate and therefore dangerous.
The manufacturer declines all responsibility in the
event of damage caused by improper, incorrect or illog-
ical use of the appliance.
DECLARATION OF
CE
CONFORMITY
– This oven has been designed to be used only for cooking. Any other use (such as
heating a room) is improper and dangerous.
– This oven has been designed, constructed, and marketed in compliance with:
- safety requirements of EEC Directive “Low voltage” 73/23
- safety requirements of EEC Directive “EMC” 89/336;
- requirements of EEC Directive 93/68.

3
IMPORTANT PRECAUTIONS AND RECOMMENDATIONS
– After having unpacked the appliance, check to ensure that it is not damaged.
If you have any doubts, do not use it and consult your supplier or a professionally
qualified technician.
– Packing elements (i.e. plastic bags, polystyrene foam, nails, packing straps, etc.)
should not be left around within easy reach of children, as these may cause serious
injuries.
– Do not attempt to modify the technical characteristics of the appliance as this may
become dangerous to use.
– Do not carry out cleaning or maintenance operations on the appliance without having
previously disconnected it from the electric power supply.
– If you should decide not to use this appliance any longer (or decide to substitute an
older model), before disposing of it, it is recommended that it be made inoperative in
an appropriate manner in accordance to health and environmental protection regula-
tions, ensuring in particular that all potentially hazardous parts be made harmless,
especially in relation to children who could play with old appliances.
IMPORTANT PRECAUTIONS AND RECOMMENDATIONS FOR USE OF ELECTRICAL
APPLIANCES
Use of any electrical appliance implies the necessity to follow a series of fundamental
rules. In particular:
– Never touch the appliance with wet hands or feet;
– do not operate the appliance barefooted;
– do not allow children or disabled people to use the appliance without your supervision.
The manufacturer cannot be held responsible for any damages caused by improper,
incorrect or unreasonable use of the appliance.
USING THE OVEN FOR THE FIRST TIME
You are advised to carry out the following operations:
– Furnish the interior of the oven as described at chapter “Cleaning and maintenance”
– Switch the empty oven ON at maximum temperature for about two hours to eliminate
traces of grease and smell from the components.
– Let the oven to cool down, switch off the electrical supply, then clean the inside of
the oven with a cloth soaked in water and neutral detergent and dry thoroughly.

4
Control panel 11
Fig. 1.1
A
U
T
O
40
50
60
100
30
0
20
10
90
80 70
110
120
6-71(A or B)
4
A
U
T
O
P
2
3
51(A or B)
4
8-9-101(A or B)
4
11-121(A or B)
4
0
2
3
0
2
3
0
2
3
0
TYPES OF THERMOSTAT
Depending on the models the thermostat
could be of type A (50 to 225°C) or type
B (50 to 250°C)
A
Fig. 1.2
Fig. 1.3
Fig. 1.4
B

CONTROL PANEL
1. Oven thermostat knob (type A or B)
2. Oven switch knob
3. Power on indicator lamp
4. Oven temperature indicator lamp
5. Electronic programmer
6. Electronic clock/end cooking timer 5
55
50
45
40
35 30 25
20
15
10
5
0
6-7 1(A or B)
4
A
U
T
O
P
2
3
5 1(A or B)
4
1(A or B)
4
1(A or B)
4
8-9-10
11-12
A
U
T
O
0
2
3
0
2
3
0
2
3
0
Fig. 1.5
Fig. 1.6
Fig. 1.7
Fig. 1.8
7. Electronic clock
8. Clock programmer (start-end)
9. Electric clock with alarm
10. Electric clock
11. Timer (120’ cut-off)
12. 60’ alarm

6
GENERAL FEATURES
As its name indicates, this is an oven
that presents particular features from an
operational point of view.
In fact, it is possible to insert 7 different
programs to satisfy every cooking need.
The 7 positions, thermostatically con-
trolled, are obtained by 4 heating ele-
ments which are:
- Lower element 1300 W
- Upper element 1000 W
- Grill element 2000 W
- Circular element 2200 W
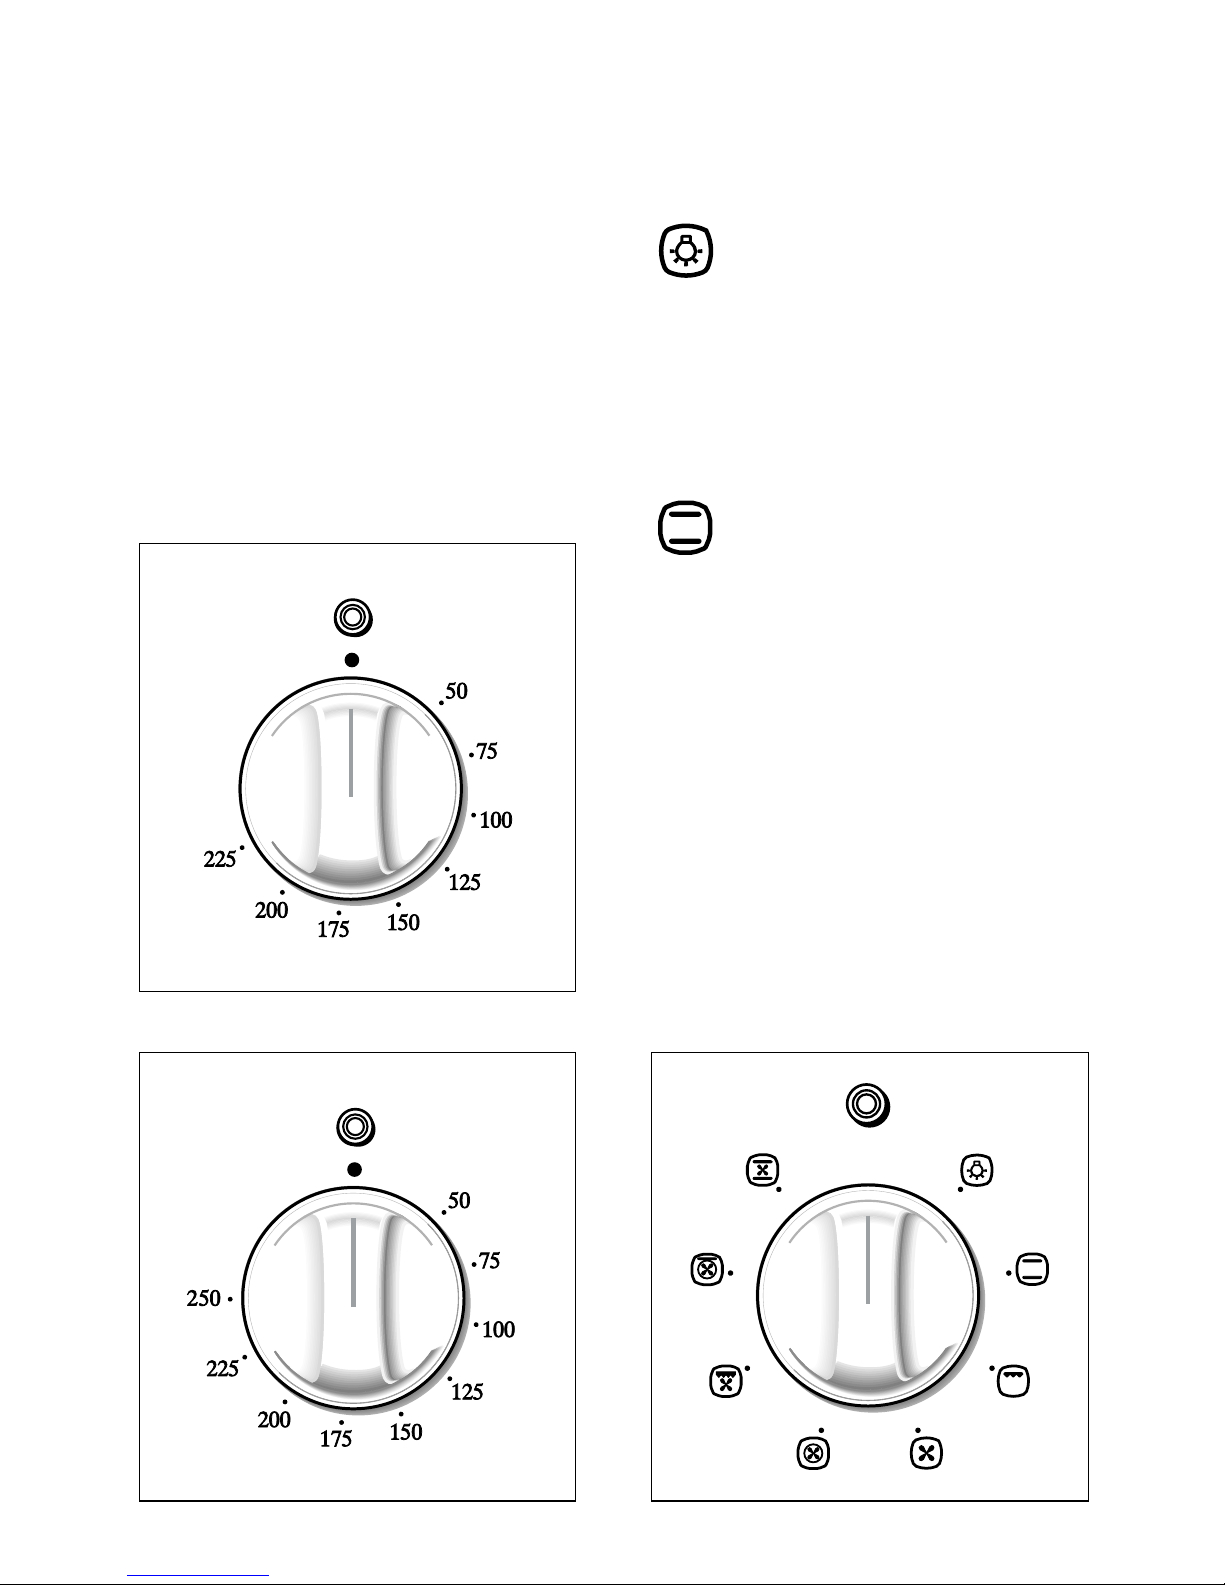
NOTE:
Upon first use, it is advisable to operate
the oven at the maximum temperature
(thermostat knob on position 225) for 60
minutes in the position and to
eliminate possible traces of grease on
the heating elements.
Repeat the operation for another 15
minutes with the grill element by turn on
it as explained in the chapters
GRILLING and USE OF THE GRILL.
Attention: the oven door becomes
very hot during operation.
Keep children away.
How to use the oven 22
GREASE FILTER (some models only)
– A special screen is provided at the
back of the oven to catch grease par-
ticles, mainly when meat is being
roasted (see page 24).
– When baking pastry etc. this filter
should be removed.
– Always clean the filter after cooking as
any solid residues on it might adverse-
ly affect the oven performance.
OPERATING PRINCIPLES
Heating and cooking in the MULTI-
FUNCTION oven are obtained in the fol-
lowing ways:
a. by normal convection
The heat is produced by the upper
and lower heating elements.
b. by forced convection
A fan sucks in the air contained in the
oven muffle, which sends it through
the circular heating element and then
sends it back through the muffle.
Before the hot air is sucked back
again by the fan to repeat the
described cycle, it envelops the food
in the oven, provoking a complete and
rapid cooking. It is possible to cook
several dishes simultaneously.
c. by semi-forced convection
The heat produced by the upper and
lower heating elements is distributed
throughout the oven by the fan.
d. by radiation
The heat is irradiated by the infra red
grill element.
e. by radiation and ventilation
The irradiated heat from the infra red
grill element is distributed throughout
the oven by the fan.
f. by ventilation
The food is defrosted by using the
fan only function without heat.

7
THERMOSTAT KNOB (fig. 2.1A - 2.1B)
To turn on the heating elements of the
oven, set the switch knob on the desired
program and the thermostat knob onto
the desired temperature.
To set the temperature, it is necessary
to make the knob indicator meet the cho-
sen value.
The elements will turn on or off automat-
ically according to the energy need
which is determined by the thermostat.
The operation of the heating elements is
signalled by a light placed on the control
panel.
0
Fig. 2.2Fig. 2.1B
FUNCTION SELECTOR KNOB (fig. 2.2)
Rotate the knob clockwise to set the
oven for one of the following functions:
OVEN LIGHT
By turning the knob onto this setting (see
picture aside) we light the oven cavity
(15 W).
The oven remains alight while any of
the functions is on.
TRADITIONAL CONVECTION
COOKING
The upper and lower heating elements
are switched on.
The heat is diffused by natural convec-
tion and the temperature must be regu-
lated between 50°C and the maximum
position with the thermostat knob.
It is necessary to preheat the oven
before introducing the foods to be
cooked.
Recommended for:
For foods which require the same cook-
ing temperature both internally and
externally, i. e. roasts, spare ribs,
meringue, etc.
Fig. 2.1A

8
GRILLING
The infra-red heating element is switched
on. The heat is diffused by radiation.
Use with the oven door closed and the
thermostat knob must be regulated
between 50°C and the maximum posi-
tion.
For correct use see chapter “USE OF THE
GRILL”.
Recommended for:
Intense grilling action for cooking with the
broiler; browning, crisping, “au gratin”,
toasting, etc.
DEFROSTING FROZEN FOODS
Only the oven fan is on.
To be used with the thermostat knob on
“0” or “●” position because the other
positions have no effect.
The defrosting is done by simple venti-
lation without heat.
Recommended for:
To rapidly defrost frozen foods; 1 kilo-
gram requires about one hour.
The defrosting times vary according to
the quantity and type of foods to be
defrosted.
HOT AIR COOKING
The circular element and the fan are on.
The heat is diffused by forced convec-
tion and the temperature must be regu-
lated between 50°C and the maximum
position with the thermostat knob.
It is not necessary to preheat the oven.
Recommended for:
For foods that must be well done on the
outside and tender or rare on the inside,
i. e. lasagna, lamb, roast beef, whole
fish, etc.
VENTILATED GRILL COOKING
The infra-red ray grill and the fan are
on.
The heat is mainly diffused by radiation
and the fan then distributes it throughout
the oven.
The temperature must be regulated
between 50°C and the maximum posi-
tion with the thermostat knob.
It is necessary to preheat the oven for
about 5 minutes.
For correct use see chapter “GRILLING
AND AU GRATIN.
Grilling with the oven door closed.
Recommended for:
For grill cooking when a fast outside
browning is necessary to keep the juices
in, i. e. veal steak, steak, hamburger,
etc.

9
MAINTAINING TEMPERATURE
AFTER COOKING OR SLOWLY
HEATING FOODS
The upper element and the circular ele-
ment connected in series, are switched
on; also the fan is on.
The heat is diffused by forced convection
with the most part being produced by the
upper element.
The temperature must be regulated
between 50° and 140 °C with the thermo-
stat knob.
Recommended for:
To keep foods hot after cooking.
To slowly heat already cooked foods.
CONVECTION COOKING WITH
VENTILATION
The upper and lower heating elements
and the fan turn on.
The heat coming from the top and bot-
tom is diffused by forced convection.
The temperature must be regulated
between 50°C and the maximum posi-
tion with the thermostat knob.
Recommended for:
For foods of large volume and quantity
which require the same internal and
external degree of cooking; for ex: rolled
roasts, turkey, legs, cakes, etc.
The outdoor parts of the oven
become hot during operation.
Keepchildren well out of reach.
COOKING ADVICE
STERILIZATION
Sterilization of foods to be conserved, in
full and hermetically sealed jars, is done
in the following way:
a. Set the switch to position .
b. Set the thermostat knob to position
185 °C and preheat the oven.
c. Fill the dripping pan with hot water.
d. Set the jars onto the dripping pan
making sure they do not touch each
other and the door and set the ther-
mostat knob to position 135 °C.
When sterilization has begun, that is,
when the contents of the jars start to
bubble, turn off the oven and let cool.
REGENERATION
Set the switch to position and the
thermostat knob to position 150° C.
Bread becomes fragrant again if wet with
a few drops of water and put into the
oven for about 10 minutes at the highest
temperature.
ROASTING
To obtain classical roasting, it is neces-
sary to remember:
– that it is advisable to maintain a tem-
perature between 180 and 200 °C.
– that the cooking time depends on the
quantity and the type of foods.

10
USE OF THE GRILL
Set the switch to position and the
thermostat knob between 50°C and the
maximum position.
Leave to warm up for approximately 5
minutes with the door closed.
Introduce the food to be cooked, posi-
tioning the rack as close to the grill as
possible.
The dripping pan should be placed
under the rack to catch the cooking
juices and fats.
Grilling with the oven door closed.
Grilling with the oven door closed and
do not for longer than 30 minutes at
any one time.
Attention: the oven door becomes
very hot during operation.
Keep children away.
COOKING DIFFERENT DISHES AT
THE SAME TIME
With the function selector in position
, the ventilated oven allows you to cook
different types of food at the same time.
Fish, cakes and meat can be cooked
together without the smells and flavours
mixing.
The only precautions required are the
following:
– The cooking temperatures must be as
close as possible with a maximum dif-
ference of 20° - 25°C between the dif-
ferent foods.
– Different dishes must be placed in the
oven at different times according to
the cooking time required for each
one. This type of cooking obviously
provides a considerable saving on
time and energy.
GRILLING AND “AU GRATIN”
Grilling may be done without the roast-
ing jack on position of the switch,
because the hot air completely envelops
the food that is to be cooked.
Set the thermostat knob between 50°C
and the maximum position and after
having preheated the oven, simply place
the food on the rack.
Close the door and let the oven operate
until grilling is done.
Adding a few dabs of butter before the
end of the cooking time gives the golden
“au gratin” effect.
Grilling with the oven door closed.
It is recommended that you do not
grill for longer than 30 minutes at any
one time.
Attention: the oven door becomes
very hot during operation.
Keep children away.

11
A
U
T
O
P
Fig. 3.1 Fig. 3.2
Electronic programmer 33
Description of the buttons:
Timer
Cooking time
End of cooking time
Manual position and cancellation of
the inserted cooking program
Advancement of the numbers of all
programs
Turning back of the numbers of al
programs and changing the
frequency of the audible signal.
The electronic programmer is a device
which groups together the following func-
tions:
– 24 hours clock with illuminated display
– Timer (up to 23 hours and 59 minutes)
– Program for automatic oven cooking
– Program for semi-automatic oven
cooking.
Description of the lighted sym-
bols:
AUTO - flashing - Programmer in auto-
matic position but not pro-
grammed
AUTO -always lighted - Programmer in
automatic position with program
inserted.
Automatic cooking taking place
Timer in operation
and AUTO - flashing - Program
error.
(The time of day lies between the
calculated cooking start and end
time).
Nota: Select a function by the respective
button and, in 5 seconds, set the
required time with th / buttons
(“one-hand” operation).
An energy black-out makes the clock go
to zero and cancels the set programs.

12 Fig. 3.3
A
U
T
O
Fig. 3.4
ELECTRONIC CLOCK (fig. 3.2)
The programmer is equipped with an
electronic clock with lighted numbers
which indicates hours and minutes.
Upon immediate connection of the oven
or after a blackout, three zeros will flash
on the programmer panel.
To set the hour it is necessary to push
the button and then the or
button until you have set the exact hour
(fig. 3.2).
In another way push simultaneously the
two buttons and at the same time
push the or button.
Nota: The hour setting delete any pro-
gram.
ELECTRONIC TIMER
The timer program consists only of a
buzzer which may be set for a maximum
period of 23 hours and 59 minutes.
If the AUTO flashing push the but-
ton.
To set the time, push the button and
the or until you obtain the desired
time in the panel (fig. 3.4).
Having finished the setting, the clock
hour will appear on the panel and the
symbol will be lighted.
The countdown will start immediately and
may be seen at any moment on the panel
by simply pressing the button .
At the end of the time, the symbol
will be switched off and an intermittent
buzzer will go off; this can be stopped
by pressing one of any of the buttons.
SETTING THE FREQUENCY OF THE
AUDIBLE SIGNAL
The selection from 3 possibilities of
sound can be made by pressing the
button.
NORMAL COOKING WITHOUT THE
USE OF THE PROGRAMMER
To manually use the oven, that is, without
the aid of the programmer, it is necessary
to cancel the flashing AUTO by pushing
the button (AUTO will be switched off
and the symbol will go on - Fig. 3.3).
Attention: If the AUTO is steady lighted
(which means a cooking program has
already been inserted), by pushing the but-
ton you have the cancellation of the
program and the switching to manual.
If the oven is switch on, you must
switch off manually.

13
A
U
T
O
PA
U
T
O
P
Fig. 3.6Fig. 3.5
AUTOMATIC OVEN COOKING
To cook food automatically in the oven,
it is necessary to:
1. Set the length of the cooking time
2. Set the end of the cooking time
3. Set the temperature and the oven
cooking program.
These operations are done in the follow-
ing way:
1. Set the length of the cooking time by
pushing the button and the
button to advance, or to go back
if you have passed the desired time
(fig. 3.5). The AUTO and the sym-
bol will be on.
2. Set the end of the cooking time by
pressing the button (the cooking
time already added to the clock time
will appear), and the button (fig.
2.6); if you pass the desired time you
may get back by pushing the but-
ton.
After this setting, the symbol will
go off. If after this setting, the AUTO
flash on the panel and a buzzer gives
off, it means there was an error in the
programming, that is that the cooking
cycle has been superimposed on the
clock. In this case, modify the end of
cooking time or the cooking time itself
by following again the above men-
tioned instructions.
3. Set the temperature and the cooking
program by using the switch and ther-
mostat knobs of the oven (see specific
chapters).
Now the oven is programmed and every-
thing will work automatically, that is the
oven will turn on at the right moment to
end the cooking at the established hour.
During cooking, the symbol remains
on.
By pushing the button you can see
the time that remains until the end of
cooking.
The cooking program may be can-
celled in any moment by pushing .
At the end of the cooking time the oven
will turn off automatically, the symbol
will turn off, AUTO will flash and a buz-
zer will be released, which can be
turned off by pushing any of the bot-
tons.
Turn the switch and thermostat knobs to
zero and put the programmer onto “man-
ual” by pressing the button.
Attention: An energy blackout makes
the clock go to zero and cancels the set
programs.
After a blackout, three zeros will flash
on the panel.

14
A
U
T
O
P
A
U
T
O
P
Fig. 3.7
Fig. 3.8
SEMI - AUTOMATIC COOKING
This is used to switch automatically off
the oven after the desired cooking time
has elapsed.
To effect the semi-automatic cooking
there are two way:
1. Set the length of the cooking time by
pushing the button and the button
to advance, or to go backwards if
you have passed the desired time (Fig.
3.7).
or
2. Set the end of the cooking time by
pushing the button and the but-
ton to advance, or to go backwards
if you have passed the desired time
(Fig. 3.8).
AUTO and the symbol will be on.
Then set the temperature and the cook-
ing program using the oven switch and
thermostat knobs (see specific chap-
ters).
The oven is switched on and it will be
switched of automatically at the end of
the desired time.
During cooking, the symbol remains
on and by pressing the button you
can see the time that remains till the end
of the cooking.
The cooking program can be can-
celled at any moment by pushing the
button.
At the end of the cooking, the oven and
the symbol will turn off, the AUTO
will flash and a buzzer will give off; that
can be stopped by pushing any of the
buttons.
Turn the switch and thermostat knobs to
zero and put the programmer onto “man-
ual” by pressing the button.

15
The electronic programmer is a device
with the following functions:
– 24 hours clock with illuminated
display
– Timing of oven cooking with automatic
switch-off (max. 99 minutes).
ELECTRONIC CLOCK
Upon immediate connection of the oven
or after a mains failure, three zeros will
flash on the programmer panel.
To set the clock it is necessary to push
the button and then, within 7 seconds,
the or button until you have set the
correct time.
The clock will show zero after a mains
failure.
Attention: When the programmer
display shows three flashing zeros the
oven cannot be switched on.
The oven can be switched on when the
symbol is shown in the display.
A
U
T
O
ELECTRONIC ALARM
The programmer can be used as an
alarm only for a maximum period of 99
minutes.
To set the alarm, push the or
button until you obtain the desired time
in the display. Once the time has
elasped, an intermittent buzzer, lasting 7
minutes, will start; this can be stopped
by pressing the button.
Attention: If the bottom oven is
switched on when the buzzer starts, it
will be automatically switched off. For it
to operate furtherly you have to stop the
buzzer by pressing the button.
SETTING THE FREQUENCY OF THE
ALARM SOUND
The selection from 3 possibilities of
sound can be made by pressing the
button.
Fig. 4.1
COOKING WITH AUTOMATIC
SWITCH-OFF
The aim of this function is to
automatically stop the cooking after a pre
programmed time, for a maximum period
of 99 minutes.
To set the cooking time, push the or
button until you obtain the desired
time in the display. The symbol AUTO
will be shown in the display. Then you
adjust the oven thermostat knob
according to the required temperature.
The oven will immediately start to
operate and will work for the pre
programmed time. The display shows the
count down. Clock time can be displayed
by pressing the button. Once the time
has elasped, the oven will switch off
automatically, the symbol AUTO will go
off and an intermittent buzzer, lasting 7
minutes, will start; this can be stopped by
pressing the button.
Important: Before the buzzer is stopped
switch off the oven manually.
To cancel the cooking program at any
time press the and buttons
together and release the button first.
Electronic clock/end cooking timer 44

16 Fig. 5.1
ELECTRONIC CLOCK (fig. 5.1)
The electronic alarm is a device which
groups the functions of 24 hours clock
with illuminated display and 99 minutes
alarm.
Upon immediate connection of the oven
or after a blackout, three zeros will flash
on the programmer panel.
To set the hour it is necessary to push
the button and then, within 7 sec-
onds, the or button until you have
set the exact hour.
An energy black-out makes the clock
go to zero.
ELECTRONIC ALARM
The alarm program consists only of a
buzzer which may be set for a maximum
period of 99 minutes.
To set the time, push the or until
you obtain the desired time in the panel.
Having finished the setting, the sym-
bol will be lighted and the countdown will
start immediately. At the end of the time,
the symbol will be switched off and
an intermittent buzzer, during 7 minutes,
will go off; this can be stopped by press-
ing the buttons.
To stop the alarm countdown in any
moment press the and buttons
together and release the button first.
SETTING THE FREQUENCY OF THE ALARM
SOUND
The selection from 3 possibilities of
sound can be made by pressing the
button.
Electronic clock 55

17
Clock programmer 66
COOKING WITH AUTOMATIC SWITCH-OFF
– Turn on the oven by setting the switch
knob on the desired program and the
thermostat knob onto the desired tem-
perature (see specific chapters).
– Set the cooking time by rotating knob
“A” anticlockwise until desired time in
window “B” coincides with the indica-
tor (Fig. 6.2).
The oven will immediately start to oper-
ate and will work for the pre pro-
grammed time. Once the time has
elasped, the oven will switch off auto-
matically and an intermittent buzzer will
start; this can be stopped by rotating
knob “A” until the symbol in window
“B” coincides with the indicator (Fig.
6.3).
Turn the switch and thermostat knobs to
“off” position.
The clock programmer is a device which
groups together the following functions:
– Electric clock
– Timing of oven cooking with automatic
switch-off (max. 180 minutes).
– End cooking buzzer
SETTING THE TIME
To adjust, simply press the knob “A” (fig.
6.1) and rotate anticlockwise to the cor-
rect time.
MANUAL COOKING (without programmer)
To use the oven without the program-
mer, i.e. only with the function selector/
thermostat, the programmer function
must be cancelled by rotating knob “A”
anticlockwise until the symbol in win-
dow “B” coincides with the indicator (Fig.
6.1).
Fig. 6.1
Fig. 6.2
Fig. 6.3
A
A
A
B
B
B

18
ELECTRIC CLOCK WITH ALARM
(Fig. 7.1)
To adjust the clock, press knob “A” and
turn clockwise until it shows the correct
time.
Caution: the knob “A” will become loose
if turned anticlockwise.
Fig. 7.1
A
C
MINUTE COUNTER
The minute counter function consists
simply of an acoustic signal which
comes on once the set time has
elapsed.
To set the minute counter, rotate the
small knob (A) clockwise or anticlock-
wise (without pressing it) until the hand
(C) coincides with the required time
(max 55 minutes) (Fig. 7.1).
Countdown will begin immediately and
the hand (C) will begin to turn anticlock-
wise, always showing the remaining
time.
Once the set time has elapsed the bell
will ring until the hand (C) is positioned
to the symbol by rotating the knob
(A) anticlockwise.
Electric clock with alarm - Electric clock
77
ELECTRIC CLOCK (Fig. 7.2)
To adjust the clock, press knob “A” and
turn clockwise until it shows the correct
time.
Caution: the knob “A” will become loose
if turned anticlockwise.
Fig. 7.2
A

19
Timer - 60’ Alarm 88
60’ ALARM (Fig. 8.2)
The minute counter is a timed acoustic
warning device which can be set for a
maximum of 60 minutes.
The knob must be rotated clockwise as
far as the 60 minute position and then
set to the required time by rotating it anti-
clockwise.
55
50
45
40
35 30 25
20
15
10
5
0
TIMER - 120’ CUT-OFF (Fig. 8.1)
The function of the timer runs the oven
for a preset time.
1) Starting up.
After setting the function selector and
thermostat to the required mode and
temperature, rotate the timer knob
clockwise until you reach the required
cooking time (max 120 minutes).
Once this time has elapsed, the timer
will return to the “0” position and the
oven will automatically switch off.
2) Manual position.
If the cooking time is longer than two
hours or if you wish to use the oven
manually, switching it off as required,
the knob must be turned to position
.
40
50
60
100
30
0
20
10
90
80 70
110
120
Fig. 8.2
Fig. 8.1

20
INSIDE OF OVEN
The oven must be always cleaned after
every use, using suitable products and
keeping in mind that its operation for 30
minutes on the highest temperature
eliminates most grime reducing it to
ashes.
GENERAL ADVICE
Important:
Before any operation of cleaning and
maintenance disconnect the
appliance from the electrical network.
It is advisable to clean when the
appliance is cold and especially for
cleaning the enamelled parts.
Avoid leaving alcaline or acidic sub-
stances (lemon juice, vinegar, etc.) on
the surfaces.
Avoid using cleaning products with a
chlorine or acidic base.
The oven must always be cleaned after
every use, using suitable products and
keeping in mind that its operation for 30
minutes on the highest temperature
eliminates most grime reducing it to
ashes.
Cleaning and maintenance 99
STAINLESS STEEL AND ALUMINIUM
PARTS AND SILK-SCREEN PRINTED
SURFACES
Clean using an appropriate product.
Always dry thoroughly.
IMPORTANT: these parts must be
cleaned very carefully to avoid scratching
and abrasion. You are advised to use a
soft cloth and neutral soap.
ENAMELLED PARTS
All the enamelled parts must be cleaned
with a sponge and soapy water only or
other non-abrasive products.
Dry preferably with a chamois leather.
Do not use a steam cleaner because
the moisture can get into the
appliance thus make it unsafe.
STAINLESS STEEL SURFACES WITH
ANTI-FINGERPRINT TREATMENT
CAUTION:
The stainless steel surfaces used in
some ovens are protected with a Special
Lacquer to reduce finger-print marks.
To avoid damaging this lacquer, do not
clean the stainless steel with abrasive
cleaners or abrasive cloths or scouring
pads.
ONLY SOAP/WARM WATER MUST BE
USED TO CLEAN THE STAINLESS
STEEL SURFACES.
Do not store flammable material in
the oven.
Table of contents
Other Caple Oven manuals

Caple
Caple CR 9220 User manual

Caple
Caple SO110 User manual

Caple
Caple LIBERTY C210 F/A User manual

Caple
Caple C2234 User manual

Caple
Caple C2216SS User manual

Caple
Caple SO108 User manual

Caple
Caple CR 9210 User manual

Caple
Caple C2500SS Operating and maintenance manual

Caple
Caple C3246 User manual

Caple
Caple C2401GM User manual
Popular Oven manuals by other brands

Alto-Shaam
Alto-Shaam Halo Heat 500-TH/III Installation, operation and maintenance manual

Silvercrest
Silvercrest SGB 1200 A4 operating instructions

Range Master
Range Master Professional + 100 User's guide & installation instructions

TriStar
TriStar OV-1443 instruction manual

StoneAge
StoneAge Big Pig Installation and operation instructions

Ultra Max
Ultra Max UM1854-NAT owner's manual