18 19Instruction manual RiL892 Instruction manual RiL892Please keep this instruction manual for future reference Please keep this instruction manual for future reference
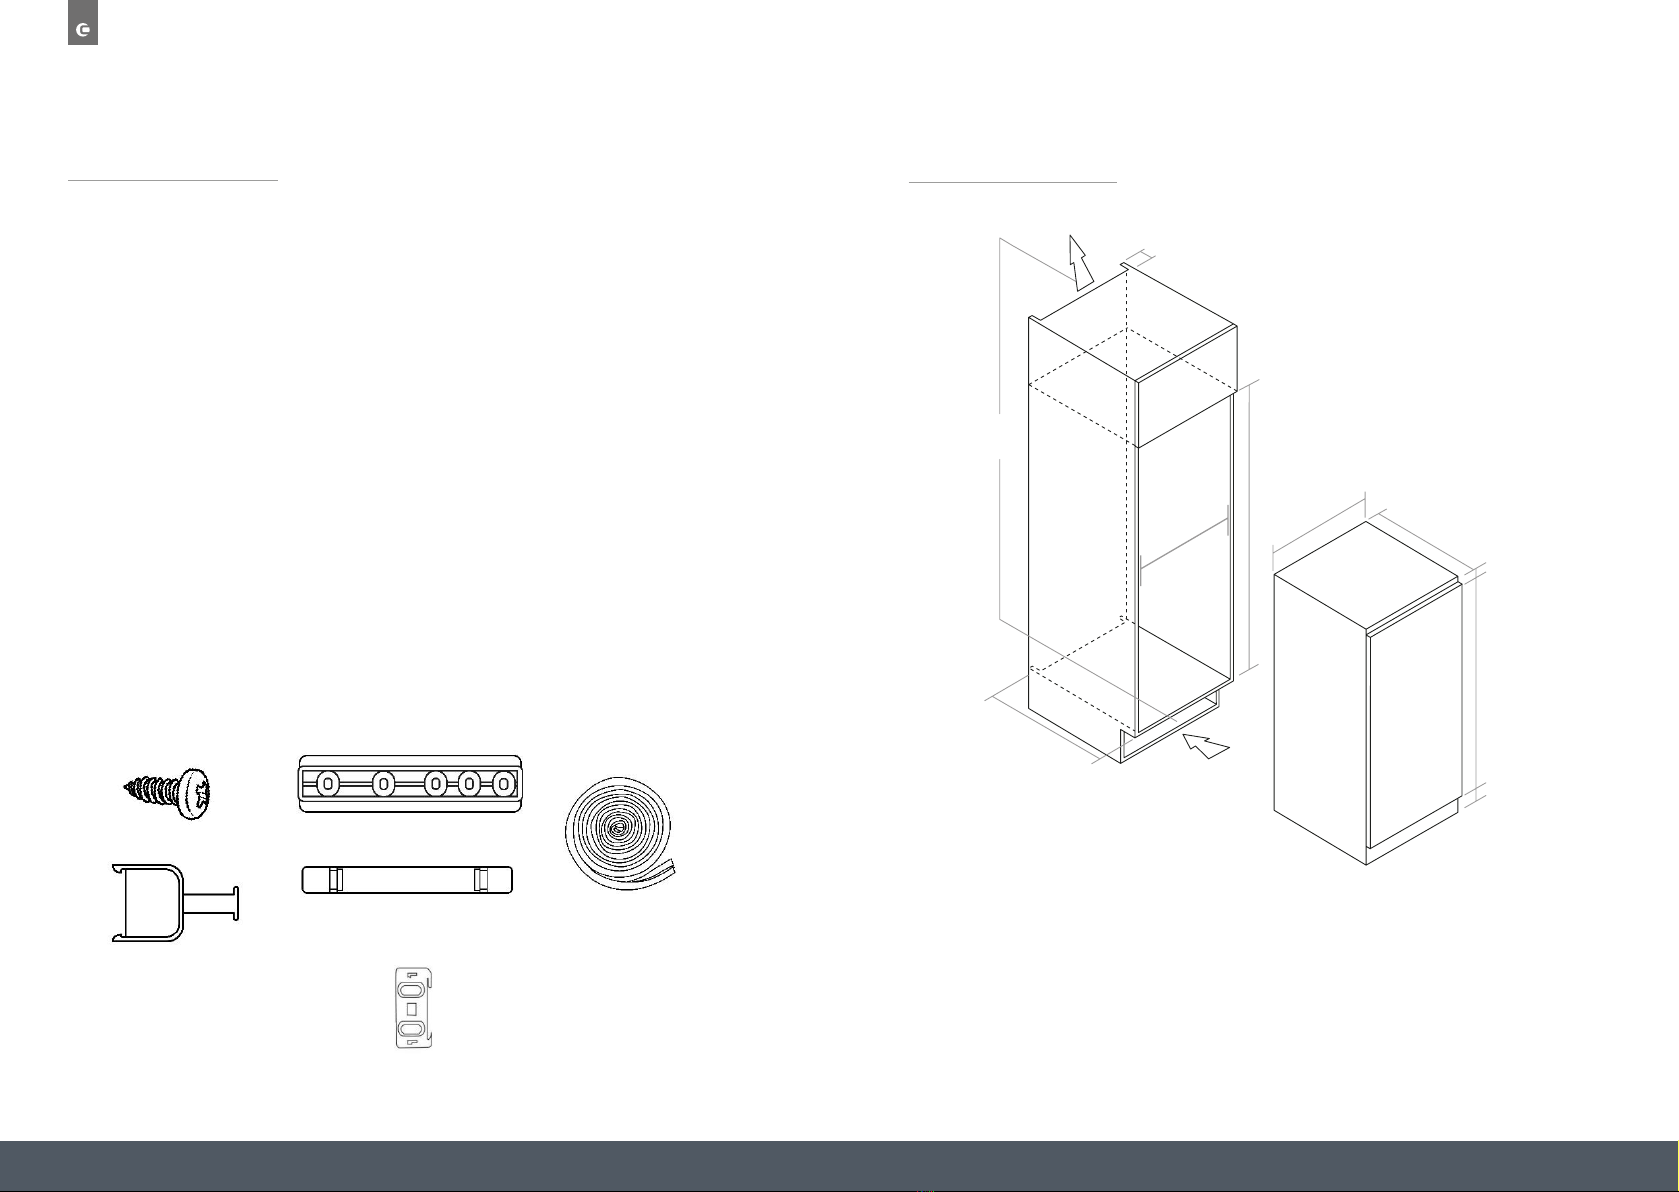
› Apply the foot blanking covers by clipping them in to place on the feet at the bottom of
the appliance. The plastic stem on the foot caps are there as a guide of what the distance
between the product and the edge of the cabinet should be (approximately 42mm). Snap
off the plastic stem after installation.
› Carefully push the appliance into the housing, ensuring that the cabinet doors are able to
fully close.
› Rollout the joint cover and on the side of the appliance without the hinges press it between
the appliance and the inside of the cabinet wall (start from the bottom and work upwards).
› Open the door and push the side of the appliance without the hinges against the side of
the cabinet wall. Fix the appliance in 2 places, 2 torx headed screws in the top plinth at the
top of the appliance and 2 torx screws in the feet (1 in each foot) at the bottom of
the appliance.
EN - 14
Alarm light
In case of a problem within the fridge,
the alarm LED will illuminate red.
Temperature Adjustment Warnings
•It is not recommended that you operate
your fridge in environments colder than
10°C in terms of its efficiency.
•Do not start another adjustment while
you are already making an adjustment.
•Temperature adjustments should be
made according to the frequency of
door openings, the quantity of food
kept inside the fridge and the ambient
temperature in the location of your
fridge.
•In order to allow your fridge to reach
the operating temperature after being
connected to mains, do not open the
doors frequently or place large
quantities of food in the fridge. Please
note that, depending on the ambient
temperature, it may take 24 hours for
your fridge to reach the operating
temperature.
•A 5 minute delay function is applied to
prevent damage to the compressor of
your fridge when connecting or
disconnecting to mains, or when an
energy breakdown occurs. Your fridge
will begin to operate normally after 5
minutes.
•Your appliance is designed to operate
in the ambient temperature range
T/N =16°C - 43°C intervals stated in
the standards, according to the climate
class displayed on the information
label. We do not recommend operating
your appliance out of the stated
temperature limits in terms of cooling
effectiveness.
Do not block the air inlet and outlet openings
when storing food, otherwise air circulation
provided by the turbo fan will be impaired.
Turbo fan
EN - 14
Alarm light
In case of a problem within the fridge,
the alarm LED will illuminate red.
Temperature Adjustment Warnings
•It is not recommended that you operate
your fridge in environments colder than
10°C in terms of its efficiency.
•Do not start another adjustment while
you are already making an adjustment.
•Temperature adjustments should be
made according to the frequency of
door openings, the quantity of food
kept inside the fridge and the ambient
temperature in the location of your
fridge.
•In order to allow your fridge to reach
the operating temperature after being
connected to mains, do not open the
doors frequently or place large
quantities of food in the fridge. Please
note that, depending on the ambient
temperature, it may take 24 hours for
your fridge to reach the operating
temperature.
•A 5 minute delay function is applied to
prevent damage to the compressor of
your fridge when connecting or
disconnecting to mains, or when an
energy breakdown occurs. Your fridge
will begin to operate normally after 5
minutes.
•Your appliance is designed to operate
in the ambient temperature range
T/N =16°C - 43°C intervals stated in
the standards, according to the climate
class displayed on the information
label. We do not recommend operating
your appliance out of the stated
temperature limits in terms of cooling
effectiveness.
Climate
Class Ambient Temperature oC
T Between 16 and 43 (°C)
ST Between 16 and 38 (°C)
N Between 16 and 32 (°C)
SN Between 10 and 32 (°C)
The Turbo Fan
Do not block the air inlet and outlet openings
when storing food, otherwise air circulation
Instruction manual RiL1795
16
CAPLE FRESH
(MAXI-FRESH PRESERVER)
Caple Fresh technology eliminates the ethylene
gas (a by product of fresh foods) inside the
vegetable draw
fresh foods shelf life, especially gr
Caple Fresh also blocks the bad smells produced
in the refrigerator.
- The Caple Fresh filter must be cleaned once a
year
one day.
- When you want to clean the filter, remove the
back side in the direction of the arrow.
- Don’t wet this part with water or detergent.
13
Caple Fresh (Maxi-fresh preserver)
Caple Fresh technology eliminates the ethylene gas (a
byproduct of fresh foods) inside the vegetable draw. By this
method, it maximizes the fresh foods shelf life, especially
green vegetables. Caple Fresh also blocks the bad smells
produced in the refrigerator.
•The Caple Fresh filter must be cleaned once a year. It can be
cleaned by leaving in sunlight for one day.
•When you want to clean the filter, remove the back side in the
direction of the arrow.
USAGE INFORMATION
13
Caple Fresh (Maxi-fresh preserver)
Caple Fresh technology eliminates the ethylene gas (a
byproduct of fresh foods) inside the vegetable draw. By this
method, it maximizes the fresh foods shelf life, especially
green vegetables. Caple Fresh also blocks the bad smells
produced in the refrigerator.
•The Caple Fresh filter must be cleaned once a year. It can be
cleaned by leaving in sunlight for one day.
•When you want to clean the filter, remove the back side in the
direction of the arrow.
• Don’t wet this part with water or detergent.
Caple Fresh
(Maxi-fresh preserver)
USAGE INFORMATION
RIL1795_Larder Instruction Manual.indd 16 07/02/2017 10:35
RI5505 Fridge Freezer Instruction Manual.indd 15RI5505 Fridge Freezer Instruction Manual.indd 15 05/02/2020 14:3005/02/2020 14:30
> Carefully push the appliance into the housing, ensuring that the cabinet doors are able to
fully close.
t the joint cover and on the side of the app Rollou liance without the hinges press it between the
appliance and the inside of the cabinet wall (start from the bottom and work upwards).
or and push the side of the applian> Open the do ce without the hinges against the side of cabinet
wall. Fix the appliance in two places, 2 torx headed screws in the top plinth at the top of the
appliance and 2 torx screws in the feet (1 in each foot) at the bottom of the appliance.
>
HUMIDITY CONTROLLED DRAW
When the humidity controller is in the closed position, it allows fresh fruit and
vegetables to be stored longer.
When the draw is totally full, the humidity controller should be opened. By means
of this the air in the draw and humidity rate will be controlled and endurance life
will be increased. If you see any condensation on the glass shelf above, the humidity
control should be moved into the open position..
NOTE:
These draws are specifically designed to store fruit & vegetables only. We do not
recommend storing meats and/or fish in these draws.
EASY ADJUSTABLE DOOR BALCONY
Y
normal door balconies). To adjust this door balcony to
the appropriate height, hold the bottom of the balcony
in Fig.1. Whilst pulled down move the door balcony to
the appropriate height (there are 6 height positions).
Once set at the correct height, release the buttons to
lock it into position.
NOTE:
Please ensure the balcony is empty before adjusting.
RI5505 Fridge Freezer Instruction Manual.indd 16RI5505 Fridge Freezer Instruction Manual.indd 16 05/02/2020 14:3005/02/2020 14:30
> Apply the foot blanking covers by clipping them in to place on the feet at the bottom of the
appliance. The plastic stem on the foot caps are there as a guide of what the distance between
the product and the edge of the cabinet should be (approximately 42mm). Snap off the plastic
stem after installation.
> Apply blanking covers by clipping them in to place at the top metal plinth at the top
of the appliance.
EN - 14
Alarm light
In case of a problem within the fridge,
the alarm LED will illuminate red.
Temperature Adjustment Warnings
•It is not recommended that you operate
your fridge in environments colder than
10°C in terms of its efficiency.
•Do not start another adjustment while
you are already making an adjustment.
•Temperature adjustments should be
made according to the frequency of
door openings, the quantity of food
kept inside the fridge and the ambient
temperature in the location of your
fridge.
•In order to allow your fridge to reach
the operating temperature after being
connected to mains, do not open the
doors frequently or place large
quantities of food in the fridge. Please
note that, depending on the ambient
temperature, it may take 24 hours for
your fridge to reach the operating
temperature.
•A 5 minute delay function is applied to
prevent damage to the compressor of
your fridge when connecting or
disconnecting to mains, or when an
energy breakdown occurs. Your fridge
will begin to operate normally after 5
minutes.
•Your appliance is designed to operate
in the ambient temperature range
T/N =16°C - 43°C intervals stated in
the standards, according to the climate
class displayed on the information
label. We do not recommend operating
your appliance out of the stated
temperature limits in terms of cooling
effectiveness.
Do not block the air inlet and outlet openings
when storing food, otherwise air circulation
provided by the turbo fan will be impaired.
Turbo fan
EN - 14
Alarm light
In case of a problem within the fridge,
the alarm LED will illuminate red.
Temperature Adjustment Warnings
•It is not recommended that you operate
your fridge in environments colder than
10°C in terms of its efficiency.
•Do not start another adjustment while
you are already making an adjustment.
•Temperature adjustments should be
made according to the frequency of
door openings, the quantity of food
kept inside the fridge and the ambient
temperature in the location of your
fridge.
•In order to allow your fridge to reach
the operating temperature after being
connected to mains, do not open the
doors frequently or place large
quantities of food in the fridge. Please
note that, depending on the ambient
temperature, it may take 24 hours for
your fridge to reach the operating
temperature.
•A 5 minute delay function is applied to
prevent damage to the compressor of
your fridge when connecting or
disconnecting to mains, or when an
energy breakdown occurs. Your fridge
will begin to operate normally after 5
minutes.
•Your appliance is designed to operate
in the ambient temperature range
T/N =16°C - 43°C intervals stated in
the standards, according to the climate
class displayed on the information
label. We do not recommend operating
your appliance out of the stated
temperature limits in terms of cooling
effectiveness.
Climate
Class Ambient Temperature oC
T Between 16 and 43 (°C)
ST Between 16 and 38 (°C)
N Between 16 and 32 (°C)
SN Between 10 and 32 (°C)
The Turbo Fan
Do not block the air inlet and outlet openings
when storing food, otherwise air circulation
Instruction manual RiL1795
16
CAPLE FRESH
(MAXI-FRESH PRESERVER)
Caple Fresh technology eliminates the ethylene
gas (a by product of fresh foods) inside the
vegetable draw
fresh foods shelf life, especially gr
Caple Fresh also blocks the bad smells produced
in the refrigerator.
- The Caple Fresh filter must be cleaned once a
year
one day.
- When you want to clean the filter, remove the
back side in the direction of the arrow.
- Don’t wet this part with water or detergent.
13
Caple Fresh (Maxi-fresh preserver)
Caple Fresh technology eliminates the ethylene gas (a
byproduct of fresh foods) inside the vegetable draw. By this
method, it maximizes the fresh foods shelf life, especially
green vegetables. Caple Fresh also blocks the bad smells
produced in the refrigerator.
•The Caple Fresh filter must be cleaned once a year. It can be
cleaned by leaving in sunlight for one day.
•When you want to clean the filter, remove the back side in the
direction of the arrow.
USAGE INFORMATION
13
Caple Fresh (Maxi-fresh preserver)
Caple Fresh technology eliminates the ethylene gas (a
byproduct of fresh foods) inside the vegetable draw. By this
method, it maximizes the fresh foods shelf life, especially
green vegetables. Caple Fresh also blocks the bad smells
produced in the refrigerator.
•The Caple Fresh filter must be cleaned once a year. It can be
cleaned by leaving in sunlight for one day.
•When you want to clean the filter, remove the back side in the
direction of the arrow.
• Don’t wet this part with water or detergent.
Caple Fresh
(Maxi-fresh preserver)
USAGE INFORMATION
13
Caple Fresh (Maxi-fresh preserver)
Caple Fresh technology eliminates the ethylene gas (a
byproduct of fresh foods) inside the vegetable draw. By this
method, it maximizes the fresh foods shelf life, especially
green vegetables. Caple Fresh also blocks the bad smells
produced in the refrigerator.
•The Caple Fresh filter must be cleaned once a year. It can be
cleaned by leaving in sunlight for one day.
•When you want to clean the filter, remove the back side in the
direction of the arrow.
• Don’t wet this part with water or detergent.
Caple Fresh
(Maxi-fresh preserver)
USAGE INFORMATION
RIL1795_Larder Instruction Manual.indd 16 07/02/2017 10:35
RI5505 Fridge Freezer Instruction Manual.indd 15RI5505 Fridge Freezer Instruction Manual.indd 15 05/02/2020 14:3005/02/2020 14:30
> Carefully push the appliance into the housing, ensuring that the cabinet doors are able to
fully close.
t the joint cover and on the side of the app Rollou liance without the hinges press it between the
appliance and the inside of the cabinet wall (start from the bottom and work upwards).
or and push the side of the applian> Open the do ce without the hinges against the side of cabinet
wall. Fix the appliance in two places, 2 torx headed screws in the top plinth at the top of the
appliance and 2 torx screws in the feet (1 in each foot) at the bottom of the appliance.
>