Caraudio-Systems C2C-M200 User manual

Page 1
C2C-M200

Page 2
Contents:
Contents...................................................................................................................................... 2
Safety Instructions...................................................................................................................... 3
Service / Support........................................................................................................................ 4
Shipment..................................................................................................................................... 4
Product Description.................................................................................................................... 5
Installation ................................................................................................................................. 5
Navigation system specific harnesses ........................................................................................ 6
RC Codes und device specific harnesses ................................................................................... 7
Image adjustments ..................................................................................................................... 8
Technical Details........................................................................................................................ 9

Page 3
Safety Instructions:
1. Read through mounting guidelines:
Please read through all safety instructions and handling directions intently before installation
and start up of the device.
2. Keep mounting guidelines:
Keep the instruction manual and safety instructions for potential further reference.
3. Caution advises:
Please follow all caution advises contained in the mounting guidelines.
4. Water and humidity:
The device should not be operated near water or near a humidity source.
5. Warmness / heat:
The device should not be set up in direct proximity of heat sources (e. g. power amplifier).
6. Connection / electric power supply:
Use the device only at a +12 volt vehicle electrical system. Make sure to have a proper
ground.
7. Intrusion of objects or liquids:
Please make sure that no objects or liquids can intrude the interior of the device! (Danger of
short circuit!)
8. Repairs:
You should call on qualified personnel, if:
a plug or a connector have been damaged
cables are damaged
objects have fallen into the device or liquids have intruded it
the product has been exposed to humidity
the device doesn't function normally or if
significant changes in the operating performance can be observed
the product/casing has been damaged.
9. Operation:
Start no operation that is likely to distract you for a prolonged time from road traffic or traffic
related events –RISK OF ACCIDENT!!!
10. Warranty:
The warranty will cease in case that:
you open the device or the casing
you carry out repairs single handed
you use the device improperly
the device shows damages caused by external forces or mischievous destructions.
We assume no liability for damages to the vehicle or to people.

Page 4
Service & Support:
All our products are manufactured under strict quality control. Each device is being tested be-
fore shipment. If nevertheless do occur problems or if you have technical questions, contact
us directly under:
Caraudio-Systems Vertriebs GmbH
manufacturer/distribution
In den Fuchslöchern 3
D-67240 Bobenheim-Roxheim
In addition to constant product update and development related changes the instruction manu-
als of the devices are constantly edited and kept up to date.
To enable us to provide you with the right information and support for the device you have
got at hand please add the following information to every inquiry:
Date of purchase, your name and address, item number and the type of your vehicle.
Shipment:
Interface C2C-M200
Manual
iPod® ist ein eingetragenes Markenzeichen der Apple Computer, Inc.
iPod® is a registered trademark of Apple Computer, Inc.

Page 5
Product Description:
Article: C2C-M200
Features: With this interface you can connect an external video source
(eg. DVD Player, DVB-T Tuner) to a navigation system
from Audi, VW, Skoda and Mercedes.
The interface features two A/V inputs, a rear view camera
input and a video output.
It also provides an ignition switched (+12V) output and a power
supply for the rear view camera.
You can also control the connected video sources with
the buttons of the navigation systems.
The following navigation are supported:
MFD1, MFD2/RNS2, MFD3/RNS510, NAVI+, RNS-E,
COMAND 2.0, COMAND 2.5
You need additional harnesses for the C2C-M200 (not included).
See page 6 and 7
For MFD3/RNS510 Firmware Version 1.000 or
higher you also need the Video-in-motion Interface
„TV-400“ with the harness „TV-VW01“:
TV-400 TV-VW01

Page 6
Navigation specific harnesses:
C2C-M200
Harness
MERCEDES
Mit NTG1: E-Klasse W211, CLS W219
Mit NTG2: C-Klasse W203 ab 4/04,
A-Klasse W169, B-Klasse W245,
CLK W209 ab 4/04, R-Klasse W251,
M-Klasse W164, GL X164,
MS-MBN2
MERCEDES
With COMAND 2.0:
C-Class W203 until 03/2004, CLK W208,
E-Class W210, G-Class W463,
M-Class W163,
S-Class W220 with COMAND APS220
C2C-MB20
MERCEDES
S-Class W220 with COMAND 2.5
C2C-MB25
AUDI, VW,
SKODA
With Audi Navi Plus (4:3):
A2, A3, A4, A6, A8
With MFD1:
Golf4, Bora, Passat,
Octavia 1, Superb
C2C-VW01
VW, SKODA
With MFD2:
Golf5, Passat, Touran, Touareg, T5
With Nexus:
Octavia 2
C2C-VW02
VW
With RNS510:
Golf5, Passat, Touareg
C2C-VW03
VW
With MFD2 / RNS510 and
original rear view camera:
Golf5, Passat, Touran, Touareg, T5
C2C-VWR
AUDI
With RNSE:
A3, A4, A6
C2C-RNSE

Page 7
RC Codes and device specific harnesses:
RC Code
Devices
Harness
01
DVD USB, MP410, AD212U, DVP-1000M, DVP-900HD, DVD500U, Ampire DVX100
STA-USB
01
DV2602
STA-UNI
02
DVB-T DVB2007, Dietz 1491/V
STA-D2007
03
DVB-T Ampire DVB-T100 (not SL Version)
STA-USB
04
DVB-T DVB2008, TRT-400
STA-SV8
05
DVDC CKO DVC10
STA-UNI
06
DVDC CKO- DVC 6M, Yamakawa DVDC
STA-UNI
07
DVB-T NL, SENERGY DVB-T, CKO DVB-T 1080, Axion DVB-T 500, Bullit DVB-T, DVB-T D60
STA-NL
08
DVD SENERGY ADJQ-DVDRD, PYLE PLTD24, Veba, Carmedien CM06
STA-UNI
09
DVD 1/2 DIN (No Name)
STA-UNI
10
DVD Alpine DVE-5207, Alpine DVDC DHA-S690
STA-AL25
11
DVB-T Alpine TUE-T150DV
STA-AL25
11
Alpine TUE-T200DVB
STA-SV4
12
DVB-T Eastern SE863-T
STA-D2007
13
iPod Vlink
STA-USB
14
DVB-T ZENEC ZE-DVBT25, DVB-T TRT-500
STA-UNI
15
V-HUB VPA-B222R Alpine Radio
STA-AL25
16
V-HUB VPA-B222R Alpine DVD
STA-AL25
17
DVD Necvox DVA-3206
-
18
Analog-TV Alpine TUE-T112P
STA-AL25
19
Analog-TV TRT-003
STA-SV7
20
BOA-DVD 85700 /AIV, MP412, C-KO 412
STA-USB
21
DVD Visteon VXM2200
-
22
DVB-T Quantum QTM10
STA-QTM
23
DVD Elite ELT-900XU
STA-USB
24
DVDC CkO MPC6, DVC62
STA-UNI
25
DVD-TIXXON (No Name)
-
26
HD-Player 3,5“ MVIX MV-5000U
-
27
DVD Axion VDV-402
STA-USB
28
DVD Bullit CDVD12
STA-USB
29
DVD ZENEC ZE-080
STA-UNI
30
DVB-T Ampire DVBT200
STA-NL
31
DVB-T&DVD USB Digitaldynamic Multiplayer
STA-USB
32
iPod Alpine KCE-425I
STA-UNI
33
A-TV TVT-765
-
34
Conexx DVB-T Mini (blue)
STA-SV42
34
DVB-T DTR-1203EU
STA-SV43
35
DVB-T Carmedien DVB423
STA-USB
36
DVB-T M-DVT0201 , Car-Hightech
STA-SV82
37
DVDC Pioneer XDV-P6
STA-PIO
38
DVD Phonocar VM 015 (USB/SD)
STA-UNI
39
Hirschmann DVB-T , Visteon DVB-T
STA-SV42
40
HD Microlab - Pocket X Div 25 (2,5” HD P. Tixxon)
STA-AL25
41
DVB-T D80
STA-NL
42
DAS / Dietz 1492 DVB-T
STA-DAS
43
DVB-T Ampire DVBT50
STA-NL

Page 8
Image adjustments:
There are two ways to adjust the image settings of the interface:
- Activate the TV function
- Pressing a button more than 2 seconds („Return“
at Navi+, RNS-E, COMAND 2.0 and COMAND 2.5
or „ESC“ at MFD1 and MFD2/RNS2)
activates the image settings menu
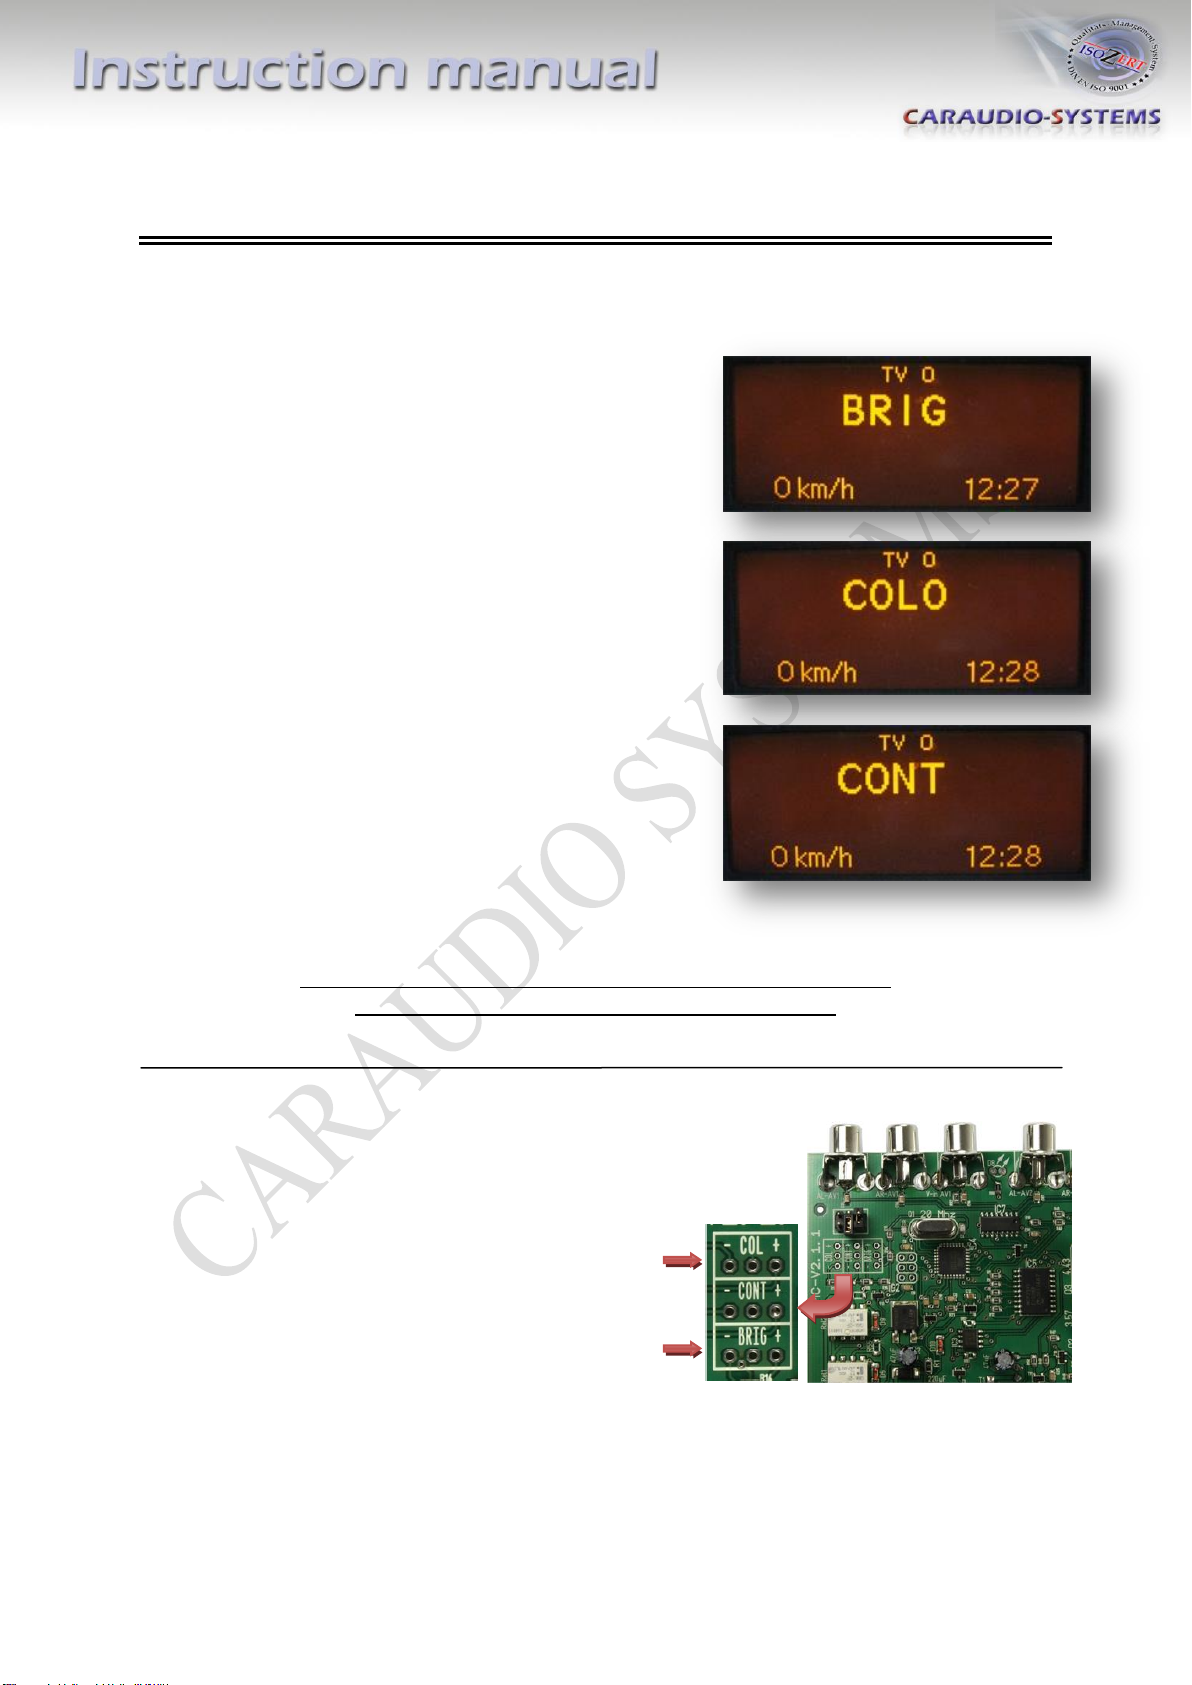
- When the image settings menu is active
it shows „BRIG“ (brightness) in the instrument cluster.
By turning the right turn knob on the navigation
system you can adjust the brightness of the image.
- Pressing the turn knob shortly switches between the
different options:
„BRIG“ (brightness), „COLO“ (color)
and „CONT“ (contrast)
- Pressing „Return“ or „ESC“ Taste leaves the
settings menu
(Due to the lack of a display connection to MDF1 and Navi+,
the setup has to be done without optical feedback)
You can also adjust the image settings directly at
the interface. You have to open the housing for that.
On the pcb you see soldering pads that have the
descriptions written above them. „CONT“ for contrast,
„COL“ for color and „BRIG“ for brightness.
Below those pads is “+” and “-“ written.
To adjust the image settings you have to short circuit
the center pad to „-“ or „+“ (eg. with tweezers).
Each short circuit changes the setting about one step.
The interface has to be connected to power for this.
Take care you don’t short circuit anything else on the
pcb and also take care that you don’t put it on metal ground.

Page 9
Technical Details:
Software version: V1.0.3
Power supply: 12V DC
Voltage range: 10.5 –14.8V DC
Standby current consumption: 1mA
Average current consumption: 230mA
Total power consumption: 3.4W
Temperature range: - 30°C - + 80°C
Weight: 210 g
Size: 105 x 30 x 102 mm
This product is designed for automotive use and therefore has a lifespan
of approximately 10 years.
Caraudio-Systems Vertriebs GmbH
manufacturer/distribution
In den Fuchslöchern 3
D-67240 Bobenheim-Roxheim
Legal disclaimer: Mentioned company and trademarks, as well as product names/codes are registered
trademarks ® of their corresponding legal owners.
Rev. 1.0 / 26.05.2009
Table of contents
Other Caraudio-Systems Car Receiver manuals