CARAVITA BIG BEN 2 LIGHT User manual

Handling
Instructions
Page 2
Bedienungs-
anleitung
Seite 16
Instructions pour la
manutention
Page 30
Instrucciones para
la operación
Página 44
DIAGRAMS OF CONNECTIONS - SCHALTPLÄNE - SCHÉMA ÉLECTRIQUE - CUADRO ELÉCTRICO
Page / Seite / Página 58
LIGHT | LICHT
ÉCLAIRAGE | LUZ
BIG BEN 2
Manufacturer / Hersteller / Fabricateur / Fabricante
CARAVITA Europe s.r.o. | Trencianska, 827/81 | 01851 Nova Dubnica | SLOVAKIA
v07.17

Big Ben 2017 Page / Seite / Page / Página 2
Please note while connecting the power supply:
Iftheconnection cable (feed cable) is damaged, it must be replaced byanoriginalcabel from CARAVITA or xedbyanauthorized
company the way, it will meet all safety regulation. In case of any failure in electrical installation or sunshade construction,
please ask for original spare parts.
• Do not use adapters or multiple pin connectors.
• To connect a power line, use original connection cable (with sealed connector), in required length which was produced
regarding to your order.
• Any changes on electrical elements or connection cables or any reconstructions at the sunshade have to be made by a
qualified company / speciality retailer.
You put yourself and others into mortal danger!
Wind Warning!
Your CARAVITA BIG BEN is weather proof and can stay outside all year long. However it is not recommended to be left opened and un-
attended for long periods of time. It is also recommended that your CARAVITA umbrella be closed during inclement weather (snow or
high winds). Close the sunshade when there are high winds or when it is not used and deconnect the power supply of BIG BEN LIGHT.
The manufacturer is not liable for wind, snow or vandalism damage.
SAFETY INSTRUCTIONS
Improper use of this umbrella may lead to property damage or serious injury. Therefore, you must carefully read and follow the
assembly and installation instructions and heed the following warnings:
• DO NOT use the umbrella in high winds!
• DO NOT use or shelter under the umbrella during electrical storms!
• DO NOT sit or climb on the umbrella!
• DO NOT leave children unsupervised in proximity to the umbrella!
• DO NOT use this umbrella other than for its intended purpose!
• DO NOT use the umbrella without its base!
• DO NOT modify this umbrella in any way!
Failure to use due care or to follow the instructions or to heed these warnings may result in property damage or serious injury
and may void the warranty!
CAUTION !

Big Ben 2017 Page / Seite / Page / Página 3
UNPACKING THE UMBRELLA
Inspect all received boxes for damages (opened ends, gouges, scratches, tears or any holes). If there is any sign of damage please
contact your retailer or CARAVITA Customer Service immediately and make notation on the BOL.
Using scissors or a box cutter cut the adhesive tape and plastic straps. Be careful not to damage the umbrella inside the box.
Do not discard of your packaging materials until all items have been able to be inspected. It is important to not damage the
cardboard when opening. The cardboard should be folded temporarily and stored until all items are reviewed and deemed in
perfect condition.
CONTENTS
Please examine the contents of the shipment to ensure all parts are included and undamaged. In addition to the umbrella the
following is included:
• Installation Guide
• Crank
• Aluminium finial top with globe
• Plug cover
WARRANTY
When properly handled, CARAVITA GmbH offers a 5-year warranty policy on the frame and canopy. The warranty on electrical and
transmission equipment is granted for 2 years. See attachement for detailed warranty-conditions.
MOVING THE UMBRELLA
The umbrella should be carried by two people. One at each end of the umbrella. Please hold the umbrella with both hands. DO NOT
DRAG THE UMBRELLA BY PULLING THE PROTECTION BAG OR THE FABRIC! This may cause tears. Do not hold on to the struts when
carrying the umbrella. They might bend.

Big Ben 2017 Page / Seite / Page / Página 4
SETTING UP THE UMBRELLA
Prepare your mobile stand or ground anchor as instructed by their corresponding manual
and have the required accessory hardware ready for install. All sheet stands that use pavers
should have the appropriate pavers installed and fillable stands should be filled with appro-
priate weighted material.
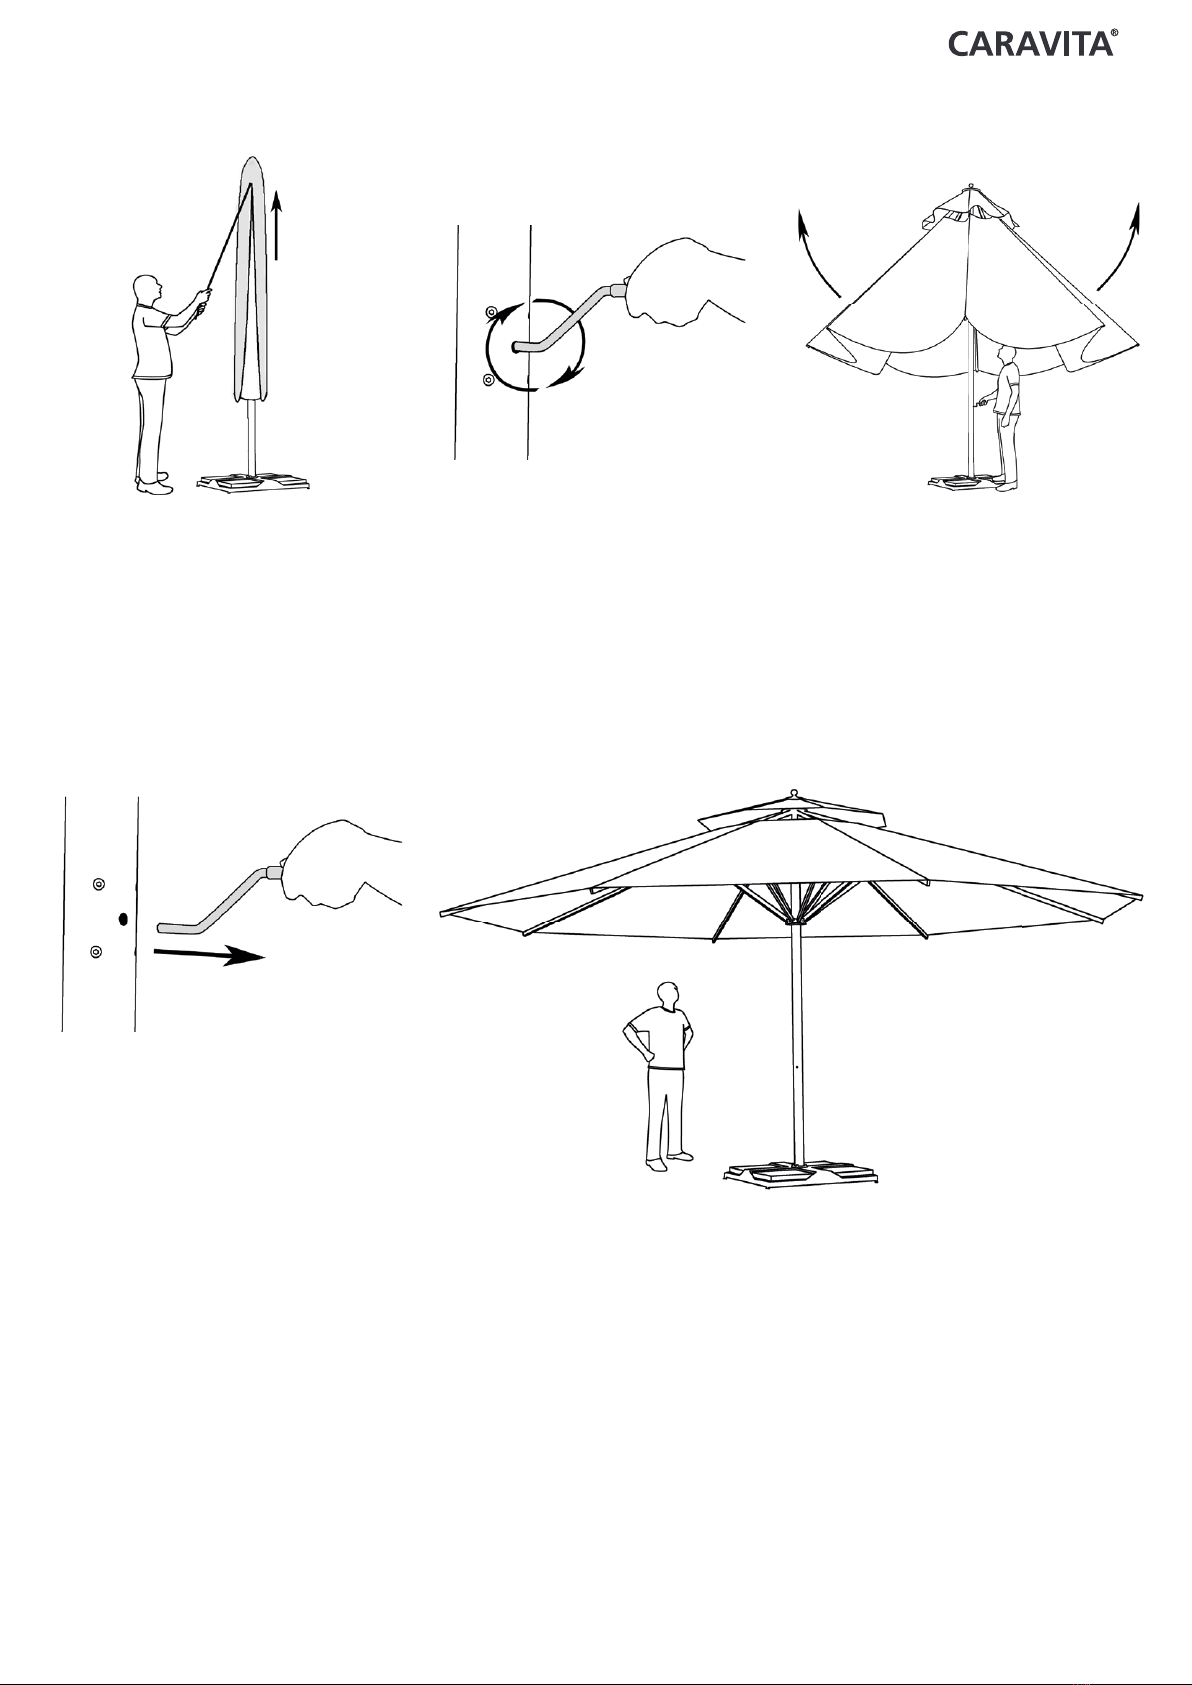
Remove the protection bag before installing if you do not have a push-rod which enables you
to remove the protection bag from a set up umbrella.
Before setting up the umbrella, make sure the area is clear of people and objects underneath that could be harmed or damaged and/
or could cause damage to the umbrella.
Please be aware, that the umbrella is very tall, and thus hard to balance in an upright position. For this reason hold the umbrella firmly
when installing to reduce the risk of injury.
For safety-purposes, two people
should set up the umbrella.
Very large umbrellas weigh up to
100kg. Work carefully and foresight-
ful to avoid danger.
At least three persons should work
on very large umbrellas!
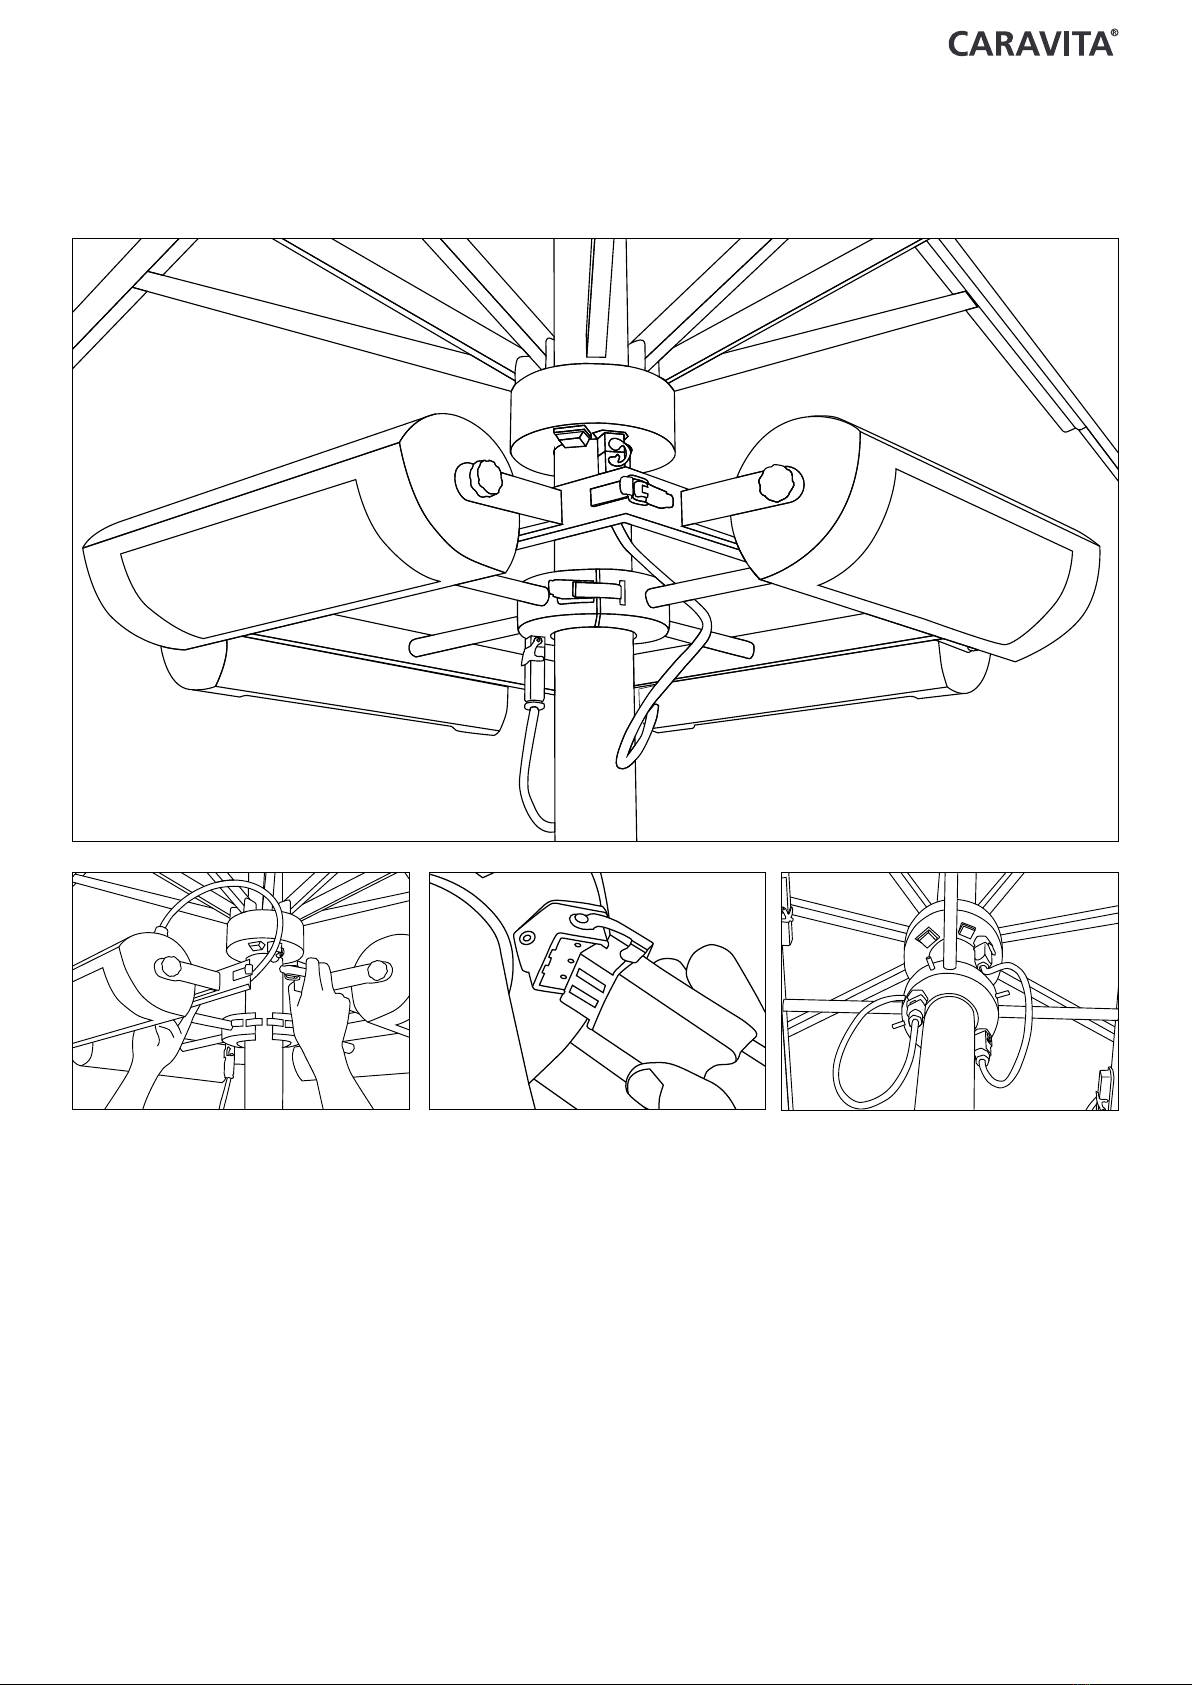
Install the supplied cover cap and finial at the top of the umbrella.
1) Put one of the 5 flange screws (M10x25) into the central hole.
Let the screw protude about 10mm.
2) Carfully put the umbrella on the floor, with the lower end
pointing towards the ground sleeve.
3) Using the alignment guide on the base of the umbrella, positi-
on on the central screw, and raise the umbrella with both hands
into an upright position.
CAUTION! - DO NOT LET GO OF THE UMBRELLA!
IT CAN STILL FALL OVER!
4) Hold the umbrella upright while a second person screws it to
the base with the 4 screws (M10x35) and the washers provided.
Do not tighten the screws yet.
5)
Adjust the orientation of the umbrella. Then tighten the screws.
At times when the umbrella is not installed on the ground
sleeve, close the holes of the ground sleeve against dirt with the
provided flange screws (M10x25).
The purpose of the plastic mesh attached to the struts is to pro-
vide protection to the shade against damage during transport.
Once the umbrella is open, the mesh can be removed carefully
with scissors or a knife. Be careful not to damage the shade!

Big Ben 2017 Page / Seite / Page / Página 5
DESCRIPTION OF THE LIGHTS AND THE ELECTRICAL PARTS
The Elegance lighting system consists of LED-strips embeded in an aluminium case with diffusor. It is attached to the supporting struts.
of the sunshade. The wires are integrated in the mast. The LED-density is 120 (RGB: 60) per meter.
The electrical box is located below the lower hub. The power supply from the ground is lead through the struts to the lights. The elec-
trical box is sealed. The switch for the lights and/or heaters is located on the lower side of the box.
Big Ben with integrated light is connected with 230V/50Hz and 16A fuse as power supply!
Big Ben with integrated light and wires for Solamagic heaters is connected with 400V/50Hz and 16A fuse as power supply!
Important:
The user of the umbrella has to make sure that the power supply is protected from being damaged.
ELECTRIC INSTALLATION
Lights are switched on and off by pushing
the switch below the lower hub.
Tighten the protective cover with the
screws.
Put the other end of the cable with the
Schuko plug into the socket. Watch out
for appropriate connection with 230V or
400V.
Using the remote control is an alternative.
Put the plug into the socket and secure it
with the clamp.
Please connect the umbrella only with the connection cable delivered. Otherwise ask a qualied company / speciality retailer
for indivudual connection solutions.
WARNING:
The connection cable must be put in a way making it impossible to be damaged or stumbled across.
Loosen the screws and remove the protec-
tive cover. The socket is located below.

Big Ben 2017 Page / Seite / Page / Página 6
ATTACHMENT OF THE HEATERS
TO THE MAST
Put the bracket around the mast. Connect the hub of the umbrella and the
Solamagic heaters with the cable that was
delivered with the heaters.
The heaters are now ready to be used. Use
the central switch to turn them on and off.
WARNING:
The connection cable must be put in a way making it impossible to be damaged or stumbled across.

Big Ben 2017 Page / Seite / Page / Página 7
ATTACHMENT OF THE HEATERS
TO THE STRUTS
Mount the heater on the strut and fix it
with the screw.
Remove the protection cap from the power
supply on the end of the strut.
Connect the plug with the socket and
secure it with the clamp.
The heaters are now ready to use. Depen-
ding on the model, it is possible to switch
the heaters on and off either on the mast
or directly on the heater itself.
CAUTION:
The heaters have to be cold before
closing the umbrella. Hot heaters might
damage the fabric at contact!
Please note the Solamagic manual
as well!

Big Ben 2017 Page / Seite / Page / Página 8
ELEGANCE - REMOTE CONTROL FOR A SINGLE UMBRELLA
maximal
illumination power
lights on lights off
medium
illumination
power minimal
illumination power
dim the lights
on off
Please switch on the lights at the mast before using the remote control. It is not possible to use the remote control before the light
is switched on manually. With the remote control it is possible to dim the lights and to switch them on and off. 3 AAA batteries are
required to operate the remote control. The signal range of the remote control is approximately 20 m (65 feet).
Put the plug into the socket. Watch out for
appropriate connection with 230V or 400V.
Switch on the light by pushing the main
switch at the hub.
To group several umbrellas or to adjust the substitutional remote control, proceed as follows:
remote control white LED lights:
Immediately press „maximal illumination
power“ for 3 seconds.
remote control coloured LED lights:
turn up (brightness or speed)
If reprogramming of the remote control
worked, the LED are blinking three times.
Reprogramming the remote control:
remote control white LED lights remote control coloured and white LED lights
Grouping of several parasols:
You can control several umbrellas with a single remote simultaneously. Therefore all
umbrellas have to be adapted to a single remote control.
lights on / off
light changing mode
(15 modes)
colour ring
turn down
(brightness or speed)
switch between coloured
and white LED light
turn up
(brightness or speed)

Big Ben 2017 Page / Seite / Page / Página 9
ELEGANCE - REMOTE CONTROL FOR MULTIPLE UMBRELLAS
(OPTIONAL)
As an option, it is possible to dim and to switch on and off the lights for multiple umbrellas with a single remote control. This feature
has to be installed during production and cannot be implemented afterwards. 3 AAA batteries are required to operate the remote
control. The remote control allows to operate the lights for each single umbrella or for multiple umbrellas at once. The signal range of
the remote control is approximately 20m (65feet).
lights on
lights off
channel 1
channel 2 channel 3
channel 4
dim continuosly
1
2 3
4
Put the plug into the socket. Watch out for
appropriate connection with 230V or 400V.
Switch on the light by pushing the main
switch at the hub.
Immediately press „lights on“ and desi-
red „channel on“ at the same time for 3
seconds.
As a result the strut lights are blinking three
times. They can now be operated with the
respective channel.
How to put strut light and remote control into operation:
How to manage single umbrellas via channels with the remote control:
The remote control enables to operate different umbrellas simul-
taneously.
Assign different channels (1-4) to umbrellas to enable indepen-
dent operating.
channel 1 channel 2 channel 3

Big Ben 2017 Page / Seite / Page / Página 10
OPENING THE UMBRELLA
Remove the protection bag, if not
done already, and the binding belt.
To open the shade, insert the crank
handle into the hole of the umbrella.
Turn clockwise.
CAUTION:
IF THE UMBRELLA DOES NOT OPEN EASILY,
DO NOT USE FORCE!
If the umbrella does not open immediately close the umbrella. Loosen the struts once
more, make sure that none of them have folded inward. Try to open the umbrella once
again. If the error cannot be detected please contact your dealer or
the CARAVITA customer service.
DO NOT USE FORCE!
The umbrella will open slowly.
Remove the crank for safety purposes
(for example if children are around or
to prevent theft in public places)

Big Ben 2017 Page / Seite / Page / Página 11
CLOSING THE UMBRELLA
Insert the crank handle into the hole
of the umbrella.
Before closing the umbrella comple-
tely, pull out the fabric from between
the struts and fold it around the um-
brella so it cannot be damaged from
getting caught between the struts.
To close, turn the crank handle coun-
ter-clockwise.
The umbrella will close slowly.
Secure the cover with the binding belt
to keep from moving around in the
wind. Movement in the canopy cover
can chafe and can wear itself through
at the frame.
Pull the protective bag over the
umbrella. The optional push-rod can
be used to assist in installing.
STORING THE UMBRELLA
1. Freestanding
It is recommended to secure the canopy cover from moving in the wind with the binding belt and to pull the protective bag over the
umbrella. Movement in the canopy cover can chafe and can wear itself through at the frame. This is not covered by the warranty. If the
protective bag is used, the umbrella should be completely dry. If the cover is wet, mold and mildew can form.
If you do not have a ground sleeve/permanent stand, be warned, that even a closed umbrella can be blown over with very high winds.
Make sure that the stand is sufficiently ballasted or store the umbrella horizontally in a dry room.
2. Storage
Store the umbrella in a dry and clean place, that is free of pests. The canopy cover should be completely dry to prevent mold or mildew
from forming.

Big Ben 2017 Page / Seite / Page / Página 12
MAINTAINING THE CANOPY
Wet umbrellas should never be stored or kept in their protection bags for long periods of time.
Fallen leaves and other foliage should be removed immediately to avoid staining or fungus growth on fabric.
Microorganisms (mold, bacteria, blue-green algae, algae) can develop if the conditions of trapped moister, dirt and heat extended
for long periods of time. In the past years many microcides, although very effective, have been banned by law in most coutries of
Western Europe because of their toxicity, and have been replaced by other less polluting microcids. These however, show different and
generally more limited spectra of effect.
Dirt is best brushed off dry on a regular basis. Stains can be treated with lukewarm water and a soft brush. Treat stubborn stains by
hand washing with some commercial mild detergent, rinse well with clear water, let dry and treat with water repellent if necessary
afterwards. Speciality dealers may offer special liquid detergents, follow instructions carefully.
WASH IN COLD WATER ONLY!
DO NOT WASH IN WARM OR HOT WATER!
Acrylic fabrics shrink even at low temperatures!
MAINTAINING THE FRAME
Wash the surfaces with water and mild detergent if necessary. Stainless steel parts can be brightened with commercial stainless steel
polish. Lubricate all joints and rollers with oil or silicone spray.
Plus umbrellas should be cleaned periodically from all kinds of dirt.
REPAIR WORK AND SPARE PARTS
Sunshade BIG BEN LIGHT is constructed the way, that by correct handling and manipulation, it will be in use for many years.
In case of any damages by wind or other harms, all spare parts are available.
In case of self made repairs – especially at the electricity, please use only original spare parts.

Big Ben 2017 Page / Seite / Page / Página 13
TENSION ADJUSTMENT OF THE CANOPY
The acrylic awning fabric will stretch slightly over time. If your canopy becomes stretched, you can readjust the tension by pulling out
the telescopic ends of the struts. See the following:
Secure with screw.
Drill a new hole with a 3.5mm drill bit at the point of the
telescopic tube where the set screw will now be placed.
Pull the telescopic ends out as far as possible.
Remove the screws at the end of the telescopic strut.

Big Ben 2017 Page / Seite / Page / Página 14
USING THE TELESCOPIC PUSH ROD
Use the telescopic push rod to lift the pro-
tection bag over the umbrella.
Attach the key ring to the zipper of the pro-
tection bag.
Open the knurled screw on the telescopic
push rod.
Seize the knurled screw on the telescopic
push rod.
Reach into the pocket of the protection
bag with the telescopic push rod.
Grab the key ring at the zipper with the
eyebolt on the telescopic push rod.
Pull the zipper down.
Extract the telescopic push rod to the pro-
per length.
ATTENTION!
Do not use force to pull the zipper
If the zipper is blocked, try to loosen it with slight movements forward
and backward. If it is not possible to loosen the zipper, try to fix the
problem by hand or remove the protection bag.
(Optional accessory)

Big Ben 2017 Page / Seite / Page / Página 15
WARRANTY CONDITIONS (EU)
CARAVITA Europe s.r.o. is proud to provide the customer an extended warranty for products expressly marked. The legal rights of the
client are not going to be restricted by this warranty.
The following warranty conditions apply:
WARRANTOR:
CARAVITA Europe s.r.o., Trencianska, 827/81, 01851 Nova Dubnica, Slovakia;
More contact details on our website: www.caravita.eu
EXTENT OF WARRANTY:
Timed:
5 years from the delivery of the goods with the exception of electrical and transmission equipment. This warranty is granted for 2
years.
Geographical:
All member states of the European Union
Objective:
Warranty case is accepted, if the product shows failure of function, material or processing, which was not caused by wind, hail,
snow etc., or inappropriate handling or storage. Purchaser has the option either to receive replacement parts, or to send the faul-
ty product to our warehouse for repair. Replacement parts and repairs shall not be invoiced; incurred transport cost will be at the
expense of the purchaser. If identical replacement parts are no longer available, the purchaser will receive similar parts that are
appropriate for the required function. Advanced claims of the warranty, especially of cancellation, reduction or compensation for
damages, are excluded.
Warranty protection:
It should be disclosed in advance, if the product case is covered by warranty or not. For this purpose a detailed picture(s) or similar
proof should be submitted. We ask that customers discuss any potential warranty case first by phone, and not to send any goods to
us without advance notice. As proof of eligibility of warranty a copy of the invoice is reqired. Upon examination or testing emerge
that the reported defect on the product is not eligible for a warranty claim, we reserve the right to charge the purchaser the cost of
examination of the product.
Warranty exclusion:
Warranty claims are excluded if the product is damaged or destroyed due to the effects of force majeure or due to environmental
influences such as wind, hail, snow, frost etc., if the product was stored or operated under conditions that do not comply with those
stated in the technical specifications, or if damage is caused by incorrect or inappropriate handling, in particular by non-compliance
with the operating instructions or by modifications of the product, as well as by common usage, which does not affect the functio-
nality of product.
The above warranty conditions are valid and in addition to statutory rights of the customer and are no restriction to the rights of the
customer.

Big Ben 2017 Page / Seite / Page / Página 16
Beim Anschluss bitte beachten:
Sollte das Anschlusskabel beschädigt werden, muss dieses durch ein Original-Ersatzkabel von CARAVITA ersetzt werden, oder
von einem Fachbetrieb repariert werden. Im Falle von Fehlfunktionen elektrischer Bauteile verlangen Sie bitte unsere Origina-
lersatzteile.
• Benutzen Sie keine Adapter oder Mehrfachstecker.
• Schließen Sie den Schirm nur mit dem original von CARAVITA gelieferten Anschlusskabel an oder lassen Sie den Anschluss
von einem Fachbetrieb ausführen.
• Lassen Sie Änderungen, Umbauten am Schirm, den elektrischen Bauteilen oder den Anschlusskabeln nur von qualifiziertem
Fachpersonal vornehmen.
Sie gefährden Ihr Leben und das Anderer !
Achtung bei Wind!
Der Großraumschirm Big Ben ist wetterfest und kann das ganze Jahr draußen bleiben. Bei Schnee und starkem Wind sollte der Schirm
geschlossen werden. Lassen Sie den Schirm daher nicht unbeaufsichtigt geöffnet. Schließen Sie den Schirm bei starkem Wind oder
wenn er nicht benötigt wird und schalten Sie bei BIG BEN LICHT die Stromzufuhr ab.
DerHerstellerübernimmtkeineGewährundHaftungfürSchädendiedurchWind,SchneeoderVandalismushervorgerufenwurden.
SICHERHEITSANWEISUNGEN
Unsachgemäße Handhabung dieses Schirmes kann zu Sachbeschädigungen und schweren Verletzungen führen. Deshalb raten
wir dringend diese Bedienungsanleitung genau zu lesen und zu befolgen und die folgenden Warnhinweise zu beachten:
• Benutzen Sie den Schirm nicht bei starkem Wind!
• Bei Gewittern den Schirm nicht benutzen und sich nicht unterstellen!
• Nicht auf den Schirm klettern oder sich daran hängen!
• Kinder nicht unbeaufsichtigt in der Nähe des Schirmes lassen!
• Den Schirm nur zu seinem vorgesehenen Zweck benutzen!
• Den Schirm nicht ohne geeigneten Standfuss verwenden!
• Den Schirm und seine Konstruktion nicht modifizieren!
Das nicht Beachten der Warnhinweise und der Bedienungsanleitung kann zu Sachbeschädigungen und schweren Verletzungen
führen. Der Hersteller verweigert jede Haftung bei unsachgemäßem Gebrauch des Produkts.
WARNUNG !

Big Ben 2017 Page / Seite / Page / Página 17
ENTPACKEN DES SCHIRMES
Prüfen Sie den angelieferten Karton auf Beschädigungen wie Druckstellen, Eindellungen, Risse oder Löcher. Sofern der Karton eine
dieser Beschädigungen aufweist, diese bitte sofort bei Ihrem Fachhändler, dem anliefernden Spediteur oder der CARAVITA Hotline*
(+49 (0)8458 603890) reklamieren.
Die Klebebänder und Kunststoffbänder bitte vorsichtig mit einem Messer aufschneiden ohne dabei den Schirm im Karton zu beschä-
digen.
Den Karton selbst bitte nicht zerschneiden oder zerreißen sondern vorläug aufbewahren. Er lässt sich leicht zusammenfalten
und platzsparend im Keller oder in der Garage aufbewahren.
INHALT
Bitte prüfen Sie bei Erhalt der Lieferung genau ob das Produkt vollständig und unbeschädigt ist.
Neben dem Schirm selbst umfasst die Lieferung folgendes Zubehör:
• Bedienungsanleitung
• Kurbel
• Deckkappe und Zierkugel
• Abdeckgehäuse für Stecker
GARANTIE
Die CARAVITA GmbH gewährt auf dieses Produkt, bei ordnungsgemäßer Handhabung 5 Jahre Garantie. Ausgenommen sind die Elek-
troinstallationen und das Getriebe, auf welche eine Garantie von 2 Jahren gewährt wird. Weitere Informationen entnehmen Sie bitte
den detaillierten Garantiebedingungen im Anhang.
TRANSPORTIEREN DES SCHIRMES
Der Schirm lässt sich am besten zu zweit transportieren. Je eine Person trägt ein Ende des Schirmes. Dazu den Schirm bitte mit beiden
Händen umgreifen. Den Schirm nicht an der Schutzhülle oder am Schirmbezug herumzerren. Dies kann Risse hervorrufen. Den
Schirm nicht an einzelnen Schirmstreben tragen. Diese können dadurch verbiegen.

Big Ben 2017 Page / Seite / Page / Página 18
AUFSTELLEN DES SCHIRMES
Bitte den mobilen Standfuss oder die Bodenhülse, nach der entsprechenden Anleitung vor-
bereiten und das Montagematerial bereitlegen. Der mobile Fuss sollte mit ausreichend Bal-
last belegt sein.
Bitte jetzt die Schutzhülle entfernen, wenn Sie keine Schubstange mitbestellt haben, mit
welcher Sie die Schutzhülle auch bei stehendem Schirm entfernen können.
Vor dem Senkrechtstellen des Schirmes bitte dafür sorgen, dass keine Personen, die verletzt oder Gegenstände, die beschädigt werden
können, in Reichweite des Schirmes sind.
Beachten Sie bitte, dass der Schirm sehr lang ist und daher schwer in Balance zu halten ist sobald er aufrecht steht. Deshalb sehr
vorsichtig vorgehen damit Ihnen der Schirm nicht entgleitet und Personen verletzt werden.
Zur Sicherheit sollten min. 2 Personen
den Schirm aufstellen.
Sehr große Schirme können bis zu
100kg haben. Vorausschauend und
vorsichtig arbeiten um Gefahren zu
vermeiden.
Bei sehr großen Schirmen zu dritt
arbeiten.
Montieren Sie nun die mitgelieferte Deckkappe an der Spitze des Schirms.
1) Schrauben Sie eine der 5 Flanschschrauben (M10x25) in das
mittlere Loch, so dass sie noch 10mm übersteht. Bitte dieses
Maß unbedingt einhalten.
2) Legen Sie den Schirm mit dem unteren Mastende in Richtung
Bodenverankerung auf den Boden.
3) Heben Sie den Schirm an und fädeln Sie den Gleitschuh am
unteren Mastende in die Mittelschraube ein. Drücken Sie den
Schirm dann mit beiden Händen nach oben bis er senkrecht
steht (siehe Bild).
VORSICHT! - den Schirm nicht loslassen
er kann immer noch umfallen.
4) Den Schirm von einer zweiten Person mit der Bodenveranke-
rung verschrauben lassen. Verwenden Sie dazu die
4 Schrauben (M10x35) mit Beilagscheiben. Die Schrauben aber
noch nicht festziehen.
5)
Den Schirm ausrichten und dann die Schrauben festziehen.
Die an den Streben befestigten Kunststoffnetze dienen dem
Schutz des Schirmes gegen Transportschäden und können bei ge-
öffnetem Schirm mit einem Messer oder einer Schere vorsichtig
entfernt werden. Achten Sie darauf den Schirm dabei nicht zu
beschädigen.

Big Ben 2017 Page / Seite / Page / Página 19
BESCHREIBUNG DER LEUCHTEN
UND DER ELEKTRISCHEN BAUTEILE
Die Beleuchtung Elegance besteht aus an den Stützstreben befestigten LED-Strips in Alugehäuse mit Diffusor. Die Verkabelung ist im
Mast integriert. Die LED-Dichte beträgt 120 pro lfm (RGB: 60 LED/lfm).
Das Verteilergehäuse befindet sich unterhalb des unteren Strebenkranzes. Die vom Boden kommende Stromleitung wird hier über
die Schirmstreben zu den Leuchten geführt. Das Verteilergehäuse ist abgedichtet. Der Schalter für die Leuchten und/oder Heizungen
befindet sich auf der Unterseite des Gehäuses.
Für Big Ben mit integrierter Beleuchtung erfolgt der Stromanschluss über 230V/50Hz und 16A Absicherung!
Für Big Ben mit integrierter Beleuchtung und Verkabelung für Heizstrahler Solamagic erfolgt der Stromanschluss über 400V/50Hz und
16A Absicherung!
WICHTIG:
Der Benutzer des Schirmes muss sicherstellen, dass die Zuleitung vor Beschädigungen geschützt ist.
ELEKTROINSTALLATION
Schalten Sie die Beleuchtung einfach am
Schalter unterhalb des unteren Verbin-
dungskranzes ein- bzw. aus.
Schrauben Sie die Abdeckhaube, unter der
sich die Dose für den Stecker befindet, ab.
Schrauben Sie die Abdeckhaube wieder
an.
Stecken Sie das andere Ende des Kabels
mit dem Schukostecker in eine vorhandene
Steckdose mit den nötigen Anschlusswer-
ten 230V oder 400V.
Alternativ können Sie dies auch per Fern-
bedienung tun.
Stecken Sie den Stecker in die Dose und
sichern Sie ihn mit dem Bügel.
Bitte den Schirm nur mit dem mitgelieferten Anschlusskabel mit Schuko-Stecker anschließen oder einen Fachmann für indiv-
duelle Anschlüsse beauftragen.
ACHTUNG:
Das Verbindungskabel muss so gelegt werden, dass es nicht beschädigt
werden kann und keine Stolperfalle bildet.

Big Ben 2017 Page / Seite / Page / Página 20
ANSCHLUSS VON
HEIZSTRAHLERN AM MAST
Legen Sie die Halterung um den Mast. Verbinden Sie den Kranz des Schirms und
die Solamagic Heizstrahler mit dem bei
den Strahlern mitgelieferten Kabel.
Die Heizung ist jetzt betriebsbereit. Sie kön-
nen die Heizung bequem über den zentra-
len Schalter am Mast an- und ausschalten.
ACHTUNG:
Das Verbindungskabel muss so gelegt werden, dass es nicht beschädigt
werden kann und keine Stolperfalle bildet.
Table of contents
Languages:
Other CARAVITA Patio Furniture manuals

CARAVITA
CARAVITA BELVEDERE User guide

CARAVITA
CARAVITA SUPREMO User manual

CARAVITA
CARAVITA SAMARA User manual

CARAVITA
CARAVITA BELVEDERE User manual

CARAVITA
CARAVITA SAMARA User guide

CARAVITA
CARAVITA RIVIERA 2012 User manual

CARAVITA
CARAVITA AMALFI User manual

CARAVITA
CARAVITA SUPREMO User manual

CARAVITA
CARAVITA BIG BEN User manual

CARAVITA
CARAVITA AMALFI User guide
Popular Patio Furniture manuals by other brands

Cacoon
Cacoon Songo Quick installation guide

Blumfeldt
Blumfeldt Pantheon Cortina Solid Sky quick start guide

Home
Home UMB-953545 Assembly & care instructions

Alice's Garden
Alice's Garden TOUQUET24 PU2X3 manual

Glatz
Glatz Sombrano S+ Operating instructions and options

LAZBOY
LAZBOY Sears Madeline D71 M20918 Use and care guide