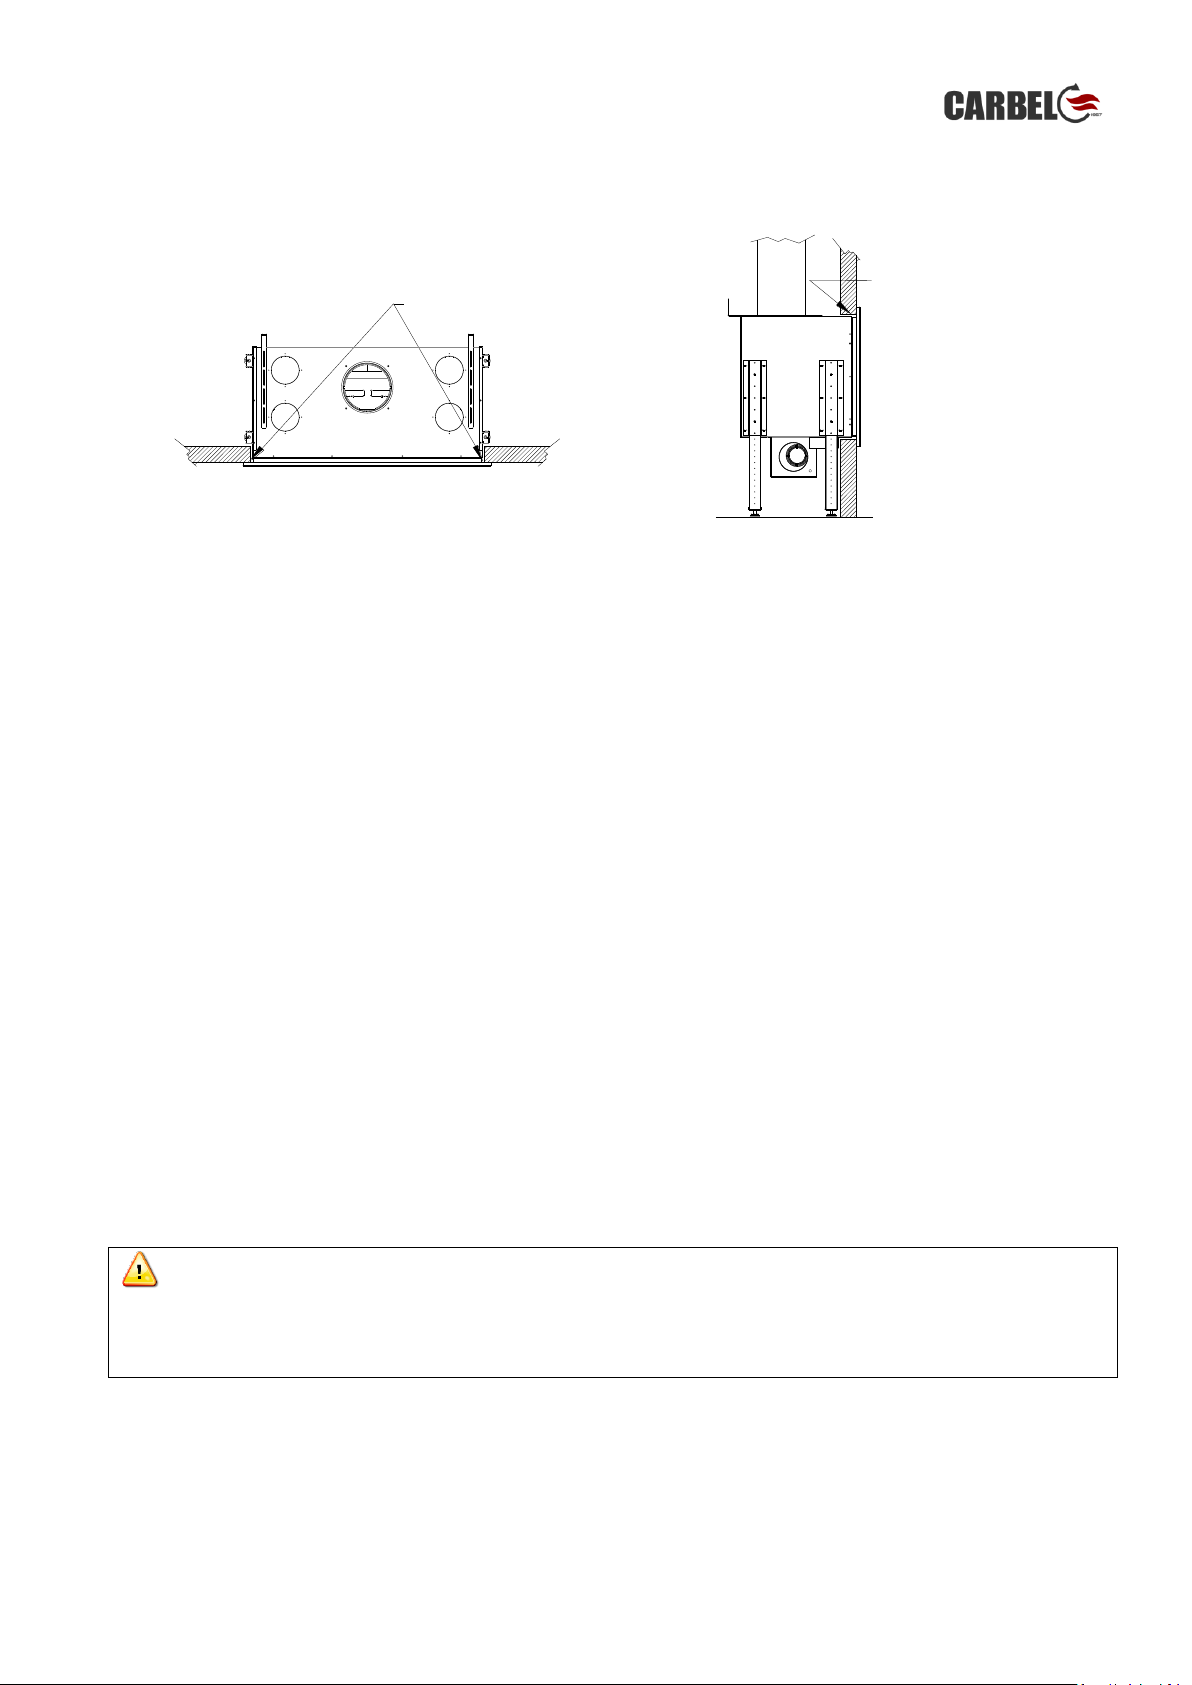
CARBEL T-2 100 Instruction manual

MANUAL DE INSTRUCCIONES DE USO Y MANTENIMIENTO
MANUAL FOR USE AND MAINTENANCE
Modelos/ Models:
•T-2 100
•T-2 80
•T-2 70

1
ÍNDICE/ INDEX
Español:
1. NOTA DEL FABRICANTE P. 3
2. INSTALACION P. 3
2.1 Consejos para la chimenea P. 3
2.2 Entrada de aire exterior P. 4
2.3 Consejos generales de instalación P. 5
3. FUNCIONAMIENTO P. 6
3.1 Combustión P. 6
3.2 Combustible P. 7
3.3 Encendido P. 8
3.4 Regulación de las entradas de aire primario y secundario P. 9
3.5 Regulación durante el encendido P. 9
3.6 Regulación durante el funcionamiento P. 9
3.7 Consejos para el funcionamiento y regulación optima
de las entradas de aire P. 11
4. MANTENIMIENTO P. 11
5. CONSEJOS, DESHOLLINADO Y NORMAS DE SEGURIDAD P. 11
ENGLISH:
1. NOTE FROM THE MANUFACTURER P. 13
2. INSTALLATION P. 13
2.1 Recommendations for the chimney P. 13
2.2 Exterior air inlet P. 14
2.3 General installation Recommendations P. 15
3. OPERATION P. 16
3.1 Combustion P. 16
3.2 Fuel P. 17
3.3 Lighting a fire P. 18
3.4 Adjusting primary and secondary air inlets P. 19
3.5 When lighting a fire P. 19
3.6 During operation P. 20
3.7 Tips for an optimal adjustment of the air intakes P. 21
4. MAINTENANCE P. 21
5. TIPS, CHIMNEY SWEEPING AND SAFETY STANDARDS P. 21
ES CERTIFICADO DE GARANTIA P. 23
EN CERTIFICATE OF WARRANTY P. 24
ANEXO I P. 25
DESMONTAJE DE LOS DEFLECTORES
DISMANTILING OF THE BAFFLES
ANEXO II P. 26
MONTAJE DE LA CAJA DE LA TURBINA
FAN BOX KIT ASSEMBLY

2
ANEXO III P. 27
MONTAJE DE LA EMBOCADURA DE ENTRADA DE AIRE DE
COMBUSTION
COMBUSTION AIR INLET CONNECTION ASSEMBLY
ANEXO IV
MONTAJE DE LAS PATAS P. 27
LEGS ASSEMBLY
ANEXO V
MONTAJE DE LA TURBINA P. 28
FAN ASSEMBLY
ANEXO VI
SUJECCIÓN DEL APARATO A LA PARED Y SUELO P. 30
ATTACHMENT OF THE DEVICE TO THE WALL AND FLOOR
ANEXO VII
MONTAJE/ CAMBIO DE SENTIDO DE LA PUERTA P. 32
HOW TO ASSEMBLE AND CHANGE THE DOOR HANDING
ESQUEMA ELECTRICO P. 33
ELECTRIC DRAWING
DATOS TECNICOS/ TECHNICAL DATA SHEET
Modelo T-2 100 P. 34
Modelo T-2 80 P. 34
Modelo T-2 70 P. 35
Etiqueta Energética/ Energy Label T-2 100 P. 36
Etiqueta Energética/ Energy Label T-2 80 P. 37
Etiqueta Energética/ Energy Label T-2 70 P. 38
Certificaciones/ Certifications P. 39

3
1. NOTA DEL FABRICANTE
Agradecemos su confianza al elegir uno de nuestros modelos. Por favor lea atentamente este manual. Su
intención es darle algunos consejos sobre la instalación, uso y mantenimiento. Si además necesita alguna
aclaración, consulte a su distribuidor o directamente al fabricante.
Nuestros modelos están diseñados para mejorar el rendimiento de cualquier chimenea convencional. Por
medio de los ventiladores el aire es forzado a circular por el interior de la cámara de convección que envuelve
al hogar. El aire entra por la parte inferior del frente y sale caliente por la parte superior. Opcionalmente, el
aire caliente también puede ser conducido a la parte superior de la campana de la chimenea y a otras
habitaciones colindantes.
El interior del hogar está fabricado con acero de gran calidad y, según el modelo, puede estar revestido con
piezas de material refractario, paneles de acero o placas de vermiculita.
Nota: Las representaciones gráficas o dibujos del presente manual, puede que no coincidan exactamente con
su modelo.
2. INSTALACION
Todos nuestros modelos están pensados y fabricados para conseguir un funcionamiento óptimo. No obstante,
el funcionamiento y el rendimiento que obtenga dependerán en gran medida de la instalación que se realice.
2.1 Consejos para la chimenea
El buen funcionamiento depende del tiro de la chimenea. Le damos unos consejos prácticos para conseguir un
funcionamiento óptimo:
-La estufa debe conectarse a un conducto de humos que garantice un tiro suficiente de la chimenea
(mínimo 12 Pa).
-El conducto debe tener altura suficiente, no menos de 4m. y debe sobrepasar como mínimo un metro la
altura máxima del edificio y de otros circundantes, incluso árboles y otros obstáculos en un radio mínimo
de 10m.
-El diámetro de la salida de humos del aparato es el idóneo para mantener un buen tiro, evite en lo posible
realizar reducciones.
-No conecte varios aparatos a la misma chimenea.
-Es aconsejable que la chimenea esté por el interior del edificio. Instalar tubos de doble pared con
aislamiento cuando el conducto de la chimenea discurra por el exterior de la construcción.
-Cuando necesite realizar ángulos o codos en el conducto, evite los tramos horizontales o en dirección
descendente. Debe tener prevista la limpieza del conducto, instale si es necesario tubos con registros o
trapas de limpieza en los tramos de difícil acceso.
-

4
-Cuando se introduzca una chimenea metálica por el interior de una chimenea de obra deberá sobrepasar
la altura de ésta y sobresalir unos centímetros en su parte superior.
-La instalación del tubo y sombrerete debe impedir rigurosamente que en días de lluvia entre agua al
interior del aparato. El agua produce mayor deterioro en las estufas que las altas temperaturas de
combustión para la que están preparadas.
-Cuando los tubos estén por el interior de la vivienda o de una chimenea de obra, es aconsejable montarlos
el sentido que indica la 1ª figura, para impedir que los líquidos producidos por la condensación de los
gases fluyan por las juntas hacia fuera de los tubos. Si algún tramo de tubos queda por exterior del edificio
debe montarse en el sentido que indica la 2ª figura, para impedir que el agua de la lluvia que escurre por
el exterior del tubo pueda entrar al interior del tubo por las juntas.
Figura 1.
Sentido correcto de los tubos por el interior de la
vivienda, los líquidos producidos por la
condensación de los gases no fluyen al exterior
por los empalmes de los tubos.
Figura 2.
Sentido correcto de los tubos por el exterior de la
vivienda, el agua de la lluvia no entra al interior
del tubo por los empalmes del tubo.
2.2 Entrada de aire exterior
Para que la chimenea tenga un tiro correcto es necesaria la entrada de aire exterior de la vivienda a la sala,
suficiente al menos para reemplazar el volumen de aire que sale al exterior por el conducto de la chimenea.
La vivienda debe contar con una entrada de aire del exterior habilitada siempre. Cuando se instalen rejillas de
entrada de aire exterior se deben montar de manera que no puedan bloquearse o quedar obstruidas.
CONEXIÓN DE LA ENTRADA DE AIRE EXTERIOR (OPCIONAL).
La entrada de aire para la combustión de este modelo está preparada para conectar a un conducto de toma
de aire del exterior de la vivienda (2). Esto garantiza un mejor funcionamiento de la estufa en cualquier
condición.
Advertencia. - En viviendas sin la adecuada entrada de aire exterior, los ventiladores de
extracción (p. ej. Extractores de humos de las cocinas) pueden causar problemas al invertir el
tiro de la chimenea.
Advertencia. - Cuando no se habilite la entrada de aire del exterior, se debe tomar el aire
de fuera de la cámara de obra de la chimenea o garantizar una entrada de aire suficiente a dicha
cámara de la chimenea de obra.

5
1
5
4
3
26
6
No se debe compartir la entrada de aire para la combustión (2) y la entrada de aire de convección (6) dentro
de la cámara de la chimenea de obra. El aire de convección (6) se debe tomar de fuera de chimenea de obra.
2.3 Consejos generales de instalación
La instalación del aparato debe cumplir todas las reglamentaciones locales, incluidas las que hagan referencia
a normas nacionales y europeas.
Aunque a continuación describimos un modelo de instalación apropiada para obtener un buen rendimiento,
puede que no sea la idónea para Vd. En cualquier caso, la instalación deberá siempre ser realizada por un
instalador autorizado.
CARBEL se responsabiliza del suministro del aparato, en ningún caso de la instalación del mismo.
1. Tubo para salida de humos
2. Entrada de aire para combustión, del exterior de la vivienda.
3. Salida de aire caliente de la cámara de convección de la estufa. Se debe habilitar al menos una de las cuatro salidas
de aire de la cámara de convección.
4. Salida de aire caliente de la cámara de la chimenea de obra.
5. Salida de aire caliente de la cámara de convección de la estufa en otras habitaciones.
6. Entrada de aire de convección desde fuera de la cámara de la chimenea a la caja de la turbina.
Advertencia. - Toda instalación debe ser realizada por un instalador autorizado, perteneciente a una
Empresa Instaladora Autorizada. Una instalación incorrecta, así como un mantenimiento inadecuado pueden
acarrear graves incidentes.

6
JUNTA DE DILATACION
MINIMO 0'5cm.
JUNTA DE DILATACION
MINIMO 1cm.
VISTA EN PLANTA
VISTA DE PERFIL
La terminación en obra debe ser tal que permita la dilatación de la estufa durante su funcionamiento, nunca
se debe apoyar la obra encima, ni contra los laterales del aparato. Dejar una junta de dilatación mínima de
0’5cm. en cada lateral y 1cm. como mínimo en la parte superior del frente.
3. FUNCIONAMIENTO
3. 1 Combustión
Para conseguir una buena combustión, limpia y ecológica (libre de CO), cuando la leña este bien prendida y se
halla alcanzado un alto grado de temperatura, debe cerrar la entrada de aire primario y debe mantener
abierta la entrada de aire secundario. De esta forma la entrada de aire para la combustión (previamente
calentado) se realiza por la parte superior del hogar junto al cristal y la pared trasera por debajo del deflector,
produciendo una mejor combustión de los gases, que Vd. notará por el aumento del volumen de las llamas y
de la temperatura emitida.
Las estufas e insertables de leña son aparatos de combustión intermitente, esto quiere decir que debe
realizar el encendido, una carga de combustible (peso de leña aprox. aconsejado por el fabricante para cada
modelo), seguida por un ciclo de combustión completo, repitiendo cargas de combustible después de cada
ciclo de combustión.
Es necesaria una buena combustión para conseguir un mayor rendimiento y una mejor visión de las llamas a
través del cristal. Debe seguir algunas pautas:
-Mantenga una temperatura elevada y constante en el hogar. Para ello debe tener la puerta del hogar cerrada
todo el tiempo, abra la puerta únicamente para realizar la recarga de leña y debe hacerlo lo más breve posible.
Mantener la puerta abierta implica que el aparato se enfría, se perjudica la combustión y dificulta el
encendido de la nueva carga de leña.
-No demore la recarga de leña, espere justo a que termine el ciclo de combustión, cuando desaparecen las
llamas de la carga anterior.
Advertencia. - Durante la utilización de su insertable o estufa, las altas temperaturas generadas durante
la combustión y su posterior enfriamiento provocan dilataciones y contracciones en el acero. Este fenómeno,
siendo normal, puede llegar a producir algún sonido metálico. En ningún caso esto podrá considerarse como
un defecto en el producto

7
Un ciclo de combustión completo comprende:
1º Un breve espacio de tiempo después de la recarga en el que la leña empieza a calentarse y no produce
llama. El tiempo que transcurre hasta que prende la llama es un indicador de la temperatura del hogar, si Vd.
espera demasiado tiempo a realizar la recarga, la temperatura desciende demasiado y la nueva carga de leña
no se enciende bien, esto perjudica la combustión y provoca que el cristal se ensucie.
2º La leña aumenta rápidamente de temperatura y empieza a descomponerse emitiendo gas que se inflama si
la temperatura del hogar es la adecuada. La temperatura del hogar empieza a recuperarse a medida que el
combustible va desprendiendo más gas y aumenta el volumen de las llamas.
3º Después de un intervalo de tiempo, que varía dependiendo del tipo y formato de la leña, se ha alcanzado el
máximo valor de temperatura, la emisión de gas de la leña empieza a descender lentamente junto con el
volumen de las llamas.
Cuando se agota la emisión de gas de la carga de leña, se extingue la llama, quedando brasas incandescentes.
Es entonces cuando se debe realizar la nueva recarga de leña.
- La carga de combustible debe ser aproximadamente el peso aconsejado por el fabricante para cada modelo,
preferentemente en una o dos piezas.
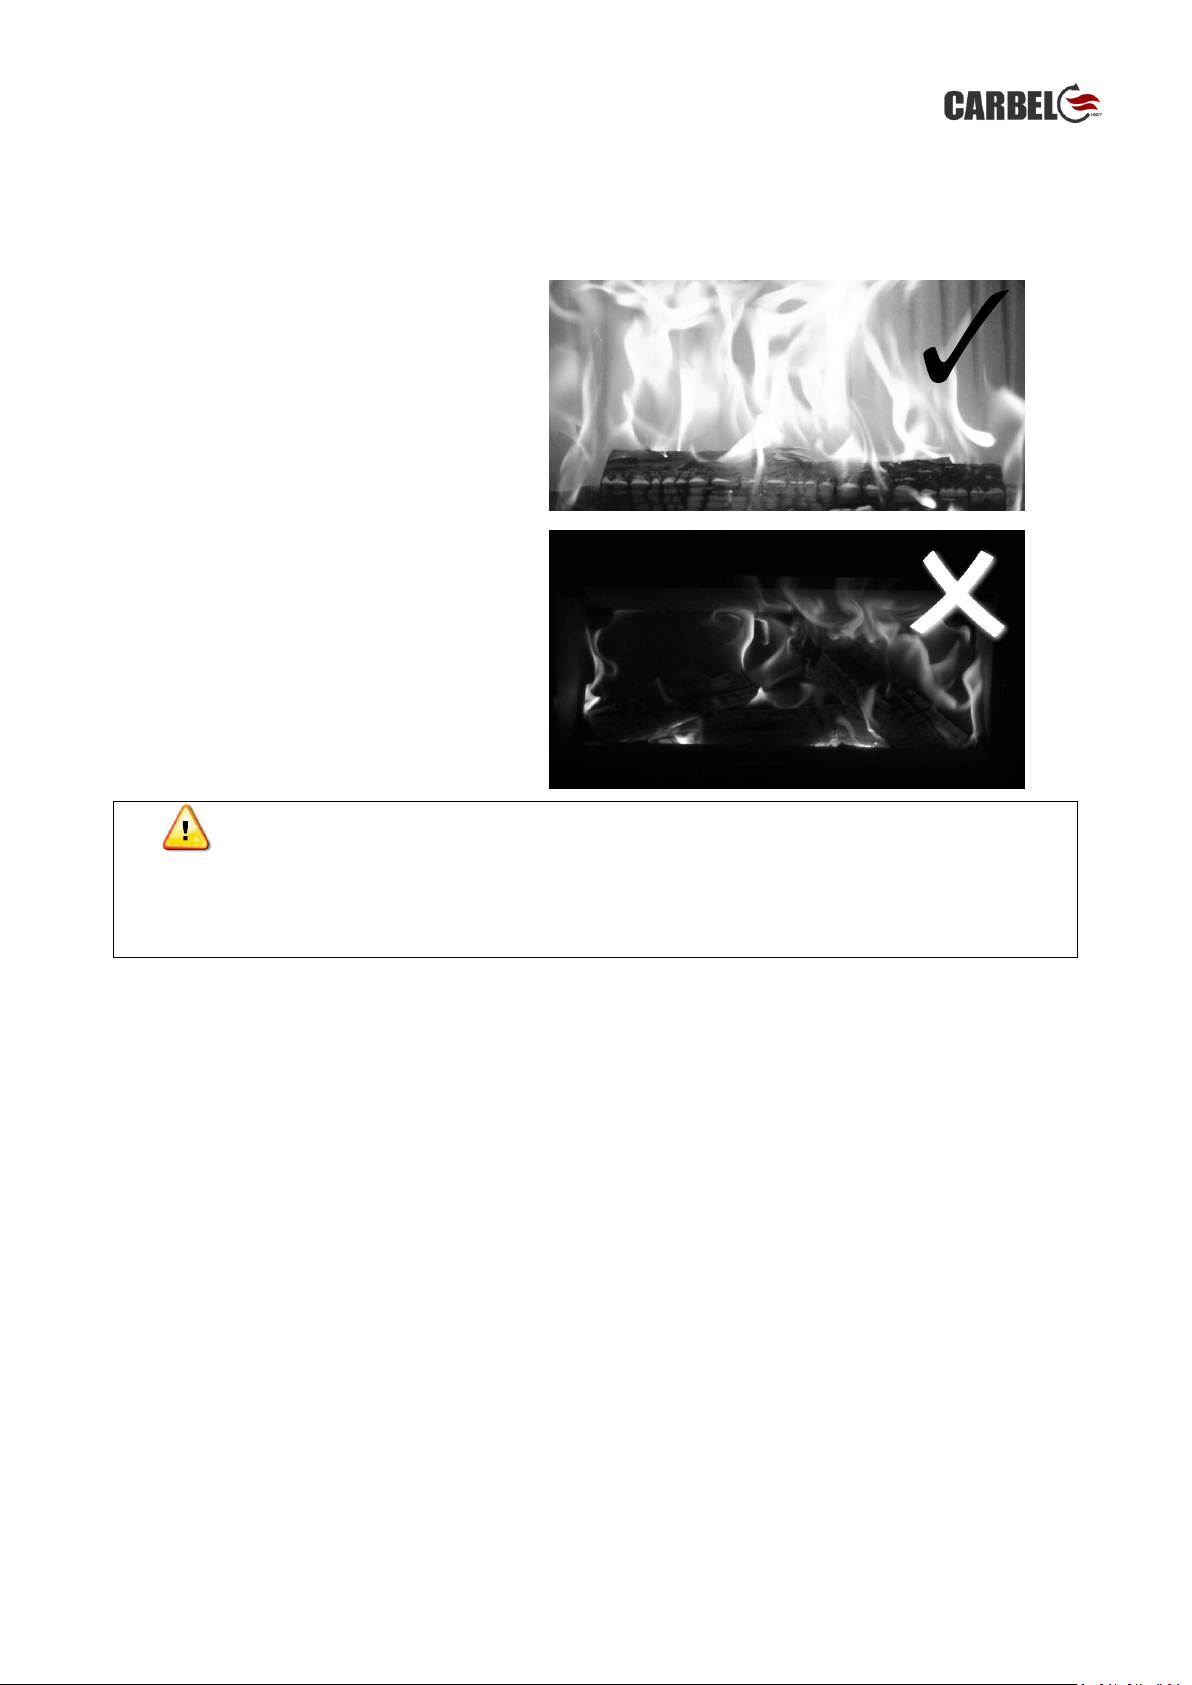
- Evite el exceso de carga con leña fina, esto puede ocasionar una combustión deficiente, la leña emite muy
rápidamente un excesivo volumen de gas y no hay suficiente aportación de aire. Aunque hay un gran volumen
de llamas la combustión no es buena y el cristal tiende a ensuciarse. Se pueden alcanzar temperaturas
excesivas que ponen en peligro la integridad de la estufa y la seguridad de los usuarios.
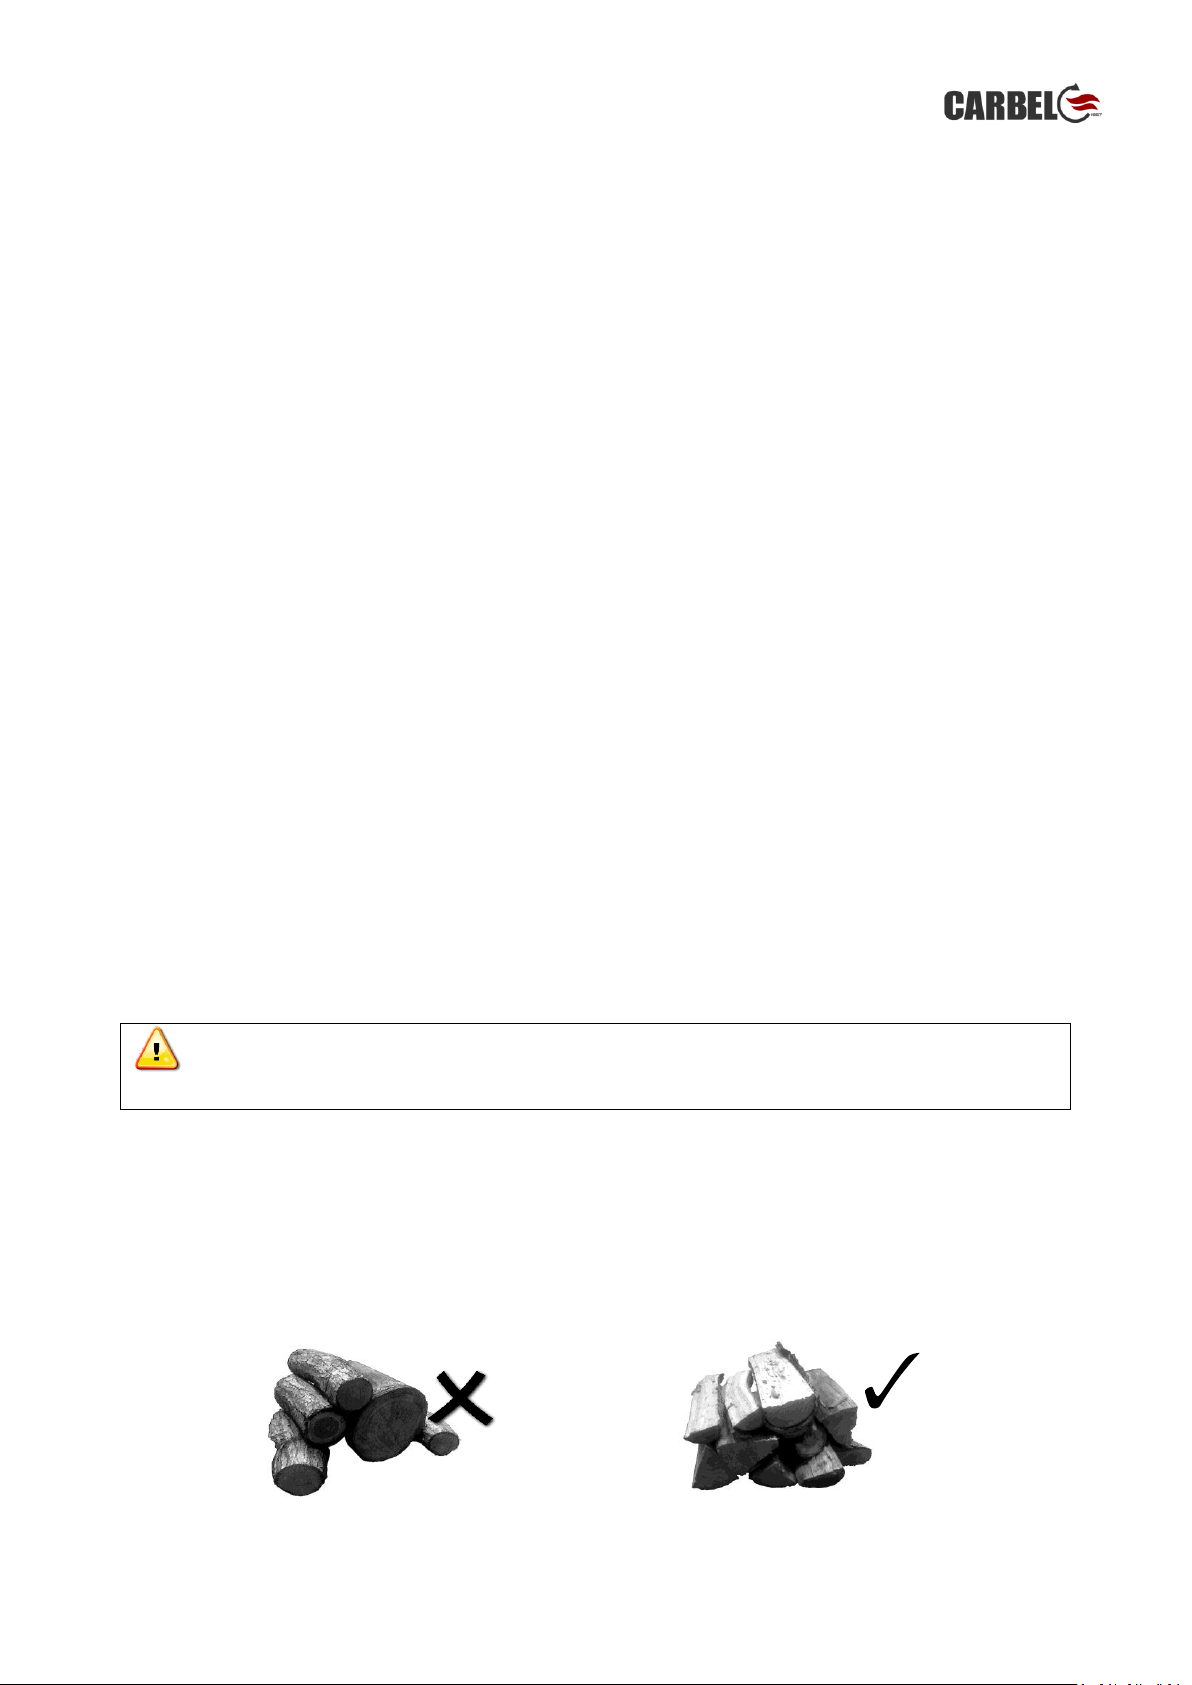
- Seleccione la leña para conseguir el tipo de funcionamiento deseado. La leña más fina de menor calibre debe
utilizarla para conseguir una mayor potencia térmica, utilícela después del encendido para conseguir una
respuesta más rápida y cuando tenga mayor necesidad de calor.
Utilice la leña más gruesa, para conseguir una combustión más lenta, cuando tenga menos necesidad de calor
o para mantenimiento, siempre precedido por un ciclo de mayor potencia con leña más fina, cuando el
aparato ya tiene una temperatura alta. Si es necesario acompañe la leña más gruesa con alguna pieza fina.
- Durante el funcionamiento la puerta debe estar siempre cerrada, cuando abra la puerta para realizar la
recarga debe hacerlo lentamente para evitar absorber el humo del interior del hogar.
3.2 Combustible
El rendimiento de la estufa depende en gran medida del combustible utilizado. La leña debe estar bien seca
(menos del 20% de humedad), le proporcionará más calor, le será más fácil regular el fuego y mantendrá en
mejor estado la estufa y el conducto de humos.
Almacene la leña en un lugar seco, ventilado y protegido de la lluvia, al menos durante 1-2 años según las
condiciones de almacenamiento y el clima de la zona.
Utilice piezas de leña abierta, arde mejor que los troncos de leña. Es mejor que las piezas de leña estén
abiertas y tengan una sección, tamaño, y forma, lo más parecido y uniforme posible entre sí.
Advertencia. - En las estufas de leña e insertables, el uso prolongado y continuo a un régimen
de combustión muy bajo o con leña muy húmeda puede causar que se forme en el conducto
de humos la acumulación de creosota, fácilmente inflamable.
Piezas de leña NO RECOMENDADA para su uso
Piezas de leña procesada, APTA para su uso.

8
- Puede utilizar también troncos de madera comprimida como las briquetas.
- Las maderas resinosas como el pino producen mucho humo y hollín afectando negativamente al
mantenimiento del cristal limpio.
- No utilice líquidos inflamables para encender, manténgalos siempre alejados de la estufa.
- No utilice la estufa como un incinerador, nunca queme plásticos, residuos, basura o desperdicios.
Ventajas de utilizar leña de buena calidad:
- Mayor poder calorífico.
- Mayor control en la regulación del fuego.
- Ayuda a mantener el cristal más limpio.
- Ayuda a mantener en mejor estado su
estufa y el conducto de humos.
- Fuego cálido y radiante.
Desventajas de utilizar leña húmeda:
- Menor poder calorífico.
- Ensucia el cristal.
- La evaporación del agua contenida puede
llegar a oxidar las partes metálicas de la
estufa.
- Aumento de la suciedad en la cámara de
combustión y el conducto de humos.
- Fuego opaco.
- Mayor acumulación de humo.
3.3 ENCENDIDO
Importante: se debe realizar el encendido con leña fina y seca.
1º Realice una carga abundante de leña abierta de pequeño o mediano calibre, y sobre estas una capa
abundante de astillas o leña fina. Debe dejar las piezas entrecruzadas y con suficiente espacio entre ellas para
que circule aire.
2º Encienda la capa superior de astillas o leña fina, preferiblemente la zona más cercana a la puerta, y
utilizando si es preciso pastillas o productos especiales para encender.
3º Junte la puerta dejando una apertura de 0’5 a 3 cm., Permitiendo de esta manera la entrada de aire
suficiente para conseguir un rápido encendido.
4º Una vez esté bien prendida la leña espere a cerrar la puerta hasta que el hogar haya alcanzado una
temperatura elevada (según factores como la leña, tiro, etc. 10 a 45mint.), después cierre la puerta y regule la
entrada de aire. Si observa que el volumen de las llamas disminuye o tiende a apagarse y aumenta el humo en
el interior del hogar, debe abrir más la entrada de aire o repetir el paso 3º.
Cuando realice una recarga de leña, si no hay suficientes brasas o temperatura para que se inflame la nueva
carga de leña realice el tercer y cuarto paso.
Durante el funcionamiento no debe abrir la puerta, al realizar la recarga de leña abra la puerta lentamente
para evitar absorber el humo del interior del hogar.
Las sobrecargas de leña del aparto acarrean una disminución del rendimiento, pérdida de
eficiencia energética y un desgaste acelerado del aparto.
No sobrepase la carga máxima de leña descrita al final del manual. La sobrecarga del aparato anula
toda garantía del fabricante

9
ENTRADA DE AIRE SECUNDARIO
ENTRADA DE AIRE PRIMARIO
Advertencia. - Durante la utilización de su insertable o estufa, las altas temperaturas generadas durante
la combustión y su posterior enfriamiento provocan dilataciones y contracciones en el acero. Este fenómeno,
siendo normal, puede llegar a producir algún sonido metálico. En ningún caso esto podrá considerarse como
un defecto en el producto.
3. 4 Regulación de las entradas de aire primario y secundario
Usted ha adquirido un modelo de insertable de máxima eficiencia y rendimiento. Por ello, el control de las
entradas de aire primario y secundario son fundamentales para alcanzar unos niveles de combustión óptima.
La regulación óptima de las entradas de aire puede variar en función de diversos factores como por ej. el tiro
de la chimenea, la temperatura del hogar de la estufa, la calidad de la leña (humedad, tamaño y forma).
3.5 REGULACION DURANTE EL ENCENDIDO
- Entrada de aire primario
Es fundamental abrir la entrada de aire primario para realizar el encendido, del mismo modo es aconsejable
dejar la puerta entreabierta unos milímetros para evitar la condensación de humo en el cristal. Debe esperar
el tiempo suficiente, (hasta que el aparato se haya calentado) para regular la entrada de aire.
- Entrada de aire secundario:
Abrir al máximo durante el encendido.
3.6 REGULACION DURANTE EL FUNCIONAMIENTO
- Entrada de aire primario
Durante el funcionamiento normal de la estufa, una vez que el aparato se ha calentado, bebe cerrar la
entrada de aire primario para conseguir una buena combustión y rendimiento.
Si la calidad de la leña se lo permite la entrada de aire primario debe estar completamente cerrada o
ligeramente abierta (no más de 1cm).
Con el fin de evitar quemaduras a la hora de regular las entradas de aire, utilice siempre la
mano fría de regulación suministrada junto con el aparato.

10
POSICION DE LA MANETA DE REGULACION DE AIRE PRIMARIO PARA POTENCIA NOMINAL (Abierta 10mm.)
Abierta un 25% de su recorrido.
- Entrada de aire secundario
La regulación de aire secundario es la que le proporcionara una mejor combustión, más limpia y eficiente,
sacando el máximo provecho a cada carga de leña.
Podrá regular la entrada de aire secundario cuando el aparato este suficientemente caliente y la llama muy
bien prendida. Durante el funcionamiento normal nunca debe cerrar por completo la entrada de aire
secundario. Normalmente la regulación de aire secundario debe tener una apertura mínima de un 15-20%.
POSICION DE LA MANETA DE REGULACION DE AIRE SECUNDARIO PARA POTENCIA NOMINAL, Abierta un
25% de su recorrido.
ABRIR
CERRAR

11
3.7 Consejos para el funcionamiento y regulación ÓPTIMA de las entradas de aire:
Una vez el aparato haya realizado un primer ciclo de combustión, y este lo suficientemente caliente, es
aconsejable seguir estas indicaciones para obtener el máximo rendimiento de su producto.
Reparta en la base del hogar las brasas procedentes de los ciclos de combustión previos.
Utilice preferentemente leña abierta, de haya o similar, con un porcentaje de humedad inferior al 20%.
Tamaño de combustible recomendado:
Mod. T-2 70: Una pieza de 30 a 45 centímetros de longitud y peso de 1kg. a 1’6 kg.
Mod. T-2 80: Una pieza de 40 a 55 centímetros de longitud y peso de 1’25kg. a 1,8 kg.
Mod. T-2 100: Una pieza de 45 a 65 centímetros de longitud y peso de 1’6kg. a 2 kg.
- Regule la entrada de aire primario con una apertura 5 a 8mm.
- Regule la entrada de aire secundario al 50%, es decir formando un ángulo aproximado de 90º con el frontal
del aparato.
Para conseguir un funcionamiento óptimo y estable con una buena visión de las llamas a través del cristal
intente realizar cargas consecutivas de leña con piezas lo más semejantes posible entre sí, para ello debe
mantener en todo momento la misma regulación de las entradas de aire.
4. MANTENIMIENTO
Para limpiar el cristal debe tener la precaución de pulverizar sobre un paño o bayeta y limpiar únicamente el
cristal, sin mojar el resto de la puerta. Los limpiacristales y productos especiales suelen contener productos
químicos que atacan la pintura, las juntas de fibra cerámica y provocan la oxidación de las piezas metálicas.
Es muy importante no mojar la estufa con limpia cristales, agua, ni productos especiales de limpieza.
La pintura anticalórica no es impermeable.
Limpiar la pintura con plumero o un paño suave y seco, si con el tiempo desea restaurarla el fabricante
dispone de pintura en Spray que Vd. Puede adquirir a su distribuidor.
5. CONSEJOS, DESHOLLINADO Y NORMAS DE SEGURIDAD
Siempre que se hace uso de la estufa existe un cierto riesgo que debe tenerse en cuenta. Por ello, deben
tenerse en cuenta las siguientes indicaciones.
- Después de un periodo de tiempo prolongado sin hacer uso de la estufa, se debe verificar que no existe
ningún bloqueo en el conducto de la chimenea.
-Se deben realizar limpiezas periódicas del conducto de la chimenea, el sombrero de la chimenea, la estufa y
la conexión con la estufa. Se deben mantener limpias y en buen estado, la acumulación de creosota en la
chimenea podría provocar que esta se incendie.
- Es imprescindible mantener el conducto de humos limpio. El número de deshollinados a realizar dependerá
de la frecuencia de uso del producto, del tipo de combustible utilizado, así como de los niveles de humedad
de este.
- El deshollinado del conducto de humos y el mantenimiento del producto deben realizarse por un profesional
cualificado.
- Advierta a los niños del peligro de quemaduras.
- Retire la ceniza cuando la estufa esté apagada y deposítela en un recipiente metálico, pueden quedar brasas
encendidas entre la ceniza.
- No realice modificaciones no autorizadas del aparato, utilicé piezas de repuesto originales.
- El aparato debe montarse sobre suelos con capacidad portante adecuada.
- No utilice líquidos inflamables para encender, manténgalos siempre alejados de la estufa.
- No se pueden instalar materiales combustibles sobre el aparato ni en el interior del revestimiento de obra.

12
-Los días con condiciones de tiro adversas (presión atmosférica muy baja, fuertes heladas), o cuando el
conducto está muy frío, o en chimeneas con tiro deficiente, puede ayudar a iniciar el tiro antes del encendido,
calentando el conducto:
1º Prepare la leña dentro de la estufa para realizar el encendido.
2º Coloque una pastilla o una hoja de periódico sobre el deflector en la boca del inicio del conducto y
préndalo.
3º Transcurridos unos segundos en cuanto inicie el tiro la chimenea prenda la leña según las instrucciones de
encendido.
- Respete las distancias mínimas de seguridad a materiales combustibles adyacentes.
Delante del aparato: mínimo 1’6 m.

13
1. NOTE FROM THE MANUFACTURER
Thank you for choosing one of our models. Please read this manual carefully. It has been written to give you tips
on installation, use and maintenance. If you need any further clarification, please contact your dealer or the
manufacturer directly.
Our models are designed to improve the performance of any conventional fireplace. The fans circulate the air
inside the convection chamber that surrounds the fireplace. Air enters through the bottom of the front and
comes out hot at the top. Optionally, the hot air can also be blown to the top of the chimney hood and to other
surrounding rooms.
The fireplace interior is made of high-quality steel and, depending on the model, can be covered with pieces of
refractory material, steel panels or plates of vermiculite.
Note: Graphic representations and drawings included in this manual may not correspond exactly with your model.
2. INSTALLATION
All our models are designed and manufactured for optimal performance. However, the operation and
performance you get will depend largely on the installation.
2.1 Recommendations for the chimney
Correct operation depends on the chimney draught. Tips for optimal performance:
- The wood burner must be connected to a flue that guarantees sufficient chimney draught (at least 12 Pa).
- The flue must have sufficient height (not less than 4 m) and should extend at least one meter beyond the
maximum height of the building and other surrounding buildings, trees and other obstacles in a minimum
radius of 10 m.
- The diameter of the flue of the appliance is ideal for keeping a good draught; do not reduce said diameter if at
all possible.
- Do not connect several appliances to the same chimney.
- The chimney should run through the interior of the building. Install insulated double-walled pipes when the
chimney flue runs outside the building.
- When the flue has to have angles or bends, avoid horizontal or downward sections. You must plan for the
cleaning of the flue and, if necessary, install pipes with access holes or cleaning hatches in sections that are
not easily accessed.
- When a metal chimney is fitted inside a brick chimney, it must exceed the height of the latter and protrude a
few centimeters at the top.
- The installation of the pipe and cap must strictly prevent water from getting into the appliance on rainy days.
Water causes more damage to wood burners than the high combustion temperatures for which they are
prepared.

14
When the pipes run through the inside of the home or a brick chimney, they should be mounted as shown in
Figure 1 to prevent liquids produced by the condensation of the gases flowing through the joints and out of the
pipes. If a pipe section runs outside the building it must be mounted in the direction shown in Figure 2 to prevent
rainwater draining down the outside part of the pipe and entering into the pipe interior through the joints.
2.2 Exterior air inlet
For the fireplace draught to work correctly, the room must have an outside air inlet from the house exterior to
the room, that is at least sufficient to replenish the volume of air that comes out of the chimney flue.
The house must always have an outside air inlet always enabled.
Air inlet must be fitted through the outer wall and if a vent is installed, it must be fitted in such a way that it
cannot be blocked.
Warning. - In homes without the appropriate outside air inlet, extraction fans (e.g. Kitchen extractors) can cause
problematic reverse chimney draughts.
Connecting outside air inlet (OPTIONAL).
The air inlet for combustion of this model is prepared to connect to an air intake duct outside the house (2).
This ensures a better performance of the stove in any condition.
The air inlet for combustion (2) and the convection air inlet (6) must not be shared inside the chamber of the
masonry chimney. The convection air (6) must be taken from outside masonry chimney.
Warning. - When the air inlet from the outside is not enabled, the air must be taken from outside of masonry
chimney chamber, or sufficient air intake must be guaranteed in this chamber.
Figure 1: correct installation running on
house interior. Liquids produced by gas
condensation do not flow to the
exterior through the pipe joints
Figure 2: correct installation for parts
running on house exterior. Rain Water
does not reach the inside of the pipe
through the pipe joints

15
1
5
4
3
26
6
2.3 General installation Recommendations
The installation of the appliance must comply with all local regulations, including those that refer to national and
European standards.
Although the following describes an example installation to ensure good performance, it may not be ideal for
your circumstances. In any case, the installation should be done by an authorised installer.
CARBEL will be responsible for the provided appliance, but in no case for the installation of the same.
1. Fumes exhaust pipe
2. Entry of air from the outside used for combustion (optional lower or rear connection)
3. Hot air outlet coming from the stove’s convection chamber. At least one of the four air vents of the convection
chamber must be enabled.
4. Hot air outlet of the chimney chamber by natural convection.
5. Optional outlet for hot air to other rooms, blown by fans.
6. air inlet from outside chimney’s chamber to the fan box.
The building work must be finished in such a way that the wood burner can expand during operation: the
brickwork must never be supported on or against the sides of the appliance. Leave a minimum expansion joint of
0.5 cm on each side and at least 1 cm the top of the front.

16
Warning. - Any installation should be done by an authorised installer. A faulty installation of this product, and an
inadequate maintenance might cause grave incidents.
3. OPERATION
3. 1 Combustion
For good combustion that is clean and environment-friendly (CO-free), when the wood is well lit and it has
reached a high temperature, you must close the primary air inlet and keep the secondary air inlet open. This will
let the air for combustion (preheated) enter through the top of the fireplace next to the glass and through the
back wall below the deflector to ensure better gas combustion. You will notice this in an increase in flames and
temperature.
Wood burners and inserts are intermittent combustion appliances. This means that they should be lit, loaded with
an approximate weight of fuel as recommended by the manufacturer for each model, followed by a full
combustion cycle and fuel reloads after each combustion cycle.
Good combustion is necessary for optimum performance and a better view of the flames through the glass.
Guidelines:
- Maintain a high and constant temperature in the fireplace. Accordingly, the fireplace door must be closed at all
times and opened only to load firewood, which must be done as quickly as possible. Keeping the door open will
cause the stove to cool down, it will worsen the combustion and make lighting of the new wood more difficult.
- Do not take a long time when loading firewood and wait for the end of the combustion cycle, when the flames
of the previous load disappear.
Warning. –During the use of your stove or inset appliance, the high temperatures generated during combustion and
cooling down of the device afterwards will cause expansion and contraction of the steel plates. This may cause some metallic
sounds; these are completely normal and should not be considered a defect in the product.
A full combustion cycle comprises the following:
1. A short period after reloading when the wood begins to heat up without flames. The time until the flame lights
is an indication of the fireplace temperature. If you wait too long to reload firewood, the temperature falls too
low and the new load of firewood does not light well. This has a negative effect on combustion and dirties the
glass.
2. The temperature of the firewood increases rapidly, and it begins to break up, emitting gas that ignites if the
fireplace temperature is appropriate. The fireplace temperature begins to increase as the fuel emits more gas and
the flames increase.
3. After a certain period of time, which varies depending on the type of firewood, the maximum temperature
value is reached, and the gases emitted from the firewood decrease slowly along with the volume of the flames.
When the firewood gas emission is complete, the flame goes out and the firewood turns to burning embers, that
is the moment to add wood into the stove.
-The fuel load should have the approximate weight recommended by the manufacturer for each model.
Preferably in one or two pieces.

17
-Avoid overloading with firewood that is too thin as this can cause poor combustion. The firewood emits an
excessive amount of gas very quickly and the air supply is insufficient. Although there is a large volume of
flames, combustion it is not good, and the glass tends to get dirty. There is a danger of reaching excessive
temperatures that threaten the integrity of the wood burner and user safety.
-Select the firewood to achieve the desired type of operation. Thin firewood should be used to get higher
thermal power, use it after lighting the fire for a faster response as you need more heat. Use thick wood
for a slower combustion when you have less need for heat or for overnight maintenance, always
preceded by a cycle of more power with thinner firewood, when the appliance temperature is already
high. If necessary, when starting the fire, burn a combination of thin and thick firewood.
-When the wood burner is in operation, the door should always be closed. When you open the door to
reload, do so slowly to avoid the smoke inside the fireplace from blowing out into the room.
3.2 Fuel
Wood burner performance also depends greatly on the fuel used. The wood must be dry to get more heat (less
than 20% humidity). It will also be easier to regulate heat and keep the wood burner and flue in better condition.
Store firewood in a dry, ventilated place protected from the rain for at one to two years depending on the storage
and weather conditions.
Use opened pieces of wood, it will burn better than logs. The best would be opened pieces with a similar section
and shape.
-You can also use compressed-wood logs, such as briquettes.
-Avoid softwoods, such as pine, because they produce a lot of smoke and soot that dirty the glass.
-Do not use flammable liquids to light the fire; always keep them away from the wood burner.
-Do not use the wood burner as an incinerator, never burn plastics, waste, garbage or rubbish.
-Remove the ashes when the wood burner is off and place them in a metal container as there may be
burning embers hidden in the ashes.
Warning. - In wood burners and inserts, prolonged and continuous use at a very low rate of
combustion or with very wet wood can cause highly flammable creosote to build up in the flue.
NOT RECOMMENDED wood pieces
.
RECOMMENDED wood pieces
.

18
Advantages of using good quality wood:
✓Better heating power
✓Better control in fire regulation
✓Helps to keep a clean glass
✓Helps to keep the wood burner and
flue cleaner and in better conditions
✓hotter and more shining fire.
Disadvantages of using wet and inconvenient wood:
Lower heating power
Dirtier glass
Water evaporation might oxide
metallic parts in the stove
Dirtier combustion chamber and flue.
Duller fire
3. 3 Lighting a fire
Important: lighting a fire must be done with thin dry wood.
1. Load a generous load of small or medium size open firewood, with a generous layer of wood chips or thin
firewood on top. You should leave the pieces crossed and with enough separation between them to allow
proper air flow.
2. Light the top layer of wood chips or thin wood, preferably the area closest to the door, and using special
products to set alight, if necessary.
3. Leave the door ajar, with an opening between 0,5cm to 3cm, so that enough air can enter for the fire to
light quickly.
4. Once the wood is well-lit, wait until the wood burner temperature is high before completely closing the
door (10 to 45 minutes, depending on factors like wood, air circulation, etc.) and adjust the air inlet. If you
find that the volume of flames decreases, or the fire tends to go out and the smoke inside the fireplace
increases, open the air intake more or repeat step 3.
When you reload with more wood, if there are not enough embers to light the new load of wood, repeat steps 3
and 4.
When the wood burner is in operation, you must not open the door. When putting more wood on the fire, open
the door slowly to prevent the smoke inside the fireplace from blowing out into the room.
Overloading the appliance with firewood decreases performance, reduces energy efficiency and
accelerates the wear and tear of the appliance.
Do not exceed the maximum load of firewood given at the end of the manual.
Overloading the appliance voids all the manufacturer’s warranties.

19
3. 4 Adjusting primary and secondary air inlets
You have purchased an insert model that offers maximum efficiency and performance. Therefore, control of the
primary and secondary air inlet is essential to achieve optimum combustion levels.
The optimal regulation of the air inlets can vary depending on various factors, such as the chimney flue, the
temperature of the wood burner, the quality of the wood (moisture, size and shape).
3. 5 Adjusting air when lighting a fire
-Primary air inlet
It is essential to open this inlet to maximum position when lighting the fire and to leave the door ajar to
avoid the condensation of fumes on the glass.
You must wait enough time (until the appliance has warmed up) before adjusting the air inlet.
-Secondary air inlet
Open fully when lighting a fire.
In order to avoid burns while regulating air flow, use always the regulation lever provided
with the apparatus .
ENTRADA DE AIRE SECUNDARIO
ENTRADA DE AIRE PRIMARIO
SECONDARY Air Inlet Regulation
PRIMARY Air Inlet Regulation
This manual suits for next models
2
Table of contents
Languages:
Other CARBEL Wood Stove manuals

CARBEL
CARBEL A-70-2 User manual

CARBEL
CARBEL RI 100 Instruction manual

CARBEL
CARBEL Aefecc A-70 Plus User manual

CARBEL
CARBEL ZEUS Programming manual

CARBEL
CARBEL KRONOS 100 DC Quick setup guide

CARBEL
CARBEL AEFECC G 100 Instruction manual

CARBEL
CARBEL I 100 Instruction manual

CARBEL
CARBEL ARES Instruction manual

CARBEL
CARBEL Aefecc A-70 Plus User manual

CARBEL
CARBEL AEFECC ATENEA Instruction manual