Cardini OV9250 User manual
90cm BUILT-IN ELECTRIC OVEN
INSTRUCTION MANUAL
Read this manual carefully before operation
Note: Pictures in this manual are for reference only.
OV9250
Electronic controls - 90cm electric oven

Contents
How to Keep your Oven in Shape.............................
01
02
03
04
05
06
07
08
09
Installing the Appliance............................................
Safety Instructions...................................................
Control Panel and Display.......................................
Contents...................................................................
2
Operation.................................................................
Oven Functions........................................................
10
Useful Notes for Cooking.........................................
11
Troubleshooting.......................................................
12
Practical Cooking Advice.........................................
Technical Specifications..........................................
Warranty & Service..................................................
2
3
7
8
12
13
15
16
16
17
19
19

This appliance is for household use only and is not to be used outdoors.
Important: Before cleaning your oven or performing maintenance, disconnect it from the
power supply.
To extend the life of your oven it must be cleaned frequently, keeping in mind the following:
•Do not use steam equipment to clean the appliance.
•To protect against the risk of electrical shock, do not immerse the unit, cord or plug in water or
other liquid or spray water to clean the appliance.
•Don’t clean the appliance while it is still hot. The internal and external surfaces of the oven should
be cleaned by a damp cloth when it has cooled down.
•Wash all accessories in hot soapy water or in a dishwasher. Wipe dry with a paper or cloth towel.
•If you use your oven for an extended period of time, condensation may form. Dry it using a soft
cloth.
•There is a rubber seal surrounding the oven opening which guarantees its perfect functioning.
Check the condition of this seal on a regular basis. If necessary, clean it and avoid using abrasive
products or objects to do so. Should it become damaged, please contact your nearest after-sales
service centre. We recommend you avoid using the oven until it has been repaired.
•Never line the oven bottom with aluminium foil, as the consequent accumulation of heat could
compromise the cooking and damage the enamel.
•Clean the glass door using damp cloth and dry it with a soft cloth.
Do not use harsh abrasive cleaners or sharp metal scrapers to clean the oven door glass
since they can scratch the surface, which may result in shattering of the glass.
Replacing the Oven Lamp
•Cut off the supply of power to the oven by turning off the omni-polar switch (circuit breaker)
connecting it to the mains to avoid electric shock.
•Unscrew the glass cover attached to the lamp holder;
•Pull out the lamp and replace it with another high-temperature lamp (300°C certified for use in
ovens) with the following characteristics:
- Voltage: AC230V
- Wattage: 25W
- Socket: G9
•Remount the glass cover and reconnect the appliance to the power supply.
How to Keep your Oven in Shape
WARNING: Ensure that the appliance is switched off before replacing the lamp to
avoid the possibility of electric shock.
WARNING: Do not operate the appliance with a damaged cord or after the appliance
malfunctions or has been damaged in any manner. Return appliance to the nearest
authorised service centre for examination, repair or adjustment.
3
4
The appliance must not be installed behind a decorative door in order to avoid
overheating.
Ensure that shelves are installed with the raised barrier to the rear, in order to prevent cooking
dishes or the like from sliding over the rear edge.
The following maintenance should be undertaken by an authorised service centre or similarly
qualified persons in order to avoid a hazard.
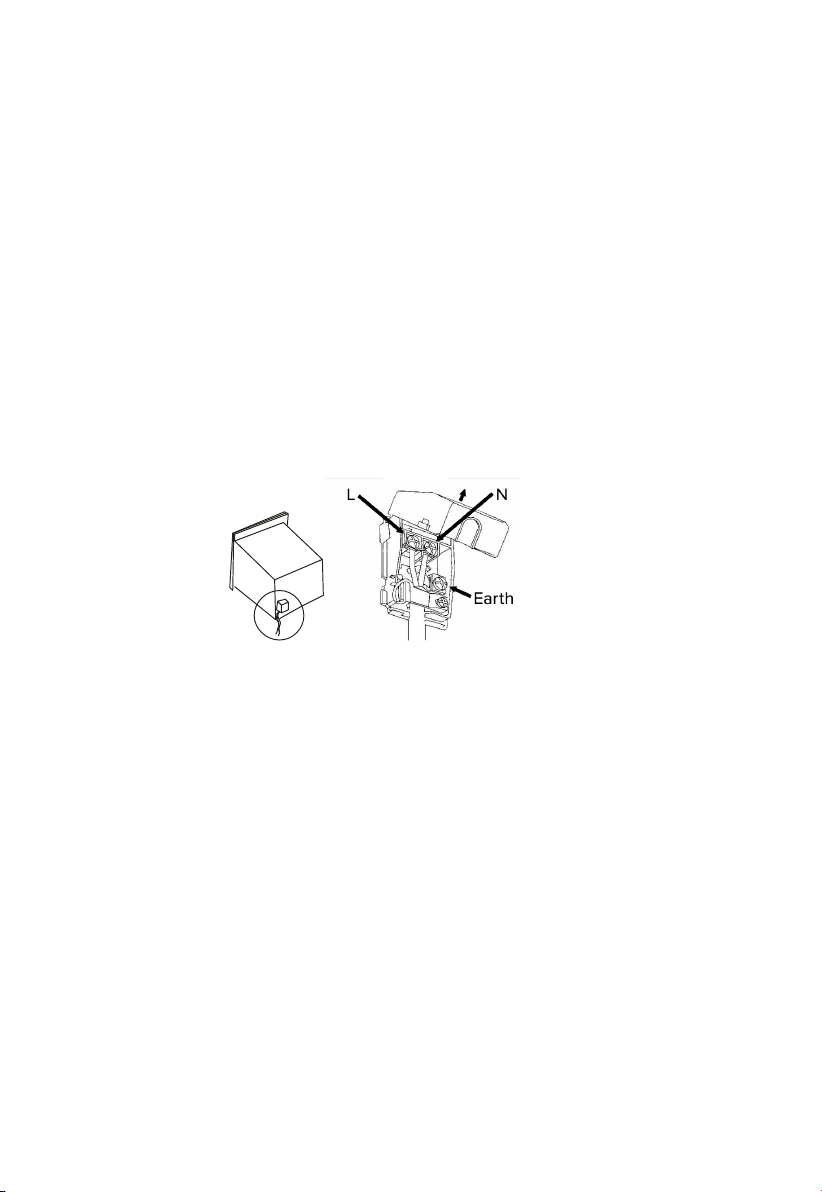
Connecting a power supply cable
Opening the terminal board:
•Using a screwdriver, prise the side tabs of the terminal board cover open
•Pull open the cover of the terminal board
To install the cable, proceed as follows:
•Remove the wire clamp screw and the three contact screws L-N and Earth
•Fasten the wires beneath the screwheads using the following color scheme; Blue
(N) Brown (L), Yellow- Green (Earth)
•Fasten the supply cable in place with the clamp and close the cover of the terminal
board.
Connecting the supply cable to the mains
When connecting the cable directly to the mains, install an omnipolar circuit-breaker with a
minimum contact opening of 3mm between the appliance and the mains. The omipolar circuit
breaker should be sized according to the load and should comply with current regulations (the
earth wire should not be interrupted by the circuit breaker).
The supply cable should be positioned so that it does not reach a temperature of more than 50°
C with respect to the room temperature, anywhere along its length.
Before making the connection, check that:
•The electrical safety of this appliance can only be guaranteed if the appliance is correctly and
efficiently earthed, always ensure that the earthing is sufficient. If you have any doubts call in a
qualified technician to check the system. The manufacturer declines all responsibility for
damage resulting from a system which has not been earthed.
•Before connecting the appliance to the mains, check that the specifications indicated on the
data plate (on the appliance and/or packaging) correspond to those of the electrical mains
system of your home.
•Check that the electrical capacity of the system will support the maximum power of the
appliance, as indicated on the data plate. If you have any doubts, call in a qualified technician.

5
WARNING: It is essential to use specific soft wire or specific groupware bought
from the manufacturer or maintenance department to replace any broken soft
wires.
Protective kit
During operation, the oven glass door and adjacent parts of the appliance become hot.
Make sure, therefore, that children do not touch the appliance.
WARNING: The appliance and its accessible parts become hot during use. Care should
be taken to avoid touching heating elements.
Children less than 8 years of age shall be kept away unless continuously supervised.
This appliance can be used by children aged from 8 years and above and persons with
reduced physical, sensory or mental capabilities or lack of experience and knowledge if
they have been given supervision or instructions concerning use of the appliance in a
safe way and understand the hazards involved.
Children shall not play with the appliance.
Cleaning and user maintenance shall not be undertaken by children without supervision.
Children should be supervised to ensure that they do not play with the appliance.
Disassembling / assembling the oven door
To make it easier to clean the inside of your oven, the oven door can be removed, by
proceeding as follows:
•Open the door completely and lift the 2 levers “B” (Fig.1- see next page);
•Now, shutting the door slightly, you can lift it out by pulling out the hooks “A” (Fig. 2 - see next
page).
To reassemble the oven door:
•With the door in a vertical position, insert the two hooks “A” into the slots;
•Ensure that seat “D” is hooked perfectly onto the edge of the slot (move the oven door
backwards and forward slightly);
•Keep the oven door open fully, unhook the 2 levers “B” downwards and then shut the door again.

6
Fig. 1 Fig. 2
Fig.3Fig.4
Fig.5Fig.6
Clean the glass panes and other parts with a damp microfibre cloth and glass cleaner fluid as
required. Wipe dry using a soft cloth.
Instructions to remove glass from the oven door
The oven door is made up of 3 panes of glass and has vents at the top and bottom. When the oven is
operating, air is circulated through the door to keep the outer pane cool. If condensation has worked its
way in between the glass panes, the door can be dismantled in order to clean in between the panes.
Remove the door as per the instructions on page 5 and place it on a protective surface (e.g. on a table
cloth) to prevent it getting scratched. The door handle should line up with the edge of the table. Please
ensure that the glass lies flat to avoid breakage during cleaning.
1. Press the button on the left and right side of the door, take out the top rail. (Fig.3)
2. Take out the inner glass carefully. (Fig.4)
3. Loosen the clips using a screwdriver. (Fig.5)
4. Take out the middle glass. (Fig.6)

Safety Instructions
•This appliance is designed for non-professional, household use and its functions must not be
changed.
•The electrical system of this appliance may be used safely only when it is correctly connected
to an efficient earthing system in compliance with the safety standards currently in effect.
•The manufacturer will not be held liable for any damages that might arise out of incorrect
installation or improper, incorrect or unreasonable use of the appliance.
The following items are potentially dangerous and, therefore, appropriate
measures must be taken to prevent children and the disabled from coming into
contact with them:
−Controls and the appliance in general;
−Packaging (bags, polystyrene, nails, etc.);
−The appliance immediately after use of the oven or grill due to the heat generated;
−The appliance when no longer in use (potentially dangerous parts must be made safe).
Avoid the following:
−Touching the appliance with wet parts of the body;
−Using the appliance when barefoot;
−Pulling on the appliance or the supply cord;
−Obstructing the ventilation or heat dissipation slots;
−Allowing power supply cords for small appliances to come into contact with the hot parts of
the appliance;
−Exposing the appliance to atmospheric agents (rain, sun);
−Using the oven for storage purposes;
−Using flammable liquids near the appliance;
−Using adaptors, multiple sockets and/or extension cords;
−Attempting to install or repair the appliance without the assistance of qualified personnel.
WARNING- Accessible parts will become hot when in use. To avoid burns and
scalds children should be kept away
During use the appliance becomes hot, Care should be taken to avoid
touching heating elements inside the oven.
7

8
Qualified personnel must be contacted in the following cases:
−Installation (Following the manufacturers instructions);
−When in doubt about operating the appliance;
−Replacing the electrical supply.
Service Centres authorised by the manufacturer must be contacted in the
following cases:
−If in doubt about the soundness of the appliance after removing it from the packaging;
−If the power supply cord has been damaged or needs to be replaced;
−If the appliance breaks down or functions poorly; ask for original spare parts.
It is a good idea to do the following:
−Only use the appliance to cook food;
−Check the soundness of the appliance after it has been unpacked;
−Disconnect the appliance from the electrical mains if it is not functioning properly and before
cleaning or performing maintenance;
−When the appliance is not used for an extended period of time, disconnect the supply of power.
−Use oven mitts to place cookware in the oven or when removing it;
−Always grasp the oven door in the centre as the ends may become hot due to the escape of
hot air;
−Make sure that the control knobs are on the “o”setting when the appliance is not in use;
−Cut the power supply chord after disconnecting it from the mains when you decide not to use
the appliance any longer.
The manufacturer will not be held responsible for any damage due to incorrect
installation, improper, incorrect or irrational use.
Installing the Appliance
Important: The power supply to the appliance must be disconnected before any
adjustments or maintenance work can be performed.
Installation of Built-in Ovens
To ensure the proper working order of the built-in appliance, the kitchen cabinetry must
be of a suitable size.
The sizes for installing the oven under a worktop or in a stack unit are shown in figure 8
(page 10).

Important note for the Cabinet maker
To provide adequate ventilation for oven cooling, there must be appropriate
ventilation openings in the front bottom and the top part with an area of
200cm² and an exhaust opening on the bottom of an least 200 cm² as well as
an exhaust opening of at least 60 cm².
Fastening the oven
Insert the appliance into the compartment. Open the oven door and fasten the oven to
the cabinet using four screws in position “A”, remembering to place the special
spacers provided between the hole and the screw itself.
Fig. 7
Provide a 30cm x 10cm vent with 50% ventilation openings on the kickboard or
provide an alternative means of free airflow through the front, of equal opening area.
9

Connecting the power supply cable to the mains
The appliance must be directly connected to the mains using an omnipolar circuit-
breaker with a minimum contact opening of 3mm installed between the appliance and
the mains, suitable for the load indicated and complying with current directives (the
earthing wire must not be interrupted by the circuit-breaker).
849
475
897.4
23.7
546
468
min.
550
860
min.
50
472
400 x 700
base cut-out
Fig. 8
NOTE: Provide adequate
ventilation as per notes
on previous page.
Cabinetmaker shall verify all
dimensions prior to manufacture
by measuring the actual oven unit
10
Table of contents
Other Cardini Oven manuals


