Cardini RH9T165 User manual

RANGEHOOD
INSTRUCTION MANUAL
Read this manual carefully before operation
Note: Pictures in this manual are for reference only.
RH9T165

Contents
Warnings................................................................ 3
01
02
03
04
05
07
08
09
Installation instruction ............................................ 6
Safety warning.......................................................
Maintenance......................................................... 11
Main parameters.................................................. 1
2
1
Troubleshooting..................................................
Contents.................................................................
06
First use..............................................................
Warranty & Service................................................14
2
5
10
3
4

Warnings
This appliance is not intended for use by persons
(including children) with reduced physical, sensory or
mental capabilities, or lack of experience and
knowledge, unless they have been given supervision or
instruction concerning use of the appliance by a
person responsible for their safety. Children shall
not play with the appliance. Cleaning and user
maintenance shall not be carried out by children
without supervision. If the supply cord is damaged, it
must be replaced by the manufacturer, its service
agent or similarly qualified persons in order to avoid a
hazard.
There shall be adequate ventilation of the room when
the rangehood is used at the same time as appliances
burning gas or other fuels.
Please do not use corrosive detergent for cleaning. The
proper function of the unit is conditioned by the
regularity of the maintenance.
To protect the main body from the corrosive effects of the
accumulation of dirt, the rangehood should be
cleaned with hot water with non-corrosive detergent
every two months.
There is a fire risk if cleaning is not carried out in
accordance with the instructions.
Do not allow flames directly under the rangehood.
The air must not be discharged into a flue that is used
for exhausting fumes from appliances burning gas or
other fuels.
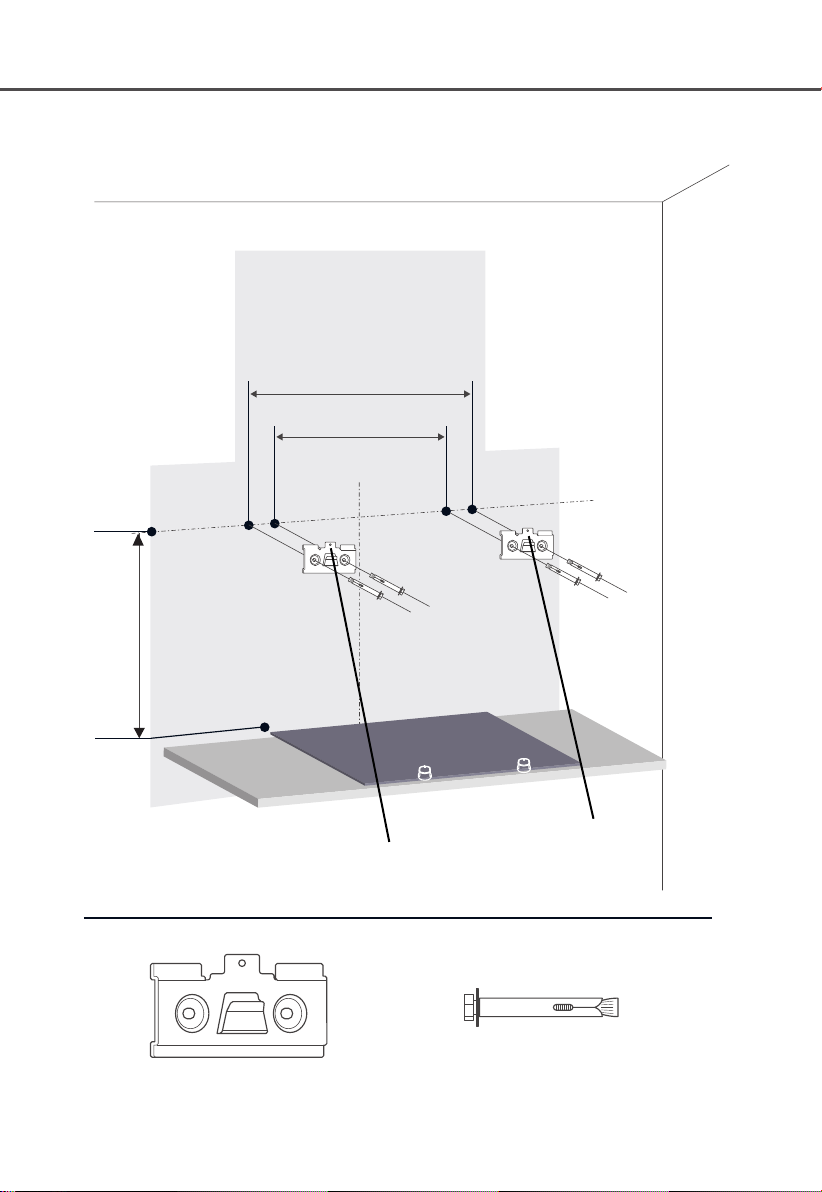
The minimum distance between the supporting surface
for the cooking vessels on the hob and the lowest part of
the range hood. (When the range hood is located above a
gas appliance, this distance shall be at least 65 cm. If the
instructions for installation for the gas hob specify a
greater distance, this has to be taken into account. The
distance of 65 cm can be reduced for:
3
3

Warnings
non-combustible parts of range hoods, and
parts operating at safety extra low voltage,
4
Provided these parts do not give access to live parts if
deformed;)
Regulations concerning the discharge of air have to be
fulfilled.
The appliance will function correctly with 4 hob elements
being used simultaneously.
CAUTION : Accessible parts may become hot.
When the mains supply is initially connected or immediately
after a power failure, the rangehood will commence a self
inspection cycle. The top glass panel of the rangehood will
automatically open and close once. Please keep your
hands well clear of the glass panel to avoid injury

This appliance is not intended for use by young children or an
infirm person without supervision.
Young children should be supervised to ensure they do not play with
the appliance.
Plug the power cord into a socket outlet with an earthing continuity
terminal.
The rangehood is for home use only and isn't suitable for barbecue,
roast shop and other commercial purposes.
The rangehood and filters should be cleaned regularly in accordance
with the instructions.
Do not use open flame, or allow oil to go beneath the appliance.
If any fault occurs with the appliance, please email the after-sales
service department - [email protected]
Please keep the room ventilated.
Prior to any maintenance or cleaning operation, please ensure the
power is turned off.
If the supply cord is damaged, it must be replaced by the manufacturer,
service agent or similarly qualified person in order to avoid a hazard.
The replaced power cord should be provided by manufacturer or seller.
If the plug or cord is damaged, please email the after-sales service
center.
There is a fire risk if cleaning is not carried out in accordance with the
instructions.
In the case of damaged wiring, please refer to the manufacturer, after-
sale service personnel or other qualified technicians.
Use the unit in accordance with the instructions to avoid any fire
hazard.
The exhaust air must not be introduced into a smoke flue or chimney
that is used for exhausting fumes from appliances burning gas.
Follow the local laws applicable for external air evacuation.
When the upper glass panel is closing, please keep your hands well
clear to avoid injury.
When the steam generator is working, be very careful of hot steam out
of the rangehood.
Safety Warning
5

Installation instruction
Determine location
Rangehood should be installed horizontally, directly above the
cooktop. Refer to the installation diagram below:
Note: all dimensions are mm.
905~915
482
Cupboard
Flue Cover
Suspended
ceiling
Exhaust pipe
430
Line for Installation
840~940
6
Top glass panel
Bottom glass panel Rangehood
Cooktop
FRONT VIEW

220
405
105
Schematic diagram of the hole
size for the exhaust pipe at the
ceiling
Ф200248
320
Note: This installation height is only applicable to
electric stove, if installed above the gas stove,
the installation height should be in accordance
with the installation height requirements of gas
stove.
7
SIDE VIEW

Installation plate
Expansion bolt
840~940
Installation instruction
lnstallation plate
570
430
8
After hanging the rangehood on the installation plate, fasten two
screws M5X16 to avoid
the rangehood sliding off accidentally.

Accessories
Note: 2x decorative flue covers
supplied 1 x 482mm and 1 x 320mm
1
5
4
3
2
6
7
8
10
11
9
12
Rangehood body
Exhaust pipe fixed ring
Exhaust pipe
Check valve
Check valve Sealing gasket
Installation plate
Expansion bolt (8 x 60)
Screws (M5x16)
Screws (ST4.2x16)
Water cup
Filter cotton for water cup
(replaced every 2 years)
Oil cup
1
1
1
1
1
2
4
2
4
1
5
1
1
2
3
4
5
6
7
8
9
10
11
12
9
Qty
Note: Flue covers are supplied in a
separate package

7 X Screws(M5*50)
First Use
Rangehood can be used immediately after the power is connected.
Light Short press: Turn on the light;
Long press: Adjust the brightness.
Washing Long press: Open the panel;
Long press: Close the panel.
Steam
washing
Long press: Start;
Long press and two short presses: Cancel the indicator
light reminder.
Boost Short press: Startup (09 speed), return to 03 speed after 5 min,
please select manually if needed to continue.
Speed Short press: Adjust speed (as clock flashes, adjust the clock).
Power
1st Short press: Startup (3 speed);
2nd Short press: Delay 3 min;
3rd Short press: OFF immediately.
Short press: 0.5 second
Long press: 2~3 seconds
10

222
Maintenance
Cleaning the surface
1. The surface of the rangehood and filter should be cleaned regularly, do not use cleaning
balls, brushes or coarse cloth, as these may scratch the surface of the rangehood.
2. When oil appears in the Oil Cup Window, please remove the oil cup tray by sliding it
forward and empty the oil. Oil Cup Window
Cleaning mode (Cleaning the surface manually )
2 Dismantle the glass panel for cleaning.
1 Long press to open the top glass panel.
Reset after cleaning. Long press
for 3 seconds to close the panel.
Dismantle the net to clean; clean the
filter net surface (don't dismantle).
)
net
handle
filter
34
3.1 Dismantle nozzle.
nozzle
Dismantle air inlet ring.
air inlet
ring
3.2
impeller
impeller
lock nut
Safety Caution
Dismantling the filter to clean the impeller,
must be completed by professionals.
Undo the impeller lock nut
in the direction indicated
and remove the impeller in
the horizontal direction of
the motor shaft.
3.3
11

Steam Washing (Cleaning inner area of the rangehood)
1
2
3
4
5
6
7
water inlet
washing drying
When the indicator light turns red and flashes,
this indicates that steam washing is required.
a) Remove the oil cup tray
b) Dispose the accumulated oil
c) Re-install the oil cup tray
Fill cup with purified water or distilled water.
Plug the tube into the water inlet.
Press "Steam Washing" for 2 seconds to
start the steam washing process.
Steam washing: 12 min
Drying: 3 min
a) Remove the oil cup tray
b) Dispose accumulated water
c) Re-install the oil cup tray
Steam washing process
CAUTION
start washing drying finish
1. Cancel the steam washing reminder (not washing):
Long press 2 seconds + short press twice to fast forward to the end.
2. Fast forward or end in advance(during washing):
Short press again to fast forward to the next step.
12
During the steam washing process, do not touch the surface
of the glass panels or deflector in order to avoid scalding.

222
Main Parameters
Voltage
Rated Power
Lighting Power
Motor Power
Diameter of air tube
Air flow
Noise
The air flow parameter is tested under conditions of 230V
~
/50Hz when the
voltage is
220-240V
~/
50Hz
220-240V~/50Hz
1600W
2 X 1.5W
260W
180mm
1080m³ /hr
≤
13
.
LED light information
Max Power Voltage Picture Lamp Cap ILCOS D code
width / length:
25mm x 138mm
1.5W DC 12 V —— DSS-1.5-S-25/138
55dB/ 69dB(A)
(SPL/APL)
*Sound Pressure Level/Acoustic Power Level
(Boost:1200
m³ /hr)

Troubleshooting
Solution
Unplug the power lead and reconnect the power supply.
Oil cup tilt, please reinstall.
Oil leakage
Oil cup full filled with oil, please dump the oil.
Oil-way blockage caused by failing to regularly clean the internal
oil-way, will require a professional to wash the rangehood.
Insufficient suction
Adjust to max. speed.
Avoid opening window or door frequently.
Steam washing fault
Screen displays "E4"
The light and motor
do not work
Fault
Filter cotton blockage, please change the filter cotton.
Water cup lack of water, please fill with water.
If the problem cannot be resolved by the solutions above, or E1-E6
appear on the display, please contact customer service for professional
maintenance.
Warranty & Service
For warranty information, please visit the Cardini website: www.cardini.com.au
For any service issues, please email our customer care team: [email protected]
14
Table of contents
Other Cardini Ventilation Hood manuals
Popular Ventilation Hood manuals by other brands

Smeg
Smeg SA480T90S user guide

Broan
Broan 43000 SERIES Instructions for use

Zephyr
Zephyr Siena Pro ZSP-E42BS Use, care and installation guide

Victory
Victory SUNSET Installation guide and user's manual

Bosch
Bosch DHU665EL Operating and installation instructions

Lamona
Lamona LAM2504 Instructions and installation