Carefree R001189 User manual

C
AREFREE
TUBULAR MOTOR REPLACEMENT KIT
RV Kits
Kit No: R001189
FOR THE TUBULAR MOTORIZED FREEDOM WINDOW &OTD
This operation can be done while the awning is mounted on the RV. Use care to avoid damaging the walls etc.
COMPONENT CHECKLIST
Motor Screw
#7 x 1/2”
x2
FIII046
Clip (ref)
Motor
Bearing (ref) Drive (ref)
PRELIMINARY STEPS
CAUTION FAILURE TO SECURE THE LEAD RAIL AS DESCRIBED WILL ALLOW THE SPRING ARMS TO UNEXPECTANTLY
EXTEND OUT POSSIBLY CAUSING PERSONAL INJURY AND DAMAGE TO THE AWNING.
052985-106r1 Printed in USA October, 2010
1. Disconnect power to the awning.
2. If the awning is extended:
2.1. Carefully push the lead rail toward the case so that the arms collapse.
While holding the lead rail in this position, firmly tie the elbows of the
spring arms together. Use a minimum 1/2" rope - do not use bungee
cords. When tying the rope, use a non-slip knot such as a square
knot or equivalent.
2.2. (Detail A) Remove the retaining screw holding the end cap.
2.3. The end cap snaps on and off the case end plate. Remove the end
cap and set aside. Go to step 4.
3. If the awning is closed:
3.1. Firmly brace the lead rail in the closed position. A second person can
hold the lead rail steady during the disassembly process.
NOTE: If the awning is closed and cannot be opened, it will be
necessary to drill through the end cap to access the end plate
screws. This will require replacing the end cap to complete the
repair.
3.2. (Detail B) Drill three (3) 1/2" holes through the surface of the end
cap. This is to provide access to the end plate attach screws.
4. Remove the 3 screws holding the end plate to the case, do not remove the
motor attach screws at this time.
Marquee012
Spring Arms
Firmly Tie
Elbows Together
Figure 1. Tying the Arms.
FIII045
Retaining
Screw
End Cap
Drill 1/2” Hole
(3 plcs)
.7”
2.3”
DETAIL
A
Removing the End Cap
(Awning Open)
DETAIL
B
Accessing the Mounting Screws
(Awning Closed)
Figure 2. Removing the End Cap.

Carefree of Colorado FREEDOM TUBULAR MOTOR REPLACEMENT
REMOVING THE MOTOR
CAUTION WHEN PULLING THE MOTOR OUT OF THE CASE,THE SERVICING TECHNICIAN MUST USE CARE TO NOT BREAK
OR DAMAGE THE MOTOR CABLES.
WHEN PULLING THE MOTOR,DO NOT LET THE ROLLBAR COME OUT MORE THAN 1"; OTHERWISE THE ROLLBAR IDLER WILL DISENGAGE
FROM THE OPPOSITE END PLATE.IF THIS OCCURS,REINSERT THE IDLER ONTO THE ENDPLATE BEFORE CONTINUING.
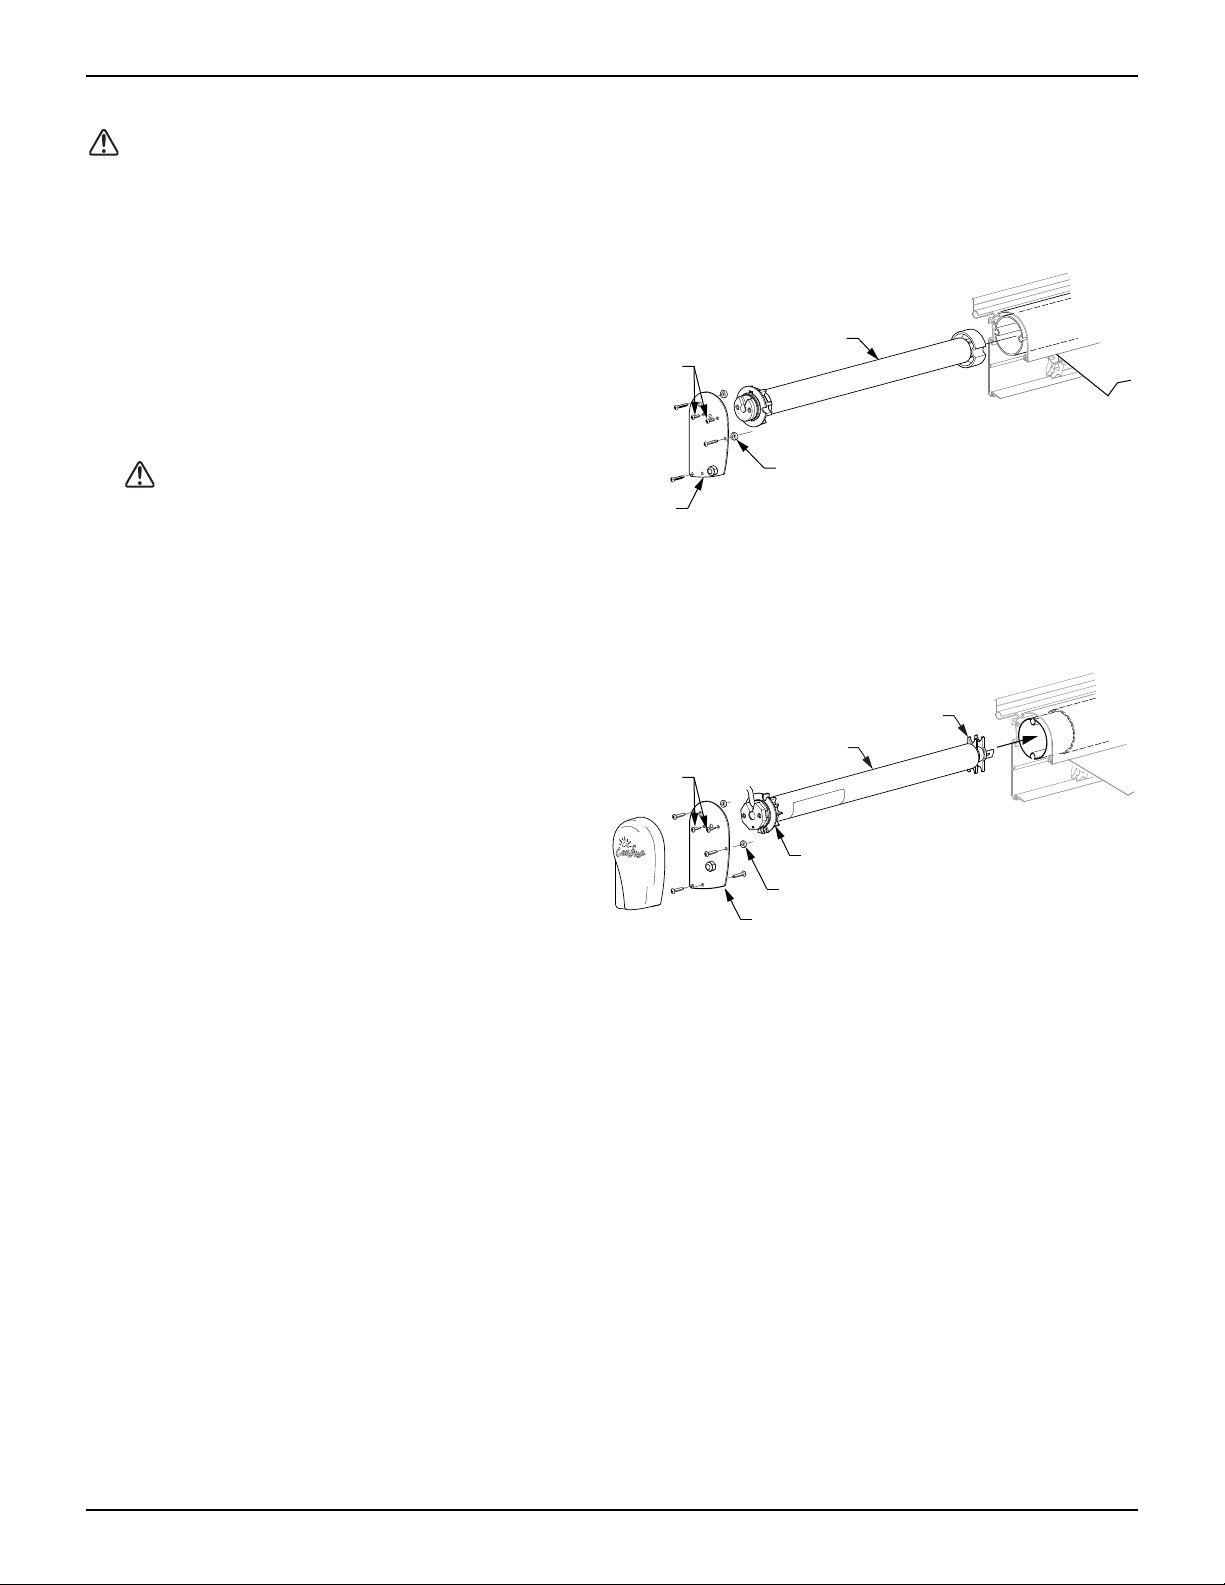
FIII047
Motor
Motor Screws
(qty: 2)
Spacer
(qty: 3)
End Plate
Figure 3. Removing the Old Motor.
1. Pull the end plate and motor partially out from the
awning case.
2. Disconnect the motor wires from inside the
coach and pull out or clip the motor wires. If
cutting the motor wires be sure to leave
enough wire that can be stripped and spliced.
3. Pull the motor, crown, roller bearing and drive hub
out of the roll bar.
CAUTION IF THE AWNING IS CLOSED WHEN
THE MOTOR IS REMOVED THE SPRING ARMS WILL TRY
TO OPEN.SUPPORT THE ROLL BAR AND ALLOW THE
AWNING TO OPEN SLOWLY THEN SECURE THE ARMS
BY TYING THE ELBOWS TOGETHER AS DESCRIBED
PREVIOUSLY.
4. If still attached, remove the end cap from the end plate then remove the attaching screws holding the motor to the end
plate. Make note of the motor orientation on the end plate.
052985-106r1 2
5. Attach the new motor to the end plate paying
attention to match the orientation from the old
motor.
6. Partially slide the new motor assembly into the
roll bar. Ensure that the drive and bearing are
properly aligned inside the roll bar.
7. Route the new motor wire into the coach and
attach or if the wires were cut, splice the new
wires to the existing wires. Ensure that the
wire colors match (Blue to Blue and Brown to
Brown). Use a quality silicone sealant to seal
the wire hole into the coach.
NOTE: If splicing the wires, allow enough lead wire from the motor so that the completed splices can be
pushed into the wall before sealing. There is not clearance room in the case for the wires and
splices.
FIII048
Motor Screws
(qty: 2)
Spacer (qty: 3)
End Plate
Motor
Bearing (ref)
Drive (ref)
Figure 4. Installing the New Motor.
8. Attach the end plate to the case.
9. While holding the lead rail, carefully remove any roller tube supports and arm ties. Allow the lead rail to extend
until the fabric is taunt.
10. To test, restore power then extend and retract the awning.
11. After replacing the motor, it will be necessary to adjust the motor limits (page 3).
12. After testing and adjusting the motor limits, attach the end cap.

Carefree of Colorado FREEDOM TUBULAR MOTOR REPLACEMENT
SETTING THE MOTOR LIMITS
The limit switches are located inside the case, near the end cap. It is necessary to extend the awning to access the
switches. The “OUT” limit switch stops the motor when the awning is fully extended. The “IN” limit switch stops the
motor when the awning is fully retracted.
FIII034
“OUT”
“IN”
4mm Hex
4mm Hex
Figure 5. Motor Limit Switches.
ADJUSTING THE OUT LIMIT SWITCH
1. Extend the awning out completely.
2. Confirm that the arms are fully extended. The motor should stop and the fabric should be tight. If the motor
continues to run, the fabric will sag; or, if the motor quits before the arms are fully extended, it will be necessary
to adjust the “OUT” limit switch.
3. Using a 4mm Allen wrench turn the “OUT” limit switch. CLOCKWISE increases time the motor runs during
extension, COUNTERCLOCKWISE reduces the time the motor runs.
NOTE: It is best to make the adjustments in increments of a single turn. 3 full turns of the screw equals
approximately 2” of fabric extension.
4. Extend and retract the awning several times to confirm that the adjustment is correct.
5. Repeat steps 3 and 4 as required until the awning extends correctly.
ADJUSTING THE IN LIMIT SWITCH
CAUTION THE IN-LIMIT SWITCH MUST BE SET TO SHUT OFF THE MOTOR WHEN THE AWNING IS CLOSED.THE MOTOR
MUST NOT CONTINUE TO RUN AFTER THE AWNING CLOSES OTHERWISE DAMAGE TO THE MOTOR WILL OCCUR IF THE MOTOR
CONTINUES TO RUN AFTER THE AWNING IS CLOSED.
1. Retract the awning in completely.
2. Confirm that the arms are fully retracted. The motor must stop when the awning is fully retracted. If the motor continues to
run; or, if the motor quits before the arms are fully retracted, it will be necessary to adjust the “IN” limit switch.
3. Using a 4mm Allen wrench turn the “IN” limit switch. Clockwise increase time the motor runs during retraction,
counter clockwise reduces the time the motor runs.
NOTE: It is best to make the adjustments in increments of a single turn. 3 full turns of the screw equals
approximately 2” of fabric extension.
4. Extend and retract the awning several times to confirm that the adjustment is correct.
5. Repeat steps 3 and 4 as required until the awning retracts correctly.
052985-106r1 3