Caresono PadScan HD 5 User manual

PadScan HD 5
Bladder Scanner
User’s Manual
TRADEMARKS

, PadScan are trademarks,
registered or otherwise, of CARESONOTechnology
Co., Ltd. Other names may be trademarks of their
respective owners.
COPYRIGHT
All rights reserved. No part of this publication
may be reproduced in any form whatsoever
without the prior written permission of
CARESONO.
© Copyright 2012-2013CARESONO
EC-Representative:MEQUIPEX
Bernhardt Kern
Address:Feldstrasse 39, 4813
Altmuenster Austria
Phone:0043-650 735 2000
Version Number: HD5.V4.4.7.11A.Caresono
Release Date: 2015
0482
Manufacturer: Caresono Technology Co., Ltd
Address:4th Floor, N0.11Building, Initiating Zone, Instruments and Meters
Industry Base, Near Port Industry Zone, Dandong, Liaoning
Tel:+86 415 6279782Fax: +86 415 3191279
Global Sales Center: Caresono Technology Co., Ltd
Address: BF13 Nanshan Medical Equipments Park, No.1019Nanhai Rd.
Nanshan, Shenzhen, China
Tel:+86 755 86367662 Fax: +86 755 86365909

Table of Contents
INTRODUCTION .................................................................................................................................................... 1
Intended Use ............................................................................................................................................................. 1
Contraindications ...................................................................................................................................................... 1
CAUTIONS AND WARNINGS .................................................................................................................................. 2
Equipment Checks ..................................................................................................................................................... 2
Pre-scan Checks ......................................................................................................................................................... 2
Scanning Checks ........................................................................................................................................................ 2
Post-scan Checks ....................................................................................................................................................... 2
Maintain Device Safety .............................................................................................................................................. 2
Maintain Probe Safety ............................................................................................................................................... 3
Handling the Device .................................................................................................................................................. 3
In Case of Device Failure ............................................................................................................................................ 3
Manufacturer Declarations ....................................................................................................................................... 3
EQUIPMENT UNPACKING AND INSTALLATION ........................................................................................................ 4
Unpacking .................................................................................................................................................................. 4
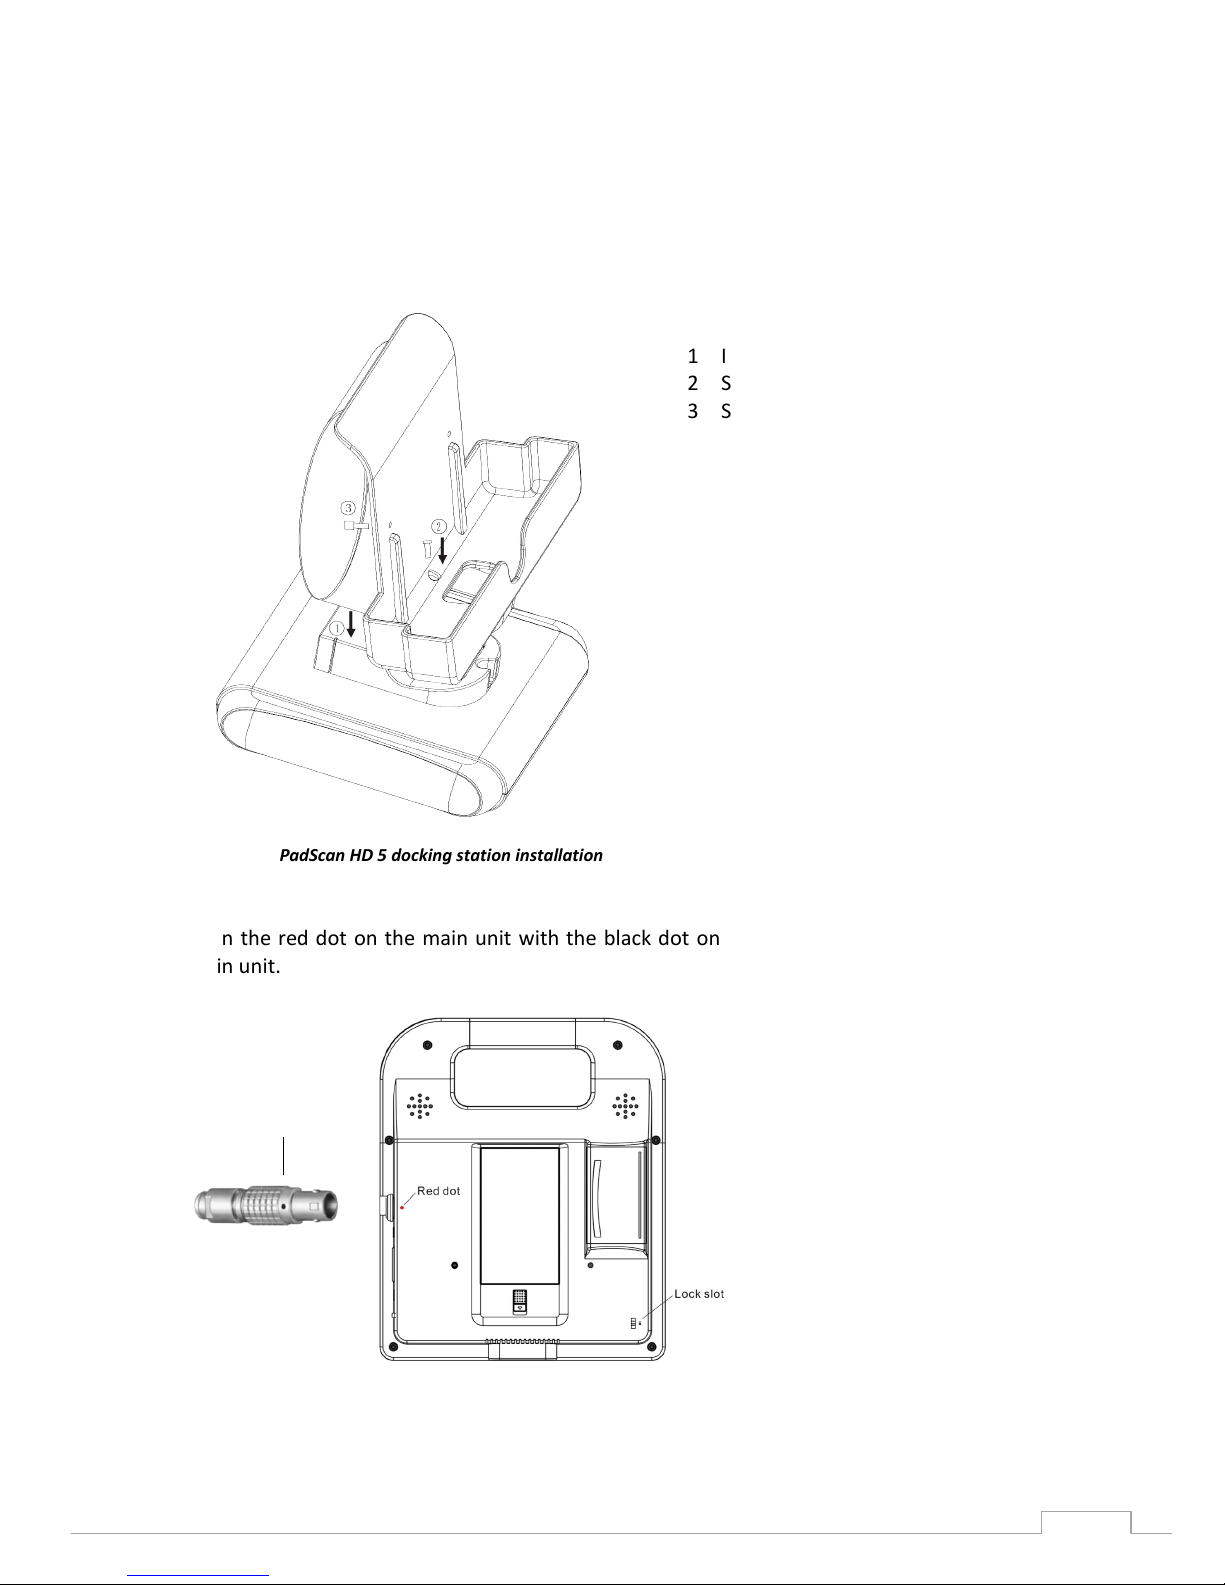
Installation ................................................................................................................................................................. 5
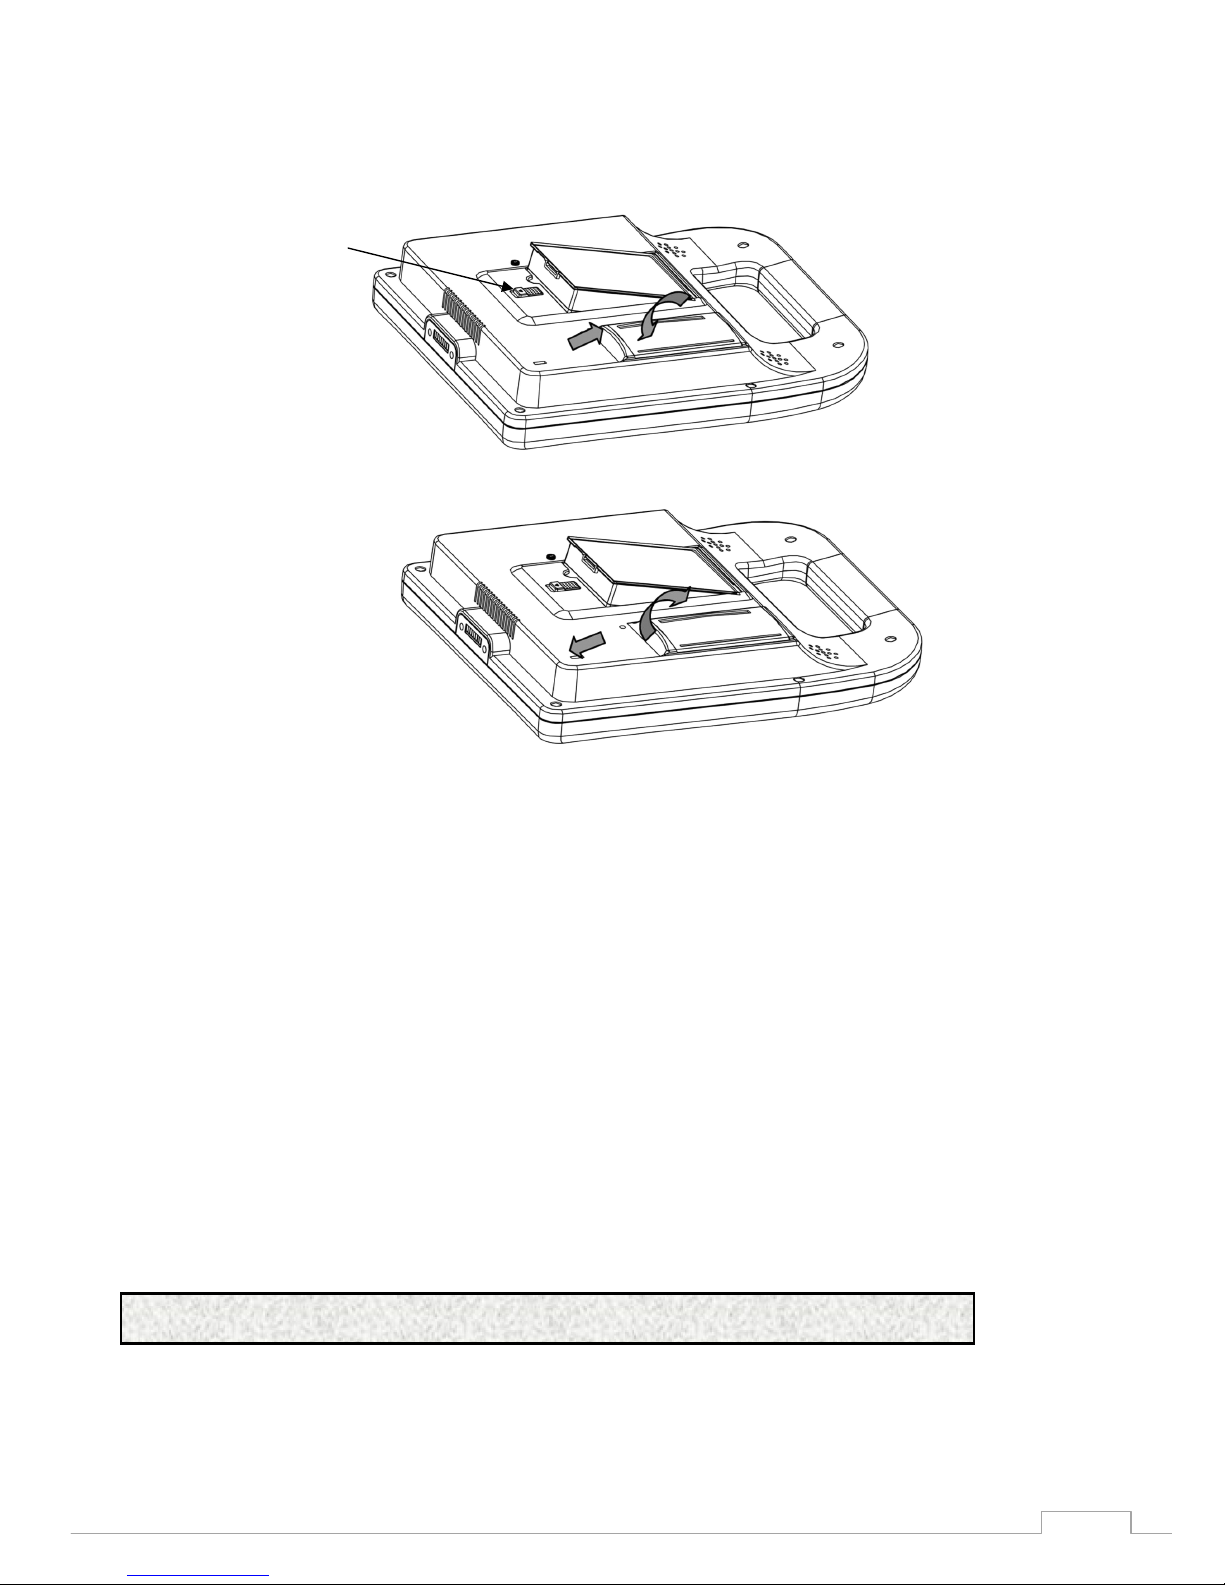
Battery Installation and Removal .............................................................................................................................. 5
Battery Charging and Status ...................................................................................................................................... 6
Power Supply ............................................................................................................................................................. 6
Adapter Power Supply .............................................................................................................................................. 6
Battery Power Supply ............................................................................................................................................... 6
POSITIONING THE PROBE AND OBTAINING OPTIMAL IMAGES ................................................................................ 7
PADSCAN HD 5 SCANNER SCREENS AND BUTTONS ................................................................................................. 9
Login Screen .............................................................................................................................................................. 9
Main Scanning Screen ............................................................................................................................................... 9
Expert Mode ............................................................................................................................................................. 9
Easy Mode .............................................................................................................................................................. 10
Patient Information Screen ..................................................................................................................................... 11
Save and Review Patient Data ................................................................................................................................. 12
Export Patient Data ................................................................................................................................................. 14
Patient Data Management ...................................................................................................................................... 15
Connect to PC ......................................................................................................................................................... 15
Patient data management ...................................................................................................................................... 15
Setup Screens .......................................................................................................................................................... 16
A: General ............................................................................................................................................................... 16
B. Service ................................................................................................................................................................ 17
C. Operator ............................................................................................................................................................. 18
D. Print .................................................................................................................................................................... 20
E. Power .................................................................................................................................................................. 20
F. Display ................................................................................................................................................................. 21
USING THE PADSCAN HD 5 BLADDER SCANNER .................................................................................................... 22
1. Login .................................................................................................................................................................... 22
2. Add Patient Information ...................................................................................................................................... 22
3. Prepare Patient and Position Probe ..................................................................................................................... 23
4. Start Scan and Capture Image ............................................................................................................................. 23
5. View the scanned images .................................................................................................................................... 24
6. Save Information ................................................................................................................................................. 24
7. Print ..................................................................................................................................................................... 24
CALIBRATION ...................................................................................................................................................... 25
TROUBLESHOOTING ............................................................................................................................................ 27
CLEANING AND PREVENTIVE MAINTENANCE ....................................................................................................... 28
System Cleaning and Maintenance ......................................................................................................................... 28
System Cleaning ...................................................................................................................................................... 28

System Maintenance .............................................................................................................................................. 28
Probe Cleaning and Maintenance ........................................................................................................................... 28
Cleaning the Probe ................................................................................................................................................. 28
Probe Maintenance ................................................................................................................................................ 28
Battery Use and Maintenance ................................................................................................................................. 28
Treating and Disposing of Products After Use ......................................................................................................... 29
TECHNICAL SPECIFICATIONS AND GENERAL SYSTEM INFORMATION ...................................................................... 30
Component Specifications* ..................................................................................................................................... 30
Operating Conditions............................................................................................................................................... 30
Transportation and Storage Conditions ................................................................................................................... 30
Transporting the System ......................................................................................................................................... 30
System Storage ....................................................................................................................................................... 31
Declaration of Electromagnetic Compatibility ........................................................................................................ 31
Promulgation of Heat Index and Mechanical Index ................................................................................................ 31
Standards ................................................................................................................................................................. 31
Symbols ................................................................................................................................................................... 32
APPENDIX A: LABELING ....................................................................................................................................... 33
Main Unit Labeling .................................................................................................................................................. 33
Probe Labeling ......................................................................................................................................................... 33
Adapter Labeling ..................................................................................................................................................... 33
APPENDIX B: ACOUSTIC OUTPUT REPORT ............................................................................................................ 34
APPENDIX C: RE-AIMING GUIDE .......................................................................................................................... 35

CARESONO PadScan HD 5 User’s Manual
1
INTRODUCTION
The PadScan HD 5by Caresono Technology Co., Ltd. Provides real-time ultrasound imaging and measuring,
and also provides non-invasive volume measurement of the bladder. During image scanning, multiple 2D
plane ultrasonic images are acquired in several seconds.
It features:
Expert operating mode and Easy operating mode.
Correct, reliable, fast, and simple operation.
Printouts of ultrasound images with many parameters.
Portable8-inch LCD screen(800x600pixels)
Combined power supply with AC adapter and a built-in battery.
Intended Use
The PadScan HD 5 projects ultrasound energy through the lower abdomen of the patient to obtain images
of the bladder which is used to calculate bladder volume noninvasively.
Contraindications
The PadScan HD 5 is contraindicated for any patient who is not a candidate for ultrasound scanning.
To prevent cross-infection, do not use on patients with sores or wounds.
This device is not suitable for the bladder scan of pregnant woman and infants.
Do not use on patients with ascites
If you scan a patient with a catheter in his/her bladder, the catheter may affect measurement accuracy.
However, the information obtained from the measurement and real-time ultrasound image could still
be clinically useful for detecting problems such as a blocked catheter.

CARESONO PadScan HD 5 User’s Manual
2
CAUTIONS AND WARNINGS
Read carefully before use
Only trained technicians should operate this device. The operator must read the Owner’s manual entirely
and refer to any additional training materials before using the device.
Check and maintain the device regularly.
Do not disassemble or attempt to repair the device and the probe. ONLY CARESONO-trained
technicians may service the unit.
Equipment Checks
1. Make sure all cables are properly connected.
2. Make sure the device is properly functioning.
3. Keep the device away from sunlight and keep dry.
Pre-scan Checks
1. Make sure the probe is properly connected.
2. Make sure no water, chemicals, or other materials are on the device.
Scanning Checks
1. Do not drop the probe. Always use ultrasound gel with the probe to ensure proper contact.
2. Pay attention to the main parts of the device. If strange noises or smells are emitted from the device,
stop the operation at once, unplug all cables, and power OFF. Contact CARESONO technical support
for help.
3. Patients must not touch other electrical equipment during examination.
4. Do not cover the air vent of the device.
Post-scan Checks
1. Turn OFF the power.
2. Pull out the power plug from the power sockets.
3. Clean the device and the probe.
Maintain Device Safety
This device should avoid the following:
Spraying water
High humidity
Poor draught
Direct sunlight
Dust
Gas with salt or sulfur
Warning:
Do not plug or unplug the probe into the system while the power is ON. Connecting
the probe while the power is ON may cause damage to the probe and the main unit.
Warning: Do not use if any part of the device or if cables display any signs of damage.

CARESONO PadScan HD 5 User’s Manual
3
Chemical medicines or gas
Sudden shaking of the device or drops
Maintain Probe Safety
Do not immerse the probe in water or any other liquids.
Keep probe away from heat sources.
To avoid damaging the cable or transducer connector, handle them with care. Do not bend or pull
probe cable.
It is recommended to use standard ultrasound gel only. Other substances may damage the probe
and the probe cable.
A dirty probe may decrease the accuracy of the system. Keep the probe clean. Use standard
detergent or clean water to clean the ultrasound gel off the probe.
The probes are not interchangeable between units. They are calibrated to specific main units. If
changing the probe associated with a machine, it is necessary to calibrate the machine before using.
Confirm that the probe and cable are normal before and after each examination. A defective probe
may cause electric shock to the patient.
Handling the Device
Always pull out the power plug.
Drop, shake, or hit the probe may cause malfunction or inaccuracy. Do not drop, shake, orhit the
probe or the device.
In Case of Device Failure
If it is suspected that the device is not operating properly, turn OFF the power and unplug the power.
Contact CARESONO technical support for help.
Manufacturer Declarations
WARNING! Changes or modifications not expressly approved by CARESONO could void the user’s
authority to operate the equipment.
Warning:
To ensure the continued safe use of the equipment, modifications must be inspected
and tested by approved departments.
Warning:
It is strictly prohibited to perform any modifications to the device without prior
permission.
Warning:
User swill assume responsibility of the risks associated with the use of the device after
recommended service life.

CARESONO PadScan HD 5 User’s Manual
4
EQUIPMENT UNPACKING AND INSTALLATION
Unpacking
After unpacking, confirm there is no damage due to shipping, and then check the parts against the packing
list. The PadScan HD 5 system arrives with:
1 main unit with docking station and screws
1 Power adapter:AC100-240V±24V 50/60Hz, main unit:DC14V±0.5V
1 N2/2.5MHz 3-D Mechanical sector scanning probe
1 Ultrasound gel bottle
1 Quick Start Guide and 1 Owner’s Manual
1 Li-ion battery: Model: SP-1196
1 Certificate
1 Packing list
1 Carrying case
PadScan HD 5 front
PadScan HD 5 side connection ports
PadScan HD 5 back
power button
scan screen
probe connection port
power adapter
connection port
printer paper
dispenser
battery
USB slot for flash disk

CARESONO PadScan HD 5 User’s Manual
5
Installation
1. Plug the AC input plug of the adapter into a power outlet. Insert the DC output plug of the adapter
into the DC14Vport on the side of the device. The DC output indicator light turns green to signal it is
working properly.
2. Connect the main unit to the docking station:
Align the socket on the bottom of the main unit with the docking station and place it into the
docking station. See following diagram:
PadScan HD 5 docking station installation
1 Insert here.
2 Screw in tightly.
3 Screw in (when necessary).
3. Align the red dot on the main unit with the black dot on the probe, and insert the probe into the
main unit.
Lock slot: Any notebook security lock is applied to this lock slot on the right down side of the main unit.
Black dot

CARESONO PadScan HD 5 User’s Manual
6
Battery Installation and Removal
Slide the battery lock down and lift the battery. Insert (or remove)the battery in the slot, and then slide the
lock back into place.
Battery Charging and Status
1. Install the battery into the main unit.
2. Place the main unit securely onto the docking station.
3. Plug the power supply into the power outlet to start charging.
4. Turn ON the scanner.
NOTE: The yellow light indicates the battery requires charging. Green light signals it is fully charged.
Power Supply
PadScan HD 5 power is supplied by two interchangeable methods: adapter and built-in battery.
Adapter Power Supply
1. Check that the adapter is properly functioning; verify the EPS is in the specified range.
2. Insert the AC input plug of the adapter into the base of the power supply.
3. Place the main unit onto the docking station.
4. The light indicator will turn green to signal it is functioning.
5. Turn on the main unit.
Battery Power Supply
1. Install the battery into the main unit as described on page 6.
2. Press the power button to turn on the main unit.
Warning:
Use only CARESONO supplied power adapters.
battery lock

CARESONO PadScan HD 5 User’s Manual
7
POSITIONING THE PROBE AND OBTAINING OPTIMAL IMAGES
Locating the position of the bladder is the most important step in obtaining correct volume measurements.
The bladder is located in the hypogastrium, below the navel. Coat the hypogastrium of the patient and the
probe with ultrasound gel before the scan. Place the probe as illustrated below.
REMEMBER: the probe button should always face up toward the patient’s head.
In order to correctly measure the volume of the bladder, grasp the probe as shown here:
A green guideline visible on screen helps center the bladder. ((You can enable/disable this function from
SETUP menu>Display>Central guide line ON/OFF)

CARESONO PadScan HD 5 User’s Manual
8
In expert mode, move the bladder image to the center. Dark green central line indicates the image is
centered, while the orange central line indicates the image derivates from the center. See Figure 1 and
Figure 2.
Figure 1:correct position (expert mode)
Figure 2:incorrect position (expert mode)
In easy mode, move the bladder image to the center. Dark green central line indicates the image is
centered, while the orange central line indicates the image derivates from the center. See Figure 3 and
Figure 4.
Figure 3: correct position (easy mode)
Figure 4: incorrect position (easy mode)
If the central position of the bladder deviates from the central line and to the right of the image, move the
probe to the left. The central position of the bladder moves according to the movements of the probe. If
the bladder image deviates from the central line and to the left side, move the probe to the right.
In both Expert mode and Easy mode, a crosshair of project icon guide is displayed at the right side on the
screen. It helps re-aim and re-scan. (You can enable/disable this function from SETUP
menu>Display>Projection ON/OFF)
Please refer to APPENDIX C: RE-AIMING GUIDE for more information about how to re-aim and re-scan.

CARESONO PadScan HD 5 User’s Manual
9
PADSCAN HD 5 SCANNER SCREENS AND BUTTONS
Login Screen
A Operator: Tap to select user ID
B Password: Tap to type password
C Keyboard:use for typing
Tap when ID and password are complete
Main Scanning Screen
Expert Mode
Bladder location for volume measurement is determined by the technician scanning the image. Displays a
real-time 2D image.

CARESONO PadScan HD 5 User’s Manual
10
A: Hospital/clinic name display
B: Name of the department and userdisplay
C: Battery status indicator
D: Date and time
E: C guideline
F: Ultrasound image viewing area
G: Tap arrows for image review
H: Patient information display
I: Current volume display
J: Projection of probe aiming (Optional)
K: Tap to add new or review patient data (see page 12)
L: Tap to enter Setup menu
M:
Maximum Volume display (Optional)
N:
Tap to print current scan
O:
Tap to save current scan
Easy Mode
Provides guidance to help find the correct location of the bladder. Does not provide a real-time 2D scanned
image.
A: Crosshair
B: Profile of the urine bladder
A
B

CARESONO PadScan HD 5 User’s Manual
11
Patient Information Screen
A: Tap GENDER and then tap icon [male , female , female with
hysterectomy , or child (under 120cm tall and weighing less than 25kg)]
B: Tap to add Patient ID
C: Tap to add Patient Age
D: Tap to add Patient Name
E: Keyboard for typing ID and age
F: Tap to clear content
G: Tap to enter Patient data management
H: Tap to confirm content
I: Tap to cancel screen

CARESONO PadScan HD 5 User’s Manual
12
Keyboard for entering patient name
A: Input patient name
B: Virtual keyboard
C: Caps lock
D: Confirm input
E: Cancel input
F: Backspace
A
D
E
C
F
B

CARESONO PadScan HD 5 User’s Manual
13
Save and Review Patient Data
Tap to save current patient scan to the Patient Data Management.
NOTE: If you want to save the exam to Patient Data Management, before you start to scan the patient,
you must at least select the patient gender. Then you can review the saved exam in the patient data
management.
NOTE: If the USB flash disk is inserted. The current patient scan will be saved into the USB flash disk
instead of the machine’s memory.
Tap in the main screen and then tap to enter patient data management.
Tap the line in the patient list then tap to review the data.
Tap or to move through the pages of patient information.
A: Sequence Number
B: Patient ID
C: Patient Name
D: Patient Age
E: Patient Gender
F: Time and date
G: Urine Volume
H: Operator Name
I: Selected Patient
J: Load selected patient case
K: Previous page
L: Export all patient data to USB Disk
M: Clear all patient data
N: Next page
O: Back to the previous page
E
H
A
B
C
D
I
F
G
L
K
J
M
N
O

CARESONO PadScan HD 5 User’s Manual
14
Tap to clear all the saved patient data; Or clear synchronization makers. During the
process of uploading the saved patient data to the PC patient management software, if you want to
re-upload, you need to clear the synchronization makers.
Export Patient Data
Insert the USB flash disk to the USB slot on the main unit.
Tap in the Patient Management screen to export the selected patient data/all patient
data to the USB flash disk.
NOTE: It will take about 10 seconds to export one selected patient data to the USB flash disk.
NOTE: Do not remove the USB flash disk during the exporting.

CARESONO PadScan HD 5 User’s Manual
15
Patient Data Management
Connect to PC
Install the Driver of HD 5 on the PC.
Connect the I/O slot of HD 5 main unit to a PC via the USB cable.
Tap in the main screen and then tap to enter patient data management.
Run <Patient Data Management> software from PC.
Do not remove the USB cable during uploading.
HD 5 main unit USB Cable PC
Patient Data Management
Select [Tools]->[Sync Data] to upload the patient data from HD 5 to <Patient Data Management>.
Add the Hospital Name, Department Name and Physician Name from [Tools]->[Option].
Review the ultrasound images of selected patient by click<Previous> and <Next>.
Print the Bladder Scanner Report from [Tools]->[Print].
Patient Data Management interface Report printout
NOTE: If you have saved new patient data to HD 5, you need to reboot HD 5 before another attempt of
uploading.

CARESONO PadScan HD 5 User’s Manual
16
Setup Screens
Tap the button on the main screen to configure the system.
A: General
Tap to add basic information and to start probe calibration if necessary (see page 25 for
calibration information).
A:
Tap to add the clinic/hospital name. Up to 25 letters can be added.
B: Tap to add the department name. Up to 20 names can be added.
C: Tap to add date and time.
D: Tap to start calibration (see page 24 for more information on how to calibrate)
E: Tap for Language selection.
F
E
D
C
B
A
Other manuals for PadScan HD 5
1
Table of contents
Other Caresono Scanner manuals
Popular Scanner manuals by other brands

Blackmagicdesign
Blackmagicdesign cintel Installation and operation manual

Shining 3D
Shining 3D EinScan-Pro Series user manual

JB Systems Light
JB Systems Light Winner II Operation manual

CyberView
CyberView X5 user manual

oneConcept
oneConcept ION Pics 6 manual

Dynalab
Dynalab SC-2124 Installation and operation manual