CAROL DW-20 User manual

DW-20 Digital Wireless Microphone
User’s Manual
Congratulations on your purchase of DW-20 Digital Wireless Microphone. This
manual is provided to help you understand the correct operation and obtain optimal
performance, please read carefully before use.
DW-20 Digital Wireless Microphone, based on the concept of designing for modern
lifestyle, with graceful curve, fine texture and user friendly design, is suitable for indoor
activities such as family, school, organization or company events, and karaoke…etc.
1. DW-20 Product Contents:
1.1. One DW-20R Digital Wireless Receiver
1.2. Two DW-20TDigital Wireless Handheld Microphones
1.3. One DC7.5V Power Adapter
1.4. One f6.3 M-XLR/M-XLR Cable
1.5. One User’s Manual
2. Parts and Functions:

Figure 1
2.1. DW-20 Digital Wireless Receiver (as shown in Figure 1)
(1) Power Switch: Switches on/off the Receiver (with status LED).
(2) Mic AConnecting LED: Lights up when microphone A is successfully
connected.
(3) Mic B Connecting LED: Lights up when microphone B is successfully
connected.
(4) Antenna: Receives signals from the microphone. The angle of the antennas
can be adjusted leftward, rightward or backward manually.
(5) Mic B Reset Button: Resets microphone B signals (FOR TECHNICIANS USE
ONLY).
(6) ∮6.3 Female Jack: Connects to the output of an amplifier.
(7) Mic A Reset Button: Resets microphone A signals (FOR TECHNICIANS USE
ONLY).
(8) DC Power Receptacle: Connects DC adapter. The polarity of central pole is
positive.
Figure 2
2.2. DW-20 Digital Wireless Handheld Microphone (as shown in Figure 2)
(1) Ball Grille: Protects the capsule. The enclosed windscreen effectively reduces
pop noises.

(2) Power Switch: Switches on/off the microphone (with status LED).
(3) Upper Housing: For easy holding the microphone, and to protect the wireless
transmitting PCB inside.
(4) Lower Housing: Protects the batteries from falling off.
(5) Rubber Cover: Protects the antenna and strengthen the transmitting effect.
Do not hold onto this area while using the microphone.
(6) Battery Compartment: Accommodates two AA batteries.
(7) Channel Switch: Changes the channel (total 16 channels) to eliminate
possible interferences.
(8) RF Power Switch: Adjusts the RF transmission poweraccording to the practical
application.
3. Operating Instruction:
3.1. Set Up the System:
3.1.1. Plug the supplied DC adapter to a wall outlet and connect the output end
to the power receptacle on the Receiver.
3.1.2. Press the Receiver’s power switch to turn the power on, and the status LED
will light up green.
3.1.3. Press the microphone power switch to turn the power on, and the status
LED will light up green. When the Microphone Connecting LED on the
Receiver lights up red, it indicates the microphone signal is been received
by the Receiver.
3.1.4. For best pickup result, keep the microphone to the sound mouth or source
in between 2 to 5 cm.
3.2. Turn Off the System:
3.2.1. Press on the microphone power switch till the status LED goes off. When
the microphone is been turned off, the Microphone Connecting LED on the
Receiver would also go off.
3.2.2. Press on the Receiver’s power switch till the status LED goes off.
3.3. Replace Batteries:
3.3.1. When the microphone is on, but the status LED keeps blinking, it indicates
the battery energyis running low. Please replace the batteries.
3.3.2. Turn the lower housing counter-clockwise to remove the lower housing as
shown in Figure 3.

Figure 3
3.3.3. Insert two AA batteries in the battery compartment according to the
polarity marks.
3.4. Change the Digital Wireless Microphone Channel
When using wireless microphone, there might be interferences from the signals
transmitted by another wireless microphone or other 2.4G wireless appliances
nearby. These disturbances can be solved by selecting a different channel.
3.4.1. It is not necessary to turn the power off when changing the channel.
Remove the lower housing, there are 8 channel scales (as shown in Figure
4) and 8 channels in between scales (total of 16 channels).
3.4.2. Fitting a slotted screwdriver into the slot and rotate the switch clockwise
or counter-clockwiseto a desired channel.When stop turning the switch,
the Microphone Connecting LED on the Receiver will blink once, which
indicates the reconnecting is completed.
3.4.3. To avoid transmission interference, microphone A and B should be set at
least 2 channels apart. For best result, keep them 8 channels apart.
Figure 4

3.5. Setting RF Power on Microphone:
3.5.1. When the RF DIP switch is set as Figure A, transmission power is -18dBm,
and the effective distance is approximately 3M.
3.5.2. When the RF DIP switch is set as Figure B, transmission power is -10dBm,
and the effective distance is approximately 7M.
3.5.3. When the RF DIP switch is set as Figure C, transmission power is -4dBm,
and the effective distance is approximately 16M.
3.5.4. When the RF DIP switch is set as Figure D, transmission power is 0dBm,
and the effective distance is approximately 20M.
Figure AFigure BFigure CFigure D
4. Troubleshooting: No sound
4.1. Check if the power to Receiver is well connected.
4.2. If the status LED is not lit when the microphone has been switched on, check
whether the batteries are properly installed or have enough energy.
4.3. The maximum effective distance between the microphone and the Receiver is
20M, so the output audiomight be inconsistent when beyond the effective range.
5. Specification:
5.1. Digital Wireless Receiver
Model : DW-20R
Power Consumption :1.5W
Receiving Sensitivity :-78dBm
Volume Adjusting Range :0dB~12dB
Output Jack :?6.3 Stereo Female Jack
Rated Output Power :80mV
Dimension :210(L) ×182(W) ×105(H)mm
Weight :560g
5.2. Digital Wireless Handheld Microphone
Model :DW-20T
Carrier Frequency :2.404∼2.474GHz

Transmitting Power :0dBm∼-18dBm
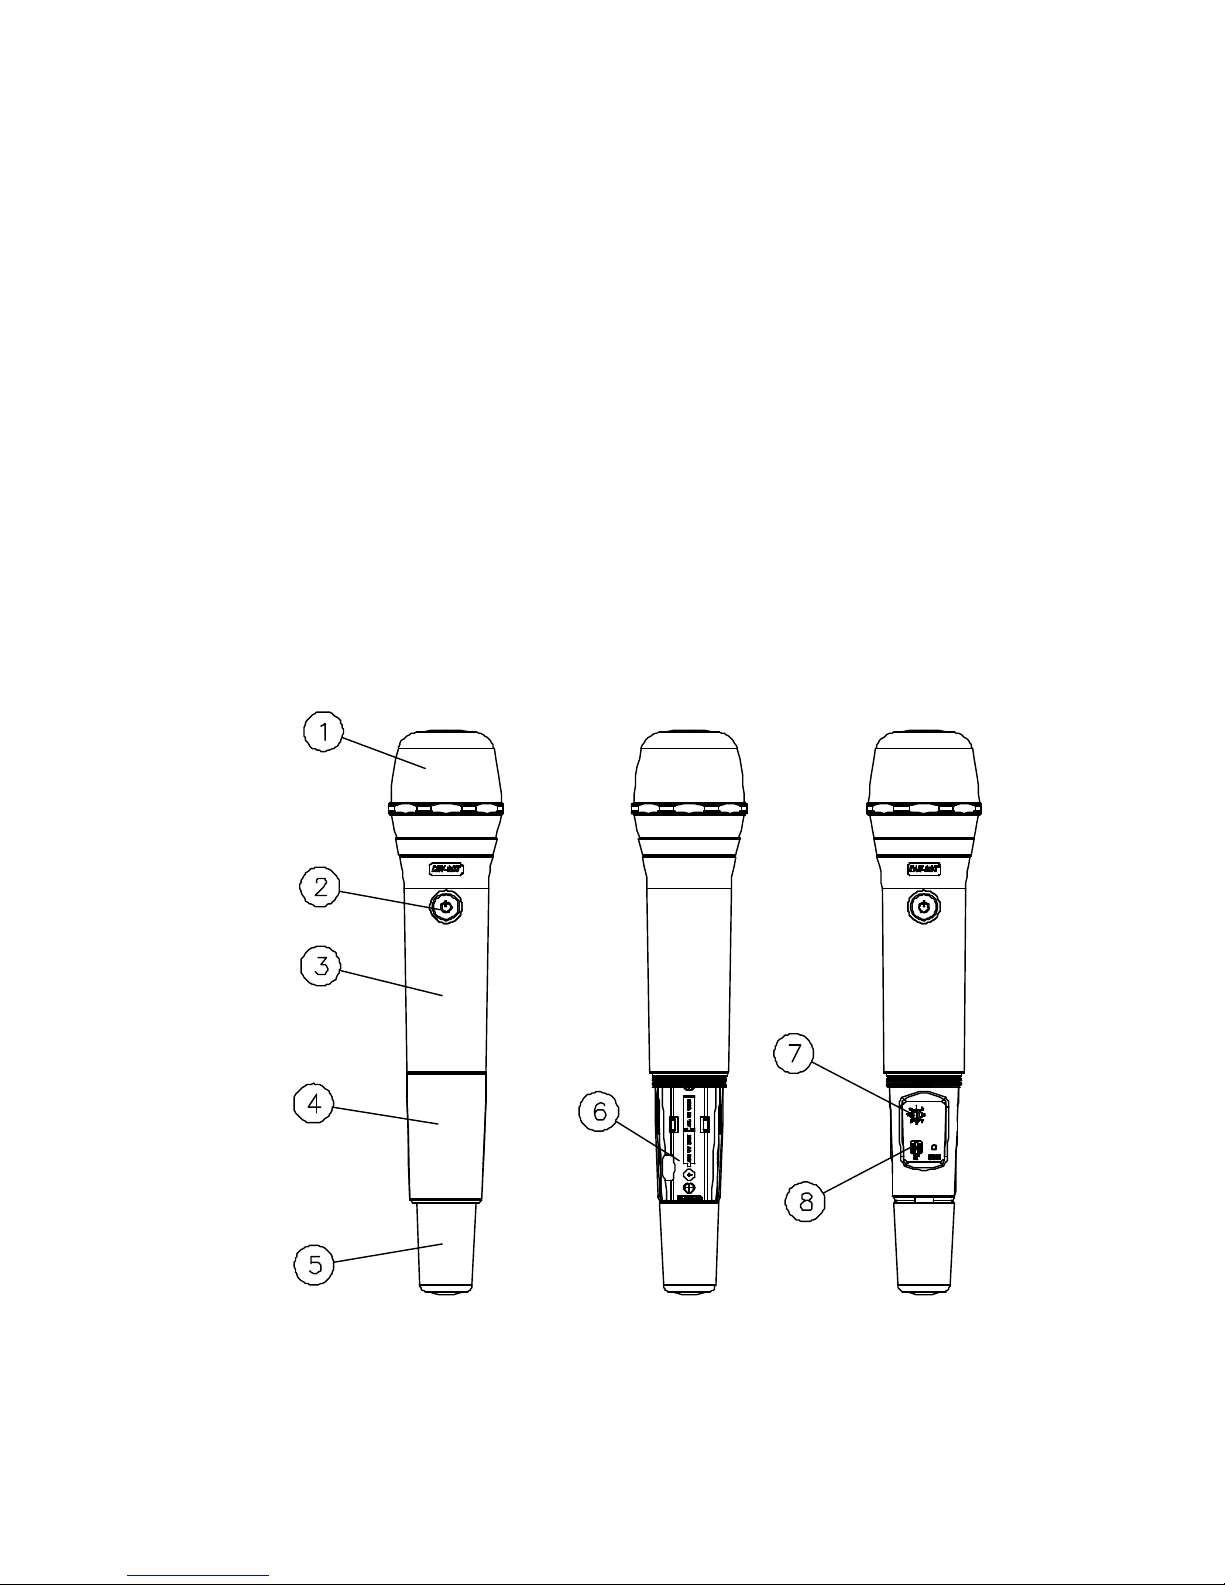
Capsule :Dynamic
Polar Pattern :Super-Cardioid
Impedance :600O
Frequency Response :50∼15K Hz
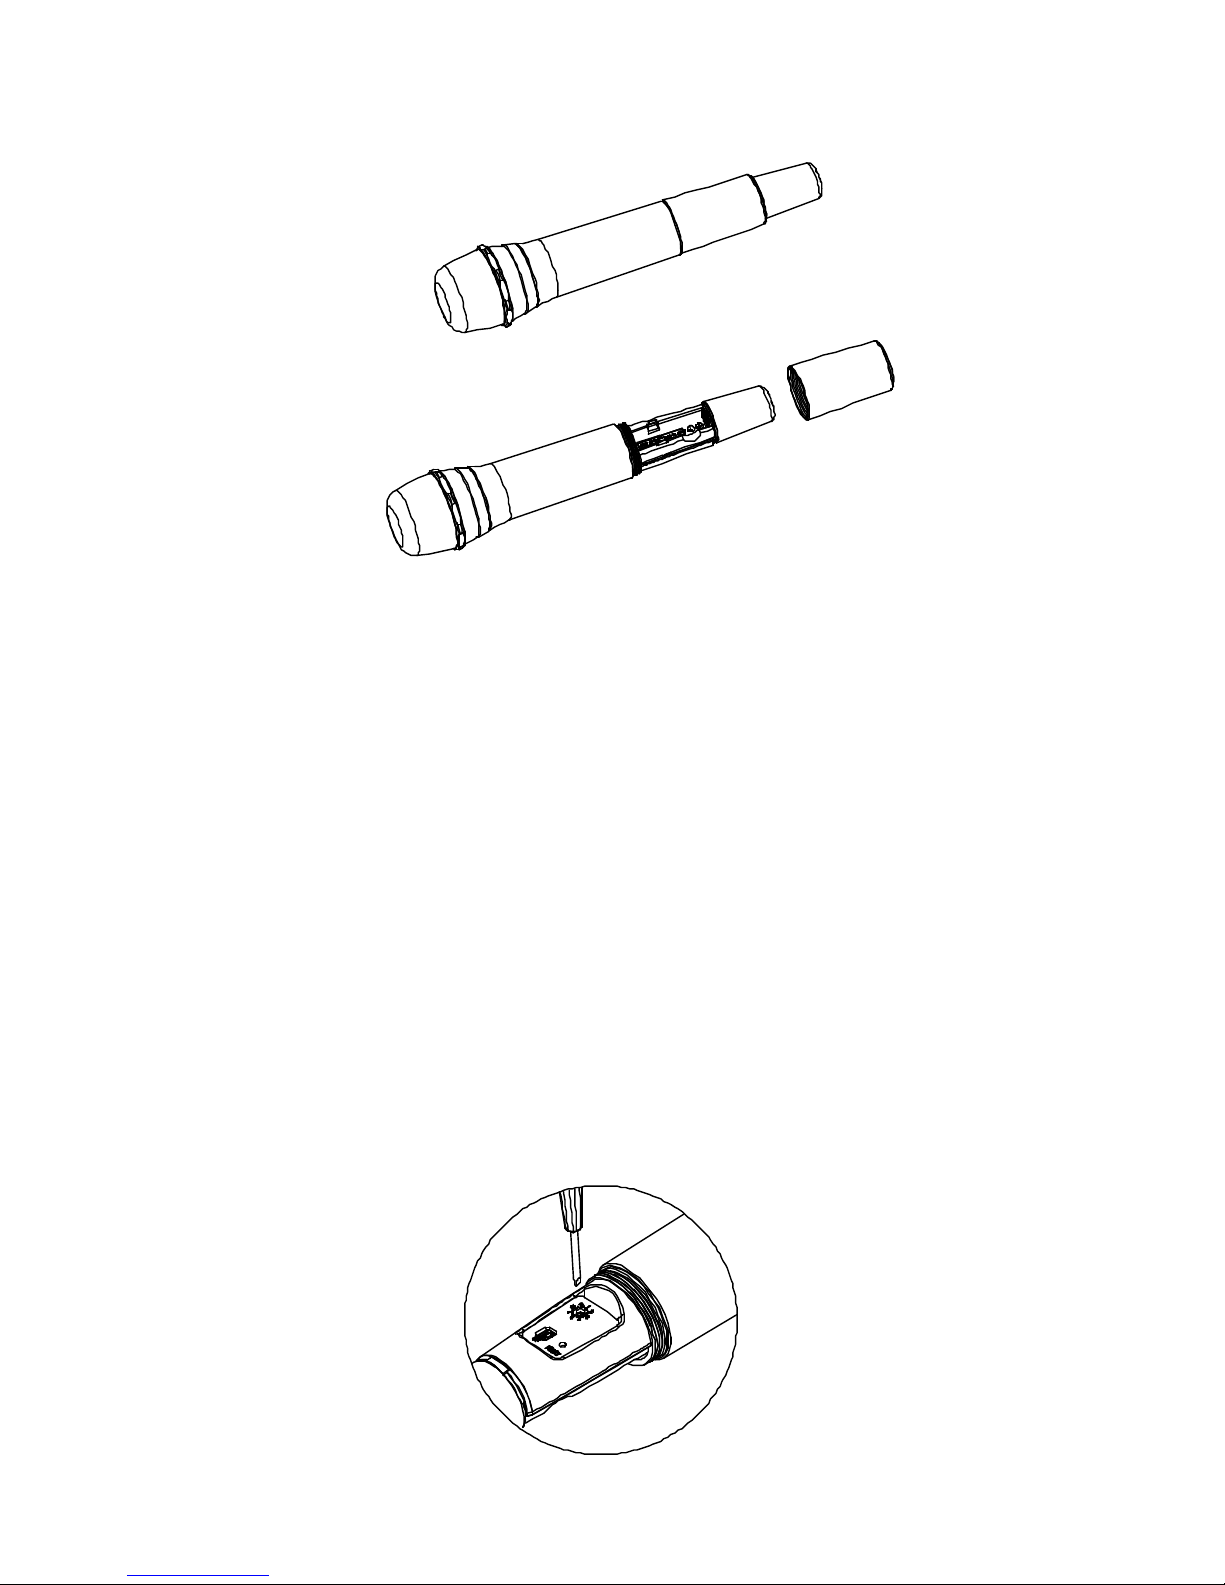
Power Supply :Two AA batteries
Battery Life :Approx. 50hours
Dimension :f54 ×258(L)mm
Weight :280g (W/O batteries)
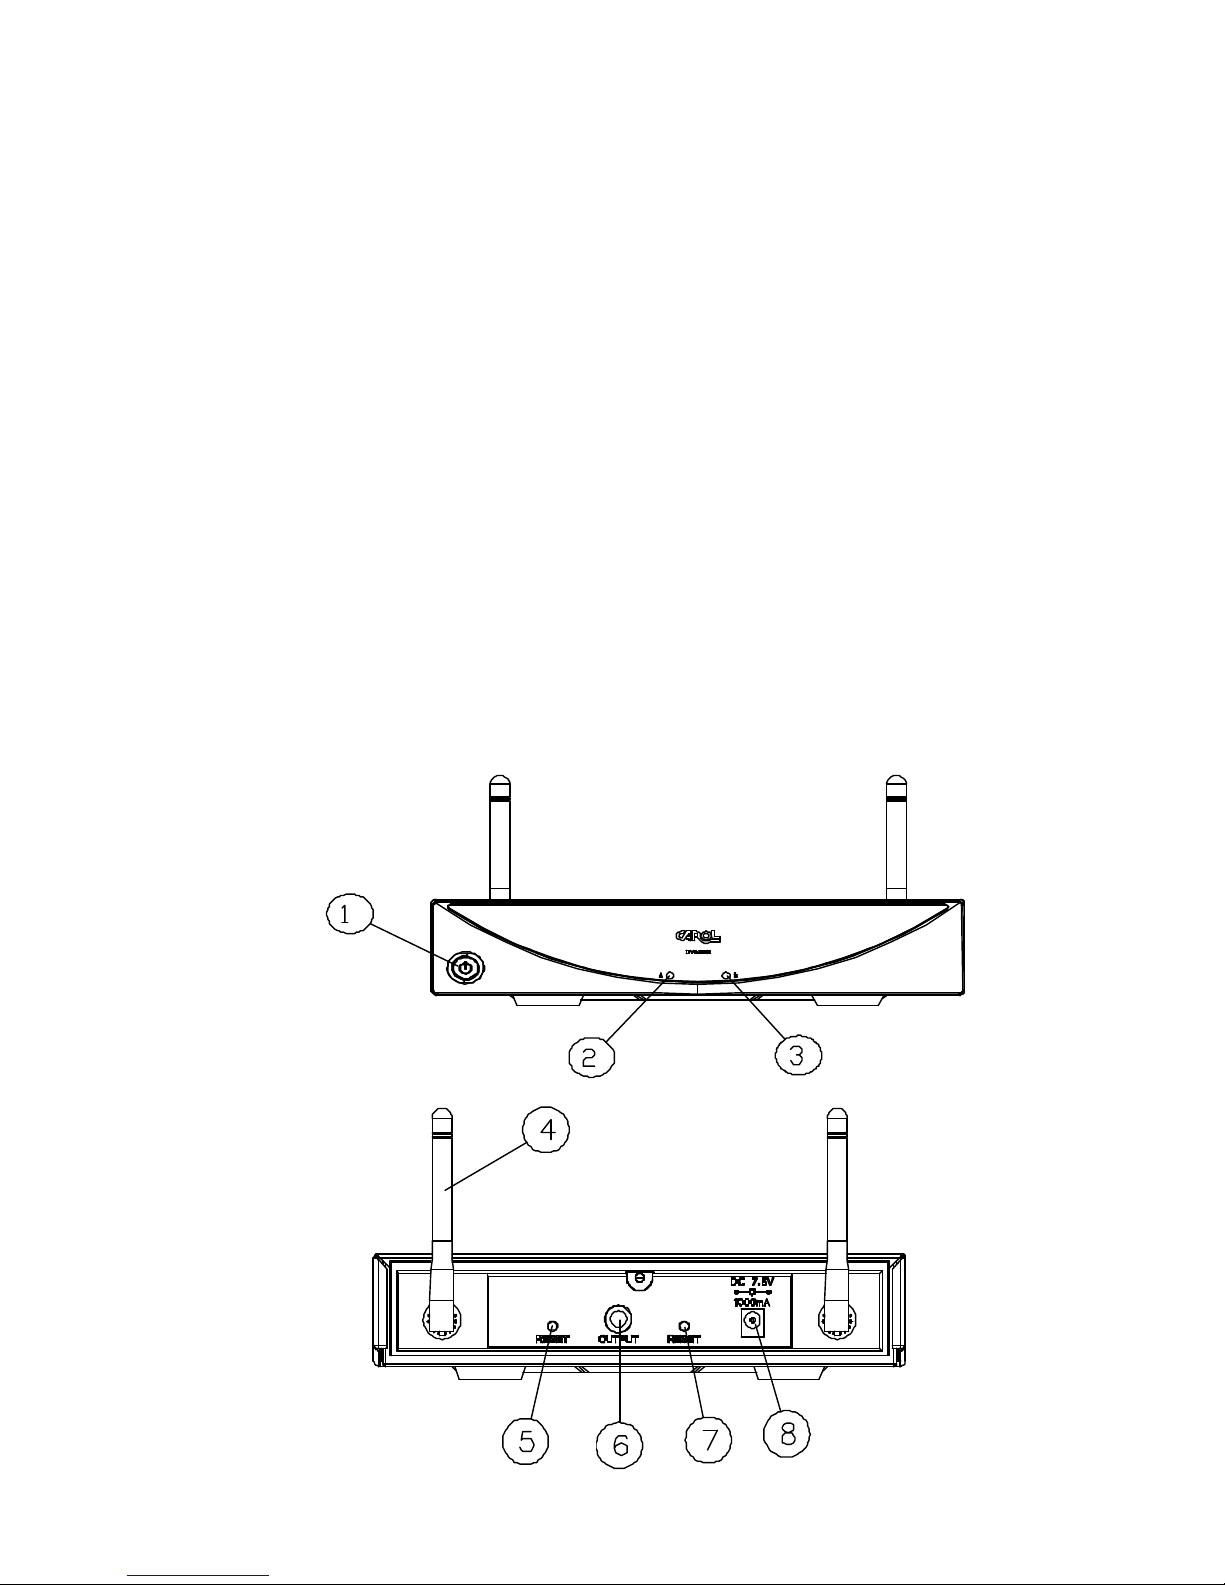
5.3. Power Adaptor
Input :AC 120/230 ,20W
Output :DC 7.5V/1A
6. Precautions
6.1. To avoid damaging the electric circuit, do not exposure the product to rain, water
or heavy humidity environment.
6.2. Avoid falling, or hitting by external force.
6.3. Do not use this product at areaswith high heat.
6.4. To avoid damaging the electric circuit, do not use the power adapter with different
specification.
6.5. To avoid interfering the display of a monitor, do not place this product near
electronic appliances that have CRT, such as TV or computer monitor.
6.6. While using the wireless microphone, keep the receiver away from any
interference sources such as a computer or communication equipments.
6.7. If not in use for a long period of time, remove the batteries and the power adapter,
and store them separately.
6.8. When the status LED keeps blinking after the microphone is turned on, it indicates
the battery energy is running low. Please replace the batteries.
7.FCC Caution
Notice : The changes or modifications not expressly approved by the party responsible for
compliance could void the user’s authority to operate the equipment.
IMPORTANT NOTE: To comply with the FCC RF exposure compliance requirements,
no change to the antenna or the device is permitted. Any change
to the antenna or the device could result in the device exceeding
the RF exposure requirements and void user’s authority to operate
the device.
This device complies with Part 15 of the FCC Rules. Operation is subject to the following two
conditions: (1) this device may not cause harmful interference, and (2) this device must accept any
interference received, including interference that may cause undesired operation.
Table of contents
Other CAROL Microphone manuals