Carot One goldolo User manual

- 2 -
Table of Contents
1. INTRODUCTION 3
2. FEATURES. 3
3. OVERVIEW. 8
3.1 Connection
3.2 Operation
4. SPECIFICATIONS 12
4.1 Specification of the Power Amplifier Unit
4.2 Specification of the Headphone Amplifier Unit
4.3 Specification of the Pre Amplifier Unit
4.4 Specification of the AC Adaptor
5. TROUBLESHOOTING 14
6. ACCESSORIES 15

- 3 -
1. Introduction
Thank you for your purchase of Carot One GILDOLO Class-D stereo
Headamp, Preamp and power amplifier.
Carot One introduces the mini-size Class-D stereo amplifier GILDOLO
providing up to 2x15W output with the bundled AC power supply unit. Thanks
to the Tripath's proprietary Class-D Digital Power Processing (TM) technology
and our special techniques in circuit design and component selection,
GILDOLO achieves the sound quality of high-end Hi Fi but in a very affordable
price.
2. Features
Applied the proprietary D-amp technology for audiophile quality sound,
high power efficiency (90%) and less heat generation
Compact design (mini-size & light weight), easy portable and setup
Provide up to 2x15W output
An AC adaptor is bundled for continuous power supply.
Separated amplifier & AC adaptor design to minimize mutual interference
and flexible to apply other power sources, e.g. lead-acid battery.
Standard audio and speaker sockets compatible with most audiophile
quality cables.
It suppresses the "pop" sound when power on/off and also increase the
sound purity.
Built-in over-current protection.
Built-in over-temperature protection
Audiophile-graded parts and components
Air-core inductor used instead of magnetic-core for better sound
The stylish & specially-plated aluminum case provides not only
good-looking, and also provides outstanding shielding capability.

- 4 -
Safety Guidelines
Important safety instructions
This product is designed and manufactured to meet strict quality and safety
standards. However, you should be aware of the following installation and
operation precautions.
1. Take heed of warnings and instructions
You should read all the safety and operating instructions before operating this
equipment. Retain this handbook for future reference and adhere to all
warnings in the handbook or on the equipment.
2. Water and moisture
The presence of electricity near water can be dangerous.
Do not uses the equipment near water, for example next to a bathtub,
washbowl, kitchen sink, in a wet basement or near a swimming pool, etc.
3. Object or liquid entry
Take care that objects do not fall and liquids are not spilled into the enclosure
through any openings. Liquid filled objects such as vases should not be placed
on the equipment.
4. Placing the equipment
Only use a rack or shelf that is stable and strong enough to support the weight
of this equipment.
5. Ventilation
Do not place the equipment on a bed, sofa, rug or similar soft surface, or in an
enclosed bookcase or cabinet, since ventilation may be impeded. We
recommend a minimum distance of 50mm around the sides and top of the
equipment to provide adequate ventilation.
6 Heat
Locate the equipment away from naked flames or heat producing appliances
such as radiators, stoves or other appliances that produce heat.

- 5 -
7 Climate
The equipment has been designed for use in moderate climates and in
domestic situations.
8. Cleaning
Unplug the unit from the mains supply before cleaning.
The case should normally only require a wipe with a soft, lint-free cloth. Do not
use chemical solvents for cleaning.
We do not advise the use of furniture cleaning sprays or polishes as they can
cause indelible white marks.
9. Power sources
Only connect the equipment to a power supply of the type described in the
operating instructions or as marked on the equipment.
The primary method of isolating Gildolo from the mains supply is to use the
switch on the rear of the unit. Gildolo must be installed in a manner that makes
disconnection possible.
10. Power-cord protection
Power supply cords should be routed so that they are not likely to be walked
on or pinched by items placed upon or against them. Pay particular attention to
the point where they exit from the equipment.
11. Power lines
Locate any outdoor antenna/aerial away from power lines.
12. Non-use periods
If the equipment is not being used for an extended period, we recommend that
you unplug the power cord of the equipment from the outlet, to save power.
13. Abnormal smell
If an abnormal smell or smoke is detected from the equipment, turn the power
off immediately and unplug the equipment from the wall outlet. Contact your
dealer and do not reconnect the equipment.
14. Servicing
You should not attempt to service the equipment.
Contact your dealer to arrange servicing.

- 6 -
15. Damage requiring service
The equipment should be serviced by qualified service personnel when:
A. the power-supply cord or the plug has been damaged, or
B. objects have fallen, or liquid has spilled into the equipment, or
C. the equipment has been exposed to rain, or
D. the equipment does not appear to operate normally or exhibits a marked
change in performance, or
E. the equipment has been dropped or the enclosure damaged.
Safety compliance
This equipment has been designed to meet the EOCENE 60065 international
electrical safety standards.
This device complies with Part 15 of the FCC Rules.
Operation is subject to the following two conditions:
(1) This device may not cause harmful interference, and
(2) This device must accept any interference received, including interference
that may cause undesired operation.
WARNING:
Due to the mains switch being located on the rear panel, the apparatus must
be located in an open area without anything obstructing access to the mains
switch.
Mains plug/appliance coupler is used to disconnect device and it shall remain
readily operable.
Correct disposal of this product
This marking indicates that this product should not be disposed with other
household waste throughout the EU.
To prevent possible harm to the environment or human health from
uncontrolled waste disposal and to conserve material resources, this product
should be recycled responsibly.
To dispose of your product, please use your local return and collection systems
or contact the retailer where the product was purchased.

- 7 -

- 8 -
3. Overview
1. Volume Controller and Pre-Amp Power On/Off.
2. 3.5mm Headphone socket
3. 3.5mm AUX input socket for MP3, etc. (over-ride rear input)
4. Power Indicator
WARNING:
When plug in your headphone or MP3 into the mini jack (2 and 3), always
plug in a vertical way. NEVER shake the mini jack as this will
permanently damage the internal structure of the socket causing bad
contact of signal.

- 9 -
5. Audio signal line output.
6. Audio input. The audio signal input (LEFT/RIGHT) connects from
audio source (e.g. CD player) to the amplifier by the RCA audio cable.
7. Power ON/OFF switches; pull up to power off the amplifier and pull
down to power on.
8. Power Supply Socket; Plug the bundled AC Adaptor to this socket to
supply power to this amplifier.
9. Speaker Output (Binding Post);
10. Audio signal line in.
WARNING:
When plug in the supplied mini jack cable between 5 and 10, always plug
in a vertical way. NEVER shake the mini jack as this will permanently
damage the internal structure of the socket causing bad contact of signal.

- 10 -
3.1 Connection
Carot-One Gildolo is easy to use product. Simply connect your source (CD
player, MP3 player, etc..) and speakers following below steps, you can enjoy
the high quality music in a second:
-Connect “Line Out” mini socket (5) to the “Line In” mini socket (10) using
the supplied mini jack to mini jack audio cable.
-Connect your CD player to the “Line In” RCA socket (6) using normal RCA
audio cable (not included)
-You can also connect your MP3 player to the 3.5mm AUX input socket (3)
using a mini jack cable (not included). Once this input is used, it will
over-ride the rear RCA input (6).
-Connect your speakers to the binding post (9)
-Connect the power adaptor to the “Power In” connector (8) of both units.
It’s now all set and you are ready to enjoy your music.
3.2 Operation
Please follow the below steps such that you can enjoy the product without any
difficulty:
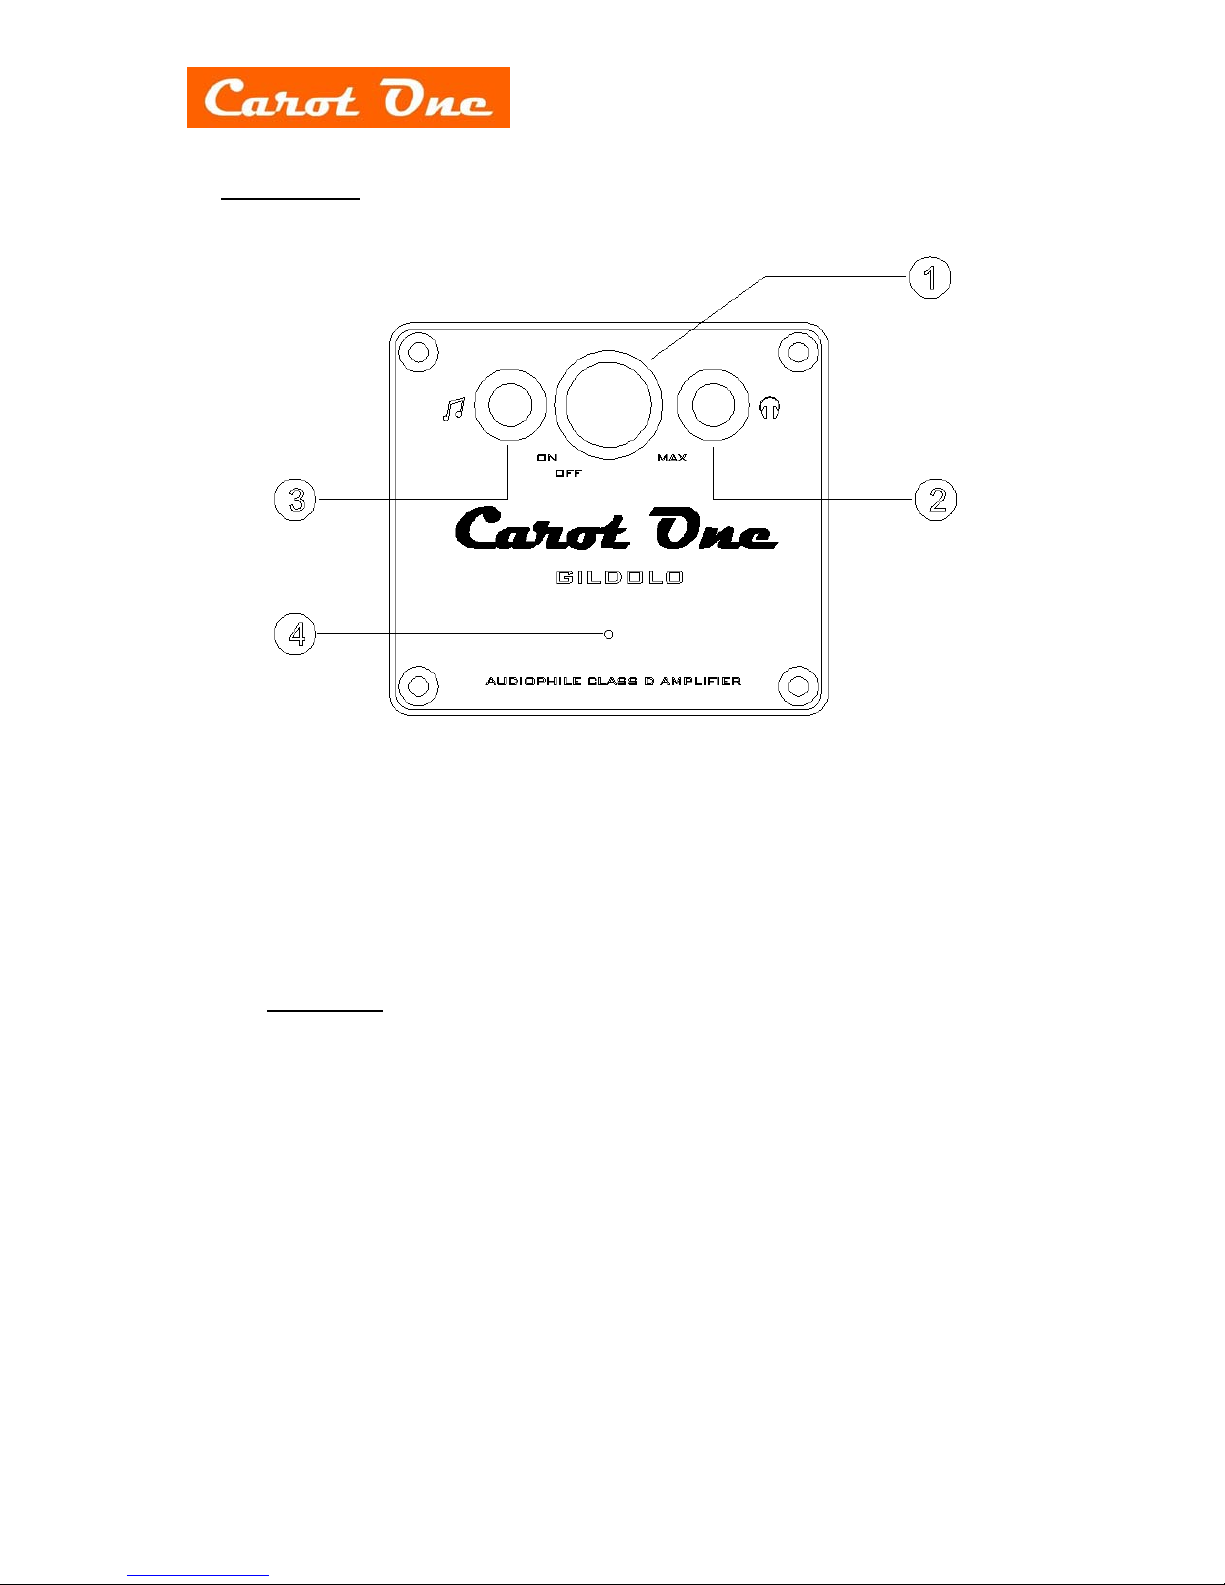
-Turn the “Volume controller” (1) clockwise to turn on the pre-amplifier and
keep the level at minimum.
-Turn on the power amplifier using the “Power” switch (7) at the back of the
unit. Now you can see the “Power Indicator” (4) turns to blue color.
-Play your source equipment and you can hear music from your speakers.
Now, you can control the volume level by turning the “Volume controller” (1)
-There is a “3.5mm Headphone socket” (2) in the front panel. You can
connect your headphone to the unit. Once your headphone is connected,
the speaker output will be disconnected automatically.
-To turn off the amplifier, turn the “Volume controller” (1) to minimum level.
Then, switch off the “Power” switch (7) of the power amplifier. When the
“Power Indicator” (4) turn off, turn the “Volume controller” (1) to fully turn off
the pre-amplifier.

- 11 -

- 12 -
4. Specifications
4.1 Specification of the Power Amplifier Unit
T-Amp IC Tripath TA2024
Output Power 2x15W @4ohm
2x6W @8ohm(RMS)
Signal-to-Noise Ratio (SNR) 98dB
Dynamic Range 98dB
IHF IM Distortion 0.10% @ 1W, 4ohm
THD+Noise Audiophile Quality 0.03% @ 9W 4ohm
0.1% @ 11W 4ohm
0.1% @ 6W 8ohm
High Power 10% @ 15W 4ohm
10% @ 10W 4ohm
Power Efficiency 81% @ 15W 4ohm
90% @ 10W 8ohm
Input Audio IN RCA (Left/Right) x 1
Power Socket (5.5mm/2.1mm) x 1
Speaker OUT RJ45 x1
Other Volume & Knob Power ON/OFF switch x
Power Indicator (Blue LED) x1
Power Supply DC 12V-13.2V (max.)
4.2 Specification of the Headphone Amplifier Unit
Signal-to-Noise Ratio (SNR) 92dB
Power Output 3.0 Watts per channel on 33 Ohm
Headphone
Frequency response 15 Hz - 100 kHz -1db
Input Impedance 10k Ohms
Input Audio CD IN RCA(Left/Right) x 1 [3Vpp max.]

- 13 -
4.3 Specification of the Pre Amplifier Unit
Input Impedence 10K Ohms unbalanced
Max Input Level +18dBV
Frequency Response 25Hz – 150KHz (+/- 3dB)
Output Power 450 mW/side,THD+N:0.1% (@16 Ohms)
108 mW/side,THD+N:0.1% (@300 Ohms)
Maximum Gain 20 dB/channel
Input Audio CD IN RCA(Left/Right) x 1 [3Vpp max.]
Audio IN 3.5mm jack (Left/Right) x 1
Power Socket (5.5mm/2.1mm) x 1
Output Audio Headphone OUT 3.5mm jack x 1
Switch Knob Audio and power switch x 1
Power Supply DC 12V-13V (max.)
4.4 Specification of the AC Adaptor
AC Input UniversalAC 100V-240V/50-60Hz
DC Output DC 12V 5A (60W)
DC Plug DC 2.1mm
Ripple & Noise <= 25mV
Over-load Protection 105%-150%
Over-voltage Protection 115%-150%

- 14 -
5. Troubleshooting
If your machine is out of order, it may not be very serious. Before you call your
local distributor or us to repair, you are suggested to check the following:
SYMPTOM POSSIBLE CAUSE REMEDY
cannot power ON
indicator not bright power cords not properly
connected properly connect the
power cords
power switch is OFF switch ON the power
no sound at all the volume level is too low turn volume level higher
The audio cable not
properly connected properly connect the
audio cable
the audio source (e.g. CD
player) not started playing start playing the audio
source
wrong input is selected check input selection
the speaker cables not
properly connected properly connect the
speaker cables
Hum audio connector plug not
fully pushed in Insert plug securely
incorrect input switch
position check the corresponding
input switch
sound out(s) loose connection check input and output
connections. When all has
been double-checked
reduce volume and switch
unit back on

- 15 -
7. Accessories
. 3.5MM jumper cable x 1
. 2.1MM Power bifurcation line x 1
. +12V power supply x 1
. User Guide x 1
OPENITEM ITALIA is WORLDWIDE DISTRIBUTOR of Carot One
Website: www.carotone.it
Email: [email protected] - END -
Table of contents
Other Carot One Amplifier manuals

Carot One
Carot One DIEGOLO Class-T User manual

Carot One
Carot One DOPPIO RUM 70 User manual

Carot One
Carot One FABRIZIOLO User manual

Carot One
Carot One FABRIZIOLO 30K User manual

Carot One
Carot One NIK 58-TUBE User manual

Carot One
Carot One Ernestolone User manual

Carot One
Carot One AUGUSTOLO-TUBE User manual
Popular Amplifier manuals by other brands

McMartin
McMartin LT-80A instruction manual

Atlas IED
Atlas IED HPA1302 owner's manual

MB QUART
MB QUART REFERENCE SERIES 4-CHANNEL AMPLIFIER RAA4200 Installation and operation manual

ART+SOUND
ART+SOUND Smart Zone 4 user manual

IMG STAGE LINE
IMG STAGE LINE STA-1000 instruction manual

BLACK STAR
BLACK STAR HT CLUB 50 owner's manual