manuals.online logo
Brands
  1. Home
  2. •
  3. Brands
  4. •
  5. Carrier
  6. •
  7. Humidifier
  8. •
  9. Carrier HUMCCSFP1016 User manual

Carrier HUMCCSFP1016 User manual

Owner's Guide
NOTE: This manual should be left with the equipment user.
REFRESHING MOISTURE...
AS NATURE INTENDED
Congratulations on your excellent choice and sound investment in
this addition to your home comfort system.
Your new unit is among the most energy-efficient and reliable
home humidifiers available today. To assure its dependability,
spend a few minutes now with this booklet. Learn about the
operation of your humidifier and the small amount of maintenance
it takes to keep it operating at peak efficiency.
With minimal care, your humidifier will provide you and your
family with moist, spring-fresh air, from season to season and year
to year. YOUR HOME HUMIDIFIER
YOUR HOME CAN BE DRIER THAN A DESERT
During the heating season, the air in your home can become
uncomfortably dry. This is because cold winter air holds very little
moisture. When outdoor air is warmed to average room
temperature, its relative humidity falls to even lower levels. Refer
to Fig. 2 for a comparison of the levels of relative humidity for a
few sample environments.
Parched air can cause the wood used in the construction of your
house and furnishings to dry, crack, and split. Draperies and
upholstery may age prematurely. Annoying static electric shock
and cling are more prevalent. Your throat, nasal passages, sinuses,
and skin are more susceptible to irritating dryness. You may even
have to set the thermostat higher than otherwise necessary -- just
to feel warn].
Fig. 1-Small Fan Powered Humidifier
Al1500
HEATED HOME
RECOMMENDED
RELATIVE
HUMIDITY
35%
SAHARA
DESERT
25%
DEATH
VALLEY
23%
HEATED HOME
AVERAGE
5-15%
A95253
Fig. 2 -Relative Humidity Comparison
MOISTURE MAKES A REFRESHING
DIFFERENCE
Proper humidity control can alleviate problems caused by
excessive dryness. Furnishings and fabrics take on a more lustrous
appearance. Houseplants thrive. Static electricity is significantly
reduced in a properly humidified home. Your family will breathe
more easily and find relief from the cool, drafty feeling commonly
experienced in overly dry homes. The additional moisture supplied
by your humidifier may enable you to reduce the temperature
setting on your thermostat -- without any loss of indoor comfort.
HOW YOUR HUMIDIFIER WORKS
Your humidifier adds water molecules to the air inside your home.
Although the rate of humidification is variable, it may exceed
one-half gallon of water per hour. That's a healthy drink for a dry
household. The typical process of humidification begins when
water flows through the humidifier valve and soaks the evaporator
pad. Hot, dry air from the furnace passes through the pad and
absorbs the water. Then, this moisture-laden air is distributed
throughout the house via the ductwork. See Fig. 3 and 4.
PAD
DRAIN
Fig. 3 - Airflow
A95254
OPERATING YOUR HUMIDIFIER
Your new humidifier is designed to operate as part of your home
heating system. It will perform at maximum efficiency if these
recommendations are followed:
• The humidifier is controlled by a humidistat. Adjust the
humidistat setting according to the outside temperature. Refer to
Table 1 as a general guide. If after several days, the air in your
home seems too moist, lower the humidistat setting.
Condensation on single-pane windows indicates excessive
moisture. If the air is too dry, increase the setting. Dry throat and
nasal passages indicate dry air.
• The humidistat is included with the humidifier. Continuous
blower operation provides for constant humidification. It may
also contribute to greater personal comfort because continuous
blower operation minimizes temperature differences throughout
the home. Furthermore, a system equipped with an air cleaner
offers the added benefit of full-time air filtration.
Table 1 - Humidistat Settings
RECOMMENDED HUMIDISTAT
OUTSIDE TEMPERATURE SETTING
°F (°C) (% RELATIVE HUMIDITY)
-20 (-29) 15
-10 (-23) 20 (LOW)
0 (-18) 25
10 (-12) 30
20 (-7) 35
30 (-1) 40 (MED)
• Supply- and return-air grilles should not be blocked by items
such as drapes, furniture, and toys. Restricted airflow reduces the
efficiency of the humidifier, as well as that of the whole comfort
system.
• The humidifier unit must be properly maintained on a regular
basis. START-UP PROCEDURES
1. Open the saddle valve on the water supply line. (See Fig. 5.)
Set humidistat to the desired relative humidity. (See Fig. 6
and Table 1.)
2. Turn the furnace on and adjust the thermostat to a high tem-
perature setting. Be sure that the furnace blower is operat-
ing.
3. Check to see if water is flowing into the humidifier
Fig. 4 - Typical Installation
A12129
Fig. 5 - Saddle Valve
A95257
Fig. 6 -Humidistat
A95258
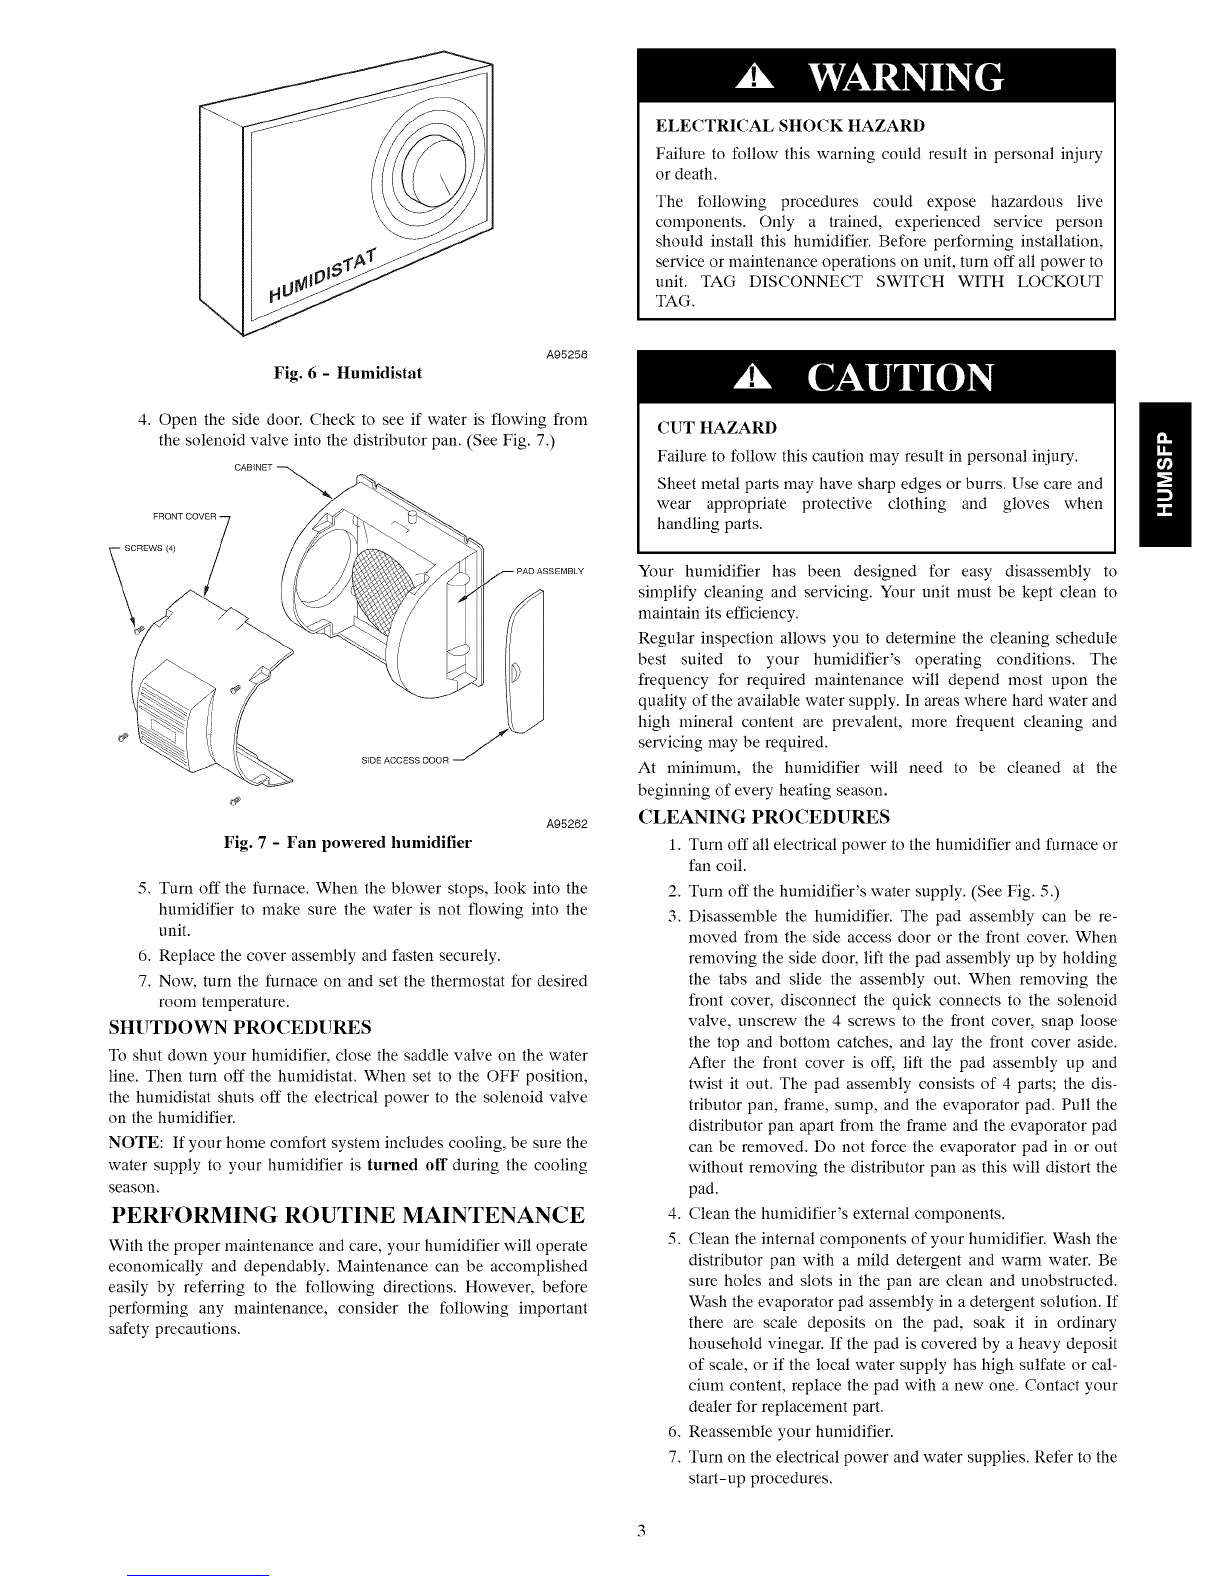
4. Open the side door. Check to see if water is flowing from
the solenoid valve into the distributor pan. (See Fig. 7.)
REWS(4)
Fig. 7 -Fan powered humidifier
A95262
5. Turn off the furnace. When the blower stops, look into the
hunfidifier to make sure the water is not flowing into the
unit.
6. Replace the cover assembly and fasten securely.
7. Now, turn the furnace on and set the thermostat for desired
room temperature.
SHUTDOWN PROCEDURES
To shut down your hunfidifier, close the saddle valve on the water
line. Then turn off the hunfidistat. When set to the OFF position,
the humidistat shuts off the electrical power to the solenoid valve
on the hunfidifier.
NOTE: If your home comfort system includes cooling, be sure the
water supply to your hunfidifier is turned off during the cooling
season.
PERFORMING ROUTINE MAINTENANCE
With the proper maintenance and care, your hunfidifier will operate
econonfically and dependably. Maintenance can be accomplished
easily by referring to the following directions. However, before
perfornfing any maintenance, consider the following important
safety precautions.
ELECTRICAL SHOCK HAZARD
Failure to follow this warning could result in personal iniury
or death.
The following procedures could expose hazardous live
components. Only a trained, experienced service person
should install this hunfidifier. Before perfornfing installation,
service or maintenance operations on unit, turn off all power to
unit. TAG DISCONNECT SWITCH WITH LOCKOUT
TAG.
CUT HAZARD
Failure to follow this caution may result in personal iniury.
Sheet metal parts may have sharp edges or burrs. Use care and
wear appropriate protective clothing and gloves when
handling parts.
Your hunfidifier has been designed for easy disassembly to
simplify cleaning and servicing. Your unit must be kept clean to
maintain its efficiency.
Regular inspection allows you to deternfine the cleaning schedule
best suited to your hunfidifier's operating conditions. The
frequency for required maintenance will depend most upon the
quality of the available water supply. In areas where hard water and
high nfineral content are prevalent, more frequent cleaning and
servicing may be required.
At minimum, the hunfidifier will need to be cleaned at the
beginning of every heating season.
CLEANING PROCEDURES
1. Turn off all electrical power to the hunfidifier and furnace or
fan coil.
2. Turn off the hunfidifier's water supply. (See Fig. 5.)
3. Disassemble the hunfidifier. The pad assembly can be re-
moved from the side access door or the front cover. When
removing the side door, lift the pad assembly up by holding
the tabs and slide the assembly out. When removing the
front cover, disconnect the quick connects to the solenoid
valve, unscrew the 4 screws to the front cover, snap loose
the top and bottom catches, and lay the front cover aside.
After the front cover is off, lift the pad assembly up and
twist it out. The pad assembly consists of 4 parts; the dis-
tributor pan, frame, sump, and the evaporator pad. Pull the
distributor pan apart from the frame and the evaporator pad
can be removed. Do not force the evaporator pad in or out
without removing the distributor pan as this will distort the
pad.
4. Clean the hunfidifier's external components.
5. Clean the internal components of your hunfidifier. Wash the
distributor pan with a nfild detergent and warm water. Be
sure holes and slots in the pan are clean and unobstructed.
Wash the evaporator pad assembly in a detergent solution. If
there are scale deposits on the pad, soak it in ordinary
household vinegar. If the pad is covered by a heavy deposit
of scale, or if the local water supply has high sulfate or cal-
cium content, replace the pad with a new one. Contact your
dealer for replacement part.
6. Reassemble your hunfidifier.
7. Turn on the electrical power and water supplies. Refer to the
start-up procedures.
BEFORE YOU REQUEST
A "SERVICE CALL"
CHECK FOR THESE EASILY SOLVED PROBLEMS:
• Check the main power disconnect switch. Verify that the circuit
breakers are on and that fuses have not blown. If you must reset
breakers or replace fuses, do so only once. Contact your servicing
dealer for assistance if the breakers trip or the fuses blow asecond
time.
• If the humidity level is too low, check the humidistat setting.
Confirm that the saddle valve is turned on. Check the evaporator
pad, and clean or replace the pad as necessary.
• Check for sufficient airflow. Check the furnace filter or air cleaner
for excessive accumulations of dirt. Check for blocked return- or
supply-air grilles. Be sure grilles are open and unobstructed.
• If water drips from the humidifier, check the drain hose for kinks
or obstructions.
If your comfort system still fails to operate properly, contact your
servicing dealer for troubleshooting and repairs. Specify your
apparent problem, and state the model and serial numbers of your
equipment. (You should have them recorded below in this
booklet.) With this information, your dealer may be able to offer
helpful suggestions over the phone, or save valuable time through
knowledgeable preparation for the service call.
REGULAR DEALER MAINTENANCE
In addition to the routine maintenance that you perform, your
humidifier should be inspected regularly by a properly trained
service technician. The inspection (preferably each year, but at least
every other year) should include the following:
• Routine inspection of the humidifier. Cleaning, if necessary.
Cleaning or replacement of the evaporator pad as required.
• A check of all electrical wiring and connections.
• A check of water connections to the unit.
• Operational check of the complete comfort system to determine
actual working condition. Necessary repair and/or adjustment
should be performed at this time.
Your servicing dealer may offer an economical service contract that
covers seasonal inspections. Ask for further details.
Record the model and serial numbers of your new humidifier in the
following spaces. This information, along with the other
ready-reference facts requested below, may be required if you
should ever need information or service.
Model No.
Serial No.
Date Installed
Dealer Name
Address
City
State
Zip
Telephone
Fig. 8 - Checklist
A95267
Copyright 2012 CAC /BDP • 7310 W, Morris St. • Indianapolis, IN 46231 Printed in U,S,A, Edition Date: 03/12
Manufacturer reserve8 the right to change, at any time, specification8 and design8 without notice and without obligations,
Catalog No: OG-HUMSFP-01
Replaces: NEW

This manual suits for next models

1

Other Carrier Humidifier manuals

Carrier HUMXXSTM3034 Installation and operating instructions

Carrier

Carrier HUMXXSTM3034 Installation and operating instructions

Carrier HUMIDIFIER 49BF User manual

Carrier

Carrier HUMIDIFIER 49BF User manual

Carrier HUMCCSBP2017-A Series Operation manual

Carrier

Carrier HUMCCSBP2017-A Series Operation manual

Carrier HUMCCLFP1025-A Series Planning guide

Carrier

Carrier HUMCCLFP1025-A Series Planning guide

Carrier SBP SMALL BYPASS HUMIDIFIER User manual

Carrier

Carrier SBP SMALL BYPASS HUMIDIFIER User manual

Carrier HUMXXSFP1012 User manual

Carrier

Carrier HUMXXSFP1012 User manual

Carrier Humidifier User manual

Carrier

Carrier Humidifier User manual

Carrier HUMXXSFP1012 User manual

Carrier

Carrier HUMXXSFP1012 User manual

Carrier HUMCCLFP1025-A Series Instructions and recipes

Carrier

Carrier HUMCCLFP1025-A Series Instructions and recipes

Carrier CAC User manual

Carrier

Carrier CAC User manual

Carrier HUMCCSBP2218 User manual

Carrier

Carrier HUMCCSBP2218 User manual

Carrier HUMCCLFP User manual

Carrier

Carrier HUMCCLFP User manual

Carrier RW Manual

Carrier

Carrier RW Manual

Carrier 49FH User manual

Carrier

Carrier 49FH User manual

Carrier HUMXXSTM3034 User manual

Carrier

Carrier HUMXXSTM3034 User manual

Carrier HUMCCLFP1025-A Series Planning guide

Carrier

Carrier HUMCCLFP1025-A Series Planning guide

Popular Humidifier manuals by other brands

Honeywell HE360A - Whole House Powered Humidifier installation instructions

Honeywell

Honeywell HE360A - Whole House Powered Humidifier installation instructions

emerio HF-106796 instruction manual

emerio

emerio HF-106796 instruction manual

HygroMatik StandardLine SLE 02 manual

HygroMatik

HygroMatik StandardLine SLE 02 manual

Honeywell TRADELINE HE360 installation instructions

Honeywell

Honeywell TRADELINE HE360 installation instructions

Vigilant Guardian 10 operating instructions

Vigilant

Vigilant Guardian 10 operating instructions

Honeywell hul570 series instruction manual

Honeywell

Honeywell hul570 series instruction manual

Essick 447 400HB OAK BURL 4 SPD Owner's care & use manual

Essick

Essick 447 400HB OAK BURL 4 SPD Owner's care & use manual

Lobb WS-3300 installation instructions

Lobb

Lobb WS-3300 installation instructions

Holmes HM1700 owner's guide

Holmes

Holmes HM1700 owner's guide

Honeywell HH950E operating instructions

Honeywell

Honeywell HH950E operating instructions

Gallet Marignane instruction manual

Gallet

Gallet Marignane instruction manual

Adler Europe AD 7963 user manual

Adler Europe

Adler Europe AD 7963 user manual

VITROTECLABS BP20 manual

VITROTECLABS

VITROTECLABS BP20 manual

Novita Humiperfect NH890 OPERATING INSTRUCTIONS AND E-WARRANTY APPLICATION

Novita

Novita Humiperfect NH890 OPERATING INSTRUCTIONS AND E-WARRANTY APPLICATION

bredeco BCLB-2.3-WT user manual

bredeco

bredeco BCLB-2.3-WT user manual

Honeywell enviracaire Elite HE225A Installation insrtuctions

Honeywell

Honeywell enviracaire Elite HE225A Installation insrtuctions

Stadler Form Eva operating instructions

Stadler Form

Stadler Form Eva operating instructions

Guardian H500 Use & care instructions

Guardian

Guardian H500 Use & care instructions

manuals.online logo
manuals.online logoBrands
  • About & Mission
  • Contact us
  • Privacy Policy
  • Terms and Conditions

Copyright 2025 Manuals.Online. All Rights Reserved.