Range Road RR608 User manual

Range Road Enterprises Ltd
Box 944
Eckville AB T0M 0X0
www.range-road.ca
RR608 Trailer
Assembly Manual
1.) Unpack all pieces from the tub & crate, empty bag with nuts, bolts and pins onto a flat surface.
2.) Find the main frame, lay on the floor with axle tabs facing up.
3.) Place the walking beams between the tabs on either side, there is not a right or left, either walking
beam can be used for both sides, however, one leg of the walking bean is longer than the other, the
39cm leg of the axle should be towards the front of the trailer on both sides. Line up the hole in the
walking beam with the tabs on the frame, push the pin in to hold axles in place.

Range Road Enterprises Ltd
Box 944
Eckville AB T0M 0X0
www.range-road.ca
4.) Install 13mm bolt & nut washer through the plate on the pin and the frame tab, tighten nut & bolt.
Install cotter pin, repeat for the opposite side.
5.) Grease both swivel pins.
6.) Install all 4 tires and tighten wheel nuts to 40ft/lbs.
7.) Flip frame section over so that the frame is higher than the walking beams.

Range Road Enterprises Ltd
Box 944
Eckville AB T0M 0X0
www.range-road.ca
8.) Install frame tube into main frame, holes at coupler end, face up & down, larger diameter bolt holes
face up for the coupler.
9.) Large bolt goes through frame tube and main frame, tighten nut. Tighten 2 bolts on the side of the
frame rail, then tighten retaining nuts.
10.) Slide battery box onto frame tube and then slide the tongue jack on, install the 2 retainer bolts for
the battery box but do not tighten, Move the tongue jack approximately 12cm back from coupler bolt
hole and tighten the retainer bolt. (note battery box may be grey, blue or black)

Range Road Enterprises Ltd
Box 944
Eckville AB T0M 0X0
www.range-road.ca
11.) Slide the swivel coupler mount in, position the swivel up or down depending on your ATV hitch height,
tighten both bolts.
12.) Grease coupler swivel.
13.) Install hydraulic fitting into cylinder (if not pre-Installed), install brackets and cylinder on frame,
hydraulic fitting should be facing the side with the hose retainer straps, tighten all 4 bolts.
14.) Install the hydraulic hose onto the cylinder and tighten.
15.) Run the hydraulic hose trough the clips and bend the clips to hold the hose in place.
Use zip ties to secure the hose in place.

Range Road Enterprises Ltd
Box 944
Eckville AB T0M 0X0
www.range-road.ca
16.) Install the hydraulic pump into the battery box, check all nuts holding wires, overtightening can break
the housing. 2 Bolts secure the pump through the bottom of the battery box.
17.) Atatch the hose to the hydraulic pump.
18.) Set the trailer deck on top of the frame.
19.) Line up the tabs at the rear of the deck and insert the pivot bolts, tighten the bolts but leave space
between the tabs nd frame so the deck can swivel up and down freely.
20.) Slide the battery box to approximately 15-20cm away from the deck and tighten the 2 retaining bolts.

Range Road Enterprises Ltd
Box 944
Eckville AB T0M 0X0
www.range-road.ca
21.) Line up holes to mount the cylinder to the deck tab and insert pin, lock pins in place with circlip.
22.) Install battery, tighten hold down bar, mount battery posts and attach the wires from the hydraulic
pump, red is positive or +. Chek that all nuts on the solenoid are snug.
23.) Mount front deck panel, snug the 3 bolts up, do not tighten yet.
24.) Install rear corner posts into deck and put retainer bolts in, do not tighten yet.

Range Road Enterprises Ltd
Box 944
Eckville AB T0M 0X0
www.range-road.ca
25.) Hold the deck side panel at a lowered position and slide the pins into the deck sockets, then raise the
side and fasten the front and rear lock clips, repeat for the other side.
26.) Mount tailgate, put in 2 bolts and tighten until locknut plastic is engaged in the threads and go 2 more
turns. Fasten lower clips.
27.) Tighten the 3 bolts on front deck plate and the 2 bolts at the bottom of the rear corner posts.

Range Road Enterprises Ltd
Box 944
Eckville AB T0M 0X0
www.range-road.ca
28.) Install plastic caps in frame
29.) Fill hydraulic tank with 5L of AW32 Hydraulic Oil and test.
30.) After raising and lowering 3 -4 times, recheck oil level
Range Road Enterprises Ltd
Box 944
Eckville AB T0M 0X0
www.range-road.ca
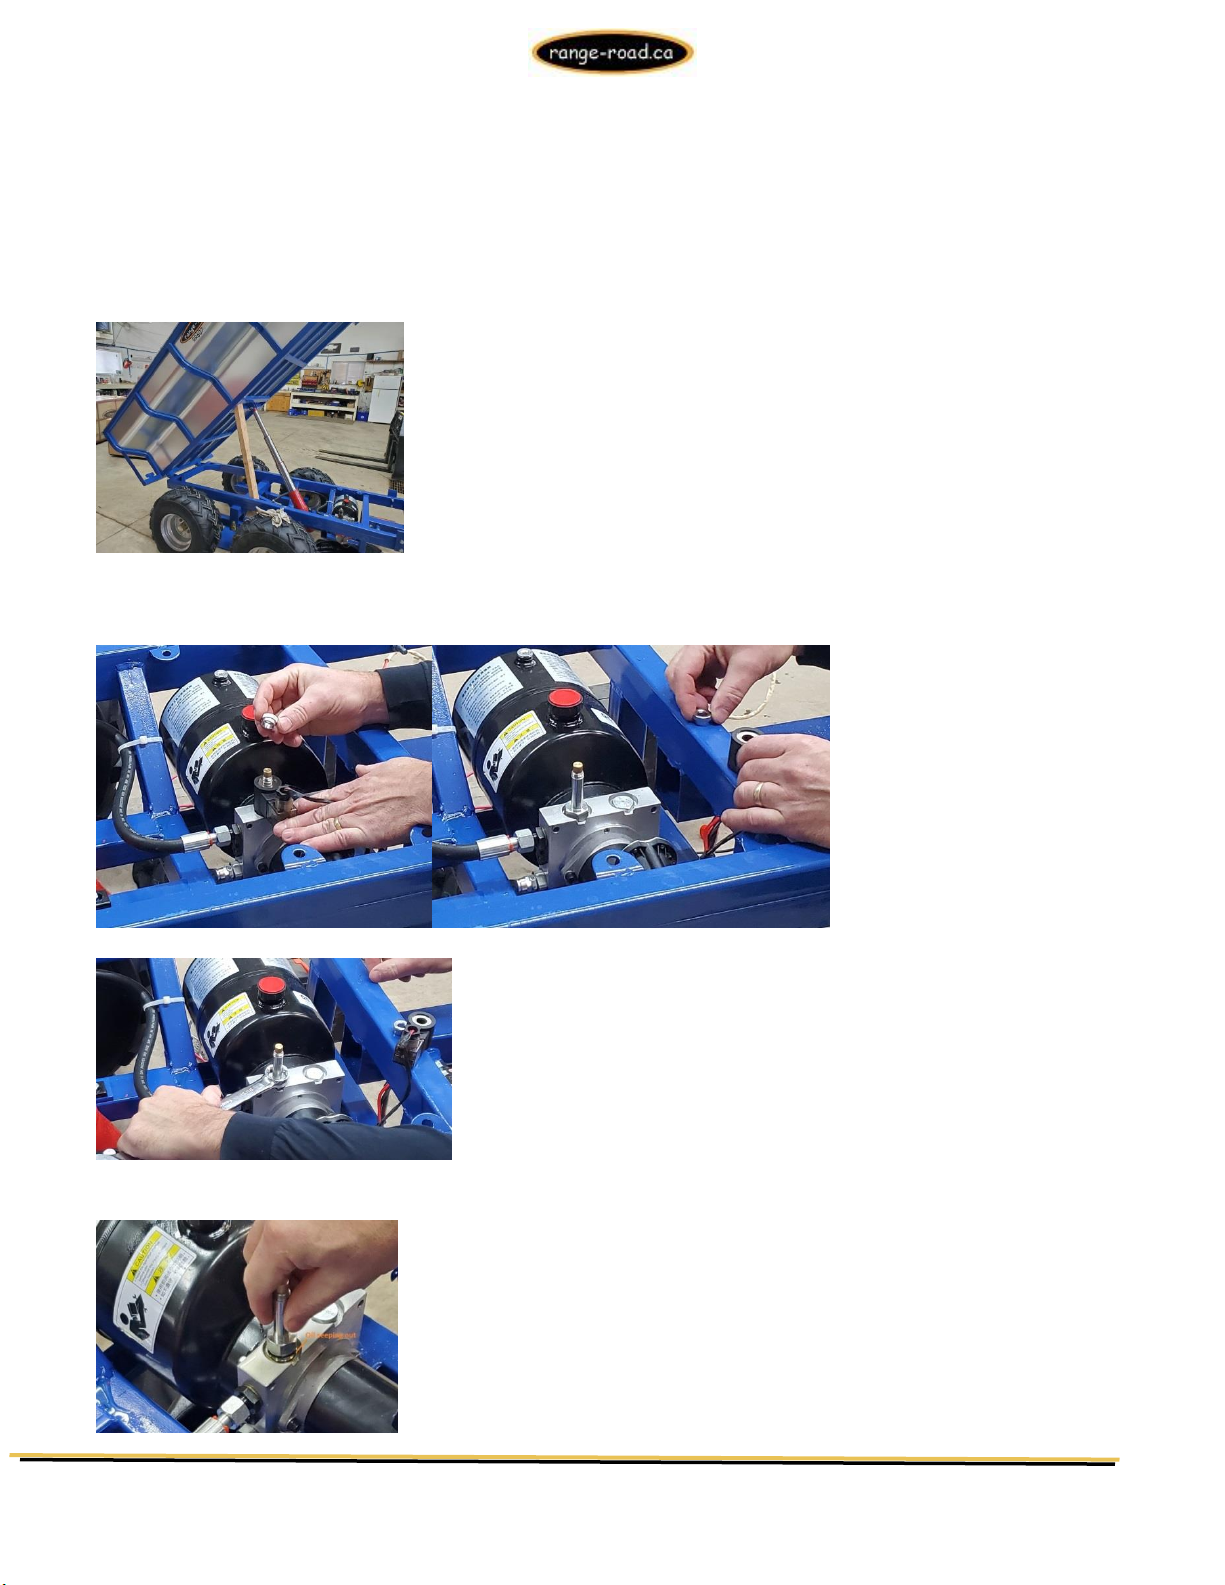
Trouble Shooting:
If the Tub/Deck comes down very slow it is usually because of an airlock which will usually work itself out after
raising and lowering the tub/deck 2 or 3 times or letting it sit in the up position for 10 –20 minutes. If the
tub/deck continues to come down slowly and does not seem to want to come down the last section of the cylinder
follow these steps to check and clean the hydraulic filter.
1) Use a 2x4 or other strong material to prop the tub/deck solidly, this support will be holding the full weight
of the tub/deck in the air so make sure it is strong enough.
2) Use the remote control to lower the cylinder, putting all of the weight on your support and taking the
pressure off the hydraulics.
3) Undo the nut holding the solenoid and the remove the solenoid, this nut is only hand tight.
4) Use a 15/16 wrench to undo the solenoid housing slowly.
5) When oil starts to seep out of the threads, stop turning until there is no pressure left in the oil coming
out, usually just a few seconds.

Range Road Enterprises Ltd
Box 944
Eckville AB T0M 0X0
www.range-road.ca
6) When you pull the housing out you will see the stainless steel screen that needs cleaned, use brake cleaner
or degreaser and a brush to clean the screen out. Screen can be removed if necessary for cleaning.
7) Re-install housing with clean filter using 15/16 wrench.
8) Re-install solenoid and tighten nut by hand only.
9) Use remote to raise tub/deck and remove 2x4 or support.
10) Lower tub/deck.
Other Range Road Utility Vehicle manuals


