Carson MLH6 User manual

Carson MLH6
Wiring Notes:
• Keep LED modules and any radios as far away from each other as possible.
• Separate the radio wires and LED wires.
• Any access wires should be cut short.
• The ground wire, power wire, and synchronization wire should be bound tightly together as they run from light to light,
through your switchbox and to the battery.
• Do not ground each unit independently to the chassis. Run the ground for each unit in a “bus” like structure, to the
negative terminal on the battery.
Note: The total wire length between the two farthest units should be no more than 40 feet.
Pattern Programming
With one of the colors activated, touch and release the GREEN wire to GROUND to scroll through the pattern to the right. (or hold it
to advance directly to the shortcuts)
Phase 1/ Phase 2
All lights are shipped with both Enables (colors) set for Phase 1. If you are synchronizing this light with another and want the same
color on the two lights to alternate, while one color is activated, use the shortcut shown in the STANDARD PROGRAMING CHART
to set the corresponding color on the second light for Phase 2.
WHITE: Connect to White wires from other S-LINK lights
for synchronization (Cut short if not using)
YELLOW/BLACK: Highest Priority
(Function/ Color/ Enable 1)
YELLOW/GREEN: Highest Priority (Function/
Color/ Enable 2)
GREEN: Touch and release to ground for
programming. (Cap off after programming)
BLACK: Connect to negative terminal
of battery

Full Steady or Cruise Mode
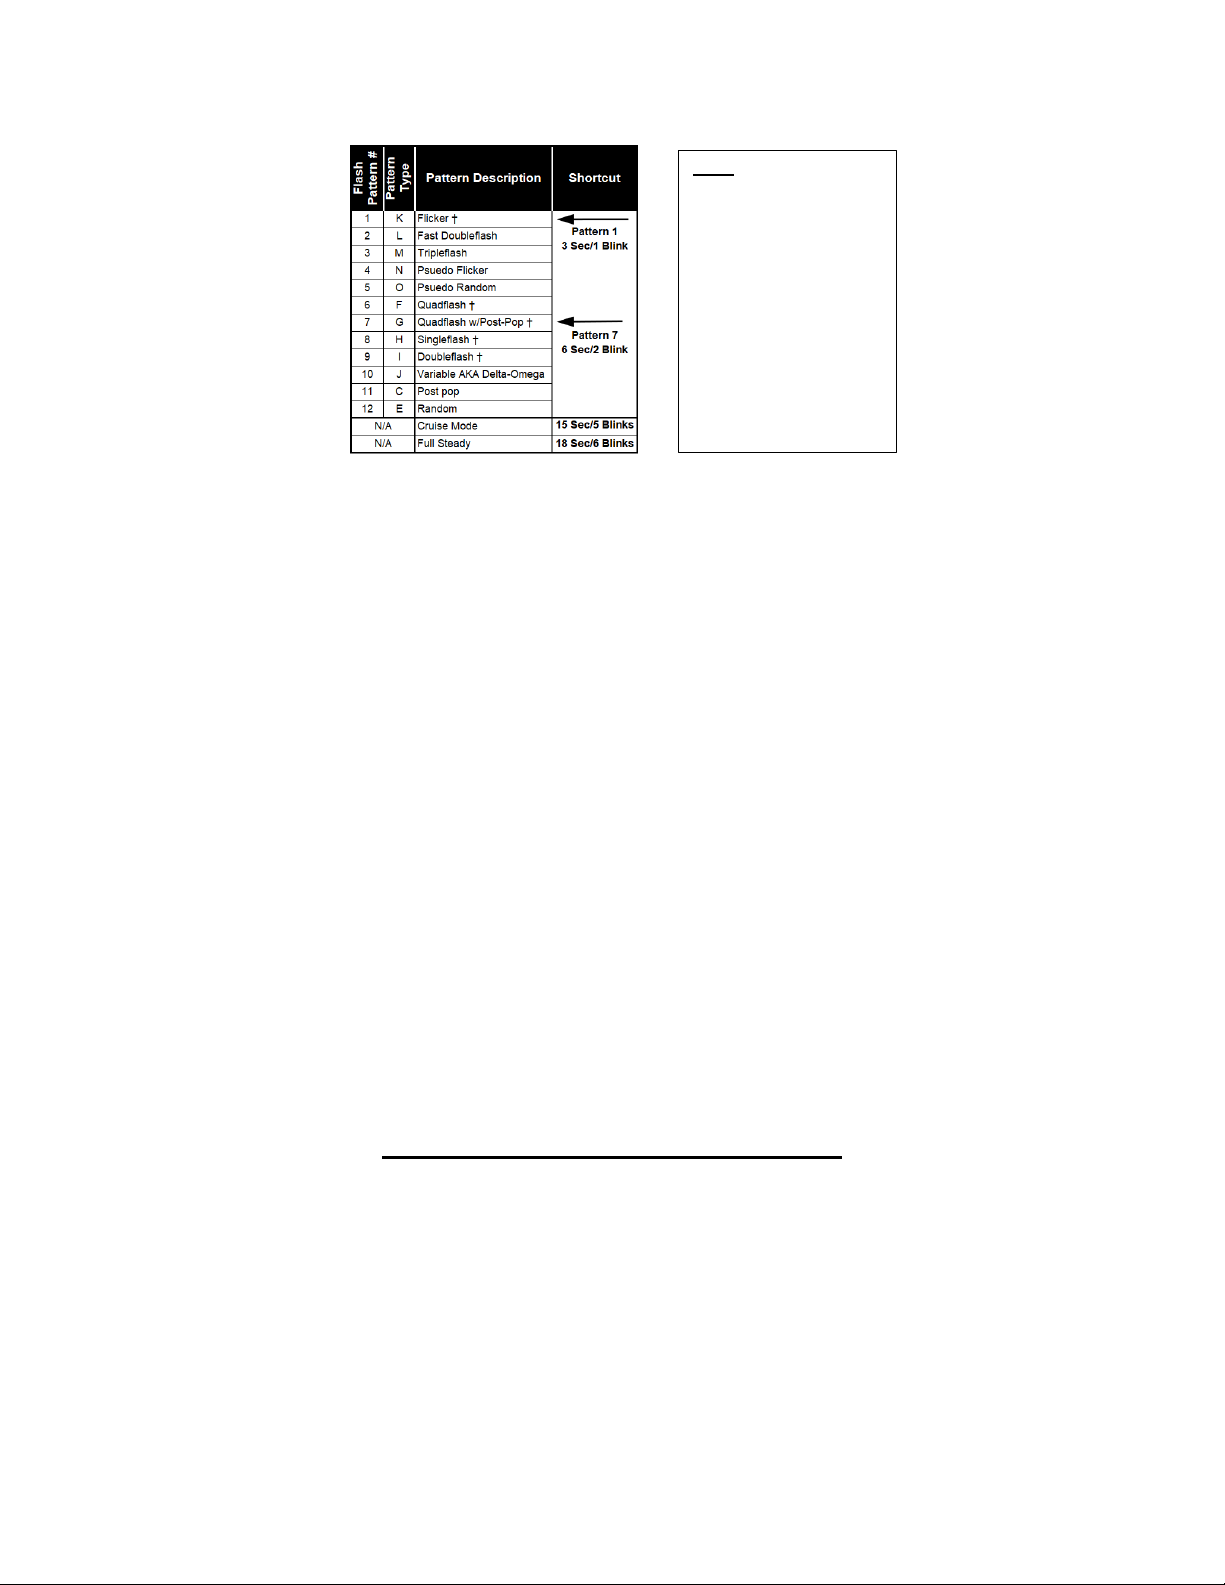
If you want either color to be FULL STEADY BURN or CRUISE MODE (low intensity steady burn mode), activate that and use the
shortcut shown in the STANDARD PROGRAMING CHART to set the corresponding enable wire for the corresponding mode. Exit
either mode by holding the GREEN wire to ground for 3 seconds/1 blink.
ADVANCED PROGRAMMING
Priority
By default, Color 2 (YELLOW w/BLACK wire) is set for high priority. And functions as follows:
• Both Enables set for Flashing: Both colors will flash in the pattern of Color 2. Additionally, Color 1 will automatically flash
in the opposite phase of color 2.
• One or both enables set for steady: only color 2 will activate. Color 1 will de-activate.
If you would like to change the priority of the colors, so that Color 1 overrides Color 2, proceed below:
1. Connect the BLACK wire to Ground.
2. Connect Power to the WHITE wire and Enable 1 (i.e. the color that you want to be High-Priority).
3. Hold the GREEN wire to GROUND until the light flashes once (~3 seconds).
4. Disconnect wires when finished programming.
To reset all settings to the factory defaults, proceed as follows:
• Connect the BLACK wire to ground.
• Connect the WHITE wire to any ONE of the enable wires to power.
• Connect the GREEN wire to Ground and the light will illuminate in a Steady Burn
mode. Keep the GREEN wire connected or 9 seconds and release it when the light flashes 3 times.
• Disconnect the WHITE wire from Power 1 second later.
Programming, Functionality, and Operation:
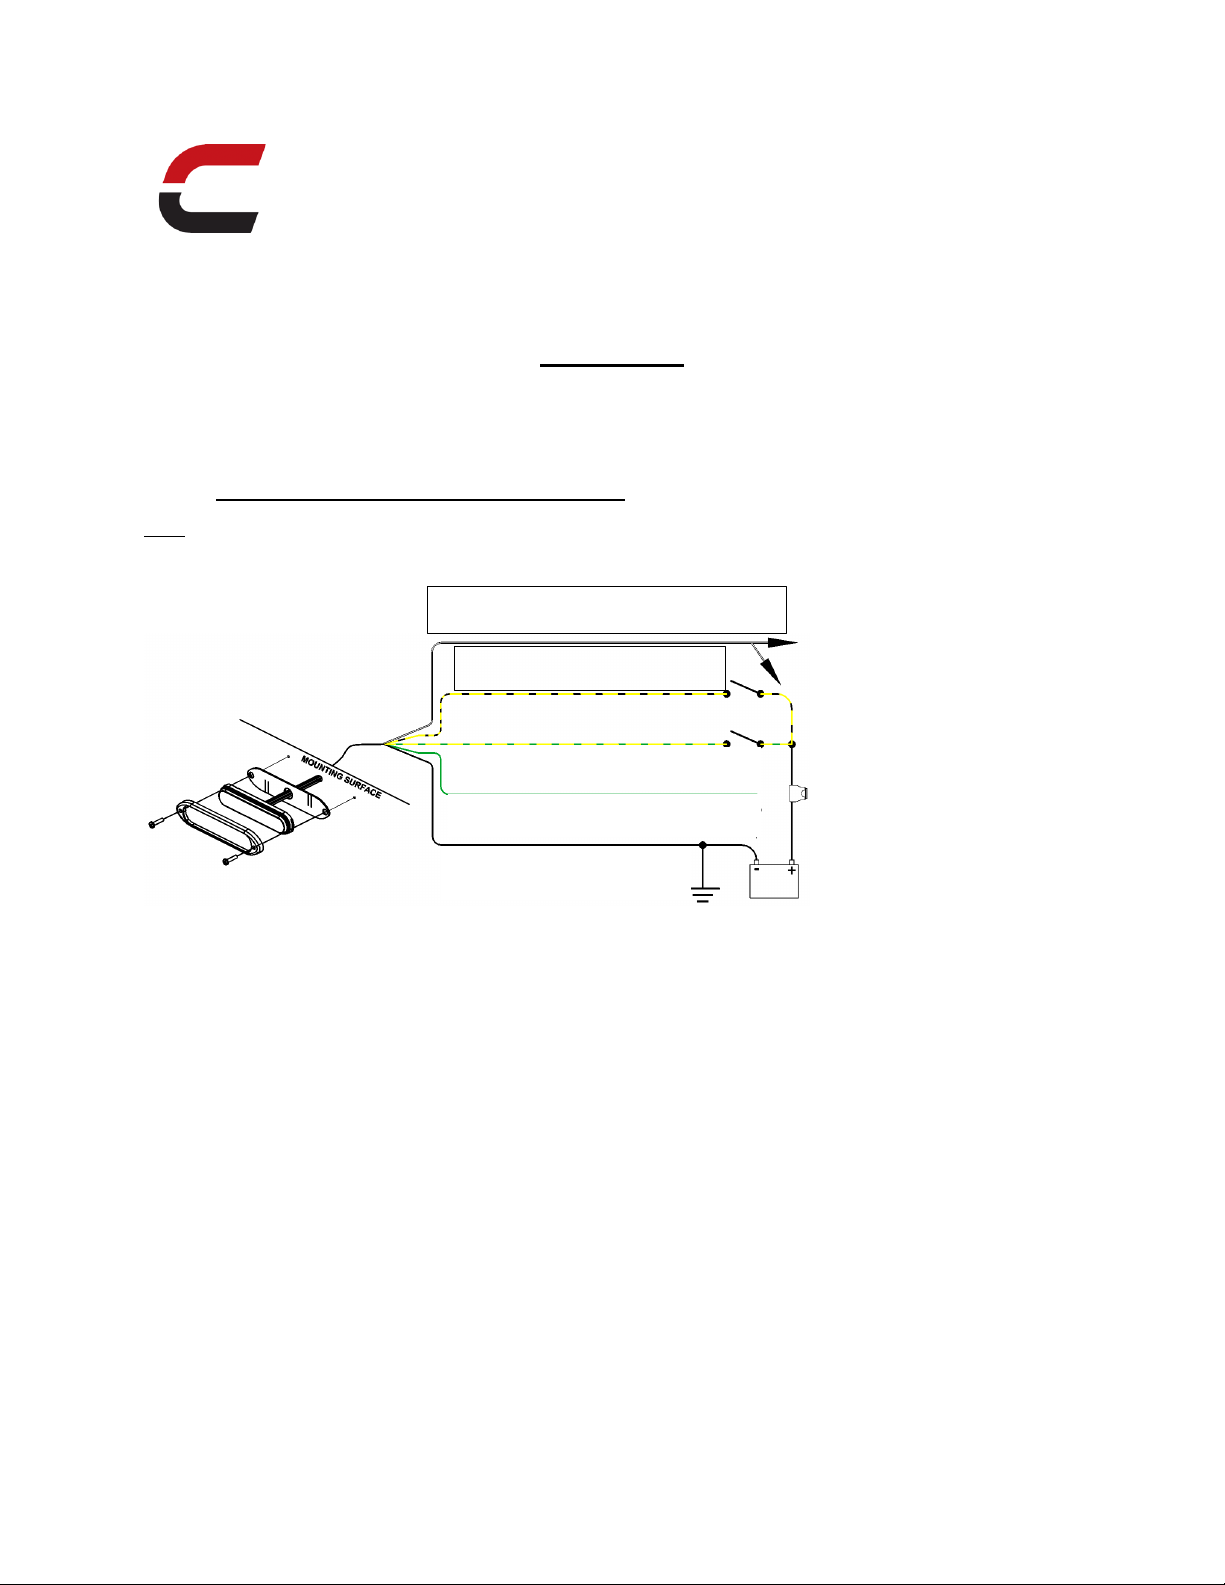
The recommended first step is to identify what color is defaulted to each input. To do this:
• Connect the BLACK wire to ground.
• Touch only one of the enable wire to power (only one at a time).
• Repeat for each enable wire.
STANDARD PROGRAMMING
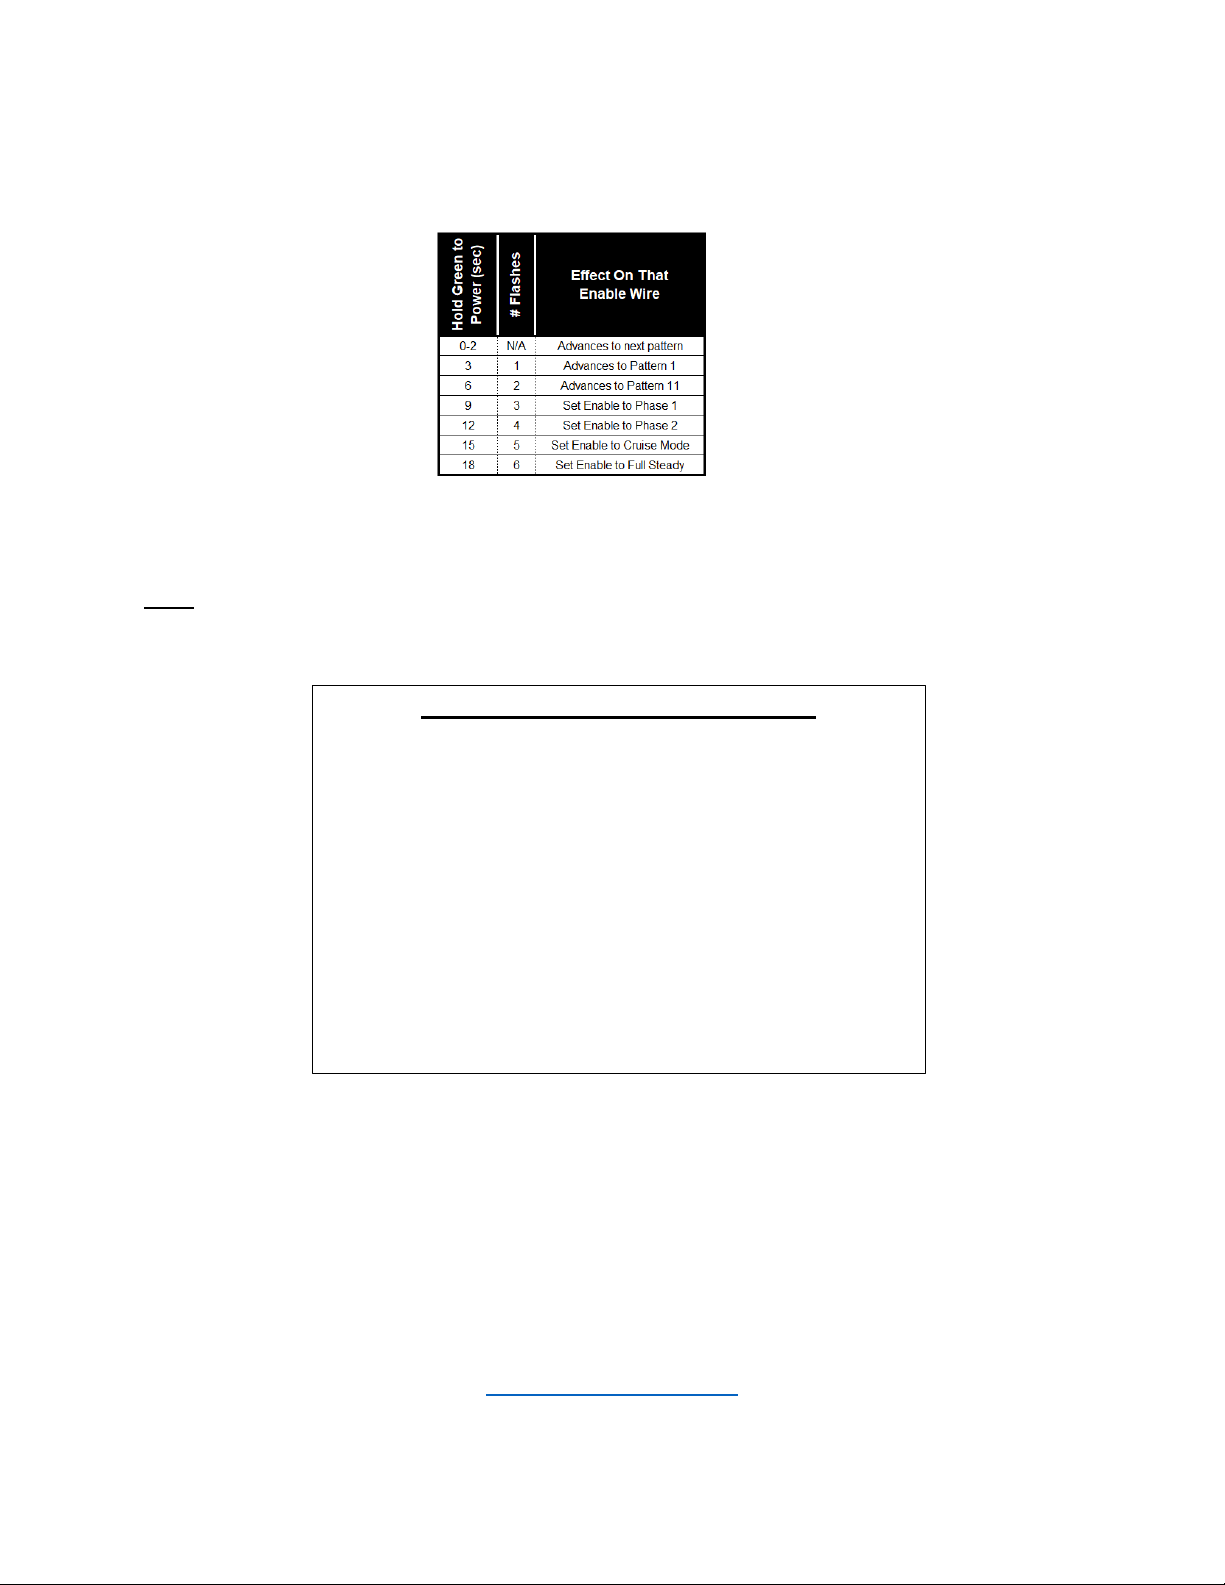
Follow the instructions below to program any of the option listed in the chart. Each enable wire is programmed independently.
1. Connect the BLACK wire to ground.
Note: When both colors
are activated on one
light, Color 1 will always
be forced into the
opposite Phase of Color
2

2. Connect the corresponding enable wire to power (only one at a time).
3. Hold (or touch and release) the GREEN wire to ground to set the options listed to the right.
4. Disconnect wire when finished programming.
DUMMY HEAD MODE
To utilize this light with an external flasher, place the light in “Dummy Head” mode by keeping the GREEN wire permanently
connected to FOUND. Both enable wires will be placed into in a steady burn mode that is compatible with external flashers.
NOTE: Heads MUST be flashed at 50% or lower total on time. They can be pulse width modulated as low as 15% and at 100hz or
higher.
If you have any questions concerning this or any other product,
please contact our customer service department at (317) 257-3191
If a product must be returned for any reason, please contact our Customer Service Department to obtain a Returned Material
Authorization number (RMA#) before you ship the product back. Please write the RMA # clearly on the package near the mailing
label.
Carson Sirens
317-257-3191
5451 N. Rural St Indianapolis, IN 46220
LED FIVE YEAR LIMITED WARRANTY
The manufacturer warrants this LED light against factory defects in material and workmanship for five years
after the date of manufacture. The owner will be responsible for returning to the Service Center any
replacement item(s) will be returned to the purchaser with transportation costs prepaid from the service point.
A copy of the purchaser's receipt must be returned with the defective item(s) in order to qualify for the
warranty shall not apply to any light, which has been altered, such that in the manufacturer's judgment, the
defective item(s) with the transportation costs prepaid. The manufacturer will, without charge, repair or
replace at its option, products, or part(s), which its inspection determines to be defective. Repaired or
warranty coverage. Exclusions from this warranty include, but are not limited to, domes, and/or the finish. This
performance or reliability has been affected, or if any damage has resulted from abnormal use or service.
There are no warranties expressed or implied (including any warranty of merchantability or fitness), which
extend this warranty period. The loss of use of the product, loss of time, inconvenience, commercial loss or
consequential damages, including costs of any labor, are not covered. The manufacturer reserves the right to
change the design of the product without assuming any obligation to modify any product previously
manufactured.
This warranty gives you specific legal rights. You might also have additional rights that may vary from state to
state. Some states do not allow limitations on how long an implied warranty lasts. Some states do not allow
the exclusion or limitation of incidental or consequential damages. Therefore, the above limitation(s) or
exclusion(s) may not apply to you.

Table of contents
Other Carson Automobile Accessories manuals