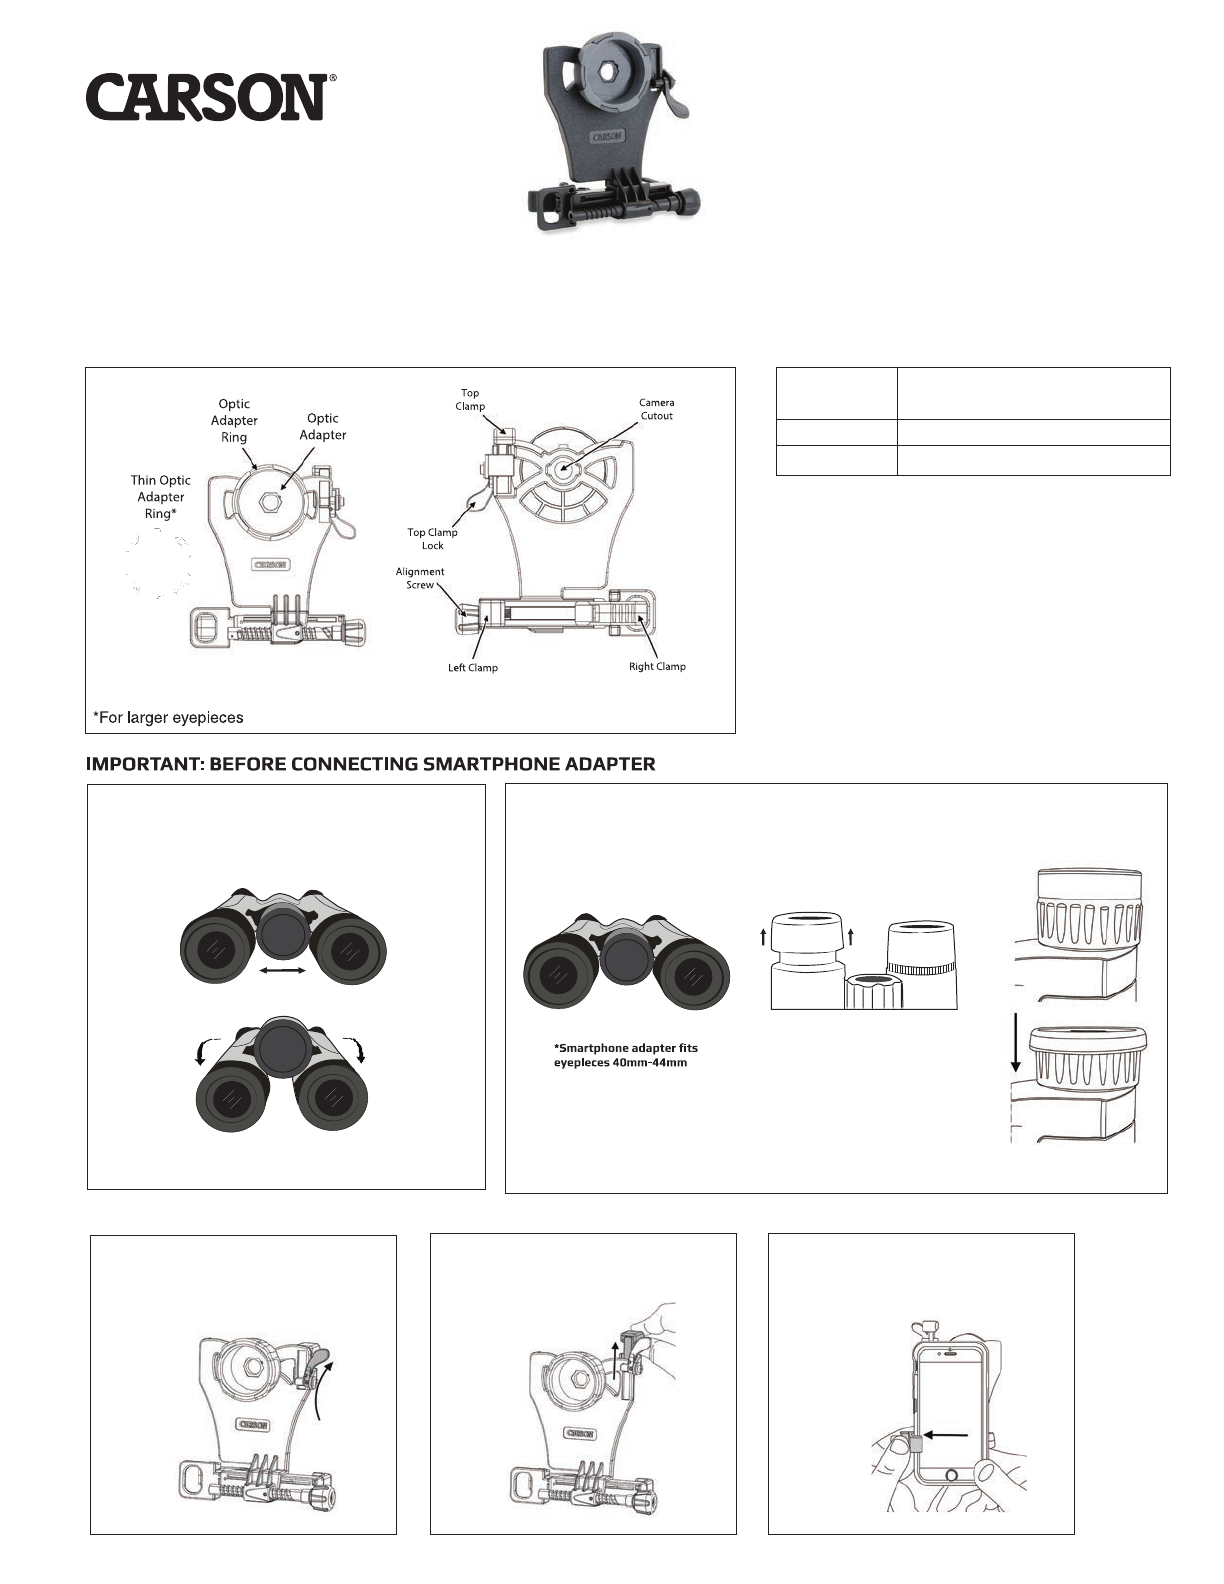
Carson HookUpz IB-700 User manual

Fig.2
CARSON
®
HookUpzTM
Smartphone Binocular Adapter
Congratulations on selecting your new HookUpz Smartphone Binocular
Adapter! In order to achieve optimum performance, please follow
instructions for proper use and care.
OPTIC AND PHONE SIDE DIAGRAM:
Thin Optic
Adapter
Ring*
Optic
Adapter
Ring
*For larger eyepieces
Optic
Adapter
Left
Clamp
Right
Clamp
OPTIC SIDE PHONE SIDE
IMPORTANT:
BEFORE
CONNECTING
SMARTPHONE ADAPTER
PRODUCT SPECIFICATION:
Fits: Most full-size binoculars with
40-44mm eyepieces
Weight: 0.18 lbs
Dimensions: 4.0 x 1.9 x 4.4”
1. Make sure binocular is focused and is in
fully extended or fully closed position only.
2. Smartphone adapter can only be used with left eyecup.* Make sure left
eyecup is fully extended before connecting.If your binocular has fold down
eyecups, fold down and attach adapter.
*Smartphone
adapter
fits
eyepieces 40mm-44mm
t
IB-700
INSERTING PHONE:
1
1. Rotate to unlock top clamp. 2. Slide top clamp into
uppermost position. 3. Insert phone into
left clamp.
UNLOCK
Fig. 1
Fig. 2
Fig. 3

INSERTING PHONE CONTINUED:
4. Squeeze and pull right
clamp past edge of phone.
Fig. 4
5. Release right clamp
to secure phone.
Fig. 5
6. Ensure phone is flat as
possible to adapter.
ALIGN & LOCK:
1. Slide phone vertically until
camera is roughly aligned with
camera cutout.
Fig. 7
Fig.7
2.
Turn alignment screw until
camera is centered in camera
cutout.
Fig. 8
3. Slide top clamp down against
phone edge.
Fig.9
ig. 9
Fig. 6
F
4.While holding top clamp tight
to phone, rotate to lock.
Fig. 10
LOCK
5. Figure 11 shows a properly aligned camera.If
needed, use alignment screw and top clamp to make
further adjustments.
Fig. 11
MULTIPLE-LENS CAMERA PHONES:
If there is more than one rear facing camera, use the primary one.Typically, the primary is a 1x wide-angle color camera
and the other camera(s) are secondary.
For the latest instructions on multiple camera phones, please visit www.carson.com/multicam
2

0
ATTACHING TO OPTIC:
1. Select the optic adapter ring
that best fits your binocular
eyepiece and insert it into optic
adapter.
Note: In rare instances (if the
eyecup is oversized and
rubber), the adapter will work
best without an adapter ring.
F
2.
Align optic adapter over eyepiece
and press down firmly. Be careful
not to move your camera out of
alignment.
Fig. 13
3.
Phone can be positioned in either
portrait or landscape mode.
ig. 14
4. Ensure that optic adapter is flush to
the eyepiece of your binocular.
✓
Fig. 15
5. Turn on camera. If image is not
centered, repeat alignment steps.
Fig. 16
6. To maximize your image, pinch to
enlarge image. For best results,
use in video mode.
Fig. 17
Fig. 12
TO REMOVE PHONE FROM ADAPTER:
To save your alignment, make no further adjustments to the top clamp and alignment knob.Simply remove
phone using right clamp only as shown in Fig. 4.
USING ADAPTER AGAIN:
The alignment of your phone to the adapter should be saved from the initial setup so that many of the steps
can be skipped (Figs.1-2, 7-11).Only a quick fine adjustment of the alignment may be needed.
7
3

f
SMARTPHONE
SIZING GUIDE
If
your phone (in its
case)
fits in"portrait"orientation between
the
2 arrows,
it
will
fit
the
smartphone binocularadapter.
FREQUENTLY ASKED QUESTIONS:
Q1: Why does the top clamp touch the round corner of my phone instead of the top flat edge?
A1: This is normal for some models of phones.Just fit as close to rounded edge as possible and lock top clamp as normal.
Q2: Why am I getting reflections and/or glare in my image?
A2: This may occur with indoor lighting. Please avoid overhead lighting or change the angle of the lighting relative to phone.Also,
please use without flash to avoid reflections and/or glare in photos.If there’s glare on your phone screen that makes image hard
to view, increase brightness setting on phone and view from a position with less overhead light.
Q3: I can’t align my phone vertically with the top clamp. It won’t fit.
What should I do? Fig. 18
A3: If you go through the alignment process (Fig.7-11), and there is
no way to achieve vertical alignment because it’s restricted by the
top clamp, try removing your phone case.
Alternatively, you can remove top clamp assembly using screw as shown
in Fig. 18. For this configuration, you will not be able to save your vertical
alignment between uses.Your phone will have to be adjusted for vertical
positioning each time it’s placed within the adapter.We recommend you
save these four parts for use with other phones, and you can reassemble
the top clamp as shown in Fig.19.
Fig. 19
Q4: Does this work with a tripod?
A4: No, the adapter itself does not have a tripod mount. However, for best stabilized images and videos, we suggest the binocular used
is mounted to a tripod.
Q5: How do I know which phones will work with the adapter?
A5: Please see the smartphone sizing guide below.
Q6: My other phone camera or flash is covered by adapter.Why is that?
A6: First, we recommend using the device with only the primary rear camera. If problems persist, please contact customer support.
Second, the flash can be covered, and is not needed for use with optic.We recommend flash setting is turned off at all times when using
adapter.
Q7: My phone rotates on the eyepiece when used in landscape (horizontal) mode.What should I do?
A7: If the eyepiece can rotate on your binocular, then you can try the following:
1. If your eyepiece can rotate outward, then you must place adapter in orientation to counter the rotation.
2. If the eyepiece has any method to secure from rotation such as a screw set, use it to lock down the eyepiece.
3. If above solutions are not possible or do not work for your application, it may not be possible to use in this mode. Please use in only
portrait (vertical) mode. 4

IS2I IS2I
•*•
* *
* *
* *
*•*
FREQUENTLY ASKED QUESTIONS CONTINUED:
Q8: My image doesn’t appear to be centered or is not a complete
round image.What is wrong?
A8: The phone alignment needs to be adjusted in vertical direction
using top clamp (Fig.7) and in horizontal direction by using alignment
screw (Fig.8).Check that phone is flat on adapter (Fig.6) and adapter
is flush with optic (Fig.14).
TIPS AND TRICKS:
PHOTOGRAPHY
• Tap object of interest on your phone screen to autofocus.
• For videos, tap and hold object of interest on phone screen for a second to lock focus.Tap again to release the focus lock.
• For long sessions, try using battery cases or phone chargers to prevent your battery from draining.
APPS
• Share photos and videos through various apps (e.g.FaceTime, Messages, Facebook, Instagram, etc.)
• Apps that allow you to set exposure and focus manually can expand the potential of the adpater.This is especially helpful for
telescopes to set longer exposure times to get the best images of sky objects.
STABILIZATION
• To prevent shaking:
1. Use your headphones.Volume button will act as shutter button.
2. Attach to tripod.
• Many phones have image stabilization features.Check your phone and turn on feature if available.If not, there are camera
apps with stabilization features.
CLEANING/STORAGE:
• Adapter should be cleaned with a soft, damp microfiber cloth only. Do not use any chemicals, abrasives, or solvents.
• To avoid damage, always store adapter in protective case when not in use.
• Store in dry area at room temperature.
˜°˛˝˙ˆˇ˘ˇ˘ˇIf you experience any difficulties,
please contact us and we will be happy to help you.
For warranty information, visit www.carson.com/warranty
Carson Optical 2070 5th Avenue, Ronkonkoma, NY 11779 | Tel: 631-963-5000
www.carson.com
˜°˛˝˙ˆˇ˘˝°ˆ˝ ˝˘˙ˆˇ˘˝°ˆ˝ ˝˘˙ˆˇ˘˝°ˆ˝
5
Other manuals for HookUpz IB-700
1
Table of contents