Carsys DPM-816 PRO User manual

Digital Electronic Coating
Thickness Gauge
DPM-816 PRO
USER MANUAL
EN-01.11.19

User Manual DPM-816 PRO Page 2
Contents
-Device controls
3
-Introduction
5
-Purpose
6
-Application
6
-Device care
7
-Cleaning the device
8
-Storage conditions
8
-Display
8
-Sound signal
8
-Sensor
9
-Included in the set
9
-Getting started
9
-Installing the battery
10
-Low battery indicator
10
-Turning on/off the device
10
-Turning on/off the backlight
11
-Operating modes
12
-Units of measurement
13

User Manual DPM-816 PRO Page 3
-Taking the measurement
13
-Calibration
15
-Zero deviation calibration (one-point calibration)
16
-Removing calibrations
17
-Two-point calibration
18
-Six-point calibration
19
-Checking the car body
22
-Specifications
23
-Possible malfunctions and suggested remedies
25
-Warranty
26
Device controls
"MODE" button
-Switches the operating mode
-Increases the thickness during calibration
-Switches on two-point calibration
-Switches on six-point calibration of ferrous metals
"POWER" button
-Turns on (off) the device
-Turns on (off) the display backlight
-Switches to the next point of calibration, and saves calibration
"UNIT" button

User Manual DPM-816 PRO Page 4
-Switches the unit of measurement
-Decreases the thickness during calibration
-Resets zero deviation and two-point calibrations
-Switches on six-point calibration of non-ferrous metals

User Manual DPM-816 PRO Page 5
Introduction
Dear owner of the digital coating thickness gauge (referred to as
"the device" from this point), we congratulate you with the
purchase of the device of Russian origin.
We are confident that the device will be useful to you, and last a
long time.
For correct and optimal use of the device, read this manual
carefully.
This model has the following features:
-Accurate coating thickness measurement on ferrous, non-
ferrous and galvanized metals
-Measurement on convex and concave surfaces
-Measurement on galvanized surfaces
-Measurement of deviation from a sample
-Wide range of measurement up to 3000µm (118 Mils)
-Measurement in millimeters, mils, and micrometers
-Wide operating temperature range, -25 to 40ºC (-14 to 40 F)
with automatic calibration adjustment
-Informative LCD display with backlight
-Sensor pressure stabilization
-Automatic metal type recognition (Fe/nFe)
-Automatic and manual selection of measurement methods
-Measurement using magnetic induction and eddy current
-Power supplied through one AAA battery at 1.5 volts
-Low battery indicator

User Manual DPM-816 PRO Page 6
-Small and convenient size
-Automatically turns off power and backlight
-5 modes for various measurement conditions
-Independent calibration using one, two or six points of
reference, saved to non-volatile memory of the device
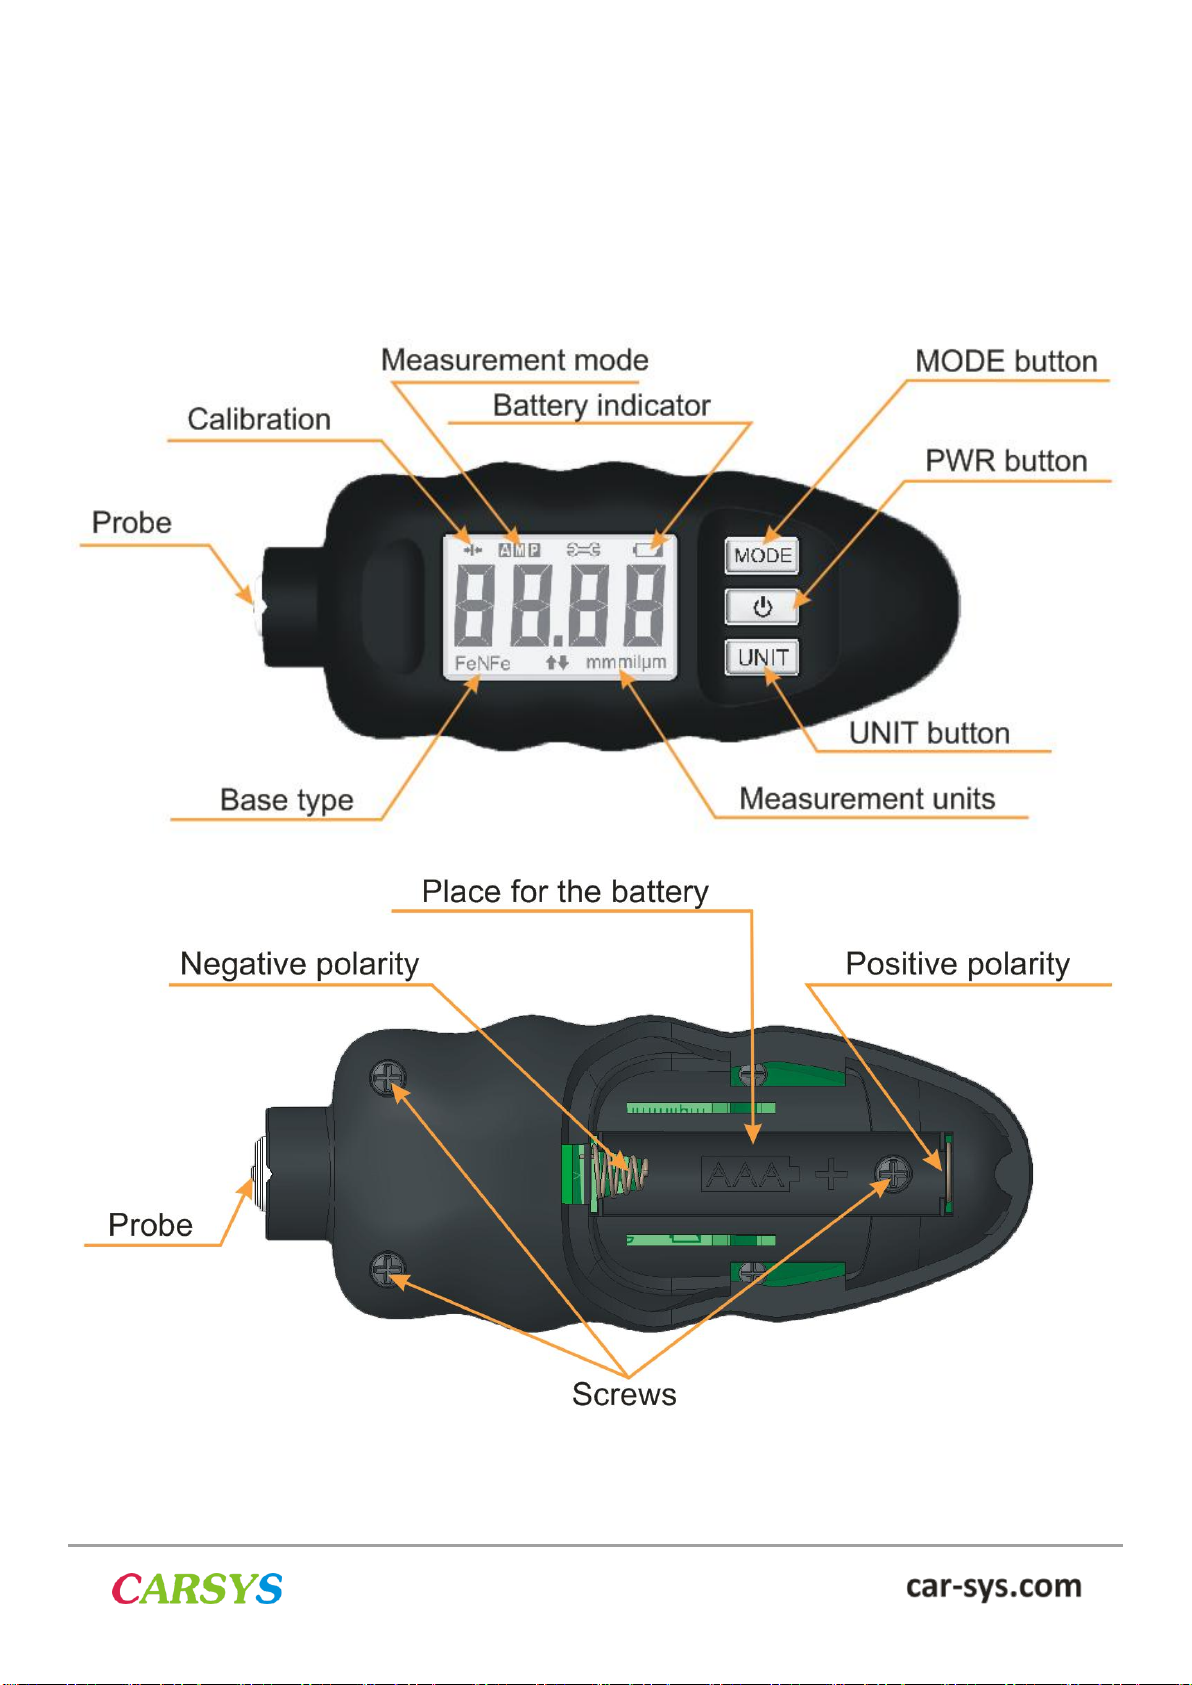
-Simple, intuitive controls with 3 buttons
-Distinct sound signal for each measurement method and
button press
-Complies with industry standards
-3 year factory warranty
Purpose
The device is designed to measure coating thickness:
Magnetic induction method - thickness of various dielectric
(paint, plastic, primer, etc.) and electrically conductive, non-
magnetic surfaces (aluminum, zinc, chrome, copper) on a ferrous
metal substrate (steel, iron).
Eddy current method - thickness of various dielectric coatings
(paint, plastic, primer, etc.) on a non-ferrous metal substrate
(aluminum, zinc, copper, etc.)
Application
Process control of application of paint or other protective coatings
in service centers and in manufacturing.

User Manual DPM-816 PRO Page 7
Diagnostics of the car body to assess its condition.
For example: when buying a car, before repairing dents without
paint (PDR), or scratch removal.
Device care
Please keep in mind that the device is a high precision measuring
instrument. Avoid dropping the device and subjecting it to
mechanical impact.
The device is protected against moisture, but is not waterproof. It
must not be used underwater or in heavy rain. If the surface of the
device accidentally gets wet, wipe off the moisture with a soft, dry
piece of cloth.
Do not use the device near sources of strong magnetic fields or in
the presence of strong radio waves. They can impact the
performance and measurement accuracy of the device.
Do not leave the device exposed to high temperatures, such as in
a car, exposed to direct sunlight. Disassembling the device is
forbidden.
If the device is brought from a cold to a warm environment,
condensation may form on its surface and its internals. To avoid
condensation, first place the device in a plastic bag. Before
removing the device from the bag, wait for it to warm up.
Should condensation form, do not use the device. Wait until all
the condensate evaporates.

User Manual DPM-816 PRO Page 8
Cleaning the device
To remove dust from the device case or the sensor, use a soft,
dry cloth. Do not use cleaning agents containing organic solvents.
Storage conditions
Store the device in a warm and dry place away from direct
sunlight. Do not leave the battery inside the device during long
term storage.
Do not leave the device near strong sources of magnetic fields,
for example, near magnets, power supplies or electric motors.
Do not store the device in hot, humid or dusty environments, or in
environments containing corrosive chemical substances.
Display
The device has an informative LCD display with a backlight that
automatically turns off. It shows the coating thickness, mode,
method, measurement units and other parameters.
Although the LCD display is manufactured using FSTN
technology with a wide operating temperature range, it may
refresh slower in low and high temperatures.
Sound signal
The device has a distinct sound signal for each measurement
method. This allows the user to quickly identify the type of metal

User Manual DPM-816 PRO Page 9
substrate under the coating when measuring in automatic mode,
without having to look at the display.
Sensor
To increase the accuracy of measurements and to enable
measurements on convex and concave surfaces, the device uses
a sensor constructed to stabilize the pressure on its sensitive tip
against the surface, as well as a spherical form for its sensitive tip.
The sensitive part of the sensor is made of high-strength heat-
treated steel, and the area of contact with the measured surface is
less than 1 mm².
Do not apply mechanical stress to the sensor. Do not attempt to
extract the sensor from the device, and do not rotate it. This may
interfere with the correct operation of the device.
Included in the set
First of all, make sure that the following items are present:
-Coating thickness gauge
-Aluminum and steel base plates for calibration
-Two sample plastic plates for calibration
-User manual
Getting started
To get started, you need to install one alkaline battery type AAA,
1.5 volts.

User Manual DPM-816 PRO Page 10
Before first use, or in case the device has not been used for an
extended period, as well as to increase the measurement
accuracy, you need to calibrate the device using one, two or six
points of reference.
Installing the battery
Open the battery cover, shifting the cover with your thumb in the
direction of the arrow.Insert the battery, taking note of the
polarity.Close the battery cover until it clicks.
Low battery indicator
The device consumes very low power, and can last an extremely
long time from a single battery without a backlight.
When the battery eventually loses its capacity and does not
supply enough power, the top right corner of the display will show
a low battery indicator.
-Do not use the device with a low battery!
Turning on the device
To turn on the device, press and hold the button for 2
seconds until the device emits a sound signal.
After turning it on, the display will show "8888".

User Manual DPM-816 PRO Page 11
The device will begin to automatically test and calibrate the
sensor.
After 2-3 seconds, the display will show dashes, indicating that
the device is ready to take measurements.
IMPORTANT! When turning on the device, keep it away from
metal objects and strong sources of magnetic fields!
Turning off the device
To turn off the device from any state, press and hold the
button for 2 seconds.
Display backlight
The device has an integrated backlight for the display. To turn the
backlight on or off, shortly press the button.

User Manual DPM-816 PRO Page 12
Operating modes
The device has 5 operating modes: A, M,P,Fe,nFe. To switch
between these modes, shortly press the button, which will
switch modes in a loop. The current mode will be shown on the
display.
A - Auto: Quick measurement with automatic selection of
measurement method. Dynamic resolution. Great for checking the
car body.
M - Manufacturing: Detailed and precise measurements with
high resolution across the entire range. Automatic selection of
measurement method. It is recommended to complete the two-
point calibration before measuring in this mode.
P - Program: Measurement using six points of reference for
custom calibration. Automatic selection of measurement method.
To use this mode, completing the six-point calibration is required.
This mode is designed for cases where the standard factory
calibration of the sensor is not suitable. For example, when
measuring coating thickness on a substrate with properties vastly
differing from steel and aluminum.
Fe - Magnetic induction method: Quick, continuous
measurement (4 measurements per second) of coating thickness
on a ferrous metal substrate, using magnetic induction. For
accurate measurements, it is recommended to complete the two-
point calibration before measuring.

User Manual DPM-816 PRO Page 13
nFe - Eddy current method: Quick, continuous measurement (4
measurements per second) of coating thickness on an aluminum
alloy substrate, using eddy current. For accurate measurements,
it is recommended to complete the two-point calibration before
measuring.
Units of measurement
For user convenience, the device can display the results of
measurement in several units of measurement: millimeters, mils,
and micrometers.
The choice of units of measurement is made with short
consecutive presses of the button, which will switch units
in a loop. The current unit will be shown on the bottom right corner
of the display.
Taking the measurement
Turn on the device (see the "Turning on the device" section
above) and wait for automatic calibration to complete. After
automatic calibration (takes 2-3 seconds) the display will show
dashes.
If necessary, select the desired mode and unit of measurement in
which you want to get the result.

User Manual DPM-816 PRO Page 14
Taking measurements in A, M, P modes (automatic modes):
Firmly place the device sensor flat against the surface to be
measured. Do not move the device during measurement (until a
sound signal is emitted), otherwise the measurement may be
inaccurate.
Once the device detects that the sensor is on the surface in a
fixed position, you will hear a sound signal indicating the
completion of measurement. Move the device away from the
measured surface. The display will show the result for 30 seconds
- the measured coating thickness and method of measurement:
Fe (magnetic induction, ferrous metals) or nFe (eddy current, non-
ferrous metals).
The accuracy of measurement depends on how flatly and firmly
the device sensor is pressed against the measured surface.
If you are using the sample plates included in the set to measure
or calibrate, the measurement must be taken from the center of
the plates.
Taking measurements in Fe, nFe modes (continuous
measurement):
In these modes, the device takes measurements quickly and
continuously. To take measurements, place the device sensor
against the surface to be measured. The device will immediately
and continuously (4 times per second) display the result of the
measurement.

User Manual DPM-816 PRO Page 15
These modes are useful when it is difficult to hold the device in a
fixed position. For example, when measuring on pipes, convex
and concave surfaces.
Calibration
For accurate thickness measurements, the device needs to be
calibrated. The device retains the calibration information and in
most cases you don't need to calibrate it again before every use.
Be sure to check and complete the calibration the first time you
use the device, or if you have not used it for a long time.
For the highest accuracy, it is advisable to calibrate the device
using a substrate that closely resembles the surface to be
measured (material, form, size).
For example, when measuring the coating thickness on carbon
steel and chrome steel substrates, the calibration will vary
insignificantly, but aluminum and zinc substrates will vary greatly.
Therefore it is important to calibrate.
The device has separate, independent calibrations:
Zero deviation calibration (one point of reference) and two-point
calibration are performed independently (separately) for A, M, Fe,
nFe modes, and for P mode with each measurement method
(magnetic induction and eddy current). This allows you to set up a
one-time calibration for modes A, M, Fe, nFe, for example on
carbon steel and aluminum substrates, and for P mode, chrome
steel and zinc substrates. To switch between calibrations, simply
switch between modes.

User Manual DPM-816 PRO Page 16
Keep a clean environment during calibration, as the slightest bit of
dust stuck between plastic and metal base plates may distort the
result by 5-10 µm.
Zero deviation calibration (one-point
calibration)
When to calibrate:
1. When measuring on a metal substrate without a coating, the
device will show a result greater or less than zero (depending on
the properties of the metal substrate). After calibration, the device
will display zero.
2. In cases where you need to measure deviation from a sample.
In these cases, the zero deviation calibration is done on a sample
coating and the device will use that coating as a point of reference
- "0". The device will display the difference from the sample
coating in subsequent measurements.
Zero deviation calibration procedure:
For zero deviation calibration, take a measurement of the metal
substrate without a coating, or a measurement of sample coating.
When the result is displayed, press and hold the button for
2 seconds. The display will show "CAL", which indicates a
successful calibration.

User Manual DPM-816 PRO Page 17
Verify the result by repeating the measurement.
Removing calibrations
This function will completely remove zero deviation and two-point
calibrations for all modes.
This function will restore the device's functionality in case of
incorrect calibration, but for accurate measurements it needs to
be calibrated again.
To remove calibrations, when the display shows dashes
, press and hold the button for 3
seconds.
The display will show "-CL-" and a sound signal will be emitted.
The calibrations have been erased.

User Manual DPM-816 PRO Page 18
Two-point calibration
When to calibrate:
-Before first use;
-If the device has not been used for an extended period;
-Before each measurement for maximum accuracy.
Two-point calibration procedure:
To enter calibration mode, press and hold the
button for 2 seconds until the display shows "F-0". This
indicates the zero point calibration.
Take a measurement on a metal substrate without a coating, for
which the device will be calibrated. If necessary, repeat the
measurement. To proceed to the next point for calibration, shortly
press the button while the measurement result is being
displayed.
The display will show "F-1", the second point of calibration.
Take a measurement on the same metal substrate together with a
sample coating of known thickness, for example 700 or 1000 µm.
If necessary, repeat the measurement. While the measurement

User Manual DPM-816 PRO Page 19
result is being displayed, shortly press the or
buttons to adjust the displayed thickness of the measured coating,
and shortly press the button to save the calibration. The
display will show "8888", indicating that the calibration has been
successfully saved.
Verify that the calibration is correct by repeating the measurement
of the metal substrate with and without the sample coating. If
unsuccessful, repeat the calibration.
Six-point calibration
This calibration is available in "P" measurement mode and will be
required when measuring coatings on substrates whose
properties differ from standard substrates, or for more accurate
measurements in a given range.
The new device's calibration is identical to the factory calibration.
For calibration, a metal base and 5 plates of known thicknesses
are required (not included in the set). All calibration points must
be evenly distributed throughout the measuring range.
F-0 (point 0) - Base without a coating (zero).
F-1 (point 1) - Plate with a thickness of 80-300µm (3-12 mils).
F-2 (point 2) - Plate with a thickness of 400-800µm (16-31 mils).
F-3 (point 3) - Plate with a thickness of 900-1800µm (36-70 mils).

User Manual DPM-816 PRO Page 20
F-4 (point 4) - Plate with a thickness of 1900-2500µm (75-98 mils).
F-5 (point 5) - Plate with a thickness of 2600-3500µm (102-137 mils).
Entering the calibration mode:
Turn off the device, then press and hold the button to enter
calibration mode for a ferrous metal substrate (magnetic induction
method) or the button to enter calibration mode for a non-
ferrous metal substrate (eddy current method), until the display
shows "FCAL" or "ACAL" respectively.
Wait until the display shows "0", indicating zero point calibration.
From this moment, calibration can begin.
Calibration process:
The first point of calibration is "0". Take a measurement of the
metal base without a coating, for which the device will be
calibrated. If necessary, repeat the measurement.
Shortly press the button to save the result and proceed to
the next point of calibration.
Table of contents
Popular Measuring Instrument manuals by other brands

Optima Home Scales
Optima Home Scales Figure user manual

Triplett
Triplett CM450 user manual

geo-FENNEL
geo-FENNEL FSM 130 user manual

Instantel
Instantel Borehole Triaxial Geophone quick start guide

Tektronix
Tektronix TTR500 series Technical reference manual

finder
finder 7E.12/13 Assembly and operating instructions