cascade corporation QFM Instruction Manual

cascade
corporation
Manual Number 6072554-R0
NSTALLATION INSTRUCTIONS
Scooping Platens
QFM™
Dedicated
I
Cascade is a Registered Trademark of Cascade Corporation

6072554-R0
1
GA0374.eps
A
GA0028.eps
ONTENTS
C
This Manual provides instructions for installing Cascade
Scooping Platens. Follow the suggested installation
procedures for best results. If you have any questions
or need more information, contact your nearest Cascade
Service Department (see back cover).
Read the WARNING Statements placed throughout this
Manual to emphasize safety during Attachment installation.
IMPORTANT: Field alterations may impair performance
or capability and could result in loss of warranty. Consult
Cascade for any required modifications.
QFM™ Scooping Platens
Truck Requirements 1
Installation 2
Dedicated Scooping Platens
Truck Requirements 4
Installation 4
Periodic Maintenance 7
WARNING: Rated capacity of the truck/Scooping
Platen combination is a responsibility of the original
truck manufacturer and may be less than that shown
on the attachment nameplate. Consult the truck
nameplate.
Carriage
Clean and inspect carriage
bars for damage. Repair any
damaged notches.
WARNING: The QFM™ Scooping
Platens require forks to support the
attachment and load. Forks up to
1.8 in. (45 mm) thick and 40–46 in.
(1015-1168 mm) long can be used.
42 in. (1066 mm) forks with bottom taper are
recommended. Sideshifter components (if
equipped) must not protrude in front of carriage
bars.
Carriage Mount Dimension (A) ITA (ISO)
Minimum Maximum
Class II 14.96 in. (380.0 mm) 15.00 in. (381.0 mm)
Class III 18.68 in. (474.5 mm) 18.74 in. (476.0 mm)
RUCK REQUIREMENTS
TQFM™ Scooping Platens

6072554-R0 2
PP1418.eps
PP1407.eps
PP0883.eps
PP1408.eps
QFM™ Scooping Platens
Follow the steps shown to install the QFM™ Scooping
Platens on the truck. Read all WARNINGS and
CAUTIONS carefully. If you don't understand a
procedure, ask your supervisor, or call the nearest
Cascade Service Department for assistance.
Remove banding, attach
overhead hoist
Engage Attachment
A Center truck behind the platens.
B Tilt mast slightly forward and
drive forks under the platens.
C Engage upper hooks with
carriage top bar.
Inside-to-Inside spacing
20.5–25.5 in. (52–65 cm)
A
C
B
Turn down lower hooks
A Open safety lockpin and turn down
lower hooks.
B Close safety lockpin to secure
hooks down.
CLower the platens onto pallet.
A
A
CAdjust
Forks
B
NSTALLATION
I
1
2
4
3

6072554-R0
3
PP0885.eps
PP0893.eps
NSTALLATION
I
5Engage lower hooks
A Open safety lockpin and turn hooks up.
B Release safety lockpin to secure hooks up.
C Adjust clearance and tighten hook capscrews.
1/8 in.
(3.2 mm)
Tighten capscrews to
60 ft.-lbs. (80 Nm)
6Adjust and lock upper hook
setscrews
A Adjust clearance for upper hook setscrews.
CAUTION: Do not overadjust.
B Tighten locknuts.
A
A
C
B
Setscrew
Locknut
1/16 in.
(1.6 mm)
QFM™ Scooping Platens

6072554-R0 4
GA0375.eps
A
GA0028.eps
Dedicated Scooping Platens
RUCK REQUIREMENTS
T
WARNING: Rated capacity of the
truck/Scooping Platen combination
is a responsibility of the original truck
manufacturer and may be less than that
shown on the attachment nameplate.
Consult the truck nameplate.
Carriage – Clean and inspect carriage
bars. Assure that bars are parallel and that
ends are flush. Grind smooth any protruding
welds that may affect Sideshift lower bear-
ings. Repair any damaged notches.
Carriage Mount Dimension (A) ITA (ISO)
Minimum Maximum
Class II 14.96 in. (380.0 mm) 15.00 in. (381.0 mm)
Class III 18.68 in. (474.5 mm) 18.74 in. (476.0 mm)
NSTALLATION
I
Follow the steps shown to install the Dedicated Scooping
Platens on the truck. Read all WARNINGS and
CAUTIONS carefully. If you don't understand a procedure,
ask your supervisor, or call the nearest Cascade Service
Department for assistance.
Remove banding
1
PP1411.eps

6072554-R0
5
3
A
B
cascade
®
C-675514-1
CL0097.eps
NSTALLATION
I
Quick-Change Lower Hooks -
Unlock lower hooks
A Remove pin and drop hooks into unlocked
position.
BReinstall pin in lower hole (unlocked).
Pin
Lower
Hook
Guide
Back (Driver's) View
Bolt-On Lower Hooks -
Remove lower hooks
2
PP1412.eps
Dedicated Scooping Platens
Tighten capscrews to
120 ft.-lbs. (165 Nm)
NOTE: Guides can be reversed to
reduce hook-to-carriage clearance.
(See Step 4)
5/8-in. (16 mm)
offset on top
provides maximum
clearance.
Tighten capscrews to
166 ft.-lbs. (225 Nm)

6072554-R0 6
PP1414.eps
PP1413.eps
GA0168.eps
cascade
®
C-675514-1
SD0065.eps
ADJUST
SD0066.eps
NSTALLATION
Mount Platens on truck carriage
A Center truck behind attachment.
B Tilt forward and raise carriage into position.
C Engage top mounting hook with carriage.
Make sure center locator tab engages cen-
ter notch on top carriage bar.
D Lift platens 2 in. (5 cm) off pallet.
I
QUICK-CHANGE TYPE
Tighten capscrews to
120 ft.-lbs. (165 Nm)
Install and engage lower hooks
Inspect hooks for
excessive clearance.
(Reverse guides to reduce
clearance – see Step 3.)
Slide hook
up to engage
bar, install pin
in upper hole
(locked).
Lower
Carriage
Bar
Lower
Carriage
Bar
Tap into position.
ITA Class II – 0.32–0.36 in. (8–9 mm)
ITA Class III – 0.39–0.43 in. (10–11 mm)
ITA Class II – 0.60–0.66 in. (15–17 mm)
ITA Class III – 0.72–0.78 in. (18–20 mm)
Center
Notch
Upper
Carriage Bar
BOLT-ON TYPE
3/16 in.
(5 mm)
max.
5
4B
A
C
Dedicated Scooping Platens

6072554-R0
7
PP1415.eps
PP1416.eps
PP1409.eps
100-Hour Maintenance
Every time the lift truck is serviced or every 100 hours
of truck operation, whichever comes first, complete the
following maintenance:
• Check for loose or missing bolts.
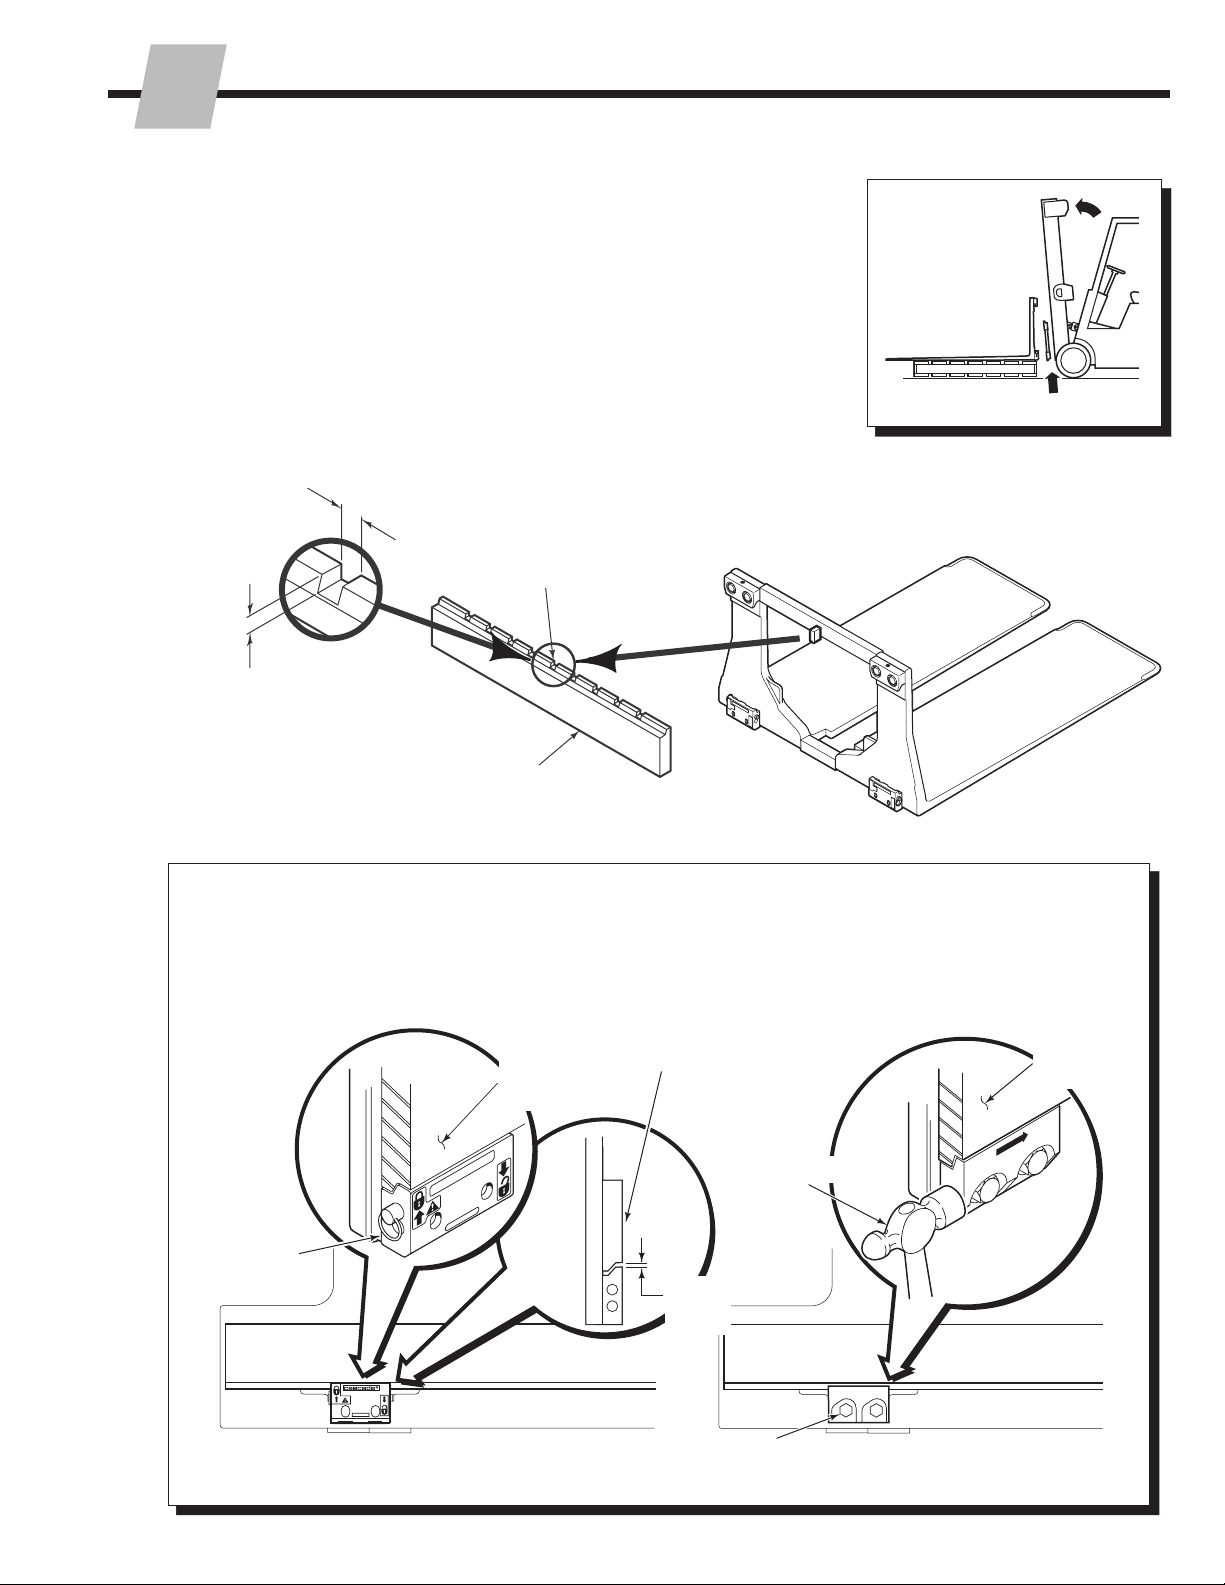
500-Hour Maintenance
After each 500 hours of truck operation, in addition to the
100-hour maintenance, perform the following procedures:
Dedicated Scooping Platens
• Tighten the upper mounting hook capscrews to 120 ft.-
lbs. (165 Nm).
• Check the clearance between the lower mounting hooks
and the truck carriage bar:
Quick-Change Hooks – 3/16 in. (5 mm) maximum.
Bolt-on Hooks – Tight against lower carriage bar.
• If hook adjustment is necessary, refer to Dedicated
Installation Step 3 (pg. 5) or 5 (pg. 6) in this Manual.
Tighten the lower hook mounting capscrews to 120 ft.-
lbs. (165 Nm).
QFM™ Scooping Platens
• Tighten the platen mounting capscrews to 40 ft.-lbs.
(60 Nm).
• Check for 1/8 in. (3.2 mm) maximum clearance between
lower mounting hooks and truck carriage bar. Refer to
Step 5 in this manual if adjustment is necessary.
• Check for 1/16 in. (1.6 mm) maximum clearance
between upper hook setscrews and truck carriage bar.
Refer to Step 6 in this manual if adjustment is necessary.
• Tighten lower hook capscrews to 52 ft.-lbs. (70 Nm).
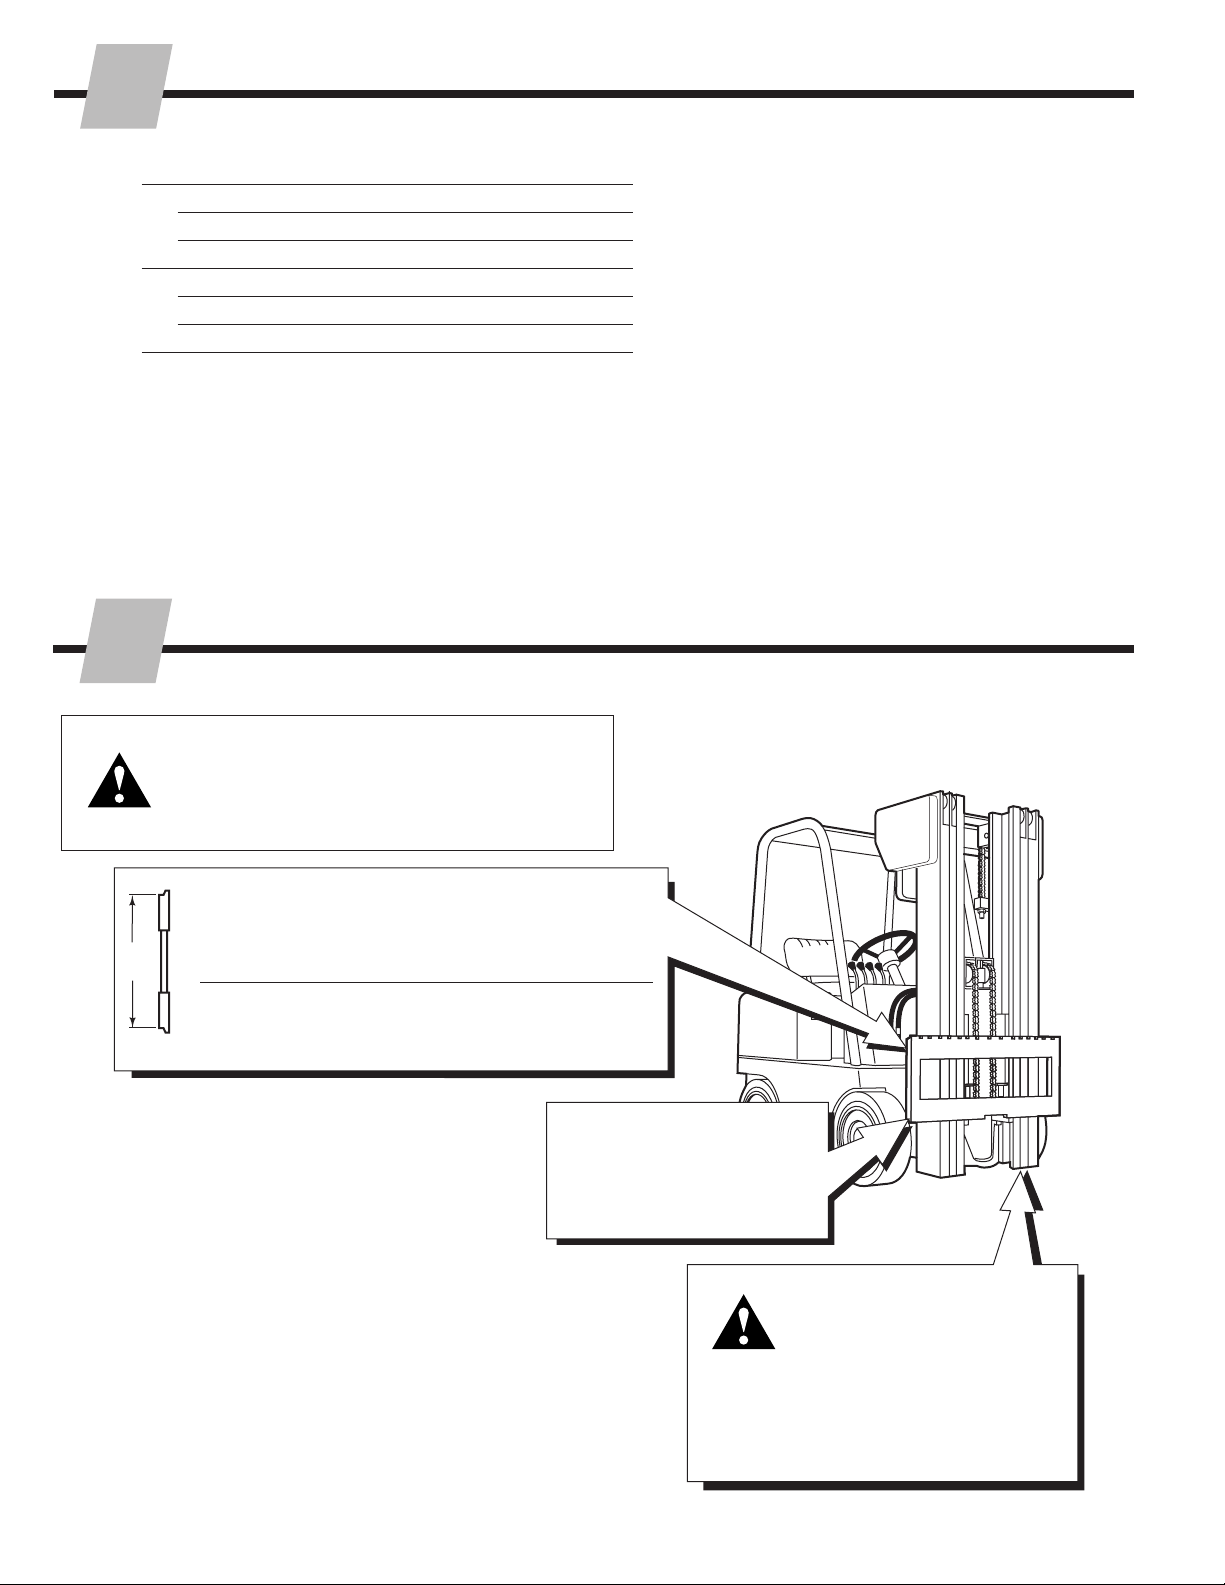
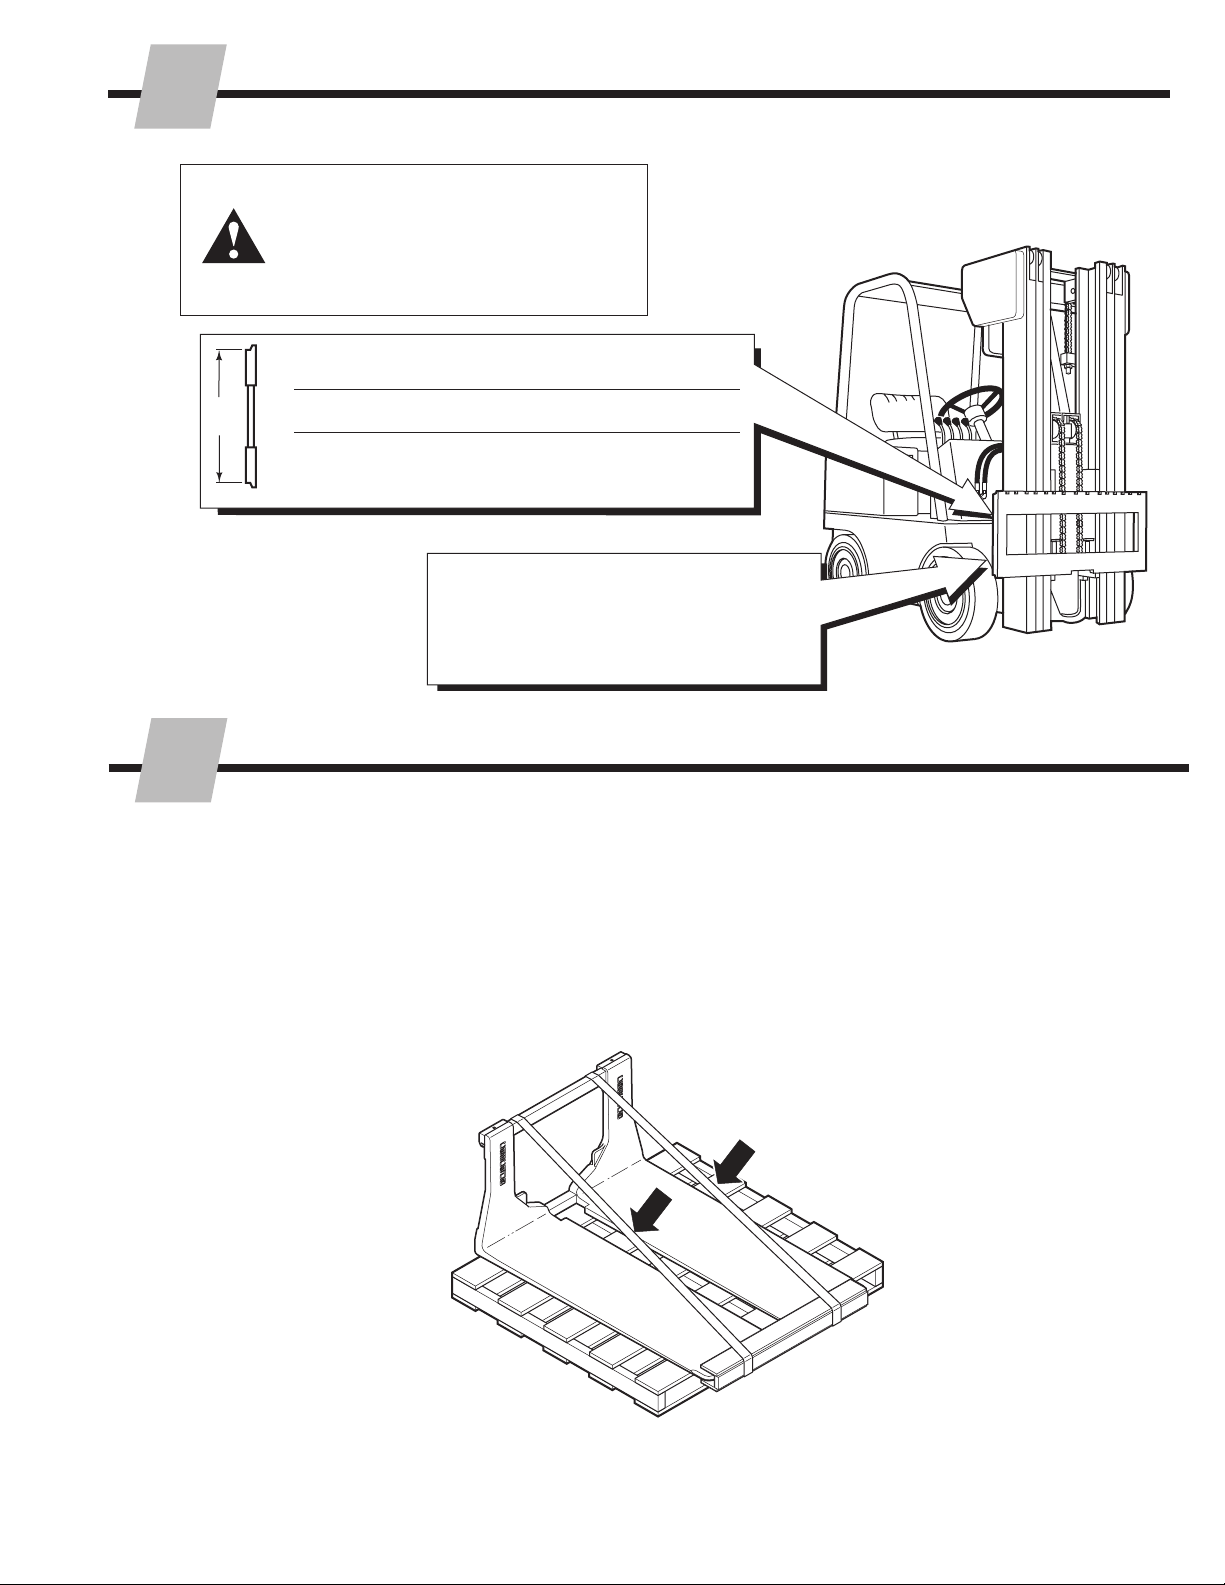
WARNING: Platen capscrews must be
tightened regularly to prevent equipment
damage or personnel injury.
Quick-Change
Lower Hooks
PERIODIC MAINTENANCE
Upper Mounting
Hook Capscrews
Lower Mounting
Hook Capscrews
Upper
Hook
Setscrews
Lower Mounting
Hook Capscrews
Platen
Mounting
Capscrews
Upper Mounting
Hook Capscrews
Lower Mounting
Hook Capscrews
Bolt-On Lower
Hooks
QFM™ Scooping Platens
Dedicated Scooping Platens


Cascade Corporation 2007 1-2007 Part Number 6072554-R0
c
Do you have questions you need
answered right now? Call your
nearest Cascade Service Department.
Visit us online at www.cascorp.com
Cascade Corporation
U.S. Headquarters
2201 NE 201st
Fairview, OR 97024-9718
Tel: 800-CASCADE (227-2233)
FAX: 888-329-8207
Cascade Canada Inc.
5570 Timberlea Blvd.
Mississauga, Ontario
Canada L4W-4M6
Tel: 905-629-7777
FAX: 905-629-7785
Cascade GmbH
Niederwippekühl 1
58579 Schalksmühle
Germany
Tel: 02355-50900
FAX: 02355-509020
Cascade Finland
A. Petreliuksenkatu 3
01370 Vantaa
Finland
Tel: 09-8361925
FAX: 09-8361935
Cascade N.V.
Benelux Sales and Service
Damsluisweg 56
PO Box 3009
1300 El Almere
The Netherlands
Tel: 036-5492950
FAX: 036-5492974
Cascade (UK) Ltd.
Unit 4, 12 O’Clock Court
Attercliffe Road
Sheffield, S4 7WW
England
Tel: 0870-850-8756
FAX: 0870-850-8757
Sales Scotland
Macade Systems Ltd.
18 Melford Road
Righead Ind. Estate
Bellshill ML4 3LR
Scotland
Tel: 01698-845777
FAX: 01698-845888
Cascade (Africa) Pty. Ltd.
PO Box 625, Isando 1600
60A Steel Road
Sparton, Kempton Park
South Africa
Tel: 27-11-975-9240
FAX: 27-11-394-1147
Cascade Scandinavia AB
Hammarvägen 10
PO Box 124
S-56723 Vaggeryd
Sweden
Tel: 039-336950
FAX: 039-336959
Cascade France
S.A.R.L. MHP
1D Rue De Charaintru BP 18,
91360 Epinay-Sur-Orge
France
Tel: 01-6454-7500
FAX: 01-6454-7501
Cascade Hispania S.A.
Carrer 5, Sector C
Zona Franca Duanera
Poligono de la Zona Franca
08040 Barcelona, Spain
Tel: 93-264-07-30
FAX: 93-264-07-31
Cascade Italia S.R.L.
Via Dell’Artigianato 1
37050 Vago di Lavagno (VR)
Italy
Tel: 39-045-8989111
FAX: 39-045-8989160
Sales Portugal FAG
Santos Lda
Rua do Mercado
Lte 6, Loja 2-Tires 2785-630
S. Domingos De Rana
Portugal
Tel: 214-448-083
FAX: 214-458-098
Sales Switzerland
Fahrzeugbedarf
8810, Horgen
Switzerland
Tel: 01-7279797
FAX: 01-7279798
Sales Poland
Targowa 35/61
03-728 Warszawa
Tel: 022-619 00 49
FAX: 022-619 00 49
Mobile Tel: 0501-27 29 55
Sales Russia
EMCG Material Handling
Equipment
Moscow
Tel: 095-795-2400
FAX: 095-795-2475
Email: [email protected]
Cascade Japan Ltd.
5-5-41,
Torikai Kami
Settsu, Osaka
Japan, 566
Tel: 81-726-53-3490
FAX: 81-726-53-3497
Cascade Korea
121B 9L Namdong Ind.
Complex, 691-8 Gojan-Dong
Namdong-Ku
Inchon, 405-310 Korea
Tel: 82-32-821-2051
FAX: 82-32-821-2055
Cascade Australia
1445 Ipswich Road
Rocklea, QLD 4107
Australia
Tel: 1-800-227-223
FAX: 617-3373-7333
Cascade New Zealand
15 Ra Ora Drive
East Tamaki, Auckland
New Zealand
Tel: 64-9-273-9136
FAX: 64-9-273-9137
Cascade-Xiamen
No. 668 Yangguang Rd.
Xinyang Industrial Zone
Haicang, Xiamen City
Fujian Province
P.R. China 361026
Tel: 86-592-651-2500
FAX: 86-592-651-2571
Sunstream Industries
Pte Ltd.
No. 3 Tuas Link 1
2263
Singapore
Tel: 65-6863-3488
FAX: 65-6863-1368
Central LTDA
(Cascade Brazil)
Av. General Valdomiro
de Lima 43
Jabaquara - Sao Paulo - S.P.
Brasil CEP 04344-070
Tel: 55-11-5013-2800
Fax: 55-11-5013-2809
Table of contents
Popular Construction Equipment manuals by other brands

Manitowoc
Manitowoc 14000 Operator's manual

Ergon
Ergon Crafco Patcher 4 Operator's & parts manual

Facom
Facom DL.1GP Original instructions

Dural
Dural Z-FLEX CURVER I operating instructions

Loglift
Loglift 105Z CE Operator's manual

BE Ag & Industrial
BE Ag & Industrial AGRI EASE DIAMOND HARROW HAR60S Assembly instructions