6
3
4
B
3
4
D
1
2
3
7
B
B
D
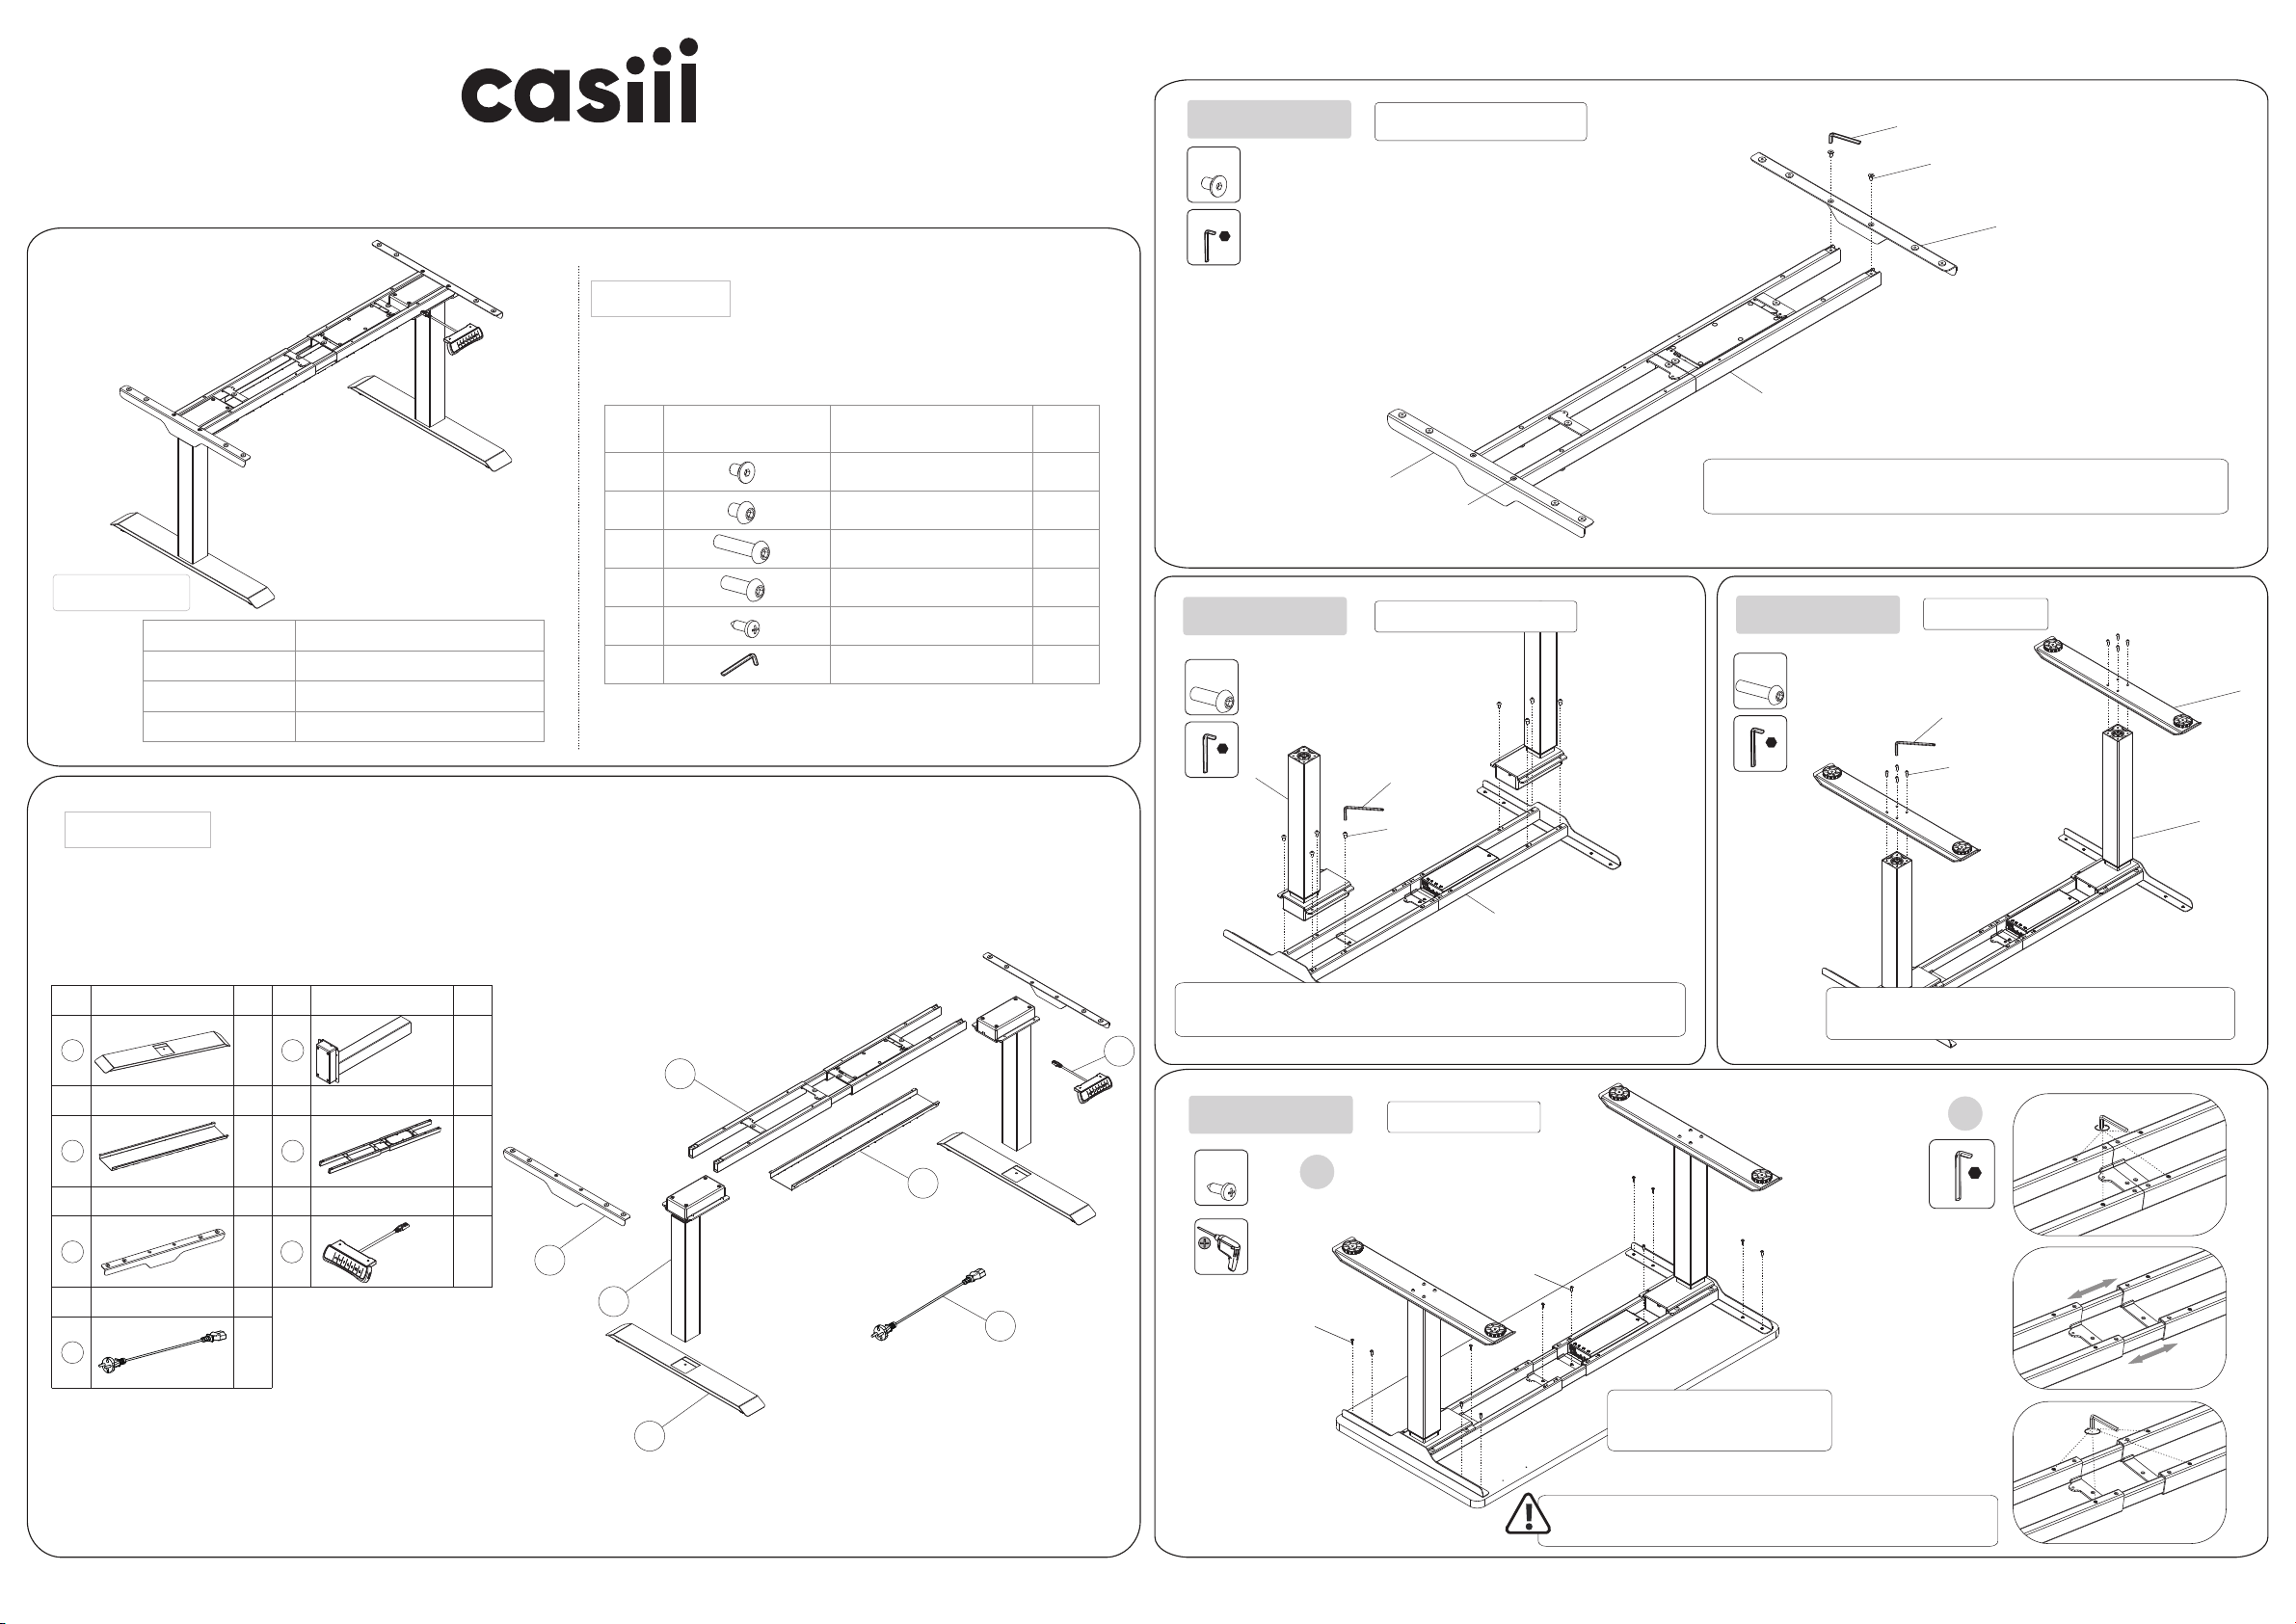
STEP 5
STEP 6
Install the Control Panel
Port for
hand switch
Power port
Port for cable
connected to the
lifting column
Install the Cable
Management Tray
Method 1
Slide one side
Tighten
Buckle the other side
Firstly, rotate the screws (B) incompletely into the supporting beam (4)
with Allen Key (F), which means do not tighten them. Next, slide one
side of the cable management tray (3) into the screws (B), then the
other side Finally, tighten the screws (B) with Allen Key (F).
Method 2
Install the cable management tray as Method 1, Step 6.
When the supporting beam stretches over 1720 mm,
the cable management tray needs to be mounted on
the middle of the supporting beam.
Do not stretch the support
beam beyond this hole
Bx4
F
4x4
Bx4
F
4x4
Dx4
Common fault treatment
The following tips will help you detected and eliminate the common fault
and error.If the fault you met is not listed below, please contact with your
supplier. Only themanufacturer and professionals are capable for investigating
and correcting those fault and error.
Fault phenomenon Method
No response while long pressing
down arrow after connected with
a power supply
1.Check if all the cables be connected well
1.Check if all the cables be connected well
2.Contact your supplier or dealer
2.Contact your supplier or dealer
No response while pressing up
arrow/ down arrow after
connected with a power supply
Rising in a low speed
1.Check if overloaded, max loading: 125kg;
1.Check if overloaded, max loading: 125kg;
1.Check if overloaded, max loading: 125kg;
2.Contact your supplier or dealer
2.Contact your supplier or dealer
2.Contact your supplier or dealer
The motor not move as instructed 1. Contact your supplier or dealer
1.Reposition
2.Contact your supplier or dealer
Go down but not go up
Downward sliding
Frequently Reposition
Overwork
(Duty cycle:Max 2min on/18min OFF)
1.Restart after suspend for 18mins while
connecting with power;
2.Contact your supplier or dealer;
1. Press "M"and "3" together for 3 seconds or
more, after hearing continuous beeping for twice,
it will restore factory settings
Not enough up&down height
2.Contact your supplier or dealer
Attention
1. Power supply: AC100V-240V,50/60Hz
2. Service Environment: 0-40℃
3. Unplug the power plug before cleaning, wipe the dust on surface with slight wet
dishcloth when cleaning, be careful not to let the drops into the internal parts, not loose
the connector.
4. The electric box contains electronic components, metals, plastics, wires etc., so
dispose of it in accordance with each country's environmental legislation, not the
general household waste.
5. Check carefully to ensure correct and complete assembly before using.
6. Be familiar with all functions and program settings of the product before first use.
7. Children are forbidden to play on the product because of unforeseen action when
playing, so any dangerous consequences caused by this improper action will not be on
manufacturers.
8. Slight noise caused by the V-ribbed belt or brake system due to structure will not
have any effect on the use of the equipment.
9. Corrosive or abrasive materials are forbidden to clean the equipment. Must ensure
that the cleaner used will not pollute the environment.
10. This appliance can be used by children aged from 8 years and above and persons
with reduced physical, sensory or mental capabilities or lack of experience and
knowledge if they have been given supervision or instruction concerning use of the
appliance in a safe way and understand the hazards involved. Children shall not play
with the appliance.
11. Cleaning and user maintenance shall not be made by children without supervision.
12. If the supply cord is damaged, it must be replaced by the manufacturer, its service
agent or a similarly qualified person in order to avoid a hazard.
13. Please make sure there is no hazard sources in your operating environment. e.g.,
do not litter the tools around. Always be careful to treat the packaging materials in order
to avoid any possible danger, e.g. plastic bag may lead to choking hazard to children.
14. Keep the original package of the equipment if necessary in case of the future use in
transportation.
Waste disposal This marking indicates that this product should not be
disposed with other household wastes. To prevent
possible harm to the environment or human health
from uncontrolled waste disposal, recycle it responsibly
to promote the sustainable reuse of material resources.
To return your used device, please use the return and
collection systems or contact the retailer where the
product was purchased. They can take this product for
environmental safe recycling.
www.casiii.com
Design in USA
Button introduction: There are seven buttons
(1) "▲" : Adjust the desk upwards
(2) "▼" : Adjust the desk downwards
(3) "1" : Position 1, first height position saved by the user
(4) "2" : Position 2, second height position saved by the user
(5) " " : the display shows “3”, which means the position of the
standing height the user saved.
(6) " ” : the display shows “4”, which means the position of the
sitting height the user saved.
(7) "M" : Height saving button, for height memory function;
Child lock: for security
" " "M" "▲" , "▼" , "1" , "2" , " "
●Troubleshooting:
height and rebounds to stop, it means the reset has been finished.
b. When it does't work and the LED shows "E01" or "E02", please retry 18 mins later.
c. If the “▼” button does't work, please check the cable connection and then cut off the
power for at least 10 seconds. Reconnect to the power and press “▼” button to start the
d. If all these above process are inefficient, plz contact our customer service.
a. Reset: When the LED shows" " , press “▼” button until the desk reaches its lowest
reset process when it shows the " ".
Press the"▲" or "▼" button to adjust the height. The LED display shows the current height.
Height Adjustable Function:
●
a. Press UP or DOWN button and adjust the height to the desired height. Press "M" to
save the height, and the screen will display " ";
you saved.
Height Memory Function:
●
Press "1" , "2" ,or " " , " " then, that is, save the height to the corresponding position
1 or 2 3, or 4, which will show in the display screen as " " ," ", or " ", or " ";
b. Press "1", "2" and " " , " "button directly to automatically adjust the memory height
●USB charging function:
a. USB output: QC2.0/QC3.0, 5.0v / 9.0v / 12.0v, ±5%, current: 1.0a
●Collision prevention sensitivity adjustment - optional features:
a. Press and hold the “▲” “▼” button for 5 seconds at the same time to switch the
sensitivity. There are four levels of sensitivity (A-3, A-2, A-1, A-0). Each operation will
switch the sensitivity into the next level.
sensitivity (factory default is A-3);
c. During height adjustment, when tabletop comes in contact with another object, it
instantly stops and reverses to avoid damage.
d. Press and hold the “▲” “▼” button for 5 seconds at the same time. If the display
does not display the above code, there is no anti-collision function.
low sensitivity; Display shows “ ”, medium sensitivity; display shows“ ”, high
b. The display shows “ ” , the anti-collision function is off; the display shows “ ”,
b. Press the button indicator to flash once
c. To unlock or start the child lock, you need to press and hold the M button for about 5
seconds.
d. Only when the child lock is unlocked, all the buttons can work normally.
a. When the child lock is turned on, the child lock blue indicator light (﹀ and M directly
above) lights up
Child lock function:
●