manuals.online logo
Brands
  1. Home
  2. •
  3. Brands
  4. •
  5. Casio
  6. •
  7. Calculator
  8. •
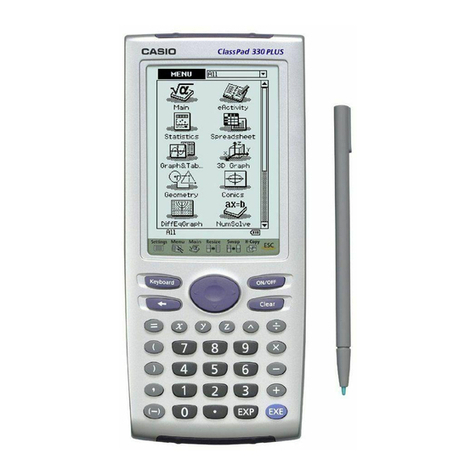
  9. Casio Prizm User manual

Casio Prizm User manual

2
The status bar will display messages and current status like battery level, angle mode, fraction
results, complex mode, or input/output settings.
Select the desired icon by highlighting it
and pressing lor just press the number
or letter in the lower right corner.
The function keys allow you to access the
tab (soft key) menus that will come up at
the bottom of the screen. When an (>)
appears above the ukey, selecting u
will offer more on-screen choices.
The akey activates any function
displayed on or above the calculator
buttons that is in red. For example, to
type the letter A, press a, then f.
The pkey displays every mode the
calculator has. To select a mode, you
may $N to the desired icon and press
lor press the number or letter in the
lower right hand corner of the icon.
The dkey operates like the back
arrow on a web browser; it will take you
back one screen each time you select it.
The dkey will not take you to the
icon menu.
The Lkey activates any function dis-
played on or above the calculator buttons
that is yellow. For example, to find the
s uare root of number, you would need
to press L, then . L5gives you
access to on-screen color formatting.
The Okey will power the unit on. To
turn the unit off, press the yellow L
key, then Okey.
The lkey executes operations. When
data is entered, the lbutton must be
pressed to store the data.
3
The following explains the meaning of each icon on the
Prizm main icon menu.
Run•Matrix
This icon menu is used for general
computations, including binary, octal,
decimal, and hexadecimal functions
and matrices.
Stati tic
This icon menu is used to perform
single-variable (standard deviation)
and paired variable (regression)
statistical calculations, to perform
tests, to analyze data and to draw
statistical graphs.
eActivity
eActivity lets you input text, math
expressions, and other data in a
notebook-like interface. Use this
mode when you want to store text,
formulas, or built-in application
data in a file.
Spread heet
This icon menu is used for creating
spreadsheets.
Graph
This icon menu is used to draw,
store and calculate information of
functions.
Dynamic Graph
This icon menu is used to draw
multiple versions of a graph by
changing the values in a function.
Table
This icon menu is used to store
functions, to generate a numeric
table of different solutions as the
values assigned to variables in a
function change, and to draw graphs.
Recur ion Graph
This icon menu is used to store
recursion formulas, to generate a
numeric table of different solutions
as the values assigned to the
variables in a function change, and
to draw graphs.
Conic Graph
This icon menu is used to graph
parabolas, circles, ellipses, and
hyperbolas. You can input a
rectangular or polar coordinate
function or a parametric function
for graphing.
Equation
This icon menu is used to solve
linear e uations with two through six
unknowns, and high-order e uations
from 2nd to 6th degree.
Program
This icon menu is used to store
programs in the program area and
to run programs.
Financial
This icon menu is used to perform
financial calculations and to draw
cash flow and other types of graphs.
Data Analyzer Link
This icon menu is used to control
the optionally available EA-200 Data
Analyzer. For information about this
icon menu, download the E-CON2
manual from http://edu.casio.com.
Link
This icon menu is used to transfer
money contents or back-up data to
another unit or PC.
Memory
This icon is used to manage data
stored in memory.
Sy tem
This icon menu is used to initialize
memory, adjust contrast, reset
memory, and to manage other
system settings.
Geometry
This mode allows you to draw,
analyze and animate geometric
objects.
Picture Plot
This mode allows you to plot points
(that represent coordinates) on
screen and then perform various
analysis of the data collected.
Conver ion
You can perform unit conversions
of length, area, volume, time,
temperature, velocity, mass,
force/weight, pressure, energy/work,
and power.
4
Quick Start Guide
To display a bac ground image press Lpand scroll to Background: and select e.
To see a preview of each image, press y(Detail) and scroll through the file choices.
Ma e your selection and dout of (SET UP).
PICTURE PLOT: In this mode, you can ta e images or a series of images, plot points on
the image and perform regressions, graph y or x as a function of time, and create tables
from the plotted points, including time. Any previous image will automatically display;
press ito see soft-menu choices for the image.
∂To begin plotting points, press w(Plot). Use numbers (they correlate to the
position on the number pad) or arrows to find a point then lto store. Follow the
prompts in the status bar.
∑To perform a quadratic regression on the plotted points, press ufor more options,
w(REG), then u(DRAW).
IMAGE
BACKGROUNDS
You can view ima es as back rounds in Statistics, Spreadsheet, Graph,
Dynamic Graphin , Table, Recursion, Conics, and Financial modes.
© styf - Fotolia.com
∏Press q(AXTRNS) to change the graph to q(T-Y) or w(T-X).
π To see a table of values for your plotted points, press i, then e(List).
Note: L5(FORMAT) will always display the color options. Here, the plots were changed
from yellow to pin .
Now that you now the equation of the arch created by the stones, press p9for the
Conic Graph mode.
∂From here, you can select the standard form, enter your coefficients, then
u(DRAW) to view your graph.
∑In Conic Graphs, you are able to modify your graph, one coefficient at a time. Press
exit to return to the Conics initial screen and select q(MODIFY). In the bottom
left corner of the screen, you can arrow to the portion of the graph you would li e
to modify. Here, the c-value was modified from 1.75 to 1. The new graph appears in
blue and the original graph appears in yellow.
5
Quick Start Guide
6
Quick Start Guide
The initial screen allows immediate input of functions set equal to zero. You may begin
inputting data into Y1: pressing lto store. To draw your function, select u(DRAW).
Note: Colors have been pre-determined for each function. To change the color of the
function, highlight the function and press L5(FORMAT).
∂To draw the graph of the function y = -1.2x2+ 2.8, enter the following from the
GRAPH home screen:
• -1.2f +2.8
To analyze features of this graph (roots, maximum and minimums, y-intercepts,
intersections, determine coordinates, and integrals) select y(G-Solv).
∑ q(Root):
Note: The left-most root within the window will always display first. Press lto display
the root’s coordinate on the graph as an ordered pair. Select $to display the next
root to the right.
GRAPH
Various icons (Run, Table, Dynamic, Recursion & Conics) will allow
you to raph or analyze the raphs of iven information. This section is
an overview of the GRAPH Icon and will hi hli ht some basic features
of this mode. To select this icon, you may hi hli ht it and
press lor press 5.
© Vladimir Mucibabic
- Fotolia.com
7
Quick Start Guide
∏ e(Maximum):
Note: As long as the x-value of your vertex is in the viewable domain, you do not need
to see the vertex to calculate the maximum value. However, you can change the
viewing window by selecting e(V-Window) in the graph window. You can also
change the window manually by using !$BN.
To change the type of function the calculator graphs, highlight the equation to be
changed and press e(Type) and r(Convert).
πConvert the original function to a Y ≤function.
∫ Graph the function y < x – 3 with the original function. To change the type
before entering in the function, Nto select the color for your expression and
then the following:
• euwf-3l
Note: The calculator is set to graph the union of the inequalities. To change this to the
intersection, press Lp(Set Up). Press NN and choose either q(Intsect) or
w(Union).
œTo find the integral value for the function, press y(G-Solv), u, and e. The
calculator now offers three different options: q(∫dx) allows the user to specify
lower and upper bounds, w(ROOT) forces the calculator to use the roots as the
bounds, e(INTSECT) forces the calculator to use the intersection points
as the bounds.
8
Quick Start Guide
Note: All operations in this handout will utilize the “Math” input mode, which allows
natural input and display of certain functions, just as they appear in a textboo .
To ma e sure your calculator is in “Math” mode, press Lpqd.
By pressing Lp, the calculator enters the set up menu; this is also where the
calculator can be changed to degree or radian mode, the number of decimal places
displayed can be set, and other options.
∂When performing general computations, you can press zto enter fractions and
mixed numbers. To solve the problem 2( 1 + (3 + )), enter the following:
• 2+j1+j3+z5Nj6-j2+1kk$kkl
∑To change the answer, , to a mixed number, press Lx.
∏To change the answer to decimal form, press x. xis a toggle ey that will switch
entered data or answers from fraction to decimal form or decimal to fraction form.
RUN
This section is an overview of the RUN icon. To select this icon,
hi hli ht it and press l or press 1to display the initial screen.
5
(6-(2+1))
34
3
9
Quick Start Guide
From the Run menu, many calculations can be entered by selecting i.
For example, hyperbolic, probability/distribution, numeric (including differential
and integration), conversion, engineering, complex number and binary, octal,
decimal and hexadecimal calculations.
π To calculate the possible number of different arrangements using 4 items selected
from among 10 items, enter the following from the Run home screen:
•iue10w4l
∫ To calculate
|
-103+ 2
|
, enter the following from the Run home screen:
• iewn10^3$+2l
œTo calculate (-3 + 2i) + 15i, enter the following:
•iejn3+2qk+15ql
ºTo calculate ∑( 2– 3 + 5), enter the following:
•iruea, -3a,+5$a,$2$6l
=2
6
10
Quick Start Guide
The initial screen allows immediate input of functions that are set equal to 0. To change
the type of expression to be entered, press e(TYPE). Select wfor polar coordinates or
efor parametric functions.
∂To see the table for the function y = x – 4, highlight Y1: and input the following:
• z2N3$f-4lu
Note: The equation and table values are the same color. Also, if a function is entered in
the Graph Menu, it will automatically be displayed as a function in the Table Menu and
vice versa. The colors will also be the same in both menus. The color of the function
can be changed by pressing L5(FORMAT).
∑The default setting for tables is: x starts at 1, ends at 5, and increases by increments
of 1. You can change this by pressing dor q(FORMULA) to return to the initial
screen, then select y(SET).
∏However, you can enter a number anywhere in the x-column of the table and press
lto see the corresponding y-value (including fractions, decimals, even p). You
can insert and delete rows in this view by pressing e(ROW).
TABLE
This section is an overview of the TABLE Icon. To select this icon,
you may hi hli ht it and press lor press 7.
2
3
11
Quick Start Guide
πFrom the table view screen, you can press y(G-CON) to see a connected
plot or u(G-PLT) to see a plot graph for the function you entered.
∫To see a split screen of your table and graph, press Lp (SET UP). Press Nto
Dual Screen, select q(T + G), d, then u.
To generate a differential number table, press Lp(SET UP). Press Nto Derivative,
select q(On), d, and then u.
œFor this example, enter Y1: 3x2– 2 and Y2: x2then uto view the differential
number table.
Note: Locating the cursor at a differential coefficient displays “dY/dX” in the upper
left hand corner.
12
Quick Start Guide
The initial screen is the List Editor Screen that allows input of statistical data and
performs numerous statistical calculations. To input a list of single-variable data,
highlight the first cell under List 1 and enter each number followed by l.
∂For this example, input this set of data:
• 1, 0.5, 1.2, 4, -1, 1, 3, 5, 6, 3.4
∑From this screen you can display various graphs depending on whether you have
single or paired-variable data (scatter plot, line, normal probability, histogram,
median box, mean box, normal distribution, bro en line, and regression: linear,
quadratic, cubic, quartic, logarithmic, exponential, power, sinusoidal and logistic).
A few examples of statistics graphs are below:
Note: The colored icon in the status bar indicates that Color Lin is on, meaning, you
can manually assign data a specific color. Here all values less than 20% appear in
blue and values greater than 20% appear in green.
STATISTICS
This section is an overview of the STAT icon; it will hi hli ht just a few
of the features for sin le-variable data and paired-variable data.
To select this icon, you may hi hli ht it and press lor press 2.

Other Casio Calculator manuals

Casio fx-3800P User manual

Casio

Casio fx-3800P User manual

Casio fx-83 Guide

Casio

Casio fx-83 Guide

Casio FX-602P User manual

Casio

Casio FX-602P User manual

Casio FX-9700GE User manual

Casio

Casio FX-9700GE User manual

Casio fx-82 Super User manual

Casio

Casio fx-82 Super User manual

Casio SF-4300A Troubleshooting guide

Casio

Casio SF-4300A Troubleshooting guide

Casio fx-50F User manual

Casio

Casio fx-50F User manual

Casio fx-500ES Technical document

Casio

Casio fx-500ES Technical document

Casio DJ-120TG User manual

Casio

Casio DJ-120TG User manual

Casio ms-310m User manual

Casio

Casio ms-310m User manual

Casio BF-100 User manual

Casio

Casio BF-100 User manual

Casio FX-82TL User manual

Casio

Casio FX-82TL User manual

Casio CFX-9850G PLUS User manual

Casio

Casio CFX-9850G PLUS User manual

Casio FX-CG20 User manual

Casio

Casio FX-CG20 User manual

Casio fx-3650P II User manual

Casio

Casio fx-3650P II User manual

Casio fx-7000GA User manual

Casio

Casio fx-7000GA User manual

Casio V.P.A.M. fx-992S User manual

Casio

Casio V.P.A.M. fx-992S User manual

Casio FX-9860GII - SOFTWARE VERSION 2-00 User manual

Casio

Casio FX-9860GII - SOFTWARE VERSION 2-00 User manual

Casio FX-9860GII - SOFTWARE VERSION 2-00 User manual

Casio

Casio FX-9860GII - SOFTWARE VERSION 2-00 User manual

Casio FX-9860GII - SOFTWARE VERSION 2-00 User manual

Casio

Casio FX-9860GII - SOFTWARE VERSION 2-00 User manual

Casio fx-CG50 User manual

Casio

Casio fx-CG50 User manual

Casio FX-85SA User manual

Casio

Casio FX-85SA User manual

Casio fx-3000 User manual

Casio

Casio fx-3000 User manual

Casio VL-80 User manual

Casio

Casio VL-80 User manual

Popular Calculator manuals by other brands

HP 12C Instructions for use

HP

HP 12C Instructions for use

Sharp EL-5060 Operation guide

Sharp

Sharp EL-5060 Operation guide

Canon P1-DTSC instructions

Canon

Canon P1-DTSC instructions

Calculated Industries 4087 user guide

Calculated Industries

Calculated Industries 4087 user guide

Sharp ESLI MATE EL-2128V Operation manual

Sharp

Sharp ESLI MATE EL-2128V Operation manual

Texas Instruments Titanium TI-89 Software guide

Texas Instruments

Texas Instruments Titanium TI-89 Software guide

Citizen SDC-8001NII instruction manual

Citizen

Citizen SDC-8001NII instruction manual

HP 40gs user guide

HP

HP 40gs user guide

Texas Instruments TI-30XIIB owner's manual

Texas Instruments

Texas Instruments TI-30XIIB owner's manual

HP 35s user guide

HP

HP 35s user guide

HP 48GII user manual

HP

HP 48GII user manual

Canon MP25DV instructions

Canon

Canon MP25DV instructions

HP WKP-270 user manual

HP

HP WKP-270 user manual

Texas Instruments nspire cx user guide

Texas Instruments

Texas Instruments nspire cx user guide

Canon P200-DH instructions

Canon

Canon P200-DH instructions

HP 39gII user guide

HP

HP 39gII user guide

CORVUS 400 owner's manual

CORVUS

CORVUS 400 owner's manual

Canon MP11DX - Printing Calculator instructions

Canon

Canon MP11DX - Printing Calculator instructions

manuals.online logo
manuals.online logoBrands
  • About & Mission
  • Contact us
  • Privacy Policy
  • Terms and Conditions

Copyright 2025 Manuals.Online. All Rights Reserved.