bot lezárunk. Feloldáshoz nyomjuk le a [Lock] gombot 3 másodpercig.
1. Előírt anyagok:
nyők/lábasok 12-26 cm közötti fenék átmérővel.
zunk más típusú edényekkel (különösen nyomásérzékelős edényekkel).
Safety Cautions
Warning :
Switch o the induction cooker in case of any crack on the cook-top
panel.
1. Do not place the unit in any place that is near gas or hot environ-
ment in order to avoid damages or malfunction.
2. To reduce the risk and damage, this plug should be t into an indi-
vidual outlet. The rated electrical current is 16A.
3. Place the unit on a level surface, the distance between it and its
background surrounding must be not less than 10cm
4. Do not immerse the appliance and electric cord in water liquid, or
allow liquid to go into the cabinet and get short/contact inner
electrical parts, the power cord must be plugged out before
cleaning.
5. Do not cover gas vent with anything during cooking, otherwise it
will cause danger.
6. To avoid danger, please uncap the cover before heating tinned
food.
7. If it is still not working after the inspection by self, please immedi-
ately contact with our service points, do not apart the unit to
avoid any danger.
8. Be sure to use the power cord recommended by the appliance
manufacturer after it is damaged.
9. It would get dangers when the metal gets heated directly or indi-
rectly.
10. Do not place any metal on the plate, also the nonmetal pad
within 10cm.
11. Do not cook with an empty pot, it will cause malfunction or
danger.
12. Always clean the unit to avoid any dirt goes into the fan to aect
normal working.
13. Do not touch the plate while the unit is working, to avoid getting
burned.
14. Do not let children operating alone to avoid getting burned or
danger,
15. Who with cardiac pacemaker, please operating the unit after
conrm with doctor there's no any aect.
16. Do not operate the unit on the gas stove to avoid any danger.
17. Please do not place paper, cloth or other articles under the
bottom of the pan to get heated, to avoid the danger of re.
18. Do not place the unit on the cloth, carpet to avoid blocking the
gas vent.
19. Please kindly avoid hitting the plate of the unit, in case of getting
cracked, should turn o the unit and plug out immediately, and
then contact with service points of our company.
20. Do not touch the control panel with any sharp implements.
21. Do not place any metal on the unit while operating.
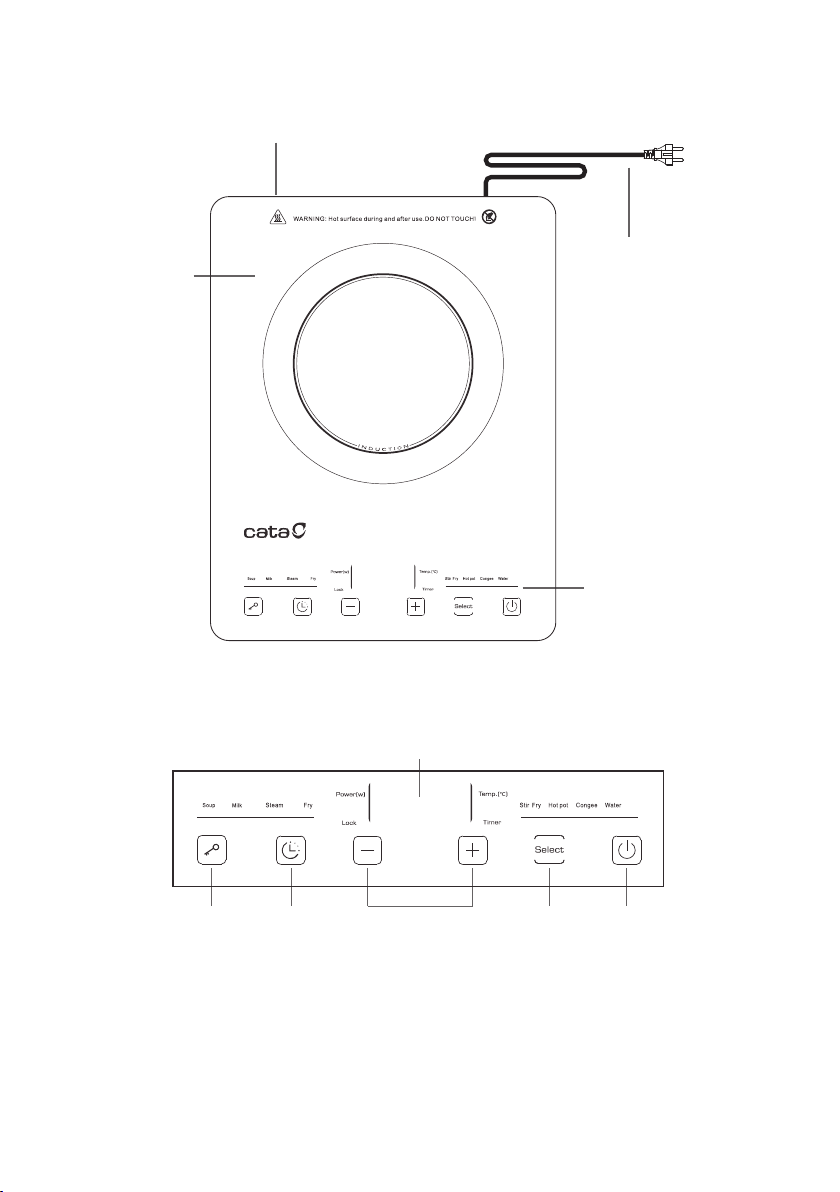
Product operating instructions
After inserting the plug into the socket, a “Beep” will emit and all the indicator
ash a time, indicating the appliance in connection with a power source, known
as standby mode. Place a suitable cookware on the center of the cooking zone.
The display shows [ON] when [On/O] key is pressed once, the appliance goes
to selection mode. Press the corresponding function keys to start operation.
Stop the operation and switch to standby mode by pressing [On/O] key after
cooking.
Cooking Mode
1. Stir-fry: Press the [Select] key until the indicator of [Stir-fry] lights up, display will
show [1600] representing that the default power is 1600W. User can press [+] or
[-] to adjust 8 power levels from 300W to 2000W. To cancel this mode, user can
press other function keys or [On/O] key to stop the operation.
2. Hot Pot: Press the [Select] key until the indicator of [Hot Pot] lights up, display
will show [1600] representing that the default power is 1600W. User can press
[+] or [-] to adjust 8 power levels from 300W to 2000W. To cancel this mode, user
can press other function keys or [On/O] key to stop the operation.
3. Soup: Press the [Select] key until the indicator of [Soup] lights up, display will
show [AU] representing that the appliance works under default power level,
where it can not be adjusted. To cancel this mode, user can press other function
keys or [On/O] key to stop the operation.
4. Water: Press the [Select] key until the indicator of [Water] lights up, display will
show [AU] representing that the appliance works under default power level,
where it can not be adjusted. To cancel this mode, user can press other function
keys or [On/O] key to stop the operation.
5. Fry: Press the [Select] key until the indicator of [Fry] lights up, display will show
[220˚] representing that the default temperature is 220℃. User can press [+] or
[-] to adjust 8 temperature levels from 60℃to 240℃. To cancel this mode, user
can press other function keys or [On/O] key to stop the operation.
6. Steam: Press the [Select] key until the indicator of [Steam] lights up, display will
show [00:45] representing that the appliance works under default power level,
where it can not be adjusted. The default operation time is 45 minutes. A“Beep”
will emit and the appliance will stop the operation and return to standby mode.
To cancel this mode, user can press other function keys or [On/O] key to stop
the operation.
7. Milk: Press [Select] key until the indicator of [Milk] lights up, display will show
[AU] representing the appliance works under default power level, where it can
not be adjusted. To cancel this mode, user can press other function keys or
[On/O] key to stop the operation.
8. Congee: Press the [Select] key until the indicator of [Congee] lights up, display
will show [AU] representing that the appliance works under default power level,
where it can not be adjusted. To cancel this mode, user can press other function
keys or [On/O] key to stop the operation.
Timer function ( Only for mode Hop pot, Fry and Stir fry):
User can set the cooking time when power mode is selected. Press the [Timer]
key once to access the timer function, the indicator will light up. Display will
show [00:00], user can press [+] or [-] to set the desired time, [-] for hour and [+]
for minute. The time can be adjusted from 0 minute to 2 hours and 59 minutes.
After setting, user can press [Timer] key once to conrm or wait until the display
stop ashing. After the “Beep” signal, the appliance will stop the operation and
change to standby mode automatically when the end of the countdown. To
cancel this function, user can hold the [Timer] key for 3 seconds.
Lock function:
To activate the lock, user can press the [Lock] key. This will lock the appliance and
all the function keys are not allowed to operate except key [ON/OFF]. Hold for 3
seconds to unlock.
Selection of Cookware
1. Material required:
Steel, cast iron, enameled iron, stainless steel, at-bottom pans/pots with
bottom diameter from 12cm to 26cm.
Suggest to use the required pot, do not try to use other pot instead (espe-
cially pressure sensors vessels.)
2. Please follow requirement below if necessary to use the vessel which is not
equipped.
Pan/pot must be suitable for induction cooker.
Pan/pot should be tried out if it's bought by self to see if there are unusual
phenomena.
Pan/pot bought by self should be at and come with the cover with gas vent.
Maintenance and Daily Care
1. Remove the power plug prior to clean the unit. Do not clean it until the surface
cools down.
2. Glass plate, panel and the shell:
1) Soft cloth for slight stain.
2) For greasy, dirt, blot by using a clean damp cloth with neutral detergent.
3. While the radiator-fan working, dust and dirt would remain on the gas vent,
please clean it by brush or cotton stick regularly.
4. Remember do not washing the unit by water directly to avoid damaging.
5. To protect induction cooker, be sure to have a good contact between plug and
socket before using.
6. Do not pull out the power cord directly during operation. To extend the appli-
ance's using life, press the "ON/OFF" button rst, then pull out the power cord.
Stainless
steel pot
Iron blast pan Iron board panMagnetic stainless
Iron pan
Magnetic stainless
steel pan
7. In order to make operating time longer, the fan would still be working for
cooling the plate, is better to plug out after the fan stops working.
8. Please pull out the power cord and put it away when not used for a long time.
9. Some models have structural design to against cockroaches, if needed, can put
something like mothball to expel the cockroaches.
EN 14
2. Amennyiben nem az előírt anyagokból készült edényt kell használnunk, akkor
kövessük az alábbi utasításokat.
bast bármi rendellenés jelenség meggyelése érdekében.
fedelének pedig gőzelvezető nyílással kell rendelkeznie.
1. A főzőlap tisztítása előtt áramtalanítsuk azt. Ne kezdjük meg a tisztítást, amíg
a főzőlap le nem hűlt.
2. Üveglap, vezérlőpult és egységház:
ves szövetdarabbal tisztítsuk.
3. Amíg a hűtőventilátor működik, a por és a kosz bekerülhet a szellőzőnyílásba,
ezért azt rendszeresen tisztítsuk egy kefe vagy vattarúd segítségével.
4. Ne feledjük, a károkozás elkerülése érdekében közvetlenül vízzel ne tisztítsuk
a készüléket.
5. Az indukciós főzőlap védelme érdekében használat előtt bizonyosodjunk
meg róla, hogy a tápkábel és az aljzat között megfelelő a csatlakozás.
6. Működés közben ne húzzuk ki a tápkábelt. A főzőlap üzemi életének meg-
ezt követően áramtalanítsuk a főzőlapot.