CATCHMASTER GLOstik User manual

INSTRUCTION MANUAL
WARNING
THIS PRODUCT IS NOT WATER
RESISTANT. TO AVOID RISK OF
ELECTRICAL SHOCK, DO NOT
USE WHERE IT MAY BE EXPOSED
TO WATER.
KEEP OUT OF REACH OF
CHILDREN.
DO NOT PLACE UNIT WHERE
IT WILL BE SUBJECTED TO
EXTREME HEAT OR DIRECT
SUNLIGHT.
Slowly lift the GLOstik™ by
holding the black protective
cap. The orange cap indicates
the replacement glue tube
(for later use).
Remove used tube from base.
Hold from the cap and pry o
from the base. Dispose used
glue tube.
Remove tube with the orange
cap from box. Remove the
orange cap from tube by
holding black cap and prying
o orange cap.
Replace tube. Hold by
protective cap and press
down firmly onto base.
Slide power switch to the
ON position.
To maximize battery life,
switch power OFF after use.
Open the base and install
3 AA batteries.*
3
2
1
Avoid contact with the tube as
it is coated with adhesive.
In case of contact with adhesive, remove
with vegetable oil or mineral spirits.
NOTE: Battery door may open on
hinge or remove completely,
depending on model. Replace or
close door before use.
IMPORTANT: READ AND SAVE THESE SAFETY INSTRUCTIONS
VISIT YOUR LOCAL RETAILER OR www.glostiktrap.com FOR REPLACEMENT GLUE TUBES.
Because of dust and other environmental
factors, replace glue tube every 30 days
or when tube is full. Reorder online at:
www.glostiktrap.com
Replacing Used Glue Tubes
* Batteries Not Included
LED LIGHT
GLUE TUBE
BLACK
PROTECTIVE CAP BLACK
PROTECTIVE
CAP
BATTERY DOOR
ON/OFF SWITCH
(DO NOT TOUCH)
GLUE TUBE
(DO NOT TOUCH)
REMOVABLE
ORANGE CAP
Replacement TubeGLOstik™

MANUAL DE INSTRUCCIONES
www.glostiktrap.com
ADVERTENCIA
ESTE PRODUCTO NO ES RESISTENTE
AL AGUA. PARA EVITAR EL RIESGO DE
DESCARGA ELÉCTRICA, NO LO
UTILICE DONDE PUEDA ESTAR
EXPUESTO AL AGUA.
MANTENER FUERA DEL ALCANCE DE
LOS NIÑOS.
NO COLOQUE LA UNIDAD DONDE
PUEDA ESTAR SOMETIDA A
CONDICIONES EXTREMAS DE CALOR
O LA LUZ SOLAR DIRECTA.
Levante lentamente el GLOstik™ al
sostener la tapa negra protectora.
La tapa anaranjada es el tubo de
pegamento de repuesto
(para su uso posterior).
Quite el tubo usado de la base.
Sostenga en la tapa y despegue
de la base. Deseche el tubo de
pegamento usado.
Saque el tubo con la tapa
anaranjada de la caja. Quite la
tapa anaranjada del tubo al
sostener la tapa negra y quitar
la tapa anaranjada.
Reemplace el tubo. Sostenga en
la tapa protectora y presione
firmemente hacia la base.
Deslice el interruptor a la
posición de ON (Encender).
Para maximizar la vida útil de la batería,
coloque el interruptor en OFF (Apagar)
después de utilizarlo.
Abra la base e instale 3
baterías AA.*
3
2
1
Evite el contacto con el tubo,
pues está cubierto con adhesivo.
.
En caso de contacto con el adhesivo, remueva
con aceite vegetal o disolvente.
NOTA: La puerta de la batería se puede abrir
en la bisagra o removerse completamente
dependiendo del modelo. Reemplace o
cierre la puerta antes de usarlo.
IMPORTANTE: LEA Y GUARDE ESTAS INSTRUCCIONES DE SEGURIDAD
VISITE SU DISTRIBUIDOR LOCAL O www.glostiktrap.com PARA OBTENER LOS TUBOS DE PEGAMENTO DE REEMPLAZO.
Debido al polvo y otros factores ambientales,
cambie el tubo de pegamento cada 30 días o
cuando esté lleno. Realice sus pedidos en
línea en:
www.glostiktrap.com
Reemplazo De Los
Tubos De Pegamento Usados
* No se incluyen las baterías
LUZ LED
TUBO DE
PEGAMENTO
TAPA
PROTECTORA NEGRA TAPA
PROTECTORA NEGRA
PUERTA DE LA BATERÍA
INTERRUPTOR DE
ENCENDIDO/APAGADO
(NO TOCAR)
TUBO DE
PEGAMENTO
(NO TOCAR)
TAPA
ANARANJADA
EXTRAÍBLE
Tubo De ReemplazoGLOstik™
TrampaParaInsectosVoladores de

MANUEL D'UTILISATION
AVERTISSEMENT
CE PRODUIT N'EST PAS RÉSISTANT À
L'EAU. POUR ÉVITER TOUT RISQUE DE
CHOC ÉLECTRIQUE, NE L'UTILISEZ PAS
OÙ IL PEUT ÊTRE EXPOSÉ À L'EAU.
TENIR HORS DE LA PORTÉE DES
ENFANTS.
NE PLACEZ PAS CE PRODUIT OÙ IL
SERA SOUMIS À UNE CHALEUR
EXTRÊME OU À LA LUMIÈRE DIRECTE
DU SOLEIL.
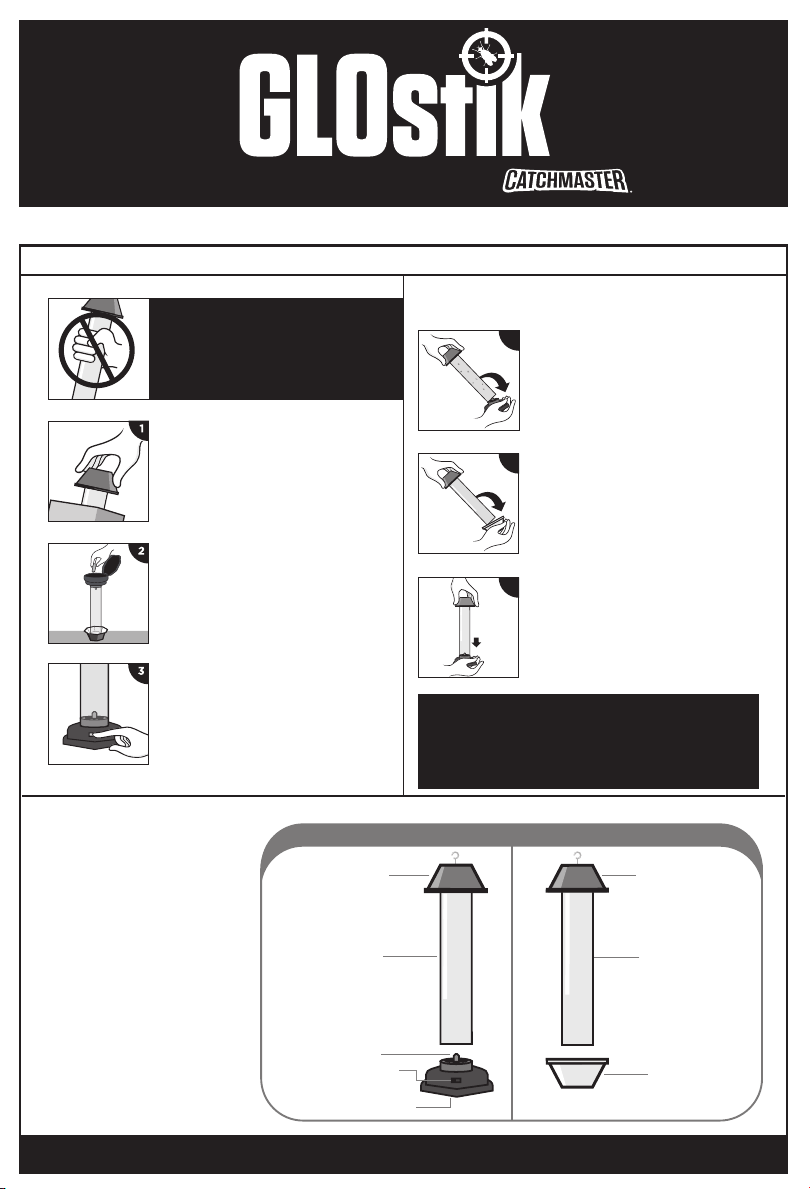
Activez peu à peu le GLOstik en
tenant le capuchon protecteur
noir. La capuchon orange identifie
le tube adhésif de remplacement
(pour une utilisation ultérieure).
Retirez le tube usagé de la base.
Tenez-le par le capuchon et
retirez-le de la base par un
mouvement de levier. Jetez le
tube adhésif usagé.
Retirez de la boîte le tube ayant
un capuchon orange. Pour retirez
le capuchon orange du tube,
exercez sur lui un mouvement de
levier tout en tenant le capuchon
noir.
Remplacez le tube. Maintenez le
tube par le capuchon protecteur
et pressez fermement pour qu'il
s'insère dans la base.
Glissez l'interrupteur
d'alimentation à la position
"ON".
Afin de maximiser la durée de vie de la
pile, mettez l'interrupteur à la position
"OFF" (ARRÊT) après l'utilisation.
Ouvrez la base et installez 3
piles de type AA.*
3
2
1
Évitez tout contact avec le tube
car il est enduit d'adhésif.
En cas de contact avec l'adhésif, enlevez-le avec
de l'huile végétale ou des essences minérales.
REMARQUE: La porte de la pile peut s'ouvrir
autour de la charnière ou s'enlever
complètement selon le modèle. Remettez en
place la porte ou fermez-la avant toute
utilisation.
IMPORTANT: LISEZ ET CONSERVEZ CES CONSIGNES DE SÉCURITÉ
VISITEZ VOTRE DÉTAILLANT LOCAL OU LE www.glostiktrap.com POUR DES TUBES ADHÉSIFS DE REMPLACEMENT.
En raison de la poussière et d'autres facteurs
environnementaux, remplacez le tube adhésif
à chaque 30 jours ou lorsque le tube est plein.
Commandez à nouveau en ligne en visitant le
www.glostiktrap.com
Remplacement Des
Tubes Adhésifs Usagés
* Piles non comprises
VOYANT DEL
TUBE ADHÉSIF
CAPUCHON DE
PROTECTION NOIR CAPUCHON DE
PROTECTION NOIR
PORTE DE LA PILE
INTERRUPTEUR
MARCHE/ARRÊT
(N'Y TOUCHEZ PAS)
TUBE ADHÉSIF
(N'Y TOUCHEZ PAS)
CAPUCHON
ORANGE
AMOVIBLE
Tube De RemplacementGLOstik
LePiègeÀ InsectesAériens par
MC
MC
Table of contents
Languages: