CDA WC680 Quick start guide

www.cda.eu
WC680
Integrated dishwasher
Installation, use and maintenance

2
Contents
3 Important information and notes
6 Recommendations and before first use
7 Control panel
7 Selecting a programme and feature information
9 Starting a programme
10 Changing a programme
11 Cancelling a programme
12 Detergent information
14 Salt information
15 Softener adjustment
17 Direct wash feature
18 Rinse aid
20 Dishwasher basket information
20 Loading information
21 Adjustable racks and cutlery tray information
22 Standard loading and test data
23 Programme listing
24 Care and Maintenance
26 Fault codes
27 Troubleshooting
28 Electrical Information
29 Installation
31 Installation diagrams
32 Fitting a non-standard decor door (additional to template)
33 Fitting the Infoled Perspex indicator
34 Installation - final checks
35 Energy eciency information

3
Important
The CDA Group Ltd cannot be held responsible for injuries or losses
caused by incorrect use or installation of this product. Please note
that CDA reserve the right to invalidate the guarantee supplied with
this product following incorrect installation or misuse of the appliance.
This appliance is not designed to be used by people (including
children) with reduced physical, sensorial or mental capacity, or
who lack experience or knowledge about it, unless they have had
supervision or instructions on how to use the appliance by someone
who is responsible for their safety.
Under no circumstances should any external covers be removed for
servicing or maintenance except by suitably qualified personnel.
Appliance information:
Please enter the details on the appliance rating plate below for
reference, to assist CDA Customer Care in the event of a fault with
your appliance and to register your appliance for guarantee purposes.
Appliance Model
Serial Number
EU Declarations of Conformity:
This product meets the requirements of all applicable EU directives
with the corresponding harmonised standards, which provide for CE
marking.

4
Availability of this manual in an alternative format:
A soft copy of this manual is available for download from www.cda.eu.
IMPORTANT INFORMATION FOR CORRECT DISPOSAL OF THE
PRODUCT IN ACCORDANCE WITH EC DIRECTIVE 2012/19/EU.
At the end of its working life, the product must be taken to a special
local authority waste collection centre or to a dealer providing
appliance recycling services. Disposing of a household appliance
separately avoids possible negative consequences for the
environment and health. It also enables the constituent materials to
be recovered, saving both energy and resources. As a reminder of
the need to dispose of household appliances separately, the product
is marked with a crossed-out wheeled dustbin.
Please note:
•Read the instructions prior to installation and use of the
appliance.
•Do not lean or climb on the open dishwasher door to
prevent damage.
•Close the dishwasher door after use to prevent accidents.
•Use only detergents, salt and rinse aid specifically
designed for dishwashers.
•Do not put solvents in the dishwasher detergent
compartment to prevent risk of explosion
•Only put dishwasher safe items into the dishwasher. If in
doubt, check with the manufacturer of the items.
•Take care when loading the dishwasher to observe the
recommendations for best loading practice, and also to

5
ensure that sharp objects such as knives are placed blade
down to prevent accidents.
•Do not open the dishwasher door when a programme
is running. If it is necessary to do so, then open it only
slightly to allow the dishwasher to pause the programme
and prevent any water spilling out. Remember that
the water in the dishwasher can be very hot when the
programme is running.
•When the dishwasher is not in use, we recommend
that you turn o the water supply at the supply tap and
disconnect the mains supply.
•If you are leaving the dishwasher for an extended period
you should leave the door slightly open to prevent the
formation of unpleasant smells.
•The plastic housing on the water inlet pipe contains an
electrically operated valve. The wires that connect to this
valve are inside the inlet hose. Do not cut through the
inlet hose, and do not put the plastic housing in water.
•Children could get locked inside the appliance. Therefore
when disposing of an old appliance, cut o the plug and
set aside, and damage the door lock so that the door can
no longer be closed.
•This appliance can be used by children aged from 8
years and above and persons with reduced physical,
sensory or mental capabilities or lack of experience
and knowledge if they have been given supervision or
instruction concerning use of the appliance in a safe way
and understand the hazards involved. Children shall not

6
play with the appliance. Cleaning and user maintenance
shall not be made by children without supervision.
Recommendations
•To reduce energy and water consumption, remove all dirt residues
from the dishes prior to loading the dishwasher.
•Only run the dishwasher when fully loaded.
•Place hollow items (bowls, glasses and pans) face down in the basket.
•Do not put dishes or cutlery with tobacco ash, wax, lubricating grease
or paint residues in the dishwasher.
•Avoid the contact of/mixing of dierent metals in the dishwasher,
where possible. (Electrochemically) Dierent metals can react
with one another and cause issues.
•We recommend that you do not wash silverware and/or expensive
cutlery in a dishwasher. Such utensils should be washed by hand
and stored in bespoke storage systems.
Before first use
•Remove all the packaging materials from the interior of the dishwasher.
•Set the water softener level as required by the water hardness in the
area (page 16).
•Add 1kg of salt into the salt compartment and then fill with water to the
top of the salt compartment.
•Fill the rinse aid compartment (page 18).
•Run a hot programme without any dishes in the dishwasher.

7
Control Panel
Power button (1)
• To switch the dishwasher on or o, press & hold the power button
(1) for 3 seconds. When you switch on the dishwasher, the end of
programme light will illuminate, and two dashes appear on the
display.
Please note: The interior light will work automatically when the
dishwasher is switched on.
Programme selection button (2)
• To select a programme, press the programme selection button (3).
The dishwasher will store in its memory the last programme used.
Programme display (3)
The programme display shows the selected programme and the
remaining time to run. If there is a fault on the dishwasher, the fault
code will show on the display.
Delay timer indicator (4)
The dishwasher is equipped with a variable timer of up to 19 hours
duration at hourly intervals.
Fig. 1 1 2
3
4
56
7 8

8
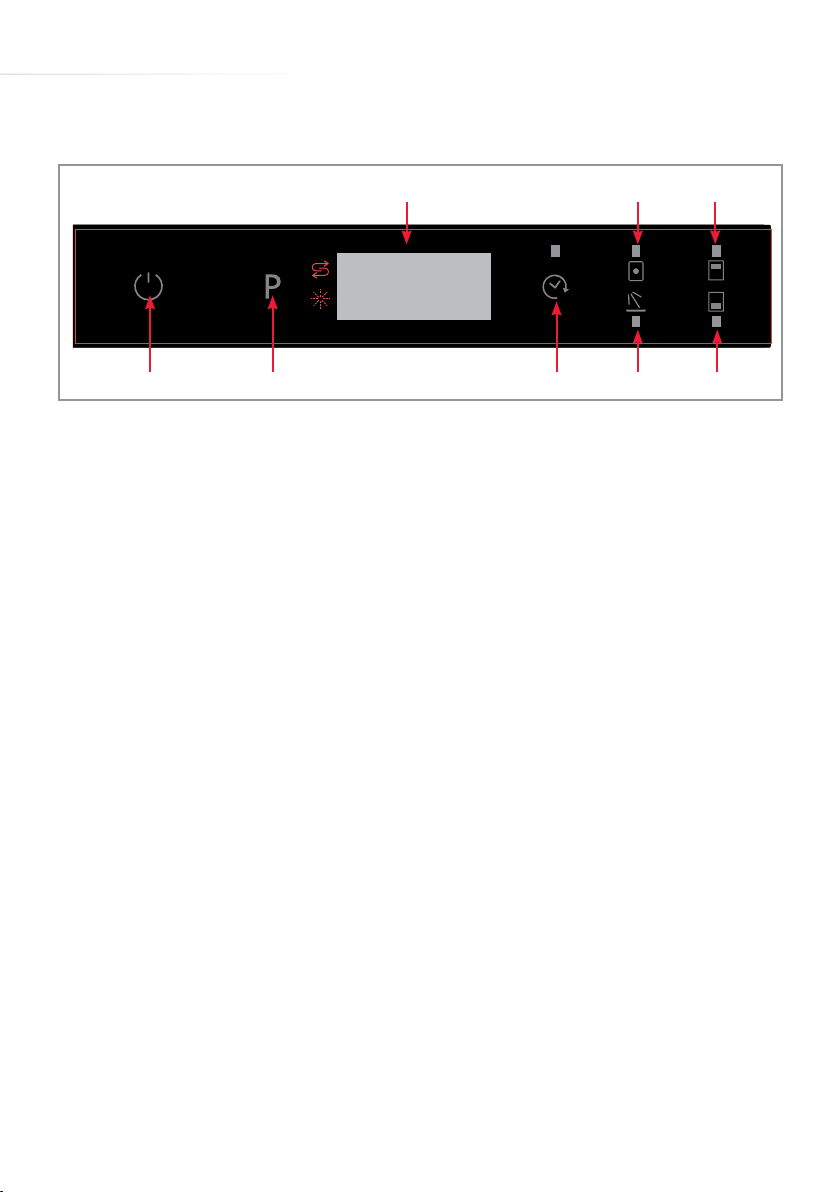
• To set the delay timer, press the delay timer button (4). This will
switch the timer on for one hour.
• To change the delay duration, press the delay timer button again
until the required delay duration is shown on the display, alternating
with the selected programme and the programme duration. You can
hold the timer button to cycle through hours faster.
• To cancel the delay timer, press the delay timer button again until
the display counts down through 3-2-1.
3 in 1 function indicator (5)
The dishwasher is equipped with a tablet function that automatically
adjusts the amount of rinse aid and dishwasher salt used during a
programme when combined tablets are used.
• To use this function, press the button (A in Fig. 2) after selecting the
programme, before you close the door.
Half-load button (6 and 8) and indicator lights
The dishwasher is equipped with a half-load function
that allows for either the upper or lower basket to
be washed independently, or for both baskets to be
washed if they contain only a small number of dishes.
• To use this function, press the half-load buttons (B
in Fig. 2) until the indicator light shows next to the
required section of the dishwasher, either upper,
lower or both lights if both baskets are to be washed
together. Each press of the buttons cycles through
the options (including cancel/no option).
Fig. 2
A
B
Dotted circles show
locations of button
sensors.

9
Prewash indicator (7)
The dishwasher is equipped with a prewash function that
automatically adds a prewash to the selected programme. The
prewash function improves the wash performance of the programme,
but also can change the temperature and duration of the programme.
• To use this function, press the button (A in Fig. 2) twice after
selecting the programme, before you close the door.
Please note: To select both 3-in-1 and Prewash, press button A in
Fig. 2 three times (or until both indicators are lit).
The prewash is also an independent programme (8) which can be
used to rinse the contents of the dishwasher, for example if the
dishwasher is not yet full and a complete programme is not yet
required.
• To do so, select the programme as described below.
• To select the Intensive+ 70º programme, select the prewash
function with the Intensive 60º programme.
Salt and rinse aid warning lights
When the dishwasher salt or rinse aid begins to run out, the warning
light will illuminate to advise that it needs refilling:
Salt - Rinse aid -
Starting a programme
• Press the Power button (the end of programme light will be switched
on)
• Press the Programme Selection button until the required

10
programme is shown on the display.
• If required, set the delay timer by pressing the Delay Timer button
• Once a programme is selected, the end of programme light will
switch o.
• When you close the dishwasher door, the programme will start
automatically.
Additional information
To cancel the selection of any extra function, press the specific extra
function button (A or B in Fig. 2 on page 8) until the indicator light for
that function goes out.
According to eco-design regulations, when the dishwasher is
switched o, the Eco programme will be selected automatically
when the dishwasher is next switched on. All extra functions will
also be cancelled when the dishwasher is switched o.
At the end of a programme
If possible, do not open the dishwasher door once the programme
has started.
At the end of a programme, the dishwasher will beep five times, and
the end of Programme Indicator light will switch o. This will be visible
via the light output perspex.
Changing a programme
It is possible to change the programme if necessary once the
programme has started.
• First open the door slightly to reduce the risk of water spillage.
• Press the programme selection button until the required programme

11
is shown on the display.
• Then close the door. The dishwasher will begin the new
programme from the point at which the old programme stopped.
Cancelling a programme
It is possible to cancel the programme once is has started.
• First open the door slightly to reduce the risk of water spillage.
• Press and hold in the Programme Selection button until the display
counts down through 3-2-1. The display should show ‘0.01’.
• Then close the door. The dishwasher will run a drain cycle which
will take approximately 60 seconds. Once this is complete, the
dishwasher will beep and the end of programme light will switch on.
Switching the dishwasher o
• Once the dishwasher beeps and the end of programme light
switches on, the dishwasher can be switched o by pressing and
holding the Power button for 3 seconds.
• Then turn o the water tap and remove the plug from the power
socket.
Please note: the dishwasher will automatically continue on the
programme it has started if the door is opened and closed or in the
event of a power cut.

12
Detergent
To fill the detergent compartment
1. Push the latch to open the compartment.
2. Add the required amount of detergent. The main detergent
compartment (page 13) has lines to allow for specific amounts of
detergent. These are marked at either 15cm3or 25cm3, to be used
depending on how dirty the dishes are.
If your dishes are in need of an intensive wash, then add 5cm3of
detergent into the prewash section of the compartment next to the
detergent compartment (see page 17).
3. Then close the detergent compartment lid until the latch locks.
Please note: You should only use detergents designed specifically
for use in dishwashers.
If using dishwasher tablets, always use the detergent compartment,
do not put them in the main body of the dishwasher or in the cutlery
basket. The solubility of dishwasher tablets can vary depending on
the temperature and duration of the programme. As a result, it is
recommended that powder detergents should be used in the shorter
programmes to allow better performance.
CDA recommend the use of separate detergent, rinse aid and
dishwasher salt rather than combination tablets as separates achieve
better wash performance.
If you do use combination detergents, add salt and rinse aid to the
dishwasher and then adjust the water hardness setting and rinse
aid setting to the minimum. When you then use separate detergents

13
again, you should fill the salt and rinse aid compartments, adjust the
water hardness setting to the maximum and run an empty wash, then
adjust the water hardness setting and the rinse aid setting to the
appropriate level.
If you use both tablets and separates at dierent times, ensure you
use the three in one function when running a programme with tablets
for best wash performance.
Many brands of detergents (as well as rinse aids) contain
phosphates which escape sewage treatment and can cause
excessive algae growth in waterways. This in turn can pollute
drinking water and cause marine life ‘dead zones’ which
are underwater environments deprived of oxygen that are
subsequently unable to support life. Please consider the
environment and try to source an environmentally friendly brand.
DETERGENT

14
Salt
To ensure the best eciency, the dishwasher needs soft water. Hard
water means that lime residues remain on the dishes and the interior
of the dishwasher, aecting performance. The softener system is
designed to remove the ions that make the water hard to provide the
best quality wash performance. This is achieved by using dishwasher
salt.
To add dishwasher salt, follow these steps:
1. Remove the lower dishwasher basket and then unscrew the salt
compartment cap, as shown in figure 3.
2. Fill the compartment with dishwasher salt (do not use table salt),
carefully to prevent unnecessary spillage (figure 4). Before first use,
you should fill the compartment with 1kg of dishwasher salt and
then fill up the salt compartment with water (up to the brim of the
compartment) as shown in figure 4.
3. Replace the cap and the lower basket.
When the salt warning light on the control panel illuminates, you
should refill the salt compartment with salt only – do not add water to
the salt compartment after the first use.
Important:
You should run a prewash programme immediately after adding
dishwasher salt to prevent any damage to the dishwasher system.

15
Detergent
To fill the detergent compartment
1. Push the latch as shown in figure 1.
2. Add the required amount of detergent. The main detergent
compartment “b” (figure 2) has lines to allow for specific amounts of
detergent. These are marked at either 15 cm3or 25 cm3, to be
used depending on how dirty the dishes are.
If your dishes are in need of an intensive wash, then add 5 cm3of
detergent into the prewash section of the compartment “a” (figure 2).
3. Then close the detergent compartment lid until the latch locks.
Please note: You should only use detergents designed specifically for
use in dishwashers.
If using dishwasher tablets, always use the detergent compartment, do not put
them in the main body of the dishwasher or in the cutlery basket. The solubility
of dishwasher tablets can vary depending on the temperature and duration of
the programme. As a result, it is recommended that powder detergents should
be used in the shorter programmes to allow better performance.
CDA recommends the use of separate detergent, rinse aid and dishwasher salt
rather than combination tablets as separates achieve better wash performance.
If you do use combination detergents, add salt and rinse aid to the dishwasher
and then adjust the water hardness setting and rinse aid setting to the
minimum. When you then use separate detergents again, you should fill the
salt and rinse aid compartments, adjust the water hardness setting to the
maximum and run an empty wash, then adjust the water hardness setting and
the rinse aid setting to the appropriate level.
Salt
To ensure the best efficiency, the dishwasher needs soft water. Hard water
means that lime residues remain on the dishes and the interior of the
dishwasher, affecting performance. The softener system is designed to
remove the ions that make the water hard to provide the best quality wash
performance. This is achieved by using dishwasher salt.
To add dishwasher salt, follow the steps below:
1. Remove the lower dishwasher basket and then unscrew the salt
compartment cap, as shown in figure 1.
2. Fill the compartment with dishwasher salt (do not use table salt), carefully
to prevent unnecessary spillage (figure 3). Before first use, you should
fill the compartment with 2kg of dishwasher salt and then fill up the salt
compartment with water (up to the brim of the compartment) as shown
in figure 3.
3. Replace the cap and the lower basket.
When the salt warning light on the control panel illuminates, you should
refill the salt compartment with salt only – do not add water to the salt
compartment after the first use.
You should run a prewash programme immediately after adding
dishwasher salt, to prevent any damage to the dishwasher systems.
fig 2
S A L T
fig 3
S A L T
fig 1
Fig. 3
Detergent
To fill the detergent compartment
1. Push the latch as shown in figure 1.
2. Add the required amount of detergent. The main detergent
compartment “b” (figure 2) has lines to allow for specific amounts of
detergent. These are marked at either 15 cm
3
or 25 cm
3
, to be
used depending on how dirty the dishes are.
If your dishes are in need of an intensive wash, then add 5 cm
3
of
detergent into the prewash section of the compartment “a” (figure 2).
3. Then close the detergent compartment lid until the latch locks.
Please note: You should only use detergents designed specifically for
use in dishwashers.
If using dishwasher tablets, always use the detergent compartment, do not put
them in the main body of the dishwasher or in the cutlery basket. The solubility
of dishwasher tablets can vary depending on the temperature and duration of
the programme. As a result, it is recommended that powder detergents should
be used in the shorter programmes to allow better performance.
CDA recommends the use of separate detergent, rinse aid and dishwasher salt
rather than combination tablets as separates achieve better wash performance.
If you do use combination detergents, add salt and rinse aid to the dishwasher
and then adjust the water hardness setting and rinse aid setting to the
minimum. When you then use separate detergents again, you should fill the
salt and rinse aid compartments, adjust the water hardness setting to the
maximum and run an empty wash, then adjust the water hardness setting and
the rinse aid setting to the appropriate level.
Salt
To ensure the best efficiency, the dishwasher needs soft water. Hard water
means that lime residues remain on the dishes and the interior of the
dishwasher, affecting performance. The softener system is designed to
remove the ions that make the water hard to provide the best quality wash
performance. This is achieved by using dishwasher salt.
To add dishwasher salt, follow the steps below:
1. Remove the lower dishwasher basket and then unscrew the salt
compartment cap, as shown in figure 1.
2. Fill the compartment with dishwasher salt (do not use table salt), carefully
to prevent unnecessary spillage (figure 3). Before first use, you should
fill the compartment with 2kg of dishwasher salt and then fill up the salt
compartment with water (up to the brim of the compartment) as shown
in figure 3.
3. Replace the cap and the lower basket.
When the salt warning light on the control panel illuminates, you should
refill the salt compartment with salt only – do not add water to the salt
compartment after the first use.
You should run a prewash programme immediately after adding
dishwasher salt, to prevent any damage to the dishwasher systems.
fig 2
S A L T
fig 3
S A L T
fig 1
Fig. 4
Softener Adjustment
The eciency of your dishwasher depends on the softness of the
tap water. To ensure best eciency, the dishwasher is equipped with
a system that reduces the hardness in the mains water supply. The
eciency will increase when the system is correctly set. To find out
the water hardness level of your water supply you can use the test
strip supplied or alternatively contact your local water board.
1. Open the testing strip (figure 5).
2. Run water through the tap for one minute.
3. Hold the testing strip in water for one second.
4. Remove from the water and shake the test strip to remove excess
water.
Fig. 5
1
2
3
4
5
6
No lime
Very low lime content
Low lime content
Medium lime content
High lime content
Very high lime content

16
5. Wait for one minute.
6. Check the number of marks on the strip to see the level of water
hardness.
If the hardness of the water you use is above 63dE or if you are
using well water; you are recommended to contact your local water
board to confirm the water hardness level and to use filter and water
refinement devices.
Please note: The level of water hardness is preset to level 3.
1. Press and hold down the programme selection button
2. Press the Power button to switch on the dishwasher
3. Keep the programme selection button pressed until “SL” shows on
the display and then disappears
4. To adjust the level, press the programme selection button until
the required level is shown on the display, as listed in the Table of
Water Hardness on page 17.
5. To store the selected water hardness level, press the power
button.
Water hardness
level
British hardness
dE
Display shows
1 0-6 L1
2 7-14 L2
3 15-21 L3
4 22-28 L4
5 29-39 L5
6 40-63 L6

17
Direct wash
This feature uses nozzles to
help to wash bottles, glasses
etc. directly. Alternatively, the
nozzles can be unclipped and
placed horizontally and used
as an aid in washing the lower
basket.
When changing the direction
of the nozzles, pay attention
to their positions on the
basket. They need to go back
in the same place(s) or else
they will not intercept the
water jets. You can align them
with the spray arm if you lose
your position.

18
Rinse aid
Rinse aid helps to ensure better quality
wash results and increased drying
performance.
To fill the rinse aid compartment,
open the rinse aid compartment lid.
Fill the compartment with rinse aid to
the MAX level and then close the lid.
Be careful not to overfill the rinse aid
compartment and ensure that you wipe
up any spillages.
In order to change the rinse aid level,
follow the steps below before turning on the machine:
1. Press and hold down the programme selection button
2. Press the Power button to switch on the dishwasher
3. Keep the programme selection button pressed until “rA” shows on
the display and then disappears
4. To adjust the level, press the programme selection button until
the required level is shown on the display, as listed in the table on
page 18.
5. To store the selected rinse aid level, press the power button.

19
Level Brightener Dose Indicator
1 Rinse-aid not dispensed r1 is shown the on display.
2 1 dose is dispensed r2 is shown the on display.
3 2 doses are dispensed r3 is shown the on display.
4 3 doses are dispensed r4 is shown the on display.
5 4 doses are dispensed r5 is shown the on display.
If the dishes are not drying properly or are spotted with food
debris, dirt etc., increase the rinse aid level. If blue stains appear
on your dishes, decrease the rinse aid level. Also check that the
filter is clean (page 24). A dirty, clogged filter will aect wash
performance.
Always refill the rinse aid when the rinse aid indicator light on the
control panel is illuminated.
Many brands of rinse aid (as well as detergents) contain
phosphates which escape sewage treatment and can cause
excessive algae growth in waterways. This in turn can pollute
drinking water and cause marine life ‘dead zones’ which
are underwater environments deprived of oxygen that are
subsequently unable to support life. Please consider the
environment and, if you wish to use rinse aid, try to source an
environmentally friendly brand.

20
Dishwasher Baskets
The middle basket has two dierent
heights available, to allow for larger
products in either the middle or lower
basket. To raise or lower the middle
basket:
1. Hold the basket on both sides and
pull it up or push it down, ensuring both
sides of the upper basket are in the
same position (fig. 9).
The images below are designed as guidance as to best practice for
loading the dishwasher. Do not block the spray arms with spoons etc.
FIg. 9
Fig. 10
Lower Basket Top Basket
Faulty loads
Table of contents
Other CDA Dishwasher manuals

CDA
CDA WC600 Reference manual

CDA
CDA CW493 Operation instructions

CDA
CDA CDI6372 User guide

CDA
CDA wc140in Instructions for use

CDA
CDA WC480 Quick start guide

CDA
CDA VW80 Reference manual

CDA
CDA WC140 Reference manual

CDA
CDA wc431 Reference manual

CDA
CDA CW447 Operation instructions

CDA
CDA WF140 Quick start guide