CDA WC350 User manual

CDA/II/FD/GB
How to use the appliance
Further indications are given in the single chapters and in the user instructions.
Press the ON button.
Compartment A:
With each wash cycle.
Compartment B:
For programmes with pre-wash only.
If using combined action dishwasher
tabs, follow the user instructions!
Mechanical indicator C.
Electric indicator on control panel (if provided).
On models with water softener
system only.
Mechanical indicator D. Electric
indicator on control panel (if provided).
Refer to the dishwasher loading instructions.
The last programme selected will light up.
Press the button until the desired programme lights up.
If necessary (and if provided) the corresponding indicator lamp lights up.
The selected programme is
then memorised (even in the
event of power failure).
- Only open the dishwasher if necessary
(Warning: beware of hot steam).
- If the appliance is switched off during a
wash cycle, when switched on again it
will resume the cycle from where it was
interrupted.
At the end of the programme an acoustic signal will sound.
Only after the START button has switched off: press the OFF button.
All the indicator lamps switch off.
Warning: when the door is opened steam comes out!
Unload the appliance, starting from the lower rack.
Open the door,
switch on the appliance
How to fill the
detergent dispenser ABC
Check the rinse aid level
Check the regeneration
salt level
Load the racks
Select a programme
Select options
Press the Start button
“Change programme in progress”
Press the START button for 2 sec. until
the Start indicator lamp switches off;
Select another programme and press
the START button again.
Turn on the water tap
close the dishwasher door
Wash cycle
Switch off the appliance
Turn off the water tap,
unload the racks

CDA/III/GB
Dishwasher loading instructions and racks provided
Upper rack:
Fold down glass holder (A):
Depending on the position, for example small or
long-stemmed glasses.
Crockery holders (B):
Depending on the position, for example plates, cups
and long-stemmed glasses.
Long-handled utensils (e.g. carving forks, knives)
must be arranged with the sharp end facing in
towards the appliance.
Rack height adjustment (also when loaded):
Lower adjustment: Pull the two rack handles
(C) outwards and lower
the rack.
Upper adjustment: Pull the two rack handles
(C) upwardsuntilthe rack
clicks into place (factory
setting).
The rack must be level on both sides.
Lower rack:
Plate holders (D).
Cutlery basket (E)
A grid (F) can be fitted onto the cutlery basket to keep
items separated.
Sharp knives and forks that might cause injury
must be placed in the cutlery basket with the
sharp end facing downwards.
Only use dishwasher-proof crockery and dishes. Do not use the appliance for items not suitable for
washing in a dishwasher, for example wooden items, aluminium, tin, hand-decorated crockery
(unglazed), silver cutlery.

CDA/IV/GB
What to do if...
If a fault occurs, before contacting our After-Sales Service, make the following checks to try and remedy the problem (* see
also the corresponding chapter in the user instructions).
Problem Cause Remedy
The appliance is not
working • No water supply. • Open the tap.
• The appliance does not load sufficient
water. • Clean the water supply tap filter.
• Ensure there are no kinks in the water hose.
• There is a power failure. • Insert the plug into the mains socket.
• Press the Start button.
• Close the door.
• Check the safety circuit breaker.
• Starting the selected programme. • The programme can be set to “0” to start.
If crockery is not
perfectly dry • Insufficient rinse aid. •Increasedosage*.
• Residual water in cavities. • Load crockery at an angle.
If crockery is not
perfectly clean • The water jet does not reach the
crockery. • Arrange crockery so that items do not touch each
other. Load crockery upside down.
• Insufficient detergent. • Follow recommended detergent dosage.
• Unsuitable programme. • Select a more intense wash cycle.
• Spray arms blocked. • The spray arms must be able to turn freely.
• Spray arm nozzles clogged. • Remove any impurities obstructing the water flow *.
• Incorrect detergent/detergent too old. • Use a good quality detergent.
Sandy or grainy
residues • Clogged filters. • Check filters regularly/if necessary clean *.
• Filters incorrectly assembled. • Insert the filter correctly *.
Colour of plastic parts
faded • Tomato/carrot juice, ... • Depending on the material, if necessary use a
detergent with a greater whitening power.
Deposits on crockery
•Removable • Streaks on the crockery/glasses. • Increase the rinse aid dosage *.
• Streaks on glasses. • Reduce the rinse aid dosage *.
• Layer of salt on crockery/glasses. • Close the salt container lid properly *.
• Not removable • Insufficient water softening, calcium
deposits. • Change water hardness setting, if necessary add salt *.
Opaque glasses/ glasses
not sparkling • Cannot be washed in the dishwasher. • Use suitable glasses.
Rust on cutlery • Not made of stainless steel. •Usesuitablecutlery.
Identifying appliance
faults • The START indicator lamp flashes.
• Indicator F... (if provided). • Ensure the filter assembly is not clogged and that
there is no interruption to the water supply
(if necessary, clean the filters *). Start the programme
again. Press the START button for 2 seconds, until the
START indicator lamp switches off. Select a new
programme and press the Start button again.
If after carrying out the above checks the malfunction persists or appears again, turn the appliance off and turn off the water
supply tap, then call our After-Sales Service (see guarantee).
Before contacting our After-Sales Service, take note of the following:
• The nature of the fault
• The appliance type and model
• The service code (the number indicated on the adhesive rating plate)
inside the door on the right-hand side.

5019 696 01011
GB
WC350 Quick Reference Guide
Before using the dishwasher, read the user instructions!
CDA/I/FD/
(We reserve the right to make technical modifications)
Add regeneration salt
Only add regeneration salt immediately
before starting a wash programme.
1) Reference programme for energy label in compliance with
EN 50242 regulations.
2) Refer to “User instructions”.
3) The data relevant to programmes are values obtained in the
laboratory in conformity with Standard EN 50242. In
practice there may be time variations or leaps depending on
different loads, function options, sensor calibration (only for
sensor-controlled programmes) water temperatures or
hardness and different power supply voltages.
4) Energy saving programme with prolonged drying cycle.
On button
Off button
Programme selection button
Start button
Switches“on” whenthedishwasher is
operating.Flashes whenafault occurs.
Switchesoff atthe end ofthe programme.
Indicators
Programme chart Detergent 2) Consumption 3)
Programmes Loading instructions A B Litres kWh Minutes
Pre-Rinse cold Crockery to be washed later. - - 5.0 0.02 10
Quickwash 40°C Lightly soiled crockery with no
dried-on food. X - 13.0 0.70 30
Bio 1) 4) 50°C Normally soiled crockery. X X 16.0 1.05 195
Daily 60°C Normally or heavily soiled
crockery. X X 16.0 1.35 120
Intensive 70°C Recommended programme for
heavily soiled crockery, especially
suitable for pans and saucepans. X X 17.0 1.65 145

3
INSTRUCTIONS FOR USE
BEFORE USING THE DISHWASHER/
CONNECTIONS
ELECTRICAL CONNECTION
PRECAUTIONS AND GENERAL
RECOMMENDATIONS
HOW TO FILL THE SALT CONTAINER
HOW TO FILL THE RINSE AID DISPENSER
HOW TO FILL THE DETERGENT DISPENSER
CARE AND MAINTENANCE

4
BEFORE USING THE DISHWASHER/
CONNECTIONS
1. Removing the packaging and controls:
After unpacking, make sure that the dishwasher is
undamaged and that the door closes correctly. If in
doubt, contact a qualified technician or your local
retailer.
•Keep the packaging materials (plastic bags,
polystyrene parts, etc.) out of reach of children, as
they are potentially dangerous.
•This dishwasher has been factory tested to ensure
it functions correctly.
Such testing may leave slight water marks that will
disappear with the first wash.
2. Water and electrical connections:
All water and electrical connections must be
carried out by a qualified technician in compliance
with the manufacturer's instructions (refer to the
enclosed installation booklet) and current local
safety regulations.
The appliance must only be used in the household
for the prescribed uses.
Do not use the dishwasher if it has been damaged
in transit. Consult your local retailer or our
After-Sales Service.
(Refer to the separate installation
instructions booklet)
3. Water inlet and drain:
•Observeanyspecialregulationsissuedbyyourlocal
Water Board.
Water supply pressure: 0,03 - 1,0 MPa.
•Make sure the inlet and drain hoses are kink-free
and are not crushed.
•If the hose length is not sufficient, please contact
your local dealer or our After-Sales Service.
•The inlet hose must be securely clamped to the
water tap to prevent leaks.
•The inlet water temperature varies according to
the model installed. Inlet hose marked “25°C Max”:
maximum temperature 25°C.
All other models: maximum temperature 60°C.
•When installing the appliance, make sure the drain
water discharges correctly (if necessary, remove
the wire gauze from the sink siphon).
•Fix the drain hose to the spigot with a clamp to
prevent it from coming off during operation.
For appliances with water-stop system only: If the
water connections are made correctly, the water-
stop system safeguards your home against damage
caused by flooding.
4. Electrical connection:
•Closely adhere to local Electricity Board
regulations.
•Voltage information is shown on the rating plate
mounted inside the door on the right hand side.
•The appliance must be earthed as prescribed by law.
•Do not use extension leads or multiple adapters.
•Before carrying out maintenance, disconnect the
mains plug.
•Ifnecessary,thepowercablemaybe replaced with
one the same obtained from our After-Sales
Service.Thepower cable mustonlybe replaced by
a qualified technician.
Warning for models provided with LCD
display:
The mains plug must be positioned in an easily
accessible place.
•ForAustria:iftheapparatusisseriesconnectedto
a fault current switch, this must be sensitive to the
pulsating current.
EC Declaration of conformity
This appliance has been designed, constructed and
distributed in compliance with the safety
requirements of EC Directives:
•73/23/EEC
•89/336/EEC
•93/68/EEC
Load capacity:
12 place settings.

5
ELECTRICAL CONNECTION
1) For Great Britain only
Warning - this appliance must be earthed
Fuse replacement
If the mains lead of this appliance is fitted with a BS 1363A 13amp
fused plug, to change a fuse in this type of plug use an A.S.T.A.
approved fuse to BS 1362 type and proceed as follows:
1.Remove the fuse cover (A) and fuse (B).
2.Fit replacement 13A fuse into fuse cover.
3.Refit both into plug.
Important:
The fuse cover must be refitted when changing a fuse and if the fuse
cover is lost the plug must not be used until a correct replacement is
fitted.
Correctreplacementareidentifiedbythecolourinsertorthe colour
embossed in words on the base of the plug.
Replacement fuse covers are available from your local electrical
store.
2) For the Republic of Ireland only
The information given in respect of Great Britain will frequently
apply, but a third type of plug and socket is also used, the
2-pin, side earth type.
3) Socket outlet / plug (valid for both countries)
If the fitted plug is not suitable for your socket outlet, please contact
Whirlpool Service for further instruction. Please do not attempt to
change plug yourself. This procedure needs to be carried out by a
qualified Whirlpool technician in compliance with the manufactures
instructions and current standard safety regulations.

6
PRECAUTIONS AND GENERAL
RECOMMENDATIONS
1. Packing:
The packing box may be fully recycled as
confirmed by the recycling symbol .
2. Energy and water saving tips:
•Do not rinse crockery under running water.
•Always fully load the dishwasher before switching
on or set the wash programme to half load/
Multizone (if available) if one rack only is loaded.
•Ifecologicalenergysourcesareavailablesuchassolar
panel heating, heat pumps or centralised heating
systems, the appliance may be connected to the hot
watermainsuptoamaximumtemperatureof60°C.
Makesurethewaterinlethoseisofthecorrecttype.
Refer to the “Connections” chapter in these user
instructions.
3. Disposal:
The appliance is built from reusable materials. If
you decide to scrap the dishwasher, it must be
disposed of in compliance with local waste disposal
laws.
Before scrapping, cut off the power cable so that
the appliance cannot be connected to the mains.
•To prevent situations of potential danger to
children (e.g. danger of suffocation), break the lock
of the door so that it can no longer be closed.
4. Child safety:
•Children must not be allowed to play with the
dishwasher.
•Store the detergent, rinse aid and salt in a dry place
out of the reach of children.
5. Safety warnings:
•The open dishwasher door can only support the
weight of the loaded rack when pulled out. Do not
rest objects on the open door or sit or stand on it:
the appliance may topple over!
•Do not use solvents inside the dishwasher: risk of
explosion!
•Sharp knives and forks that mightcause injury must
be placed in the cutlery basket with the sharp end
facing downwards.
Long-handled utensils must be arranged
horizontally in the upper rack, with the sharp end
facing away from the front of the appliance.
•Before cleaning or carrying out maintenance,
switch off the appliance, disconnect the mains plug
and turn off the water tap.
•Ifafaultoccurs,switchofftheapplianceandturnoff
the water tap.
•On completion of the programme switch off the
dishwasher and turn off the water tap.
•Repairsandtechnicalmodificationsmustbe carried
out exclusively by a qualified technician.
•The water in the dishwasher is not potable.
•Do not store inflammable liquids near the
dishwasher.
•Do not operate the appliance in the open air.
•Attention: Danger when door is opened.
6. Resistance to frost
If the appliance is placed in surroundings exposed
to the risk of frost, it must be drained completely.
Turn off the water tap, remove the flexible inlet
and outlet hoses, and let all the water run out.
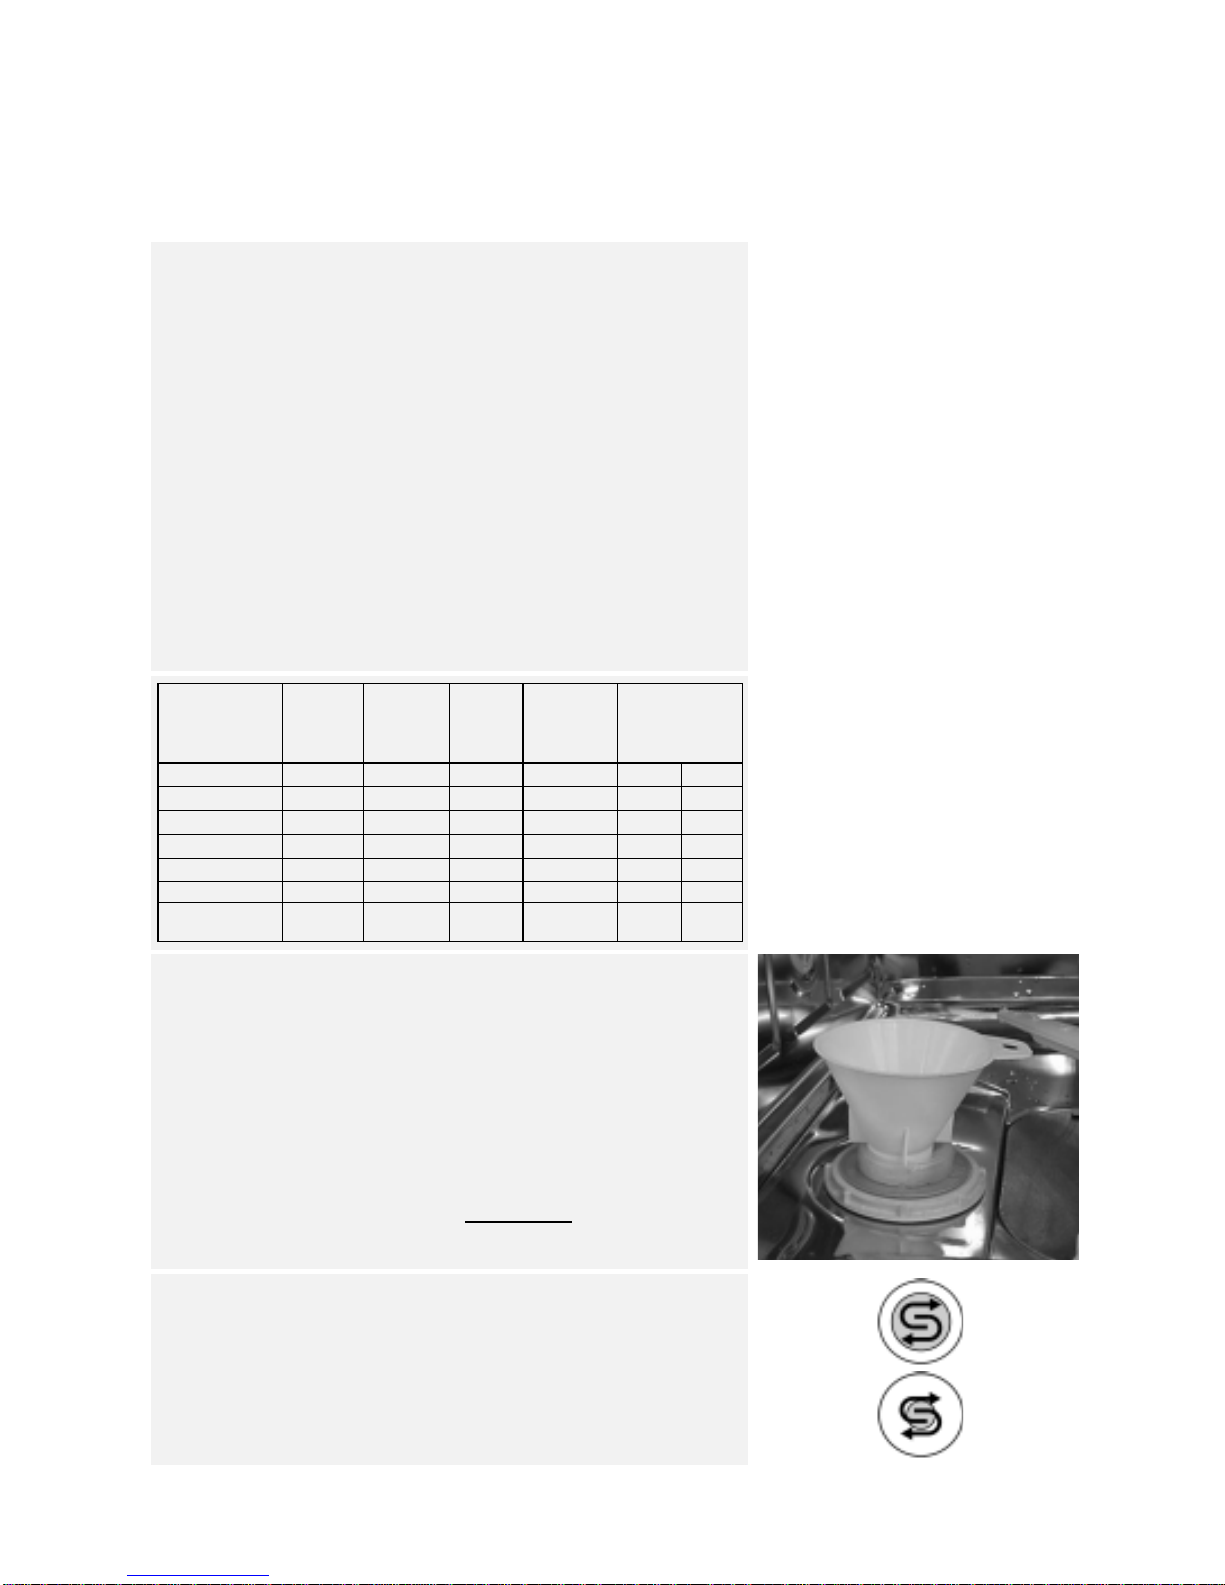
7. For appliances with water stop system:
The water inlet hose and plastic casing contain
electrical components. Do not therefore cut the
hose or immerse the plastic casing in water. If the
hose is damaged switch off the appliance
immediately.
8. The appliance must be used at temperatures
between 5°C and 45°C.
This appliance is marked according to the
European directive 2002/96/EC on Waste
Electrical and Electronic Equipment (WEEE).
By ensuring this product is disposed of correctly,
you will help prevent potential negative
consequences for the environment and human
health, which could otherwise be caused by
inappropriate waste handling of this product.
The symbol on the product, or on the
documents accompanying the product, indicates
thatthisappliancemay not betreatedashousehold
waste. Instead it shall be handed over to the
applicable collection point for the recycling of
electrical and electronic equipment.
Disposal must be carried out in accordance with
local environmental regulations for waste disposal.
For more detailed information about treatment,
recovery and recycling of this product, please
contact your local city office, your household
waste disposal service or the shop where you
purchased the product.

7
HOW TO FILL THE SALT CONTAINER
From a water hardness category of 1–2 (medium), before using the
dishwasher, fill the salt container with regeneration salt (to find out the
hardness level of water in your area, contact your local Water Board or
check the last bill you received).
If the water hardness level does not correspond to position 3 (factory
setting) or if the water hardness level changes:
Set the water hardness level (for dishwashers without water
hardness sensor only):
Setting must be carried out according to the following table.
•Switch on the appliance (consult the quick reference guide).
•Select programme 2 (consult the programme chart in the quick
reference guide).
•PresstheStartbuttonforatleast5secondsuntiltheStartindicatorlamp
blinks.
•The“Startindicator lamp” blinks orthe digital display lights up according to
the water hardness level selected (chart, setting - blinking frequency or
digital display).
•With each successive touch of the Start buttonthe setting increases and
when it reaches 7 it returns to 1 again.
•Switch off the appliance (consult the quick reference guide).
The selected setting is now memorized.
Settings for dishwashers without
water hardness sensor only.
In appliances provided with a water
hardness sensor, the setting is
automatically executed.
Hardness
level German
degrees
°dH
French
degrees
°fH
mmol/l Clarkescale
or English
degrees
°eH
Setting
blinking frequency
(1x-7x)
or digital display
(1-7)
1 soft 0 - 5 0 - 9 0 - 0.9 0 - 6.3 1x 1
1 - 2 medium 6 - 10 10 - 18 1.0 - 1.8 7 - 12.6 2x 2
2 average 11 - 15 19 - 27 1.9 - 2.7 13.3 - 18.9 3x 3
3 medium-hard 16 - 21 28 - 37 2.8 - 3.7 19.6 - 25.9 4x 4
4 hard 22 - 28 38 - 50 3.8 - 5.0 26.6 - 35 5x 5
4 very hard 29 - 35 51 - 63 5.1 - 6.3 35.7 - 44.1 6x 6
4 extremely
hard 36 - 60 64 - 107 6.4- 10.7 44.8 - 74.9 7x 7If the water hardness level falls within
category 1 (soft), no salt is required.
How to fill the salt container
Warning: Only use regeneration salts for use in domestic dishwashers!
Donot fillthesalt containerwithunsuitable substances,suchasdetergent,
as this will cause irreparable damage to the water softener system.
1. Remove the lower rack.
2. Unscrew the cap by turning it counter-clockwise.
3. Whenfirst usingthedishwasher:fill thesaltcontainertotherimwithwater.
4. Fill the salt container to the rim with salt (using the filler provided)
(when filling for the first time use min. 1.5 kg and max. 2 kg) and stir
with a spoon handle.
5. Screw the cap back on by turning it clockwise.
6. Fit the lower rack.
7. If regeneration salt is to be added, immediately start a wash
programme (rinsing alone is not sufficient) in order to eliminate any
residual saline solution straight away and avoid corrosion.
Salt level indicator
The dishwasher is equipped with an electric or visual salt level indicator
(depending on the model installed).
Electric indicator
The salt level indicator lamp on the control panel lights up when the salt
container is empty.
Visual indicator
The float is clearly visible in the cap window when the salt container is full.
The float lowers and is no longer visible when the salt container is empty.

8
HOW TO FILL THE RINSE AID DISPENSER
The rinse aid facilitates drying and prevents the formation of unsightly
spots and streaks on crockery. Before using the dishwasher for the
firsttime,filltherinseaiddispenser.Onlyuserinseaidsrecommended
for use in domestic dishwashers.
1. Press button Ato open the cover (see drawing).
2. Fill the dispenser with rinse aid up to the dotted line
(about 100 ml maximum).
Immediately wipe away any rinse aid spilt accidentally! This prevents
the formation of excess suds which may spoil washing results.
3. Close the cover.
Thereafter, regularly check the rinse aid level.
How to adjust the rinse aid dosage regulator
Factory setting: Position 4.
If you are not satisfied with washing or drying results, change the rinse
aid dosage setting.
1. Press button Ato open the cover (see drawing).
2. If crockery is prone to whitish streaks: reduce the dosage by
turning the dial to a lower setting (1-3) using a coin or the like. If
crockery is not perfectly dry: increase the dosage by turning the
dial to a higher setting (5-6).
3. Close the cover.
Rinse aid level indicator:
Visual indicator:
light add rinse aid
dark sufficient rinse aid.
Electric indicator (if provided):
The indicator lamp on the control panel lights up when more rinse aid
needs to be added.
A

9
HOW TO FILL THE DETERGENT DISPENSER
Only use detergents recommended for use in domestic dishwashers.
Only fill the detergent dispenser prior to starting a wash
programme (see the Quick Reference Guide).
1. Press button Cto open the cover.
2. How to fill the detergent dispenser.
•Programmes with pre-rinse:
-Powder and/or liquid detergent:
pour two thirds of the recommended dosage into the
compartment (A);
pour one third into the compartment (B).
-Tablets:
place a tablet in the compartment (A) and/or follow the
directions on the detergent pack.
•Programmes without pre-rinse:
-Powder and/or liquid detergent, tablets:
pour the entire recommended dosage into the compartment
(A).
•For programmes with additional “Half load/Multizone” function
selected (if provided):
-When using powder or liquid detergent the dosage can be
reduced by 1/3.
3. Close the cover.
Detergent
Use good quality liquid or powder dishwasher detergents and/or
tablets (do not use hand dishwashing detergents).
In order to safeguard the environment, follow the manufacturer's
directionsforuse. Donotusemorethan theamountofdetergent that
is recommended. Observe the manufacturer's safety warnings.
Keep these products out of reach of children.
If you use detergents in tablet form, follow the manufacturer's
directions for use.
If you use multi-action dishwasher detergents that incorporate rinse
aid and regeneration salt, follow the directions below:
•products that incorporate the rinse aid enhance the detergent
action only with some programs.
•products that do not require using regeneration salt may be
used only in areas with specific water hardness level.
Read the product user instructions carefully. If in doubt, contact the
detergent manufacturer.
The guarantee is not applicable if faults are caused by the use of these
products.
AB
C

10
CARE AND MAINTENANCE
Before cleaning or carrying out maintenance, switch off the appliance,
disconnect the mains plug and turn off the water tap.
Cleaning the outside of the appliance:
To clean the outside of the appliance, use a neutral detergent and a
damp cloth.
Clean the control panel with a damp cloth only.
Do not use abrasive detergents.
Cleaning the inside of the dishwasher:
Regularly wipe the door seal and inside of the door with a damp cloth
to remove any food residue.
Upper spray arm:
1. Slacken the fixing nut (A) (by turning it counter-clockwise) and
detach the spray arm (B) by pulling it down.
2. Rinse the nozzles.
3. To remount the spray arm, align it and then tighten the fixing nut
(by turning it clockwise), paying attention not to bend it.
The fixing nut must be tightened until it clicks!
Make sure the spray arm rotates freely.
Lower spray arm:
1. Slacken the fixing nut (C) (by turning it counter-clockwise) and
detach the spray arm (D) by pulling it upwards.
2. Rinse the nozzles.
3. To remount the spray arm, align it and then tighten the fixing nut
(by turning it clockwise), paying attention not to bend it.
The fixing nut must be tightened until it clicks.
Make sure the spray arm rotates freely.
A
B
D
C
C
D

11
CARE AND MAINTENANCE
Cleaning the filters
1. Rotate the microfilter counter-clockwise (in the direction of the
arrow “0”) and extract it (E).
2. Remove the wide-mesh filter (F).
3. Remove the fine-mesh filter (G).
4. Clean all filters under running water, paying attention not to bend
the fine-mesh filter.
Check that no impurities are left inside the dishwasher!
5. To reassemble:
insert the wide-mesh filter into the microfilter so it clicks into
place. Insert the fine-mesh filter.
The filter must be fitted under both tabs (H).
Insert the wide-mesh filter / microfilter unit and turn clockwise
(in the direction of the arrow “1”), until the dashed lines on the
microfilter and fine-mesh filter are aligned.
The filter unit must be correctly assembled to ensure good
wash results!
E
F
G
H

Important notes:
1. All sizes are given in millimetres.
2. During assembly, unplug the appliance from the mains.
3. Do not use the dish asher until it has been fully assembled.
4. Be careful about irregular surfaces: regulate the foot height, push the dish asher under
the orktop!
5. When installing the dish asher at the end of a fitted kitchen and the side of the machine
is left exposed, cover the hinge area (available from the After-Sales Service).
6. Protect the edges of units and orktops from humidity (insulating material not
supplied).
7. Do not seal the gaps bet een the appliance and adjacent units/ orktop (for example,
ith silicone).
8. Leave at least 3 mm bet een the top edge of the ooden panel and the orktop.
9. Set any electrical scre drivers to a lo rev count.
10. Depending on the model, your dish asher may differ slightly from the illustration. ★
11. The first time you use the dish asher, check the ater inlet hose and drain hose for
leaks.
12. Once the decor panels and plinth have been fitted, before opening the dish asher door,
evaluate hether the plinth needs to be trimmed, and if so by ho much, (see page 24),
in order to avoid damaging it.
13. Caution! Be are of sharp corners.
14. The Appliance is to be connected to the ater supply using ne hose-sets. Old hose-sets
should not be reused.
15. Depending on Appliance configuration the magnet valve of inlet ill be driven by line
voltage (see ★★).
2
Wichtige Hin eise:
1. Alle Maßangaben in Millimeter
2. Während der Montage muss der Netzstecker gezogen sein.
3. Geschirrspüler nur im eingebauten Zustand betreiben.
4. Achtung bei unebenen Aufstellflächen: Geschirrspüler mit eit herausgedrehten
Füssen vorsichtig unter Arbeitsplatte schieben.
5. Wenn das Gerät am Ende einer Küchenzeile steht und damit eine Seiten and
zugänglich ist, muss der Scharnierbereich seitlich verkleidet sein (Abdeckung beim
Service erhältlich).
6. Schnittkanten an Möbelteilen und Arbeitsplatten müssen gegen Feuchtigkeit
isoliert erden (Isoliermaterial nicht im Lieferumfang enthalten).
7. Z ischenräume zu Nachbarmöbeln und Arbeitsplatte dürfen nicht versiegelt
erden (z.B. Silicon)
8. Z ischen Oberkante Holztür und Arbeitsplatte muß ein Spalt von min. 3 mm sein.
9. Beim Einsatz von Elektroschraubern ist eine niedrige Drehzahl einzustellen.
10. Der Inhalt des Beipacks kann je nach Geräteausführung unterschiedlich sein. ★
11. Bei der ersten Inbetriebnahme den Wasserzulauf und Wasserablauf auf Dichtheit
prüfen.
12. Nach der Dekorplatten- und Sockelmontage ist vor dem Öffnen der Tür zu prüfen
ob bz . ie eit der Sockel auszuschneiden ist (siehe Seite 24) um Beschädigungen
zu vermeiden.
13. Vorsicht ! Verletzungsgefahr durch scharfe Kanten.
14. Das Gerät mit neuen Schläuchen an die Wasserversorgung anschließen. Keine alten
Schläuche iederver enden.
15. Je nach Geräteausführung ird das Magnetventil des Zulaufschlauches durch die
Netzspannung ausgelöst (siehe ★★).
D
GB

15
1x 700 x 75 mm
2x 300 x 75 mm
1x
2x / 4x M8
2x /4x
1x 1/2” - 3/4”
1x 25 - 29 mm
4x
6x 3,5 x 16 mm
4x
4x
2x
3,0 x 12 mm
★
★
★
★
★
4,0 x 40 mm

16

17

18
820 - 900 mm

19
850 - 900 mm

20
Table of contents
Other CDA Dishwasher manuals