manuals.online logo
Brands
  1. Home
  2. •
  3. Brands
  4. •
  5. Cefndy
  6. •
  7. Indoor Furnishing
  8. •
  9. Cefndy Mediatric Series Installation instructions

Cefndy Mediatric Series Installation instructions

Ref: 2015 Commode Range October 2015
Issue1
Form No: Cef 0035
User Instruction for the 2015
Mediatric/Bariatric & Super
Bariatric Commode range
This product can be purchased in various
configurations as detailed in the table. There are
also 3 options in width between the arms which
are identified by the prefix in italics at the
beginning of the product code, e.g.
M221/15/FB/V.
Mediatric ™ –600mm
(product code begins with “M”)
Bariatric –700mm
(product code begins with “X”)
Super Bariatric –800mm
(product code begins with “SX”)
Seat height range = 450mm –600mm
1.Introduction
The Commode Range is designed with both comfort
and hygiene in mind. The potty can be located from
either the front or rear of the Commode and the seat clips off the frame to aid cleaning. The Commode is adjustable
in height at 25mm intervals. The feet are non-marking & non-slip for extra user safety.
All structural joints are fully welded. As well as providing
structural strength this feature also aids product hygiene by
reducing the possibility of bacterial entrapment. The steel
framework is also coated in an anti-bacterial powder coated
finish.
Product code & description
220/15/DB/PU
Fixed height/detachable back/polyurethane
upholstery
220/15/DB/V
Fixed height/detachable back/vinyl upholstery
220/15/FB/PU
Fixed height/fixed back/polyurethane
upholstery
220/15/FB/V
Fixed height/fixed back/vinyl upholstery
221/15/DB/PU
Adjustable height/detachable
back/polyurethane upholstery
221/15/DB/V
Adjustable height/detachable back/vinyl
upholstery
221/15/FB/PU
Adjustable height/fixed back/polyurethane
upholstery
221/15/FB/V
Adjustable height/fixed back/vinyl upholstery
222/15/DB/PU
Detachable arm/adjustable height/detachable
back/polyurethane upholstery
222/15/DB/V
Detachable arm/adjustable
height/detachable back/vinyl upholstery
222/15/FB/PU
Detachable arm/adjustable height/fixed
back/polyurethane upholstery
222/15/FB/V
Detachable arm/adjustable height/fixed
back/vinyl upholstery
Parts list
Description
Part No
Crutch tip
74G3
Extension leg (standard)
56C319P
Extension leg (transporter
type kit)
63YESSP/I
Pin clip
63PC
Anti-rattle collar
74GAR/2
Hand wheel (DB only)
73046
PU Back
72PU600BACK
PU Modesty Cover
72PU600TS/PU/MC
Vinyl Back “M” range
67057BEW/G/2
Vinyl Back “X & SX”
range
67220EWB/2
Vinyl Seat Modesty Cover
67YESS/MC
Clip on seat “M” range
720600TS
Clip on seat “X & SX”
range
720700TS
Product specification
Seat depth
460 mm
Max footprint “M” range
660mm x 600mm
Max footprint “X” range
760mm x 600mm
Max footprint “SX” range
860mm x 600mm
Seat to top of arms
170mm
Seat to top of back
375mm
Maximum user weight
318 KG (50 Stone)
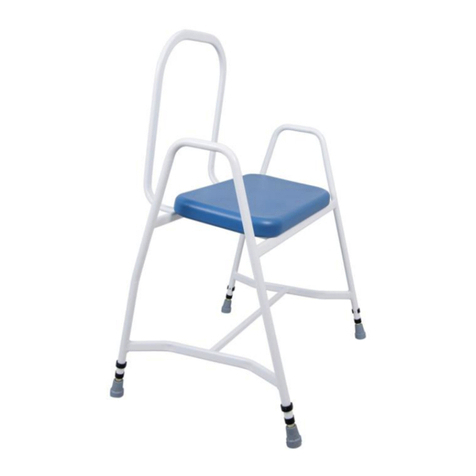
Version pictured is an M221/15/DB/V
Ref: 2015 Commode Range October 2015
Issue1
Form No: Cef 0035
User Instruction for the 2015
Mediatric/Bariatric & Super
Bariatric Commode range
2. Contents
Commode
User Instructions (this leaflet)
Batch label –This will be found on the product and will include the product code as well as a number. In the
event of needing to contact the manufacturer about this product always quote the Batch Number.
3. Assembly Instructions
Carefully unpack and examine the product to ensure it is complete.
Before use check for any signs of damage e.g. cracked weld, flaking of paint, bent tube. If any signs occur
please contact your supplier to exchange and refrain from using the product.
DO NOT ATTEMPT TO USE IF PRODUCT IS DAMAGED.
To adjust the Commode height
1. Remove the pin clip from the leg individually
2. Select the height by positioning each extension leg individually, aligning the
holes in the extension leg and frame
3. When the required height is selected re-fit the pin clip into the appropriate
hole ensuring the pin is fully engaged
4. Repeat the above on the other three legs
5. Ensuring all four pin clips are fully engaged and check that all four legs are
set to the same height
To adjust the removable back (DB versions only)
1. Unscrew the handle wheels (clockwise) around half one full turn
2. The detachable back should now slide freely in the locating brackets
3. Once the desired position is reached re-tighten (anti-clockwise) the four
hand-wheels to lock the back in position
4. As an added safety feature pin clips are inserted between the hanging
brackets to stop the back from sliding out of the brackets ensure these pin
clips are always inserted when the product in in use
The back may have been located in an inverted position for transit. If so remove
the two safety pin clips located on the back between the hanging brackets,
slightly unscrew the hand wheels as above, fully withdraw the back from the
brackets. Then rotate the back to an upright position and slide the back into all
four brackets, insert the safety pin clips & repeat the adjustment process to
locate and secure the back in the correct position.
To remove detachable arms (models including, 222 only)
1. Withdraw the retaining pin clips from both the front and rear of the arm
which is to be removed
2. Lift the arm upwards away from the commode
3. Reverse this process to replace the arm securely
Ref: 2015 Commode Range October 2015
Issue1
Form No: Cef 0035
User Instruction for the 2015
Mediatric/Bariatric & Super
Bariatric Commode range
5. Cleaning
Use mild detergent with warm water to wipe down framework on at least a weekly basis more frequently if
required.
Do not use an abrasive cleaner as this will damage the frame and nullify your warranty.
It is not recommended that polyurethane is cleaned using power/jet washing or industrial washing
machines.
Use of power/jet washing & industrial washing machines (Not recommended for PU products):
If either of the above is used to clean equipment care must be taken since high-pressure water can be
penetrative.
Care should be taken that frames are not placed too close to high-pressure water jets.
After cleaning ensure any residual water is removed from the framework as it could cause permanent
rusting of the frame (leave frames open in a warm environment for several hours to ensure all internal
moisture evaporates).
We cannot offer advice on the use of industrial washing machine to clean this product
6. Maintenance Requirements
The product should be checked on a regular basis for damage or wear and tear –this includes flaking or
cracking paint. Any undue signs of damage should be noted and reported to the supplier in the first instance.
Should damage be evident, then the user should refrain from using the product until advice has been sought
from the supplier.
7. Warning
This product is intended for users up to a maximum of 318kg/50stone in weight.
We recommend a full risk assessment be carried out before use.
Under no circumstance should the Commode be moved whilst occupied.
It is advised that the frame is checked periodically for signs of wear and tear. Any problems please report to
your supplier immediately.
8. Warranty
This product carries a 12 month warranty from the date of purchase from Cefndy against manufacturing defects.
Misuse or accidental damage is not covered. This warranty does not affect your statutory rights. As manufacturers
we cannot specify expected product life as this is based on the level of usage however we can advise that this
product has been designed, manufactured and independently tested in the UK (including cyclic testing to
represent real life usage).
9. Disposal Instructions
Appropriate hygiene standards should be applied before disposal to reduce the risk of infection.
Materials used are essentially non-hazardous and can be disposed of appropriately.
10. Contact Details
We have attempted to cover most eventualities, however if you have any specific queries, please contact:
Cefndy Healthcare, Cefndy Road, Rhyl, Denbighshire, LL18 2HG
Tel: 0044 1745 343877 (Quality Assurance Dept) E-mail: cefndy.sales@denbighshire.gov.uk

This manual suits for next models

38

Other Cefndy Indoor Furnishing manuals

Cefndy B43 Installation instructions

Cefndy

Cefndy B43 Installation instructions

Cefndy Mediatric Series Installation instructions

Cefndy

Cefndy Mediatric Series Installation instructions

Cefndy X700 Installation instructions

Cefndy

Cefndy X700 Installation instructions

Cefndy X165 Installation instructions

Cefndy

Cefndy X165 Installation instructions

Popular Indoor Furnishing manuals by other brands

Regency LWMS3015 Assembly instructions

Regency

Regency LWMS3015 Assembly instructions

Furniture of America CM7751C Assembly instructions

Furniture of America

Furniture of America CM7751C Assembly instructions

Safavieh Furniture Estella CNS5731 manual

Safavieh Furniture

Safavieh Furniture Estella CNS5731 manual

PLACES OF STYLE Ovalfuss Assembly instruction

PLACES OF STYLE

PLACES OF STYLE Ovalfuss Assembly instruction

Trasman 1138 Bo1 Assembly manual

Trasman

Trasman 1138 Bo1 Assembly manual

Costway JV10856 manual

Costway

Costway JV10856 manual

moss DESIGN Caisson Credenza Assembly instructions

moss DESIGN

moss DESIGN Caisson Credenza Assembly instructions

Aquaglide FULL DECK 15.0 owner's manual

Aquaglide

Aquaglide FULL DECK 15.0 owner's manual

AREBOS AR-HE-SW30 user manual

AREBOS

AREBOS AR-HE-SW30 user manual

Till-Hilft Fulda 87005.330 Assembly instructions

Till-Hilft

Till-Hilft Fulda 87005.330 Assembly instructions

Twoey Outside 2010 quick start guide

Twoey Outside

Twoey Outside 2010 quick start guide

Hettich Easys 200 operating instructions

Hettich

Hettich Easys 200 operating instructions

The bedboss RELAX 404 Series owner's manual

The bedboss

The bedboss RELAX 404 Series owner's manual

Oeseder Möbelindustrie Bern 991 720 Assembly instructions

Oeseder Möbelindustrie

Oeseder Möbelindustrie Bern 991 720 Assembly instructions

Costway HW68469 user manual

Costway

Costway HW68469 user manual

Next ALIX A27743 Assembly instructions

Next

Next ALIX A27743 Assembly instructions

BROSA Hans Assembly guide

BROSA

BROSA Hans Assembly guide

Prodigg MINIKA PBA015T-FUR installation manual

Prodigg

Prodigg MINIKA PBA015T-FUR installation manual

manuals.online logo
manuals.online logoBrands
  • About & Mission
  • Contact us
  • Privacy Policy
  • Terms and Conditions

Copyright 2025 Manuals.Online. All Rights Reserved.