manuals.online logo
Brands
  1. Home
  2. •
  3. Brands
  4. •
  5. Celestron
  6. •
  7. Accessories
  8. •
  9. Celestron FOCUS 94155-A User manual

Celestron FOCUS 94155-A User manual

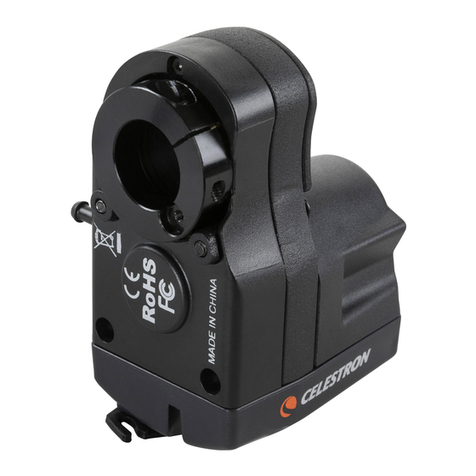
FOCUS MOTOR
#94155-A - Setup Guide
The focus motor is compatible with all Celestron SCTs from
6” to 14” in aperture that have been produced since the year
2006; it is not compatible with 5” SCTs or older models. It
is compatible with all EdgeHD telescopes. It is compatible
with the 8” and 36cm Rowe-Ackermann Schmidt Astrograph
(RASA) models, and the Celestron 7” Maksutov-Cassegrain.
The focus motor can also be used with the 11” RASA, but
if it has the FeatherTouch MicroFocuser installed, then it will
require the Focuser Retrofit Kit for the RASA 11 (#94255).
For 6” Schmidt-Cassegrain telescopes only, the Off-Axis
Guider (#93648) cannot be used when the focus motor is
installed due to mechanical interferences.
This setup guide will guide you through installation and basic
operation of the focus motor. The full instruction manual
can be downloaded from the focus motor webpage at
celestron.com. For the 36cm RASA, refer to the “Focus
Motor Installation for the RASA 36cm” instructions found on
the focus motor webpage at celestron.com.
PARTS LIST
1. Focus Motor Assembly
2. Cover Plate, 6”
through 9.25” Fig.1
3. Cover Plate, 11” & 14” Fig.2
4. Adapter Sleeve
5. Adapter Sleeve Screw
6. Set Screw
7. AUX Cable
8. Hex Key
9. Wrench
10. Screwdriver
Fig.1
Fig.2
WARNINGS
• Do not run the focus motor when the clamping screw
is not tightened, as the unthreaded screw can interfere
with the motor housing, which will prevent the motor from
turning. If the screw is unthreaded and interferes with
the motor housing, do not use the supplied wrench to
force the motor to turn. Doing so can damage the motor.
Instead, tighten the clamping screw, and the motor
should operate properly.
Unthreaded clamping screw can interfere with motor housing
• Never use the wrench to turn the motor when the motor
is powered. If you should ever need to use the wrench,
first disconnect power to the motor and confirm the
clamping screw is not interfering with the motor housing.
• Do not attempt to tighten the motor’s clamping screw
onto the focuser knob until the motor is firmly connected
to the cover plate. Otherwise, the focus motor may
become tilted relative to the cover plate, which can
cause the focus motor to bind.
• If the motor does not turn the focuser after initial
installation, DO NOT USE THE WRENCH TO FORCE
THE MOTOR TO TURN! Likely an improper installation
is causing the focuser to bind and using the wrench
to turn the motor can damage the gears in the motor’s
gearbox and break the motor. If the focus motor will still
not properly turn the focuser after reinstalling carefully
following the steps below, please contact Celestron
Technical Support at:
celestron.com/pages/technical-support
INSTALLATION
1. Remove the rubber cover from the telescope’s focuser
knob. If you cannot simply pull it off, use a flat head
screwdriver or other tool to pry off the rubber cover.
2. Loosen and remove the 3x screws on the cover plate of
the focuser.
3. Carefully remove the cover plate.
4. Identify which one of the two supplied cover plates is for
your size optical tube as indicated in the parts list.
5. Orient the new orange cover plate for your size optical
tube as shown below.
11” and
14”
6” and 7”
8” and 9.25”
6. Reuse the 3 screws previously removed to install the
new orange cover plate in place of the old one. We
recommend first placing the telescope tube in a vertical
position (i.e. with the front aperture facing the ground),
as this will prevent any sagging due to gravity before
the screws are tightened. Install the three cover plate
mounting screws loosely; do not fully tighten them.
7. While the cover plate can still move around slightly, make
sure the central hole in the cover plate is concentric with
the brass cylinder of the focuser knob.
Keep the brass cylinder of the focuser knob centered relative to
the inner diameter of the cover plate.
8. Hold the brass cylinder concentric with the cover plate
while tightening the three screws by a small amount
each. Follow the arrows in the illustration below for
the tightening sequence. This will require two or three
passes. DO NOT OVERTIGHTEN THE SCREWS!
This can cause the focuser bearing to bind. The screws
should be tight enough to prevent any lateral movement
of the focuser knob, but not so tight that it binds. The
cover plate must install flatly onto the machined surface in
the recess without tilting.
Tighten a screw by a small amount, then move on to the next screw
9. Check to make sure the focuser knob cannot move when
applying side pressure to it. If the focuser knob can move,
then the brass cylinder will need to be re-centered (as in
step 7), and the screws will need to be tightened a little
more. This is an important step, as it will ensure the focus
motor will install straight and won’t bind and become
inoperable. However, do not overtighten the screws!
10. Rotate the focuser knob a couple rotations in each
direction to make sure it moves smoothly and does not
bind. If it does bind, then repeat all previous steps.
11. Check to see if the arrow indicator on the motor housing
is pointing within the “range” marking on the rear of
the motor coupling. If it isn’t, rotate the motor coupling
using the supplied wrench as shown until the arrow
points within the range. This allows access to the motor
coupling’s clamping screw after the motor is installed
on the focuser.
Clamping
Screw
Range Marking
Arrow Indicator
12. Loosen the focus motor’s clamping screw a few turns
using the supplied 2.5mm hex key.
13. FOR 6” THROUGH 9.25” TELESCOPES ONLY:
Install the adapter sleeve into the focus motor. Use
the supplied adapter sleeve screw to secure the
sleeve.
Adapter
Sleeve
Adapter Sleeve Screw
14. FOR 6” THROUGH 9.25” TELESCOPES ONLY:
Install the set screw into the threaded hole in the
focus motor’s clamping collar using the supplied hex
key. Do not tighten the set screw yet, only thread it in a
few turns.
Set Screw
Clamping Screw
15. Place the focus motor onto the brass focuser knob.
Orient the motor as shown below. Make sure the two
captive screws in the focus motor line up with the two
holes in the orange cover plate as shown.
Holes in
Cover
Plate
Captive Screws
16. Slide the focus motor onto the focuser knob until the
two attachment posts on the face of the motor are flat
against the cover plate.
Attachment Posts
17. Check to make sure there are no air gaps between the
cover plate and the two attachment posts on the focus
motor as indicated by the arrow in the illustration below.
18. Tighten the two captive screws on the motor
to the corresponding threaded holes on the
cover plate using the supplied hex key. Again,
first loosely connect the screws to the cover
plate, then alternate tightening each screw
by a small amount until the focus motor cannot move
or wiggle and is solid. Do not overtighten the screws.
Captive
Screw
Captive
Screw
Hex Key
Alternate between tightening each of the captive screws
by a small amount
19. FOR 6” THROUGH 9.25” TELESCOPES ONLY:
Fully tighten the set screw that was installed in step 14.
Tighten until snug, but do not overtighten. If you need to
rotate the motor coupling to gain better access to the set
screw, use the wrench as indicated in step 11.
20. Tighten the focus motor’s clamping screw using the
hex key until fully tightened. If you need to rotate the
motor coupling to gain better access to the clamping
screw, use the wrench as indicated in step 11. Tighten
the screw snuggly, but be careful: attempting to use
full force on the wrench may strip the hex socket in the
screw head.
Clamping Screw
Hex Key
NOTE: If the focus motor interferes with camera installation, the motor
mounting orientation can be rotated. This can be done by using the other
mounting holes in the cover plate’s perimeter (step 15), or by rotating the
entire cover plate (step 5).
POWERING THE FOCUS MOTOR
There are three ways to power the focus motor:
1. Use a Celestron computerized mount. Connect the AUX
port on the focus motor to an AUX port on the mount using
the supplied cable.
2. Use a USB3 port or a USB2 port that provides at least
900 mA. Connect the focus motor with a USB A-to-B
cable (not included). Use a high quality cable, or the
motor may not receive enough power.
3. Use a DC power source able to supply at least 1A. Connect
the power source to the 12V DC jack on the focus motor
using a 5.5mm/2.1mm plug that is tip positive.
CONTROLLING THE FOCUS MOTOR
WITH A CELESTRON HAND CONTROL
If using a Celestron mount and plugged into an AUX port,
the focus motor can be controlled from the mount’s
hand control. Either the NexStar+ hand control
(requires firmware version 5.30+) or the StarSense
hand controller (requires firmware version 1.19+) can
be used. If your firmware is not up to date, use the
Celestron Firmware Manager (CFM) program available at
celestron.com/CFM to update it. The focus motor
controls can be found in the hand control by pressing
the MENU button and selecting “Focuser.”
CONTROLLING THE FOCUS MOTOR
WITH A COMPUTER
If using a Celestron mount and plugged into an AUX port,
connect the hand control to the computer using a USB
A-to-mini B cable (not included). One end of the cable is
connected to the USB mini B port on the bottom of the
hand control, the other end is connected to the computer.
Once connected, you can use most any third-party
astronomy software that has focuser control by using the
Celestron Unified ASCOM mount driver (download from
ascom-standards.org).
If connected directly to a computer through the focus
motor’s USB port, use the focus motor with third-party
astronomy software by using the Celestron Focuser USB
ASCOM driver (download from the focus motor page at
celestron.com).
Celestron also offers free Windows PC software that
controls the focus motor without the need for an ASCOM
driver. The simple Celestron Focuser Utility Program can be
downloaded from the focus motor page at celestron.com.
The focus motor can also be controlled with the Celestron
PWI program.
For more information, download the full instruction manual
from the focus motor page at celestron.com
FCC NOTE: This equipment has been tested and found to
comply with the limits for a Class B digital device, pursuant
to part 15 of the FCC Rules. These limits are designed to
provide reasonable protection against harmful interference
in a residential installation. This equipment generates,
uses, and can radiate radio frequency energy and, if not
installed and used in accordance with the instructions,
may cause harmful interference to radio communications.
However, there is no guarantee that interference will not
occur in a particular ninstallation. If this equipment does
cause harmful interference to radio or television reception,
which can be determined by turning the equipment
off and on, the user is encouraged to try to correct the
interference by one or more of the following measures:
• Reorient or relocate the receiving antenna.
• Increase the separation between the equipment and
receiver.
• Connect the equipment into an outlet on a circuit
different from that to which the receiver is connected.
• Consult the dealer or an experienced radio/TV
technician for help.
This product is designed and intended for use by those 14
years of age and older.
WARRANTY
celestron.com/support/warranties
© 2019 Celestron • All rights reserved
celestron.com/pages/technical-support
2835 Columbia Street • Torrance, CA 90503 USA
1219

Other manuals for FOCUS 94155-A

2

Other Celestron Accessories manuals

Celestron 94175 User manual

Celestron

Celestron 94175 User manual

Celestron FOCUS 94155-A User manual

Celestron

Celestron FOCUS 94155-A User manual

Celestron ECLIPSMART 94248 User manual

Celestron

Celestron ECLIPSMART 94248 User manual

Celestron POWER CONTROLLER 4X User manual

Celestron

Celestron POWER CONTROLLER 4X User manual

Celestron StarPointer User manual

Celestron

Celestron StarPointer User manual

Celestron Popular Science ThermoCharge 3 User manual

Celestron

Celestron Popular Science ThermoCharge 3 User manual

Celestron NexImage User manual

Celestron

Celestron NexImage User manual

Celestron 94020 User manual

Celestron

Celestron 94020 User manual

Celestron 93515 Manual

Celestron

Celestron 93515 Manual

Celestron Mossy Oak Gamekeeper FireCel+ 93549 User manual

Celestron

Celestron Mossy Oak Gamekeeper FireCel+ 93549 User manual

Celestron Feathertouch SCT Microfocuser User manual

Celestron

Celestron Feathertouch SCT Microfocuser User manual

Celestron CGE1100 Manual

Celestron

Celestron CGE1100 Manual

Celestron NexStar+ Hand Control User manual

Celestron

Celestron NexStar+ Hand Control User manual

Celestron 93571 User manual

Celestron

Celestron 93571 User manual

Celestron STARPOINTER PRO User manual

Celestron

Celestron STARPOINTER PRO User manual

Celestron 94306 User manual

Celestron

Celestron 94306 User manual

Celestron SMART DEWHEATER AND CONTROLLER 2X User manual

Celestron

Celestron SMART DEWHEATER AND CONTROLLER 2X User manual

Celestron ELEMENTS THERMOTORCH 5 User manual

Celestron

Celestron ELEMENTS THERMOTORCH 5 User manual

Celestron WEDGE 93665 User manual

Celestron

Celestron WEDGE 93665 User manual

Celestron EDGEHD User manual

Celestron

Celestron EDGEHD User manual

Celestron 94182 User manual

Celestron

Celestron 94182 User manual

Celestron CrossAim User manual

Celestron

Celestron CrossAim User manual

Celestron EclipSmart User manual

Celestron

Celestron EclipSmart User manual

Celestron Thermocharge 10 48024 User manual

Celestron

Celestron Thermocharge 10 48024 User manual

Popular Accessories manuals by other brands

Sunshower PURE WHITE Installation manual Part

Sunshower

Sunshower PURE WHITE Installation manual Part

Avid Technology Pro Tools Duet quick start guide

Avid Technology

Avid Technology Pro Tools Duet quick start guide

Sunbeam BL48 user guide

Sunbeam

Sunbeam BL48 user guide

Defender DX-500 quick guide

Defender

Defender DX-500 quick guide

Vega VEGAPULS 69 operating instructions

Vega

Vega VEGAPULS 69 operating instructions

Surefire Sonic Defenders Ultra EP7-SPR quick start guide

Surefire

Surefire Sonic Defenders Ultra EP7-SPR quick start guide

mikroElektronika IR eclipse click MIKROE-1711 manual

mikroElektronika

mikroElektronika IR eclipse click MIKROE-1711 manual

SilverStone PB06 user manual

SilverStone

SilverStone PB06 user manual

Melissa Electric Heating Sheet 631-087 Specification sheet

Melissa

Melissa Electric Heating Sheet 631-087 Specification sheet

Tecnoplastic CRAB instructions

Tecnoplastic

Tecnoplastic CRAB instructions

Becker Centronic VarioControl VC280 Assembly and operating instructions

Becker

Becker Centronic VarioControl VC280 Assembly and operating instructions

KitchenIQ 50142 owner's manual

KitchenIQ

KitchenIQ 50142 owner's manual

STEINEL LEDVANCE Osram ST8 LB Gen2 manual

STEINEL

STEINEL LEDVANCE Osram ST8 LB Gen2 manual

AEB 1050 Assembly Instructions and Guarantee

AEB

AEB 1050 Assembly Instructions and Guarantee

ABB Relion SMU615 installation manual

ABB

ABB Relion SMU615 installation manual

Middle Atlantic Products COMP-COOL Quiet-Cool Series instruction sheet

Middle Atlantic Products

Middle Atlantic Products COMP-COOL Quiet-Cool Series instruction sheet

M-Audio FireWire Solo quick start guide

M-Audio

M-Audio FireWire Solo quick start guide

Philio PSM02 manual

Philio

Philio PSM02 manual

manuals.online logo
manuals.online logoBrands
  • About & Mission
  • Contact us
  • Privacy Policy
  • Terms and Conditions

Copyright 2025 Manuals.Online. All Rights Reserved.