Celestron 44420 User manual

1
Celestron Microscope Imager – Model # 44420
Information, Specifications, and Instructions
Thank you for purchasing the Celestron Microscope Imager. We hope you will have years of satisfaction with this fantastic
product. You can observe specimen slides or objects magnified through your microscope and capture video or snapshots.
Imager connected to your computer Imager connected to your computer and your microscope
Computer Requirements
Operating System – Microsoft Windows 98/2000/ME/XP/Vista; CD or DVD Drive; USB Port Available
Specifications
Digital Camera – VGA (0.3mp) using a 1/3” CMOS chip (640 x 480 pixels); Video Frame Rate – 30fps
USB2.0 Cable – interface to PC
Magnification – 10x
CD-ROM – for installation of the driver and software (AMCap and Ulead)
Size – 3.6” x 2.4” x 1.5” (92mm x 60mm x 38mm); Weight – 3 oz. (85gr.)
Warranty – Two year limited
CE/FCC/RoHS – compliant; Made in China
Items Included in the box
Microscope Imager, USB Cable, CD-ROM for the driver & software installation, Adapter for Stereo Microscopes
Uses
This imager can be used with virtually any type of microscope (biological, dissecting, or stereo). You can observe or image
(video or snapshot) at whatever the microscope power is set to (see instructions later in this manual).
Below is an example of what type of snapshot imaging you can do with a specimen slide of a cross section of part of an animal
intestine. From left to right – at 40x, at 100x, and at 400x.
ENGLISH

2
Getting Started
Before using your microscope imager, you first need to install the driver, software, and related files. This is a short and easy
process and will only take a few minutes.
First, put the included installation CD-ROM in your computer CD/DVD drive. Do not connect the USB cable of the imager
to the computer until the driver and software are installed on your computer or the imager may not work properly.
The following screens (left to right) will appear during the installation on most computers although variations may appear on
some operating systems or even with the same operating system. The screens below are shown with the XP operating system.
The first screen to appear after you insert the CD-ROM is shown below left. You will be asked which action you wish to take
to open the CD-ROM. Shown is the typical choice to make but you can make your own choice and then click “OK”.
From the next screen that appears below, double click on
“soft” and it will take you to the next screen.
Now you will double click on “Setup” using the file that is
highlighted on the screen directly below.
Select the language and click on “OK”
Now you will install the Ulead photo software. It is
recommended to close all other open Windows programs.

3
You should read the ULead License Agreement.
If you agree, then click “Yes”. If you don’t agree,
click “No” and exit the Setup.
Fill in your name and serial number (found on the
CD-ROM cover) and then click “Next”.
You will select the folder for Ulead to be installed on
your computer. Stay with the default destination folder
shown or choose another folder and then click “Next”. Check the shortcuts you want and then click “Next”.
You will select which country you reside in or select
the video standard you prefer and then click “Next”. Ulead is now being installed and will go
automatically to the next screen.

4
You can select file association (or defer to a later
time) and then click “Next”. The Ulead software installation has been installed. Before
proceeding to install the driver for the imager, you need to restart
your computer. Before restarting, remove the CD-ROM from
the drive and close all open programs. Then, click “Finish”.
Now that the Ulead software is installed, you will need to install the driver for the microscope imager.
Put the CD-ROM back into your CD/DVD drive.
As with the software installation, you
will choose which action to take to open
the CD-ROM and then click on “OK”.
This screen also appeared during the software
installation, but this time you will double click on
“driver” which is highlighted here.
Now, double click on “setup” and it will take you
to the InstallShield Wizard. The installation will begin after you click “Next”.

5
Choose a setup type. Most people select “Complete” but
you canselect“Custom” if you opt to. Then click “Next”. To begin the installation click “Install”.
.
The driver is now being installed. The installation of the driver and related files is
complete. Click “Finish” to exit the installation process.
Remove the CD-ROM from your drive. Now, connect the USB cable to the microscope imager and to a USB port on
your computer.
You now have many different choices. If you want to capture videos, you can choose “AMCap” from your programs under
“Electronic ocular-R” and your will see the screen below where you will double click on “AMCap” or you may have a shortcut
to “AMCap” and you will directly enter the program. For taking snapshots, see the section below.

6
Snapshots – You can use “AMCap” to take snapshots but you can only take one image at a time and then save it on your
computer. For more efficient snapshot capturing, you can use “Ulead” (you will have to open the program to choose the
imager as the device) and instructions on “Ulead” can be found from their help menu and additional information can be found
on their website (www.ulead.com).
Another way to take snapshots is to go to “Control Panel” and find “Scanners and Cameras”. You will see the screen below
(left side) and double click on “Electronic ocular-R”. Then, the screen on the right below will appear and click “Next”.
The wizard screen shows “Take and Select Pictures to Copy”. The “Preview” mode will be on the left half of the screen and
you can then focus sharply the object you want to image. When ready, click “Take Picture” near the bottom left under
“Preview” on the screen and the picture will show up under “Pictures” on the right half of the screen. Continue taking as many
images as you want until done.
Now you want to save the pictures to your computer files. First click “Next” and the screen allows you to “Choose Picture
Name and Destination” and then click “Next”. You can select the images you want to save and then click “Next” and your
pictures will be copied to your computer as you selected. The wizard will then give you “Other Options”. If you are done,
check that option, and click “Next” and the screen will show “Completing the Scanner and Camera Wizard”, and click “Finish”
to close the wizard.

7
Using the Microscope Imager
Installing the Imager on a Microscope
The imager and adapter are shown in photo # A below. For most biological microscopes, remove one eyepiece and insert the
imager into the eyepiece tube (see photo # B below) where it is held in place by friction. Stereo microscopes have a larger
diameter eyepiece (and eyepiece tube) and thus require an adapter to use the imager. The adapter is shown inserted into a
stereo microscope eyepiece tube after the eyepiece is removed (see photo # C below). In photo # D below, the imager is shown
being put into the adapter of a stereo microscope.
Photo A Photo B Photo C Photo D
Power (Magnification) when Using the Imager
The power is determined by the imager power and the objective lens power. The imager has a 10x magnifying lens at the
bottom of it. As an example, if the objective lens being used is 4x, then the power you will be capturing for snapshots or video
will be 40x (10x of the imager times 4 x of the objective). If using a 40x objective, then the power will be 400x, etc.
Adjusting Light Intensity
Whether using mirror illumination or electrical illumination, you will have to experiment with how much light will give you
the best image. You can also experiment with condensers and diaphragms (if your microscope has these) for optimum
adjustment for obtaining the best image.
Focusing
You will focus your microscope with the imager attached the same as you would for observing. For the best images, make sure
the specimen or object is sharply focused. When changing powers, you will have to refocus.
Rotating the Imager
When you are looking at the image on your computer screen, you can rotate the position by rotating the imager to the position
you prefer.

8
Microscope imageur Celestron – Modèle nº 44420
Informations, spécifications et instructions
Nous vous remercions d’avoir fait l’acquisition d’un microscope imageur Celestron. Nous espérons que cet incroyable produit
vous procurera des années de satisfaction. Vous pouvez observer des lames porte-objets ou des objets grossis par votre
microscope et capturer des vidéos ou des instantanés.
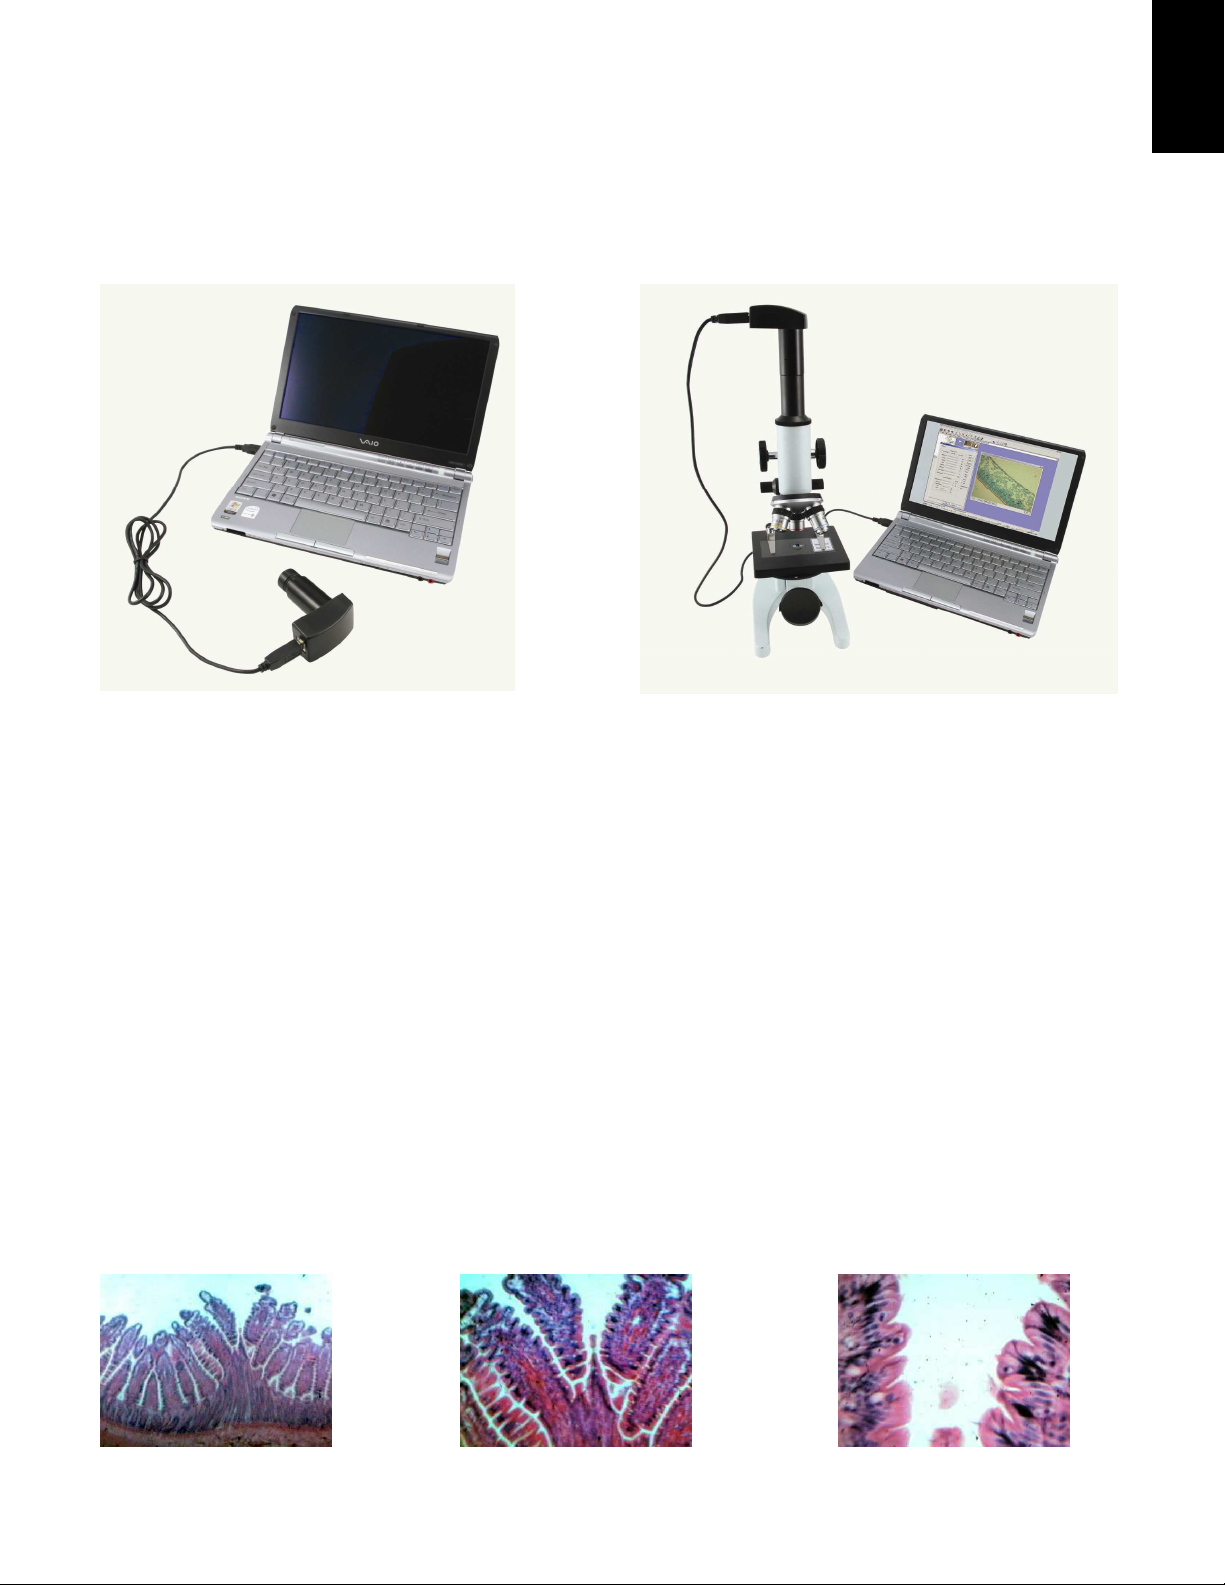
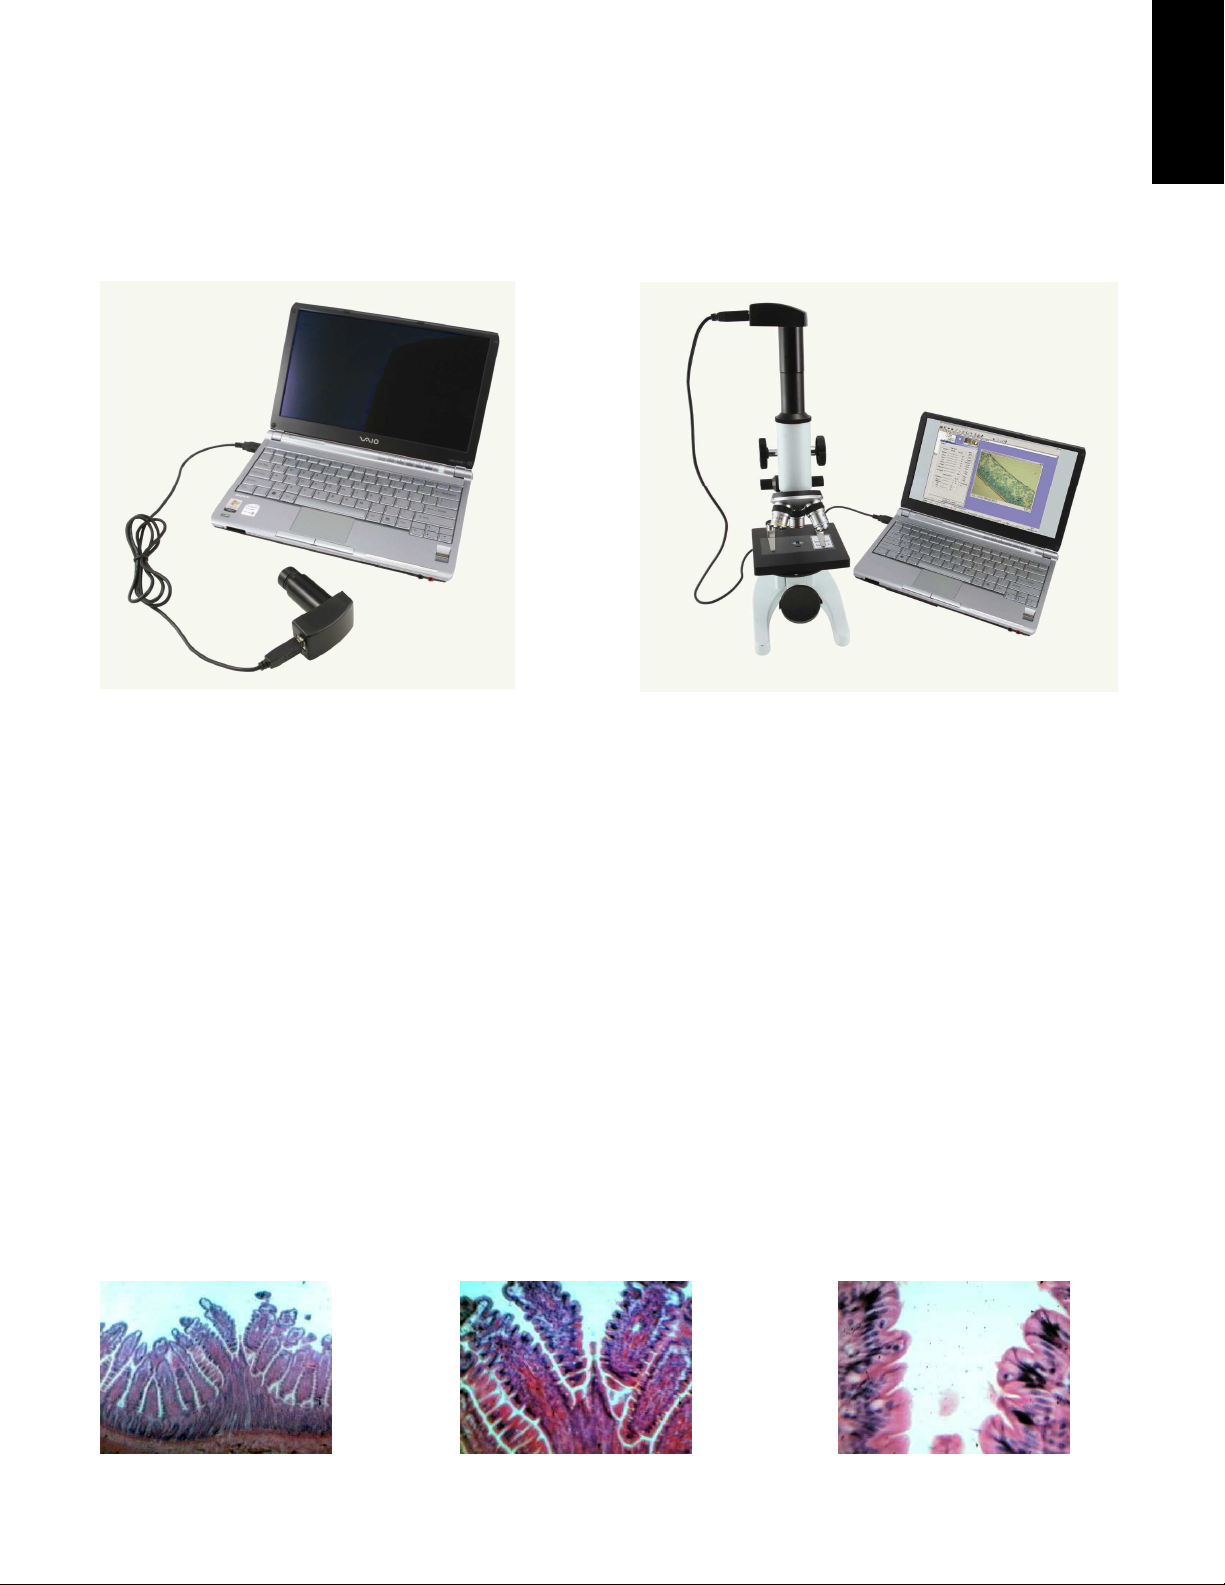
Imageur branché sur votre ordinateur Imageur branché sur votre ordinateur et votre microscope
Exigences système
Système d’exploitation – Microsoft Windows 98/2000/ME/XP/Vista ; lecteur CD ou DVD ; port USB disponible
Spécifications
Appareil photo numérique – VGA (0.3mp) avec puce CMOS 1/3” (640 x 480 pixels) ; Video Frame Rate (taux d’images
vidéo) – 30fps (images/sec).
Câble USB2.0 – interface vers PC
Grossissement – 10x
CD-ROM – pour l’installation du pilote et du logiciel (AMCap et Ulead)
Dimensions – 92 mm x 60 mm x 38 mm (3.6 po x 2.4 po x 1.5 po) ; Poids – 85g (3 oz)
Garantie – Limitée de 2 ans
Conforme CE/FCC/RoHS ; Fabriqué en Chine
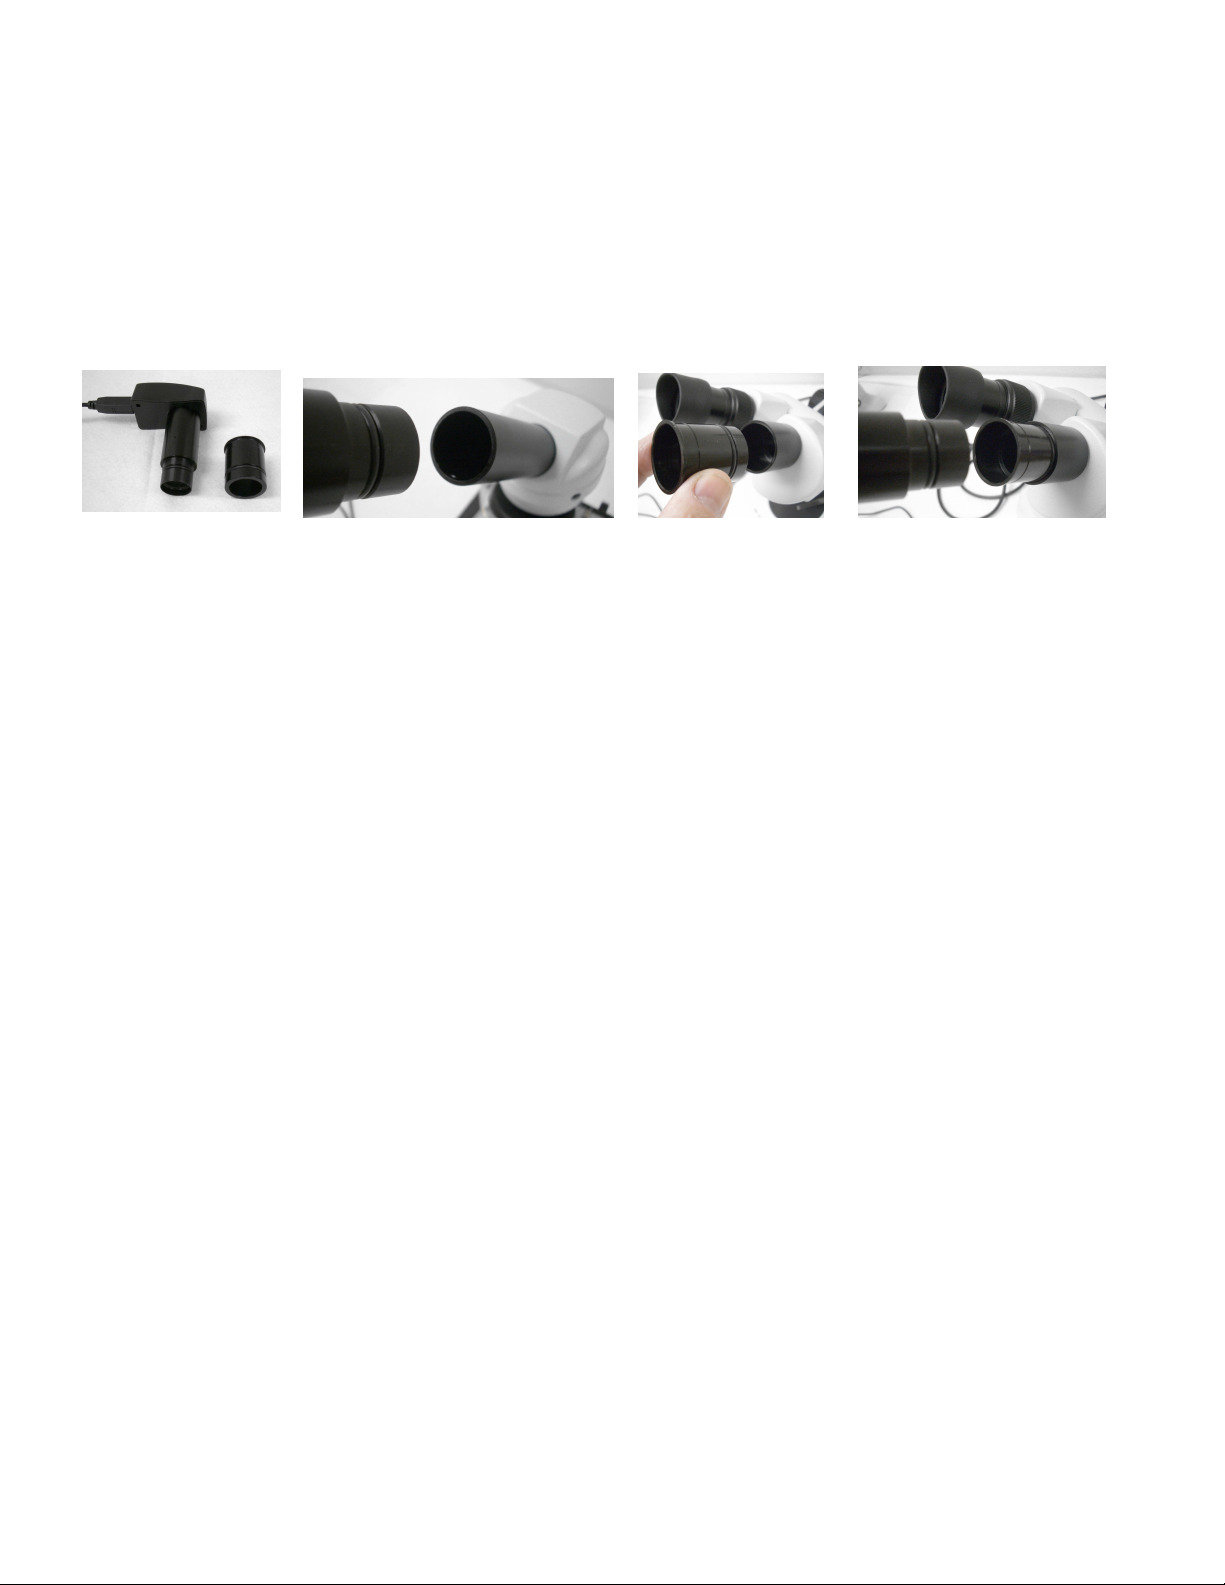
Articles inclus dans le carton
Microscope imageur, câble USB, CD-ROM d'installation du pilote et du logiciel, adaptateur pour microscopes stéréo
Utilisations
Cet imageur peut s’utiliser avec virtuellement n’importe quel type de microscope (biologique, de dissection, ou stéréo). Vous
pouvez observer ou imager (vidéo ou instantané), quelle que soit la puissance sur laquelle le microscope est réglé (voir les
instructions plus loin dans ce manuel).
Vous trouverez ci-dessous un exemple du type d’instantané que vous pouvez obtenir avec une lame porte-objets d’une coupe
transversale des intestins d'un animal. De gauche à droite – à 40x, à 100x, et à 400x.
FRANÇAIS

9
Comment démarrer
Avant d’utiliser votre microscope imageur, vous devez installer le pilote au préalable, le logiciel, et les fichiers nécessaires.
Ce processus est rapide et simple, et ne prend que quelques minutes.
Tout d’abord, mettez le CD-ROM d’installation inclus dans le lecteur CD/DVD de votre ordinateur. Ne pas brancher le câble
USB de l’imageur à l’ordinateur avant d’avoir installé le pilote et le logiciel sur votre ordinateur ou l’imageur
risquerait de mal fonctionner.
Les écrans suivants (de gauche à droite) apparaîtront lors de l’installation sur la plupart des ordinateurs, bien qu’il puisse
exister certaines variations selon les systèmes d’exploitation ou même avec un même système d’exploitation. Les écrans ci-
dessous sont ceux qui apparaissent avec le système d’exploitation XP.
Le premier écran à s’afficher une fois le CD-ROM inséré figure ci-dessous, à gauche. Vous serez invité à sélectionner une
action pour ouvrir le CD-ROM. Le choix illustré est généralement classique, mais vous pouvez effectuer votre propre choix
puis cliquer sur « OK ».
Sur le prochain écran illustré ci-dessous, double-cliquez
sur « soft » pour passer à l'écran suivant.
Maintenant, vous devez cliquer sur « Setup » (Installation) en
utilisant le fichier qui apparaît en surbrillance sur l'écran ci-dessous.
Sélectionnez la langue puis cliquez sur « OK ».
Vous allez maintenant installer le logiciel de photographie Ulead. Il
est recommandé de fermer tous les autres programmes de Windows.

10
Lisez le contrat de licence ULead. Si vous
acceptez, cliquez sur « Yes » (Oui). Si vous
refusez, cliquez sur « No » (Non) et quittez
l’installation.
Tapez votre nom et le numéro de série (sur la
couverture du CD-ROM), puis cliquez sur « Next »
(Suivant).
Sélectionnez alors le dossier où vous installerez
Ulead sur votre ordinateur. Conservez le dossier de
destination par défaut indiqué ou choisissez un autre
dossier puis cliquez sur « Next » (Suivant).
Vérifiez l’emplacement souhaité pour les raccourcis
et cliquez sur « Next » (Suivant).
Sélectionnez ensuite votre pays de résidence ou la
norme vidéo que vous préférez, puis cliquez sur
« Next » (Suivant).
Ulead va alors s’installer et afficher automatiquement
l'écran suivant.

11
Vous pouvez choisir d’associer le fichier (ou
remettre l’opération à plus tard), puis cliquez
sur « Next » (Suivant).
L’installation du logiciel Ulead a été effectuée. Vous devez redémarrer
l’ordinateur avant de poursuivre avec l’installation du pilote de
l’imageur. Avant de redémarrer, retirez le CD-ROM du lecteur et
fermez tous les programmes ouverts. Cliquez ensuite sur « Finish »
(Terminer).
Maintenant que le logiciel Ulead est installé, vous devez installer le pilote du microscope imageur. Remettez le CD-
ROM dans votre lecteur CD/DVD.
Comme pour l’installation du logiciel, vous
devrez sélectionner l'action à effectuer pour
ouvrir le CD-ROM puis cliquer sur « OK ».
Cet écran apparaît également pendant l’installation
du logiciel, mais cette fois vous devez cliquer sur
« driver » (pilote) affiché ici en surbrillance.
Ensuite, double-cliquez sur « setup » (installation)
pour que l'assistant InstallShield s’ouvre.
L’installation commencera une fois que vous aurez cliqué
sur « Next » (Suivant).

12
Choisissez un type d’installation. La plupart des gens
choisissent « Complete » (Complète) mais vous pouvez
sélectionner « Custom » (Personnalisée) si vous le
souhaitez. Cliquez ensuite sur « Next » (Suivant).
Pour lancer l’installation, cliquez sur « Install »
(Installer).
Le pilote est maintenant installé.
L’installation du pilote et des fichiers requis est
terminée. Cliquez sur « Finish » (Terminer) pour
quitter le processus d’installation.
Retirez le CD-ROM du lecteur. Ensuite, branchez le câble USB au microscope imageur et sur l’un des ports USB de
votre ordinateur.
Vous disposez de plusieurs choix. Si vous voulez capturer des vidéos, vous pouvez choisir « AMCap » dans vos programmes
sous « Electronic ocular-R ». L’écran ci-dessous s’affichera et vous devrez double-cliquer sur « AMCap », ou vous aurez peut-
être un raccourci pour « AMCap » vous permettant d’entrer directement dans le programme. Pour prendre des instantanés, voir
la rubrique ci-dessous.

13
Instantanés – Vous pouvez utiliser « AMCap » pour faire des instantanés mais vous ne pouvez capturer qu’une seule image à
la fois et la sauvegarder sur votre ordinateur. Pour une capture d’instantanés plus efficace, vous pouvez utiliser « Ulead »
(vous devrez ouvrir le programme pour choisir l’imageur comme dispositif). Vous trouverez des instructions plus détaillées
dans le menu d’aide de « Ulead » ou sur leur site web (www.ulead.com).
L’autre façon de prendre des instantanés consiste à aller sous «Control Panel » (Panneau de configuration) et de sélectionner
« Scanners and Cameras » (Scanneurs et appareils photo). L’écran ci-dessous (à gauche) s’affiche. Double-cliquez sur
« Electronic ocular-R ». Ensuite, l’écran ci-dessous à droite s’affiche. Cliquez sur « Next » (Suivant).
L’écran de l’assistant indique « Take and Select Pictures to Copy » (Saisir et sélectionner les photos à copier). Le mode
« Preview » (Aperçu) sera situé dans la partie gauche de l’écran et vous pourrez ensuite faire une mise au point nette sur l’objet
que vous souhaitez imager. Une fois prêt, cliquez sur « Take Picture » (Saisir l’image) en bas, à gauche de l’écran « Preview »
(Aperçu) et la photo apparaîtra sous « Pictures » (Images) dans la moitié droite de l’écran. Continuez à prendre autant d'images
que vous le souhaitez jusqu’à ce vous ayez fini.
Vous pouvez maintenant enregistrer les images dans les fichiers de votre ordinateur. Tout d’abord, cliquez sur « Next »
(Suivant). L’écran vous permet de choisir un nom et une destination pour cette image (« Choose Picture Name and
Destination »). Cliquez à nouveau sur « Next » (Suivant). Vous pouvez sélectionner les images que vous souhaitez enregistrer,
puis cliquez sur « Next » (Suivant) et vos images seront copiées sur votre ordinateur telles que vous les avez sélectionnées.
L’assistant vous offrira ensuite d’autres options (« Other Options »). Lorsque vous avez terminé, cochez cette option, puis
cliquez sur « Next » (Suivant). L’écran indiquera alors « Completing the Scanner and Camera Wizard » (Fin de l'assistant
Scanneur et Appareil photo), puis cliquez sur « Finish » (Terminé) pour refermer l'assistant.

14
Utilisation de l’imageur du microscope
Installation de l’imageur sur un microscope
L’imageur et l’adaptateur sont illustrés ci-dessous sur la photo nº A. Pour la plupart des microscopes biologiques, retirez un
oculaire et insérez l’imageur dans le tube de l’oculaire (voir photo nº B ci-dessous) là où il est maintenu en place par friction.
Les microscopes stéréo possèdent un oculaire (et un tube d’oculaire) de gros diamètre et nécessitent un adaptateur pour utiliser
l’imageur. L’adaptateur est illustré une fois inséré dans le tube de l’oculaire du microscope stéréo après avoir retiré l’oculaire
(voir photo nº C ci-dessous). Dans la photo nº D ci-dessous, l’imageur est illustré une fois placé dans l’adaptateur d’un
microscope stéréo.
Photo A Photo B Photo C Photo D
Puissance (Grossissement) lors de l’utilisation de l’imageur
La puissance est déterminée par la puissance de l’imageur et celle de l’objectif. L’imageur possède une lentille de
grossissement de 10x à sa base. À titre d’exemple, si la lentille de l’objectif utilisée est de 4x, la puissance disponible pour
capturer des instantanés ou des vidéos sera de 40x (puissance de l’imageur de 10x multipliée par celle de l’objectif qui est de
4x). Si vous utilisez un objectif de 40x, la puissance sera alors de 400x, etc.
Réglage de l’intensité lumineuse
Que l’on utilise l’éclairage du miroir ou un éclairage électrique, il est nécessaire d’expérimenter avec la quantité de lumière
nécessaire pour obtenir la meilleure image possible. Vous pouvez également expérimenter avec des condenseurs et des
diaphragmes (si votre microscope en est équipé) pour un réglage optimum permettant d’obtenir la meilleure image.
Mise au point
Vous ferez la mise au point de votre microscope avec l’imageur fixé dessus de la même manière que si vous observiez. Pour
obtenir des images de la meilleure qualité possible, veillez à ce que l’échantillon ou l’objet soit parfaitement net. Vous devez
refaire la mise au point de l’objet si vous modifiez le grossissement.
Rotation de l’imageur
Lorsque vous observez l’image sur l’écran de votre ordinateur, vous pouvez changer sa position en effectuant une rotation de
l’imageur sur la position recherchée.

15
Celestron Mikroskop-Imager – Modell 44420
Informationen, Technische Daten und Anleitung
Wir danken Ihnen für Ihren Kauf des Celestron Mikroskop-Imagers. Wir hoffen, dass Sie lange mit diesem vorzüglichen
Produkt zufrieden sein werden. Es ermöglicht Ihnen die Betrachtung von Objektträgern oder Objekten, vergrößert unter Ihrem
Mikroskop, und die Aufnahme von Video oder Fotos.
Imager am Computer angeschlossen Imager am Computer und am Mikroskop angeschlossen
Computeranforderungen
Betriebssystem – Microsoft Windows 98/2000/ME/XP/Vista; CD- oder DVD-Laufwerk; USB-Schnittstelle verfügbar
Technische Daten
Digitalkamera – VGA (0,3 mp) mit 1/3” CMOS-Chip (640 x 480 Pixel); Video-Framerate – 30 fps
USB2.0-Kabel – PC-Schnittstelle
Vergrößerung – 10x
CD-ROM – zur Installation des Treibers und der Software (AMCap und Ulead)
Größe – 92 mm x 60 mm x 38 mm (3,6” x 2,4” x 1,5”); Gewicht – 85 g (3 oz.)
Garantie – Zwei Jahre, beschränkt
CE/FCC/RoHS – konform; Hergestellt in China
In der Verpackung enthaltene Artikel
Mikroskop-Imager, USB-Kabel, CD-ROM für Treiber- und Software-Installation, Adapter für Stereomikroskope
Verwendungen
Dieser Imager kann mit praktisch jeder Art von Mikroskop verwendet werden (biologische, Dissektions- oder
Stereomikroskope). Die Betrachtung oder Aufnahme (Video oder Schnappschuss) ist bei jeder eingestellten Vergrößerung des
Mikroskops möglich (siehe Anleitung an späterer Stelle in diesem Handbuch).
Das Beispiel unten illustriert die Arten der Fotoaufnahmen, die Sie von einem Objektträger mit einem Tierdarmabschnitt
(Querschnitt) machen können. Von links nach rechts – mit 40x, mit 100x und mit 400x.
DEUTSCH

16
Erste Schritte
Vor der Verwendung Ihres Mikroskop-Imagers müssen Sie zuerst den Treiber, die Software und zugehörige Dateien
installieren. Das geht ganz schnell und einfach. Es dauert nur ein paar Minuten.
Legen Sie zuerst die Installations-CD-ROM in das CD/DVD-Laufwerk Ihres Computers. Schließen Sie das USB-Kabel des
Imagers erst dann am Computer an, wenn der Treiber und die Software auf dem Computer installiert sind, sonst
funktioniert der Imager u.U. nicht richtig.
Die folgenden Bildschirme (von links nach rechts) erscheinen während der Installation auf den meisten Computern. Bei
manchen Betriebssystemen oder selbst beim gleichen Betriebssystem sind Varianten dieser Bildschirme möglich. Die
nachstehenden Bildschirme erscheinen bei Verwendung des XP-Betriebssystems.
Der erste Bildschirm, der nach Einlegen der CD-ROM erscheint, ist links unten abgebildet. Sie werden gefragt, welche Aktion
Sie wünschen, um die CD-ROM zu öffnen. Im Screenshot ist die typische Auswahl gezeigt, aber Sie können Ihre eigene
Auswahl treffen und dann auf „OK“ klicken.
Doppelklicken Sie im nächsten Bildschirm auf „Soft“.
Daraufhin werden Sie zum nächsten Bildschirm gebracht.
Doppelklicken Sie nun auf „Setup“ (Einrichtung) unter Verwendung der Datei, die auf dem Bildschirm direkt unten markiert ist.
Wählen Sie die Sprache und klicken Sie auf „OK“.
Jetzt werden Sie die Ulead-Fotosoftware installieren. Es wird empfohlen,
dass Sie zuerst alle anderen geöffnetenWindows-Programme schließen.

17
Sie sollten den Ulead-Lizenzvertrag lesen. Wenn Sie
damit einverstanden sind, klicken Sie auf „Yes“ (Ja).
Wenn Sie nicht einverstanden sind, klicken Sie auf
„No“ (Nein) und beenden die Einrichtung.
Geben Sie Ihren Namen und die Seriennummer ein (auf
dem CD-ROM-Deckel befindlich) und klicken dann auf
„Next“ (Weiter).
Nun wählen Sie den Ordner, in dem Ulead auf Ihrem
Computer installiert werden soll. Akzeptieren Sie den
angezeigten Standardzielordner oder wählen Sie einen
anderen Ordner und klicken Sie auf „Next“ (Weiter).
Prüfen Sie die gewünschten Shortcuts und klicken
Sie auf „Next“ (Weiter).
Wählen Sie nun Ihr Wohnland oder wählen Sie den
von Ihnen bevorzugten Videostandard und klicken
Sie auf „Next“ (Weiter).
Ulead wird jetzt installiert und geht automatisch
zum nächsten Bildschirm weiter.

18
Sie können Dateiassoziation wählen (oder für
einen späteren Zeitpunkt aufschieben). Klicken
Sie dann auf „Next“ (Weiter).
Die Ulead-Softwareinstallation ist abgeschlossen. Bevor Sie mit
der Installation des Treibers für den Imager fortfahren, müssen Sie
den Computer neu starten. Nehmen Sie vor dem Neustart die CD-
ROM aus dem Laufwerk und schließen Sie alle geöffneten
Programme. Klicken Sie dann auf „Finish“ (Fertig stellen).
Nun da die Ulead-Software installiert ist, müssen Sie den Treiber für den Mikroskop-Imager installieren. Legen Sie die
CD-ROM wieder in das CD/DVD-Laufwerk ein.
Wählen Sie, wie bei der Softwareinstallation, welche
Aktion ausgeführt werden soll, um die CD-ROM zu
öffnen und klicken Sie dann auf „OK“.
Dieser Bildschirm erschien auch bei der Softwareinstallation,
aber dieses Mal doppelklicken Sie auf „Driver“ (Treiber)“,
was hier markiert ist.
Doppelklicken Sie jetzt auf „Setup“ (Einrichtung).
Daraufhin wird der InstallShield-Assistent aufgerufen. Die Installation beginnt, nachdem Sie auf „Next“
(Weiter) klicken.

19
Wählen Sie einen Setup-Typ. Die meisten Benutzer
wählen „Complete“ (Vollständig), aber Sie können
nach Wunsch auch „Custom“ (Benutzerdefiniert)
wählen. Klicken Sie dann auf „Next“ (Weiter).
Klicken Sie auf „Install“ (Installieren), um die
Installation zu beginnen.
Nun wird der Treiber installiert. Die Installation des Treibers und der zugehörigen
Dateien ist beendet. Klicken Sie auf „Finish“ (Fertig
stellen), um den Installationsprozess zu beenden.
Nehmen Sie die CD-ROM aus dem Laufwerk. Schließen Sie jetzt das USB-Kabel am Mikroskop-Imager und an einem
USB-Anschluss an Ihrem Computer an.
Jetzt haben Sie viele Auswahlmöglichkeiten. Wenn Sie Videos aufnehmen wollen, können Sie „AMCap“ aus Ihren
Programmen unter „Electronic ocular-R“ auswählen. Sie sehen dann den nachstehenden Bildschirm, wo Sie auf „AMCap“
doppelklicken. Oder wenn Sie einen Shortcut zu „AMCap“ haben, wird das Programm direkt aufgerufen. Der folgende
Abschnitt behandelt Fotoaufnahmen.

20
Schnappschüsse – Sie können mit „AMCap“ Schnappschüsse machen, aber immer nur jeweils ein Bild aufnehmen, das Sie
auf Ihrem Computer speichern müssen. Mit „Ulead“ ist die Aufnahme von Schnappschüssen effizienter (Sie müssen das
Programm öffnen, um den Imager als Gerät zu wählen). Eine Anleitung für „Ulead“ finden Sie im Hilfemenü. Die Website
(www.ulead.com) enthält weitere Informationen.
Eine andere Möglichkeit, um Schnappschüsse zu machen, ist, zu „Control Panel” (Systemsteuerung) zu gehen und „Scanners
and Cameras” (Scanner und Kameras) zu suchen. Sie sehen dann den unten links abgebildeten Bildschirm . Dort
doppelklicken Sie auf „Electronic ocular-R“. Dann erscheint der unten rechts abgebildete Bildschirm, wo Sie auf „Next“
(Weiter) klicken.
Der Bildschirm des Assistenten zeigt an: „Take and Select Pictures to Copy“ (Bilder aufnehmen und zum Kopieren
auswählen). Der Vorschau-Modus ist in der linken Hälfte des Bildschirms. Sie können dann das aufzunehmende Objekt scharf
einstellen. Wenn Sie bereit sind, klicken Sie auf „Take Picture“ (Aufnahme machen) unten links im „Preview“ (Vorschau)-
Bildschirm. Das Bild erscheint daraufhin unter „Pictures“ (Bilder) in der rechten Hälfte des Bildschirms. Sie können nun so
viele Bilder wie gewünscht aufnehmen.
Nun werden Sie die Bilder unter Ihren Computerdateien abspeichern wollen. Klicken Sie zuerst auf „Next“ (Weiter). Der nun
folgende Bildschirm ermöglicht Ihnen die Auswahl des Bildnamens und Speicherziels. Daraufhin klicken Sie auf „Next“ (Weiter).
Sie können nun die zu speichernden Bilder auswählen. Klicken Sie dann auf „Next“ (Weiter). Daraufhin werden Ihre Bilder
gemäß Ihrer Auswahl auf Ihren Computer kopiert. Der Assistent gibt Ihnen dann die Wahl „Other Options“ (Andere Optionen).
Wenn Sie fertig sind, wählen Sie diese Option und klicken auf „Next“ (Weiter). Der Bildschirm zeigt den Abschluss des
Assistenten für Scanner und Kameras an, und Sie klicken auf „Finish“ (Fertig stellen), um den Assistenten zu beenden.
Table of contents
Languages:
Other Celestron Laboratory Equipment manuals
Popular Laboratory Equipment manuals by other brands

ROSITEK
ROSITEK RMP2 User guide and troubleshooting

IKA
IKA A10 basic operating instructions

Lumen Dynamics Group
Lumen Dynamics Group X-Cite 120 Series General maintenance & troubleshooting

Sartorius Stedim Biotech
Sartorius Stedim Biotech 16249 Directions for use

MELAG
MELAG MELAtherm 10 Service manual

Nano Temper
Nano Temper Prometheus Series user manual

Buehler
Buehler Vibromet 2 manual

WATERS CORPORATION
WATERS CORPORATION 3465 Overview and maintenance guide

Analytik Jena
Analytik Jena PlasmaQuant PQ 9000 operating manual

NuAire
NuAire LabGard NU-560E Series Operation & maintenance manual

Beckman Coulter
Beckman Coulter BiomekFX quick start guide

ETS-Lindgren
ETS-Lindgren OMS user manual