Funktionen
In the box
Operation & Functions
Specification
1x UV Sterilizer
1x Transport bag
1x USB-C cable 1m long
1x User manual
Optionally required:
USB-C TYPE DC 5V power supply
Useage
Before starting, check the battery status by turning the 6-way switch to ON. If the
battery status indicator (2) flashes green, the battery is too weak and must be
charged. Use the supplied USB-C to connect the charging port (3) and connect
it to a USB-C TYPE DC 5V power supply. Please make sure that the battery status
indicator lights red when the charging unit is inserted. After a long time without
use, the built-in battery can become discharged. Please check the battery charge
status before use.
celexon Microphone UV Sterilizer Professional disinfects 99.9% of the bacteria
found on a microphone using the ION deodorizing function. The special design
with integrated reflectors distribute the UV-C radiation effectively and evenly for
a clean and fast result.
Keep the product away from moisture and heat.
Never immerse the product in water or other liquids.
Only use the product when it is charged. Do not use the product during the
charging process.
The product is only suitable for cleaning and sterilizing microphones
Use the product only in its intended manner. Any other use may cause damage
to the product or the environment.
Should you see any external damage to the device or experience unexpected
or unusual operation, the product should not be used. In these cases, switch off
the product immediately and contact the dealer where you have purchased the
for more information.
Failure to comply with the above instructions may result in personal injury
and damage to the product or devices connected to it. Also, in case of faulty
installation or use, the warranty may expire.
If you are unsure about using the product, contact a specialist, your dealer or
We reserve the right to make technical changes.
Power supply rechargeable battery
Power consumption
Battery life at full charge
Bulb
Wavelength
Intensity
Automatic shutdown
UV radiation protection
Charging time
Dimensions
Weight
3.7V 420mAh Li-ion battery
5W
5x cleaning operation
UV-C light
254nm
>300um/cm²
Yes after 5 minutes cleaning operation
Yes, device switches off if tilted
over 30°2 Stunden
2 hours
80 x 110 x 80mm (WxHxD)
200g
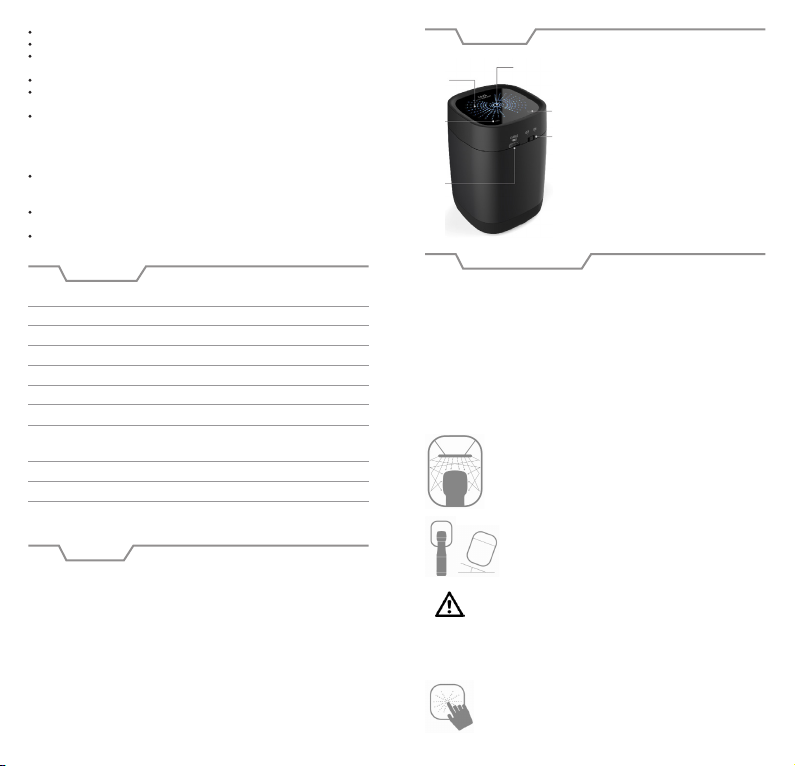
1
2
3
4
5
6
1. Power indicator: Flashing blue
2. Battery status indicator
Battery status„Low“ = Flashing green
Battery status„Charging“ = Solid red
Battery status„charging completed“ =
Solid green
3. Charging port: Connection via USB-C
4. Operating touch panel:
Hold for 2 seconds
Preparation = bright pink
Ready for use = shining blue
5. On / Off display
6. On / off switch
1. After switching the ON / OFF switch (6) to ON, place the ce-
lexon Microphone UV Sterilizer Professional on the micropho-
ne. Make sure the device is vertically sitting on the micropho-
ne. If the device tilts more than 30°, the UV radiation protection
cuts in and the operation is interrupted (recognizable by the
pink blinking of the operation touch panel (4)).
2. If tilted, wait or adjust the device until the Operation Touch
panel (4) is flashing from pink to solid blue. Now the steri-
lizer is ready.
Attention risk of injury! Do not aim the product at persons or ani-
mals. Do not use the product on the skin and do not look directly
into the light source.
3. Start the 5 minute cleaning program by holding the operating touch pad for
2 seconds. The operating display flashes blue until the cleaning process is
completed (5 minutes).
4. Once the cleaning is complete, the operating touch panel will
light as a solid blue. Turn the device off by sliding the on/off
switch to OFF.
5. The cleaning is complete.


