Celsius LeDIX User manual

1
LeDIX
User Guide

2
Contents
1 Introduction.....................................................................................................................................3
2 Quick start ..................................................................................................................................7
3 Phone menus ................................................................................................................................14
4 Calls ..............................................................................................................................................15
5 Contacts........................................................................................................................................17
6 Messages ..................................................................................................................................19
7 Camera and Tools .....................................................................................................................21
8 Connection functions ................................................................................................................24
9 Phone customization.................................................................................................................26
10 Other functions .....................................................................................................................30
11 Appendix...............................................................................................................................32

3
1 Introduction
This phone can be used internationally in the various networks (EDGE, GSM 900 MHz and DCS 1800 MHz or
PCS 1900 MHz) depending on the roaming arrangements with your operator.
Depending on the network configuration and associated subscription cards, certain functions may not be
available.
It is recommended that you read this handbook carefully in order to use your phone efficiently and in the best
conditions.
Trademarks:
–Celsius X VI II, LeDIX and Remontage Papillon are registered trademarks.
–T9® Text Input is a trademark of ©Tegic Communications Inc.
–Java™ and all Java™ based trademarks and logos are trademarks or registered trademarks of Sun
Microsystems, Inc. in the U.S. and other countries.
–The WAP navigator and the softwares included are the exclusive property of Openwave. For this reason, it is
forbidden to modify, translate, disassemble or even decompile all or part of these softwares.
–The Bluetooth® word mark and logos are owned by the Bluetooth® SIG, Inc.
–microSD™ is a trademark of SD Card Association.
–Windows is a trademark of Microsoft Corporation.
–Arkamys is a trademark of Arkamys SA.

4
1.1 Description
Keypad view
1] Left contextual key
In idle screen : shortcut to ―write a message‖
In menus: access to the selection shown on screen
2] Green key
During a call: activate /deactivate hands-free mode
In call context: make a call / accept a call
In idle screen: display the call log
Warning: in hands-free mode do not bring the
phone up to your ear.
3] Star Key
When composing a message :
Short press: switch from one input mode to another
(upper case/lower case, 123 mode)
Long press: activate/deactivate T9 mode
4] 5 keys navigator
Outcentered keys : navigation through menus
Central key : confirmation of a selection
5] Right contextual key
In idle screen: shortcut to ―set up alarm clock‖
In menus: access to the selection shown on screen
6] Red key
Short press: switch on the mobile
Long press: switch off the mobile
In call context: reject a call / hang up
In menus: return to idle screen
7] Hash key
When composing a message
Long press: modify the T9 mode language
Short press: display the symbol table
In other modes :
In idle screen: long press: silent mode
In call reception mode: mute the ring tone
When playing sounds: mute/unmute the sound

5
Rear view
1] Roll the knob [1] to open the connector cover
[2]
2] Connector cover
3] Flash
4] Camera lens
5] Microphone for video mode
6] SIM cover
7] Button to open the battery cover [8] and SIM
cover [6]
8] Battery cover
Left view
1] Set the volume

6
Front view
1] Pull the crown to setup the mechanical clock.
2] Minute hand
3] Hour hand
4] Power reserve hand
5] Excentred Tourbillon complication
6] Hinge : open and close the mobile phone in
order to wind up the mechanical clock

7
2 Quick start
2.1 Information on the SIM card
To use your phone, you need a SIM card.
This card must be handled and stored with care in order not to be damaged.
If you should lose your SIM card, contact your network provider immediately.
Please keep your SIM card out of reach of young children.
Your phone is identified by its IMEI number.
Write this number down, and do not keep it with your phone, because you may be asked for it in the event of your
phone being stolen, in order to prevent it from being used, even with a different SIM card.
In order to display the IMEI on your phone screen, type: *#06#
Installing the SIM card and the battery
Step 1 : Push on the ejection Button.
The Battery cover is open. You could take out or put the battery inside.

8
Step 2 : If there’s no SIM card already in the SIM rack, only the battery cover opens
Step 3: Push again on the ejection Button [2] and in the same time, use the notch as a lever to lift the Cover [3].
Step 4: Insert the SIM card inside the SIM cover as shown on the phone drawing.

9
Step 5: Push the ejection button [5] and close se SIM cover [6].
Step 6: [7] Close the battery cover by pushing in the corner as shown on the phone drawing.

10
2.2 Charging the battery
Your phone is powered by a rechargeable battery.
A new battery must be charged for 4 hours at least before being used for the first time.
When your battery has been discharged, the empty battery icon flashes. In this case charge your battery for at
least 15 minutes before making any calls in order not to be cut off quickly.
To charge the battery :
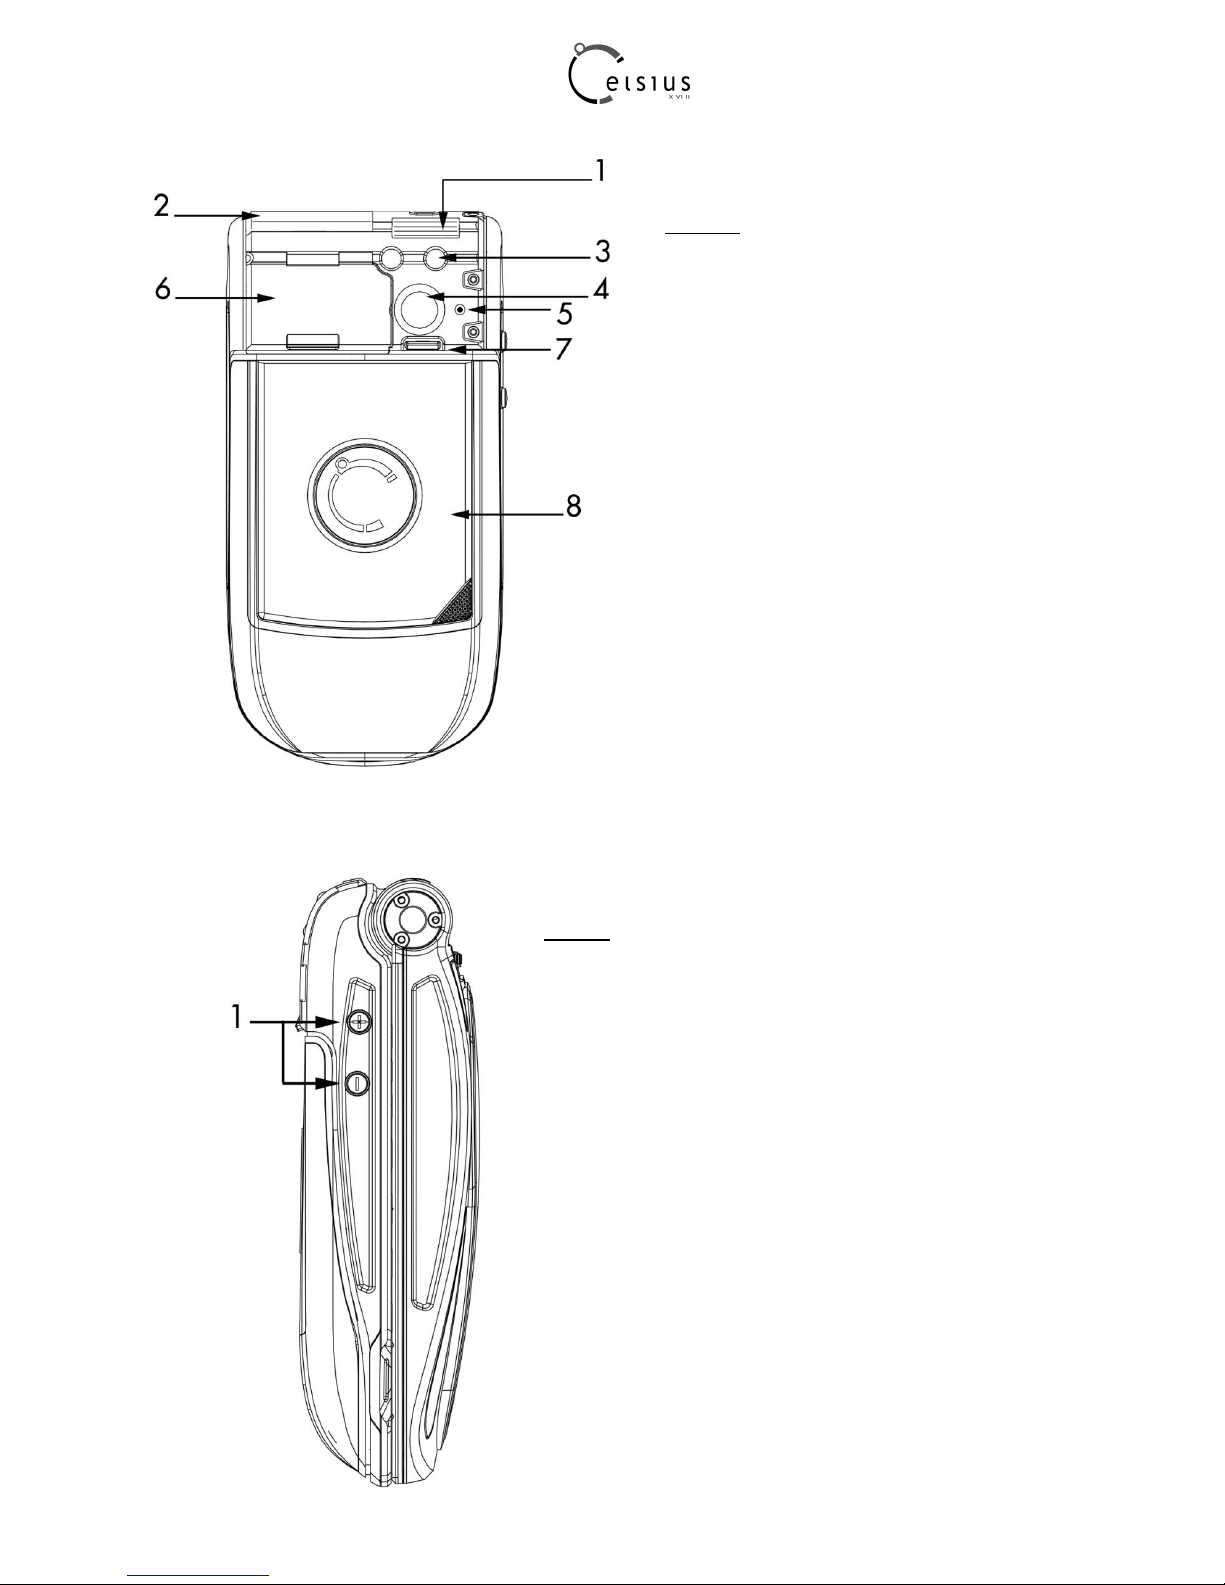
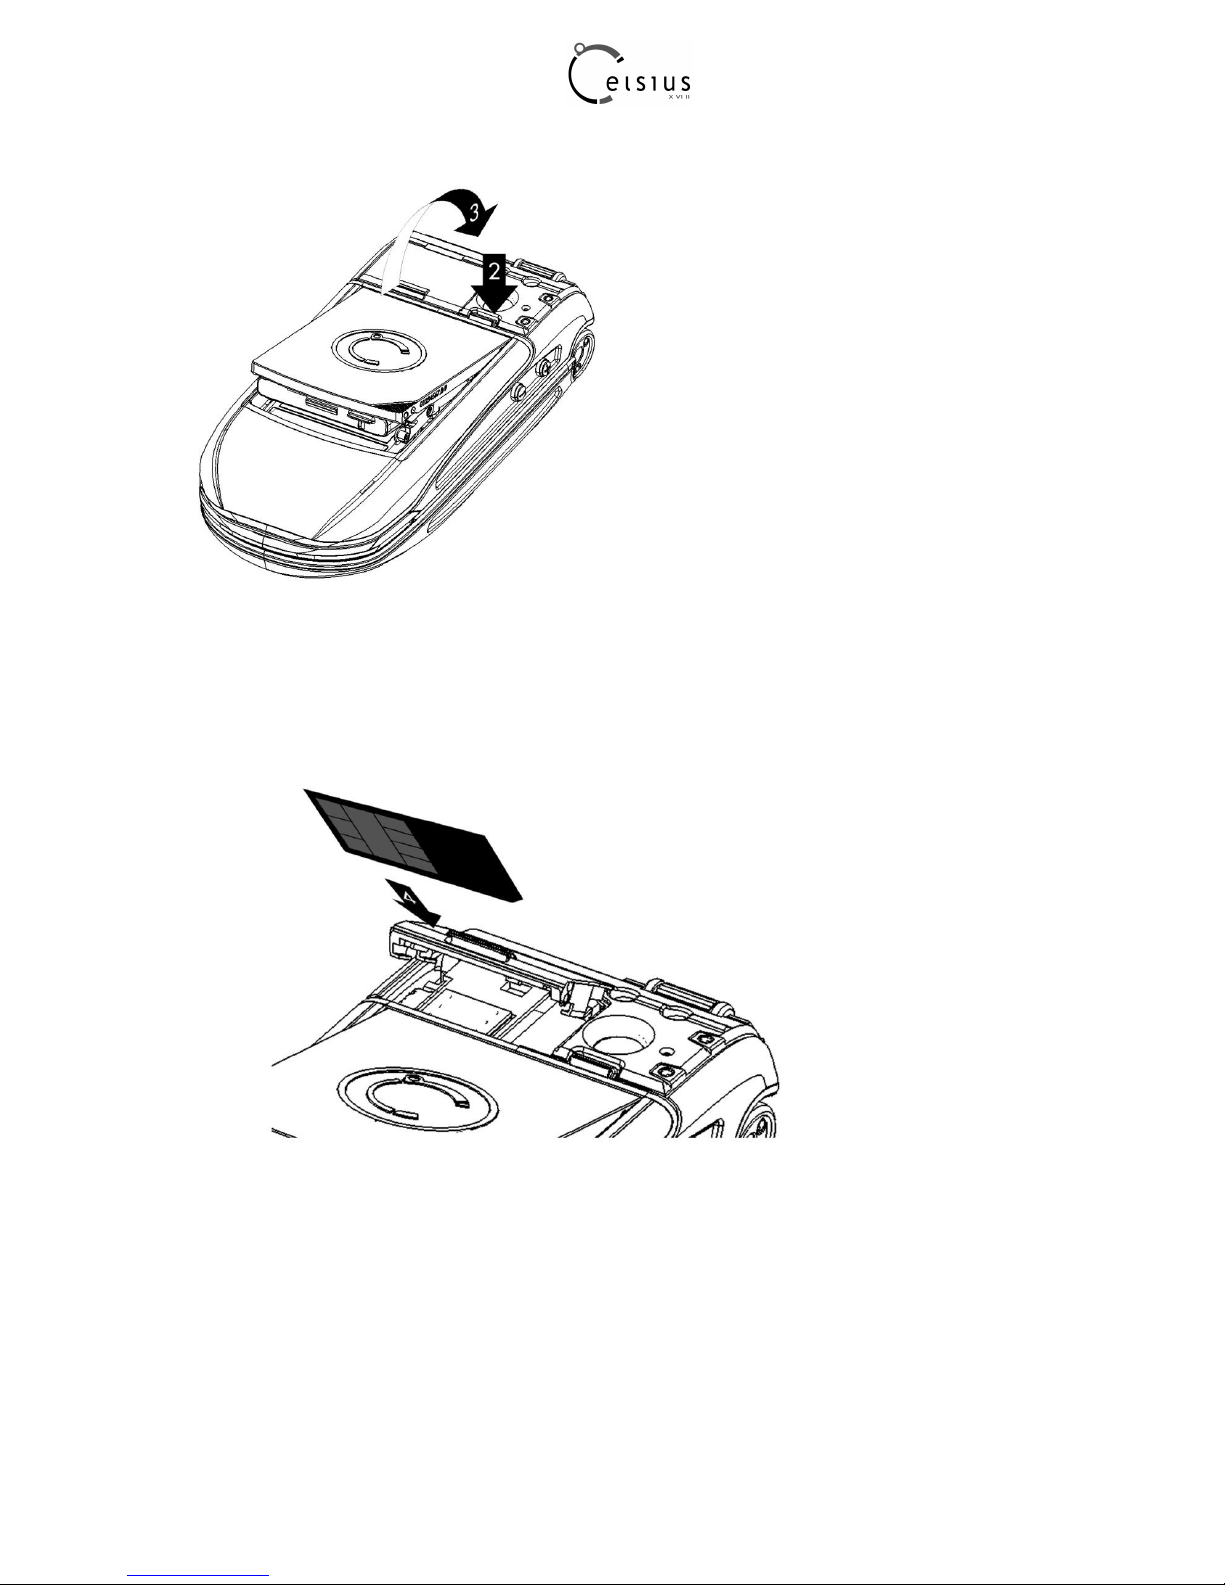
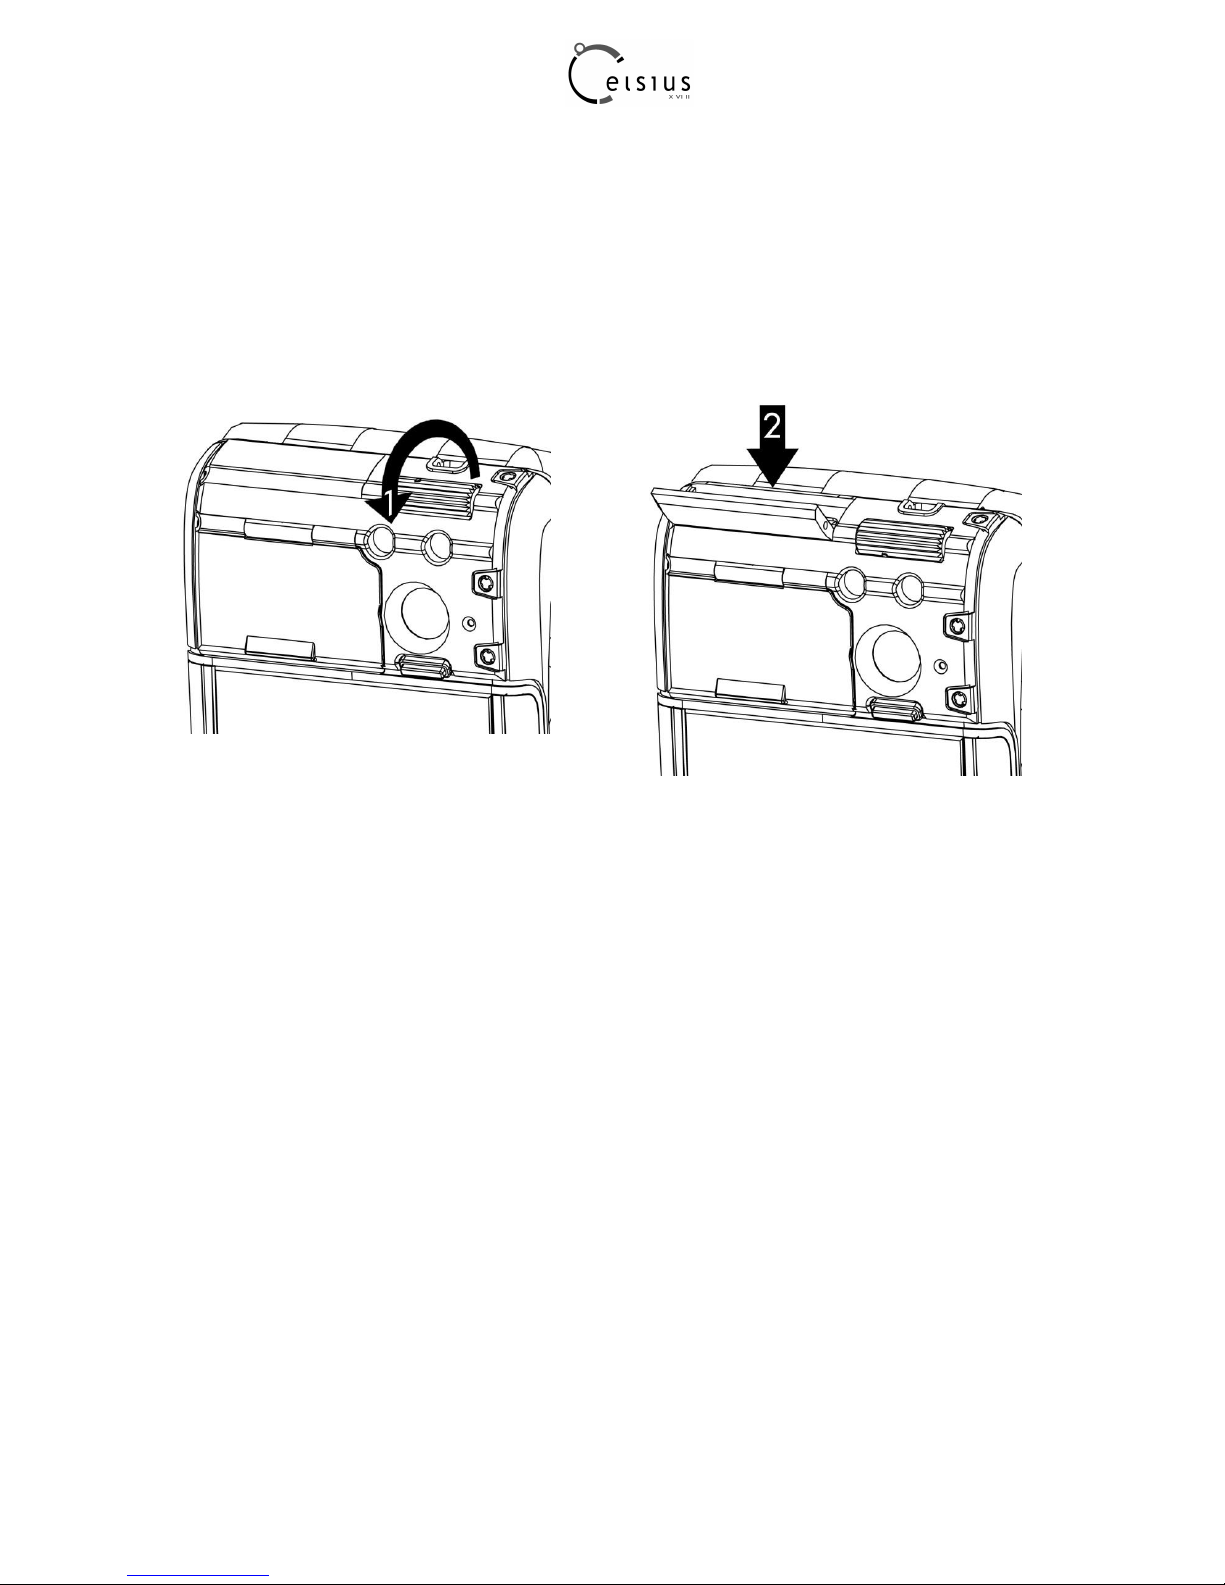
–Step 1 : open connector cover [1] by rolling the knob
–Step 2 : Plug the end of the cable [2] into the top connector of the phone.
The phone will then charge up when the charger will be put into a socket.
The battery icon scrolls up to indicate that it is charging.
When the battery is fully charged, the charging stops on its own. You may then disconnect the cable.
When charging, the battery may warm up, this is normal.
Warning: if the battery has entirely discharged, the phone cannot start. Plug the phone to the charger.
The phone will switch on after a few minutes of charge. You can use the phone again when the Start
option is displayed on the screen.
Warning: there is a danger of explosion if the battery is not fit properly or if it is exposed to fire. Do not
short circuit it.
The battery does not have any part that you can change.
Do not try to open the battery casing.
Use only the chargers and batteries delivered with the product.
The use of other types of chargers or batteries may be dangerous and will invalidate the warranty.
Used batteries must be disposed in the appropriate places.
We advise you to take the battery out if you plan not to use the phone for extended periods.
You are strongly advised not to connect your phone to the charger if it doesn’t contain a battery.
The charger is a safety step-down transformer, it is forbidden to modify, alter or replace it by another component.

11
2.3 Using advice
2.4.1 Improving antenna performance
The antenna is
integrated in your
phone, under the back cover at the bottom.
To increase the performance of your phone, please avoid putting your fingers on this area when using the phone.
2.4.2 Increasing the battery life of your phone
The Bluetooth® function reduces the phone battery life.
We advise you to deactivate it when you do not need it. Pourquoi ne pas virer cela ?

12
2.4 Getting started
2.4.1 PIN (Personal Identification Number)
If the software access to the SIM card is protected, the device prompts you to enter the PIN.
Enter the code between 4 and 8 digits given to you when the SIM card was issued.
These digits do not appear on the screen for security reasons.
If there are contacts saved in your SIM card, you are invited, if you wish, to copy them in the phone contacts
memory.
Warning: if a wrong PIN is entered three times in a row, your SIM card is blocked.
You must then:
1. Enter the PUK [Personal Unblocking Key] provided by your operator, and validate.
2. Enter your PIN and validate.
3. Enter your PIN again and validate.
After 5 or 10 failed attempts [depending on the type of SIM card], the SIM card is definitely locked. You
must then contact your operator to obtain a new card.
2.4.2 Switching on/off (Red key)
When your phone is off, a short press on the red key will turn it on.
When you are in the idle screen, a long press on the red key will switch off the phone.

13
2.6 The watch
2.6.1 Setting up the clock
- Step 1 : Pull the crown
- Step 2 : Turn the crown to setup the clock
- Step 3 : Push the crown in the initial position
2.6.2 Rewinding up the clock
The only way to wind up the watch is to open and close the cell phone.
One opening adds 3 hours of power reserve to the mechanical clock.
The maximum power reserve of the watch is about 100 hours.
2.6.3 Care and Maintenance
The tourbillon movement integrated in the mobile makes it a relatively fragile piece that has to be used with care.
Ideally, the mechanical movement has to go through maintenance every 36 months at your specialized retailer.

14
3 Phone menus
1] Camera
2] Messages
New
Inbox
Outbox
Sentbox
Drafts
Templates
Settings
Memory
Local info
Voice mail
Lists of contacts
3] Contacts
Contacts
Lists
4] Calls Dialed
Missed
Received
Durations
5] Tools Files
Settings
Celsius X VI II
Alarm
Diary
Calculator
Internet Player
Timer
To do
Java applets
Services

15
4 Calls
4.1 Calling
Dial the number you want to call. Press the green key.
Tones may indicate the establishment of the call, then the phone icon and duration counter appear.
You can adjust the volume using the navigator up/down keys or the +/- side keys.
At the end of the conversation press the red key to hang up.
International call Press 0 [long press] to display "+", then dial the country code without waiting for the dial tone,
then the number of the called party.
Emergency services :
Depending on the network you can obtain the emergency service with or without SIM card.
You just have to be in an area served by a network.
To obtain the international emergency service, dial 112 then press the green key.
4.2 Receiving a call
When you receive a call, the number of your caller is displayed.
Press the green key to answer, and speak.
To refuse the call, press the red key.
To mute the ring tone or the vibration, without refusing the call, Press #.
Speaker Mode : during a call, make a short press on the green key and confirm, or press [Options] and select
Amplified mode ON then confirm.
Warning: in this mode do not bring the phone up to your ear.
All the numbers corresponding to incoming and outgoing calls are logged in the list of recent calls.
When on a call, pressing [Options] gives you access to different functions.
[Secret Mode ON] switches off the microphone so that your caller cannot hear you.
4.3 Call log
The call log is accessible from the idle screen by pressing the green key.
It is divided into four lists that you can display using the navigator left/right keys.
Various options are proposed: store a number in your phonebook, call, send a message, etc.
You can also make a call to a number by pressing the green key.
4.4 Calls parameters
The Settings/Calls menu allows you to manage all the calls functions [call forwarding, numbers display, call
waiting, voicemail number, etc.].
4.4.1 Call forward
Depending on your subscription, this service forwards incoming calls to a different number or to the voice mailbox.
4.4.2 View last calls
This option leads to the calls log.
4.4.3 Display numbers
Anonymous mode
You can decide whether or not your phone number will be displayed on the phone of the person you call.

16
–Yes: your phone number will be displayed.
–No: your phone number will not be displayed.
–Preset: the phone default mode.
My number
–On outgoing calls: status of the Display numbers function.
–On incoming calls: status of the Display numbers function when you have forwarded the incoming calls to
another number.
Caller's Number
–On outgoing calls: status of the Display numbers function when your call is forwarded to another number.
–On incoming calls: status of the caller's Display numbers function.
4.4.4 Call waiting
[Operator-dependent service]
During a call, you may be informed that a caller is trying to reach you: you hear a special tone. The caller's identity
is displayed on the screen [name or number]. You can activate, deactivate, or get the status of the call waiting
service in order to check if it is active or not. During a call, if a second caller tries to contact you, the screen
displays the call warning.
4.4.5 Auto redial
This service automatically calls back a correspondent you could not reach at first attempt.
You can set the redial function to inactive, on request or systematic.
If you choose [On demand], your phone will offer to redial your caller automatically if his line is busy.
4.4.6 Blacklist
The blacklist is used to limit failures on automatic calls (calls generated by the automatic redial function or by
applications: fax for example).
When several automatic calls failed with a number [number busy or unknown], this number is put in the blacklist
and no automatic call will be done with this number any more until you delete it from the blacklist.
Note: this function does not apply to the calls performed manually.
4.4.7 Voicemail
This function is used to record your voicemail access number.
This number will be used during a call to the voice mailbox using the programmable keys.
4.4.8 New number
After an incoming or outgoing call with a number not stored in the phonebook, this option allows you to activate or
deactivate a request to store the number in the phonebook.

17
5 Contacts
5.1 Using the phonebook
When a contact is selected, the SIM Card icon appears at the top of the screen if it is a contact stored in the SIM
card and the telephone icon is displayed instead if it is a contact stored in the phone
Note: you can quickly reach a contact by typing the first letters (up to three). Then you can display it by pressing
the navigator central key.
5.2 Storing a new contact
–Select the New contact option on top of the list.
–Select the location where the new contact will be stored.
–Enter the last name and press the navigator central key.
–Enter the number and press the navigator central key.
Note: you can fill other fields if you store the contact in the
phone memory [email, address, ringtone, photo, etc.].
–Press [Save] to store it.
5.3 Calling a contact from the phonebook
You can use any of the following ways:
–Select a contact and press the green key to start the call.
–Select a contact, press the navigator central key to display it, press [Call] to start the call.
–Direct call from the idle screen [only for the contacts stored in the SIM card memory]: type the number with
which the contact was saved then [#]. Press the green key to start the call.
5.4 Contact options
To display the various options, select a contact and press [Options].
5.4.1 Modify contact
Modify what you want and validate then select [Save] once the modifications are complete.
5.4.2 Send message
This option lets you write a new message that will be sent to the contact selected (see chapter Messages).
5.4.3 Send by message
A new message will be created that contains the selected contact information, so that you can send them to
another correspondent.
5.4.4 Send by Bluetooth
To send the details of one, several or all the contacts by Bluetooth®.
5.4.5 Copy to SIM/Copy to mobile
This option allows you to copy your phonebook contacts from one memory to the other. Only the name and the
first phone number will be copied.

18
5.4.6 Export
The contact details are copied as a visit card in the Files/My Contacts directory.
5.4.7 My numbers
You can create the entries corresponding to your own numbers in order to consult them when necessary.
Select My numbers and validate. Enter the different details and validate.
5.4.8 Memory
Select SIM or Telephone and validate.
–Telephone: the memory capacity is shared between the phonebook and various other features. If you lack
memory, check if you can free some space.
–SIM: this memory is only available for contacts.
–Personal Memory
5.4.9 Delete/Delete all
This option deletes the contacts selected.
5.4.10 Set as my card/Business card
The details of a contact stored in the phone memory can be saved in a business card.
–Select a contact and press [Options].
–Select Set as my card and [OK]. The details are saved as Business card. From that point, you may use the
Business Card option to read it, modify it, send it by a message or exchange it by Bluetooth®.
5.4.11 Add to mailing list
This option adds a contact to a mailing list, sothat you can easily send messages to a group of correspondents.
(see 5.5 Lists section)
5.4.12 Settings
–List choice: this menu lets you select the default phonebook (SIM, Phone, SIM and Phone) displayed when
the phone switches on.
–Sorting: this menu lets you change the way contacts are sorted (by name or first name).
5.5 Lists
A mailing list is a list of contacts, so that you can easily send messages to a group of correspondents.
To create a new mailing list (The contacts that are just on the SIM card cannot be added to a list. The Contacts
should be first be copied on themobile to be added to a list)
–In the phonebook, select the Lists tab pressing the navigator right key.
–Press [Options].
–Select Add mailing list.
–Enter a name and press the navigator central key.
–Then, on a list press [Options]. Select Add contact each time you want to add a contact in the list.

19
6 Messages
From this menu, you are able to send SMS and MMS.
MMS is a Multimedia Message Service, which allows you to enclose pictures, audio files, and others rich contents
to your messages; these messages can even be composed of several slides.
MMS are charged differently than SMS. Please contact your network provider to get more information on their
cost and the service availability.
6.1 Creating a text message (SMS or MMS)
–Select Messages/New/Message.
–Type your text. The T9 mode is applied by default.
Using the T9 text input mode The Easy Message T9® mode helps you to easily write your messages.
The language used is the one you can select with a long press on the # key (if the language selected is not
compatible with the Easy Message T9®, the English language will be automatically selected).
To type a word, type its letters by pressing once each of the corresponding keys. The Easy Message T9® will
guess the word accordingly. For example, type 4, 3, 5, 5, 6 to get the word hello.
The same key sequence can lead to several words from the dictionary. If the word that appears is not the word
you expected, press the navigator up/down keys to scroll through the words corresponding to this key sequence.
Once you agree with the word proposed on the screen, press the navigator right key to validate it or press the 0
key (which validates and inserts a space after the word), and go on writing the next word.
If the word you expected is not proposed, please add characters until you get the message ―Add a word?‖. Press
[Yes] and validate if the word displayed suits you or modify this word before adding it to the dictionary.
Note: you may change to capital letter, small letter or 123 (digit) mode at any time by pressing the * key.
You may also obtain the digits by pressing and holding the key you want. To change the language in T9 mode:
press and hold the # key.
Using another mode
To deactivate T9 mode press and hold the * key. The ABC mode then applies: press each key several times in a
row to get the letter you want (for example, press 2 twice to display B).
As in T9 mode, you may change to capital letter, small letter or 123 (digit) mode at any time by pressing the * key.
Note: you may change mode by pressing [Options].
Punctuation characters
Punctuation characters are obtained by pressing the 1 key (except in 123 mode), or with the help of the Symbol
input
mode (direct access with a short press on the # key).
Accented characters
Accented characters are generated automatically in T9 mode.
In ABC mode accented characters are available by pressing the key supporting the non-accented character
repeatedly.
6.2 Saving the message without sending it
Select [Options/Save] (the message is saved in the Drafts folder) or [Options/Save as Template] (the message is
saved in the Templates folder).

20
6.2 Sending the message
–Once the text is complete, press the navigator central key or select [Options] then [Add recipient].
–Enter the receiver’s number or take it from your phonebook by selecting [Options], then [Contacts]. You can
also select a contacts list in your phonebook.
–Once the receiver is selected you may send the message by selecting [Options] then [Send].
6.3 Receiving messages
When you receive a message, the phone plays the ring tone that you selected, and a message icon appears.
This icon remains until you haveread all your messages. When it flashes, the memory is full.
Note that you have two different possibilities to receive MMS: automatically or manually; if "manual mode" is
activated, then you will only receive a notification in your Inbox, meaning that a MMS is available on the MMS
Server; select Retrieve in the options when you want to retrieve the MMS from the network.
6.4 Messages menu
6.5.1 Inbox
Messages are listed in chronological order, the latest one being displayed first.
The number of Not Read and Not Retrieved messages is displayed on the top. The corresponding messages
titles are displayed in bold.
6.5.2 Outbox
The Outbox lists the messages that have not been sent. You may try again to send them.
6.5.3 Sentbox
The Sentbox is used to store all your sent messages if you activated the option ―Store sent messages‖in the
Settings menu.
Warning: Too many messages saved will quickly fill up the available memory, and you will not be able to
receive more messages until you delete some.
6.5.4 Drafts
The Drafts list contains all the messages that have been saved but not sent yet. To modify such a draft message,
select it and press the navigator central key, or select [Options] then [Modify].
Once your message is complete, you can send it by the usual way.
6.5.5 Templates
Templates are messages you saved with the ―Save as template‖ option. You may use these templates as a
starting point when writing a new message.
6.5.6 Settings
This menu allows youto select various sending and receiving options.
6.5.7 Memory
–SMS: displays the memory available in the SIM card and in the phone to save SMS.
–MMS: displays how much memory is used by the MMS.
6.5.8 Local information
Table of contents